Skip to main content
Useful ConfigMgr query for Intune Enrolled Devices
How to check if Sideloading is enabled
In order to test if Windows Intune has enabled sideloading, open an elevated command prompt and type "slmgr.exe /dlv" and hit enter.
If the output looks similair to this, sideloading is not enabled

After going through Intune enrollment, wait 15 to 20 minutes and try again. You should get similair output to this:

How to put a "Request Remote Assistance" icon on users desktop in Windows 8 or 8.1
Currently Windows Intune does not support Remote Assistance Invitations (requests) to be sent on Windows 8 using Windows Intune Center. However, you can achieve a similair solution using the power of Group Policy.
This method will provide end users with a desktop icon which, when clicked, generates a request for asssistance. An e-mail is composed and the the request file is attached.
Note: the computer needs to be domain joined, a solution for Workgroup Windows computers will be explained in a future blog.
Edit or create a GPO targeted against your end-users.
- Open Group Policy Management to edit or create a policy.

- Browse to "Computer Configuration", "Administrative Templates", "System", "Remote Assistance".
- Edit "Configure Offer Remote Assistance" and select "Enabled"

- Depending on whether your IT administrators want to view or control end-users sessions, select the desired option accordingly:

- Select "OK" and return to the Group Policy Management console.
Edit or create a Group Policy Preference targeted against your end-users
- Either use the previously edited Group Policy or create a new one.
- Browse to "User Configuration", "Preferences", "Windows Settings" and right-click "Shortcuts" followed by "New -> Shortcut".

- In the shortcut properties make sure to enter the details as follows:
- Action: Update
- Name: Request Remote Assistance (note: can be anything)
- Target Type: File System Object
- Location: Desktop
- Target Path: %windir%\system32\msra.exe
- Arguments: /email (note: can be changed according to desired behaviour)
- Start in: %windir%\system32
- Icon File Path: %windir%\system32\msra.exe

- Select "OK" and return to the Group Policy Management console.
- Close the Group Policy Management console.
Test the new Remote Assistance procedure
On a Windows 8/8.1 client PC, open a Command Prompt and type:
You should see the policy being applied and a new icon appear on the destop.

Note: If the icon doesn't appear test whether the policy is being applied using "gpresult /r" or check the eventlog for more detailed information.
If an end user double-clicks the "Request Remote Assistance" icon, the default e-mail client will be opened with a Remote Assistance Invitation attached.
Instruct the end user to send this e-mail to the central helpdesk or a specific user.

Consider leaving a reply in case this post helped you. Thanks!
How to troubleshoot User Enrollment for ConfigMgr 2012 and Windows Intune
To double-check whether an user has been prepared for Windows Intune enrollment, please check the following scenarios:
- Create an account in your on-premise Active Directory
- Wait or manually run a User Discovery, check in ConfigMgr 2012 whether the user is listed

3. Check in SQL whether the user has a Cloud ID
select user_name0,cloudUserID from USer_disc where Name0 like '%pieter%' <--- replace PIETER with the username you are troubleshooting.

4. Open the cloudusersync logfile and check for any potential errors.

5. Restart the SMS_EXECUTIVE service to force the sync.
6. Check the eventlog of the dirsync server for any potential issues:

7. Enable the FIM log

8. Perform a manual sync using the powershell commandlet
- Open "C:\Program Files\Windows Azure Active Directory Sync\DirSyncConfigShell.psc1" on your dirsync server.
- Type "Start-OnlineCoexistenceSync" and hit enter.
9. Open a browser and navigate to
https://account.manage.microsoft.com/UserManagement/UserManager.aspx
Check to see if the user is listed.
In case this post helped you, please consider leaving a reply.
Manual run a directory sync with Azure AD Sync
Recently Microsoft released the Azure AD Sync tool, the download can be found here and the documentation is located here.
Now if you want to run a manual sync, perform these steps:
- Start a command prompt
- Navigate to "c:\program files\microsoft azure ad sync\bin"
- Run "DirectorySyncClientCmd.exe delta"

Good luck!
NDES - Error 12186 in ndesplugin.log
Are you trying to configure certificate deployment for mobile devices and run into the error 12186 in ndesplugin.log? This post might help you reach a solution.
The exact error shown in ndesplugin.log is:
Failed to send http request /CMCertificateRegistration/Certificate/VerifyRequest. Error 12186
This error occurs if the account under which NDES application pool runs may not have read permission to the client certificate's private key while doing https connection to the Certificate Registration Point (CRP).
- Get the Unique Container Name of the NDES client certificate:
certutil -VerifyStore My
The container will be listed as something similar to this:
Key Container = fc9b3ab746d7b0739ae8c6c0468e0eb5_6de86d88-a02c-4b33-91b0-43d27ebe455b - Check the location of the certificate by matching the unique container name acquired at step 1 with the filenames, on Windows Server 2012 R2 check this location:
%ALLUSERSPROFILE%\Microsoft\Crypto\RSA\MachineKeys
(these certs will be hidden, use ATTRIB or adjust Explorer to show hidden files.) - Run the icacls.exe command line tool to grant R (Read) permission for the NDES user account (DOMAIN\User). Make sure you adjust the filename starting with fc9b3……
iCacls.exe %ALLUSERSPROFILE%\Microsoft\Crypto\RSA\MachineKeys\fc9b3ab746d7b0739ae8c6c0468e0eb5_6de86d88-a02c-4b33-91b0-43d27ebe455b /grant DOMAIN\User:R

Restart the NDES server and you should not get the same error. Please consider leaving a reply in case this post helped you.
NDES: Event ID 29 (The password in the certificate request cannot be verified)
This week I received an e-mail from our support organization about a case regarding NDES. One of our customers (Bechir Hammami from Germany) ran into an issue where NDES stopped working after performing an upgrade on their ConfigMgr 2012 environment.
Luckily the customer managed to resolve the issue themselves and even shared the steps he took - hoping others would benefit from the information. Thanks Bechir for resolving and sharing this info - much appreciated!
The issue:
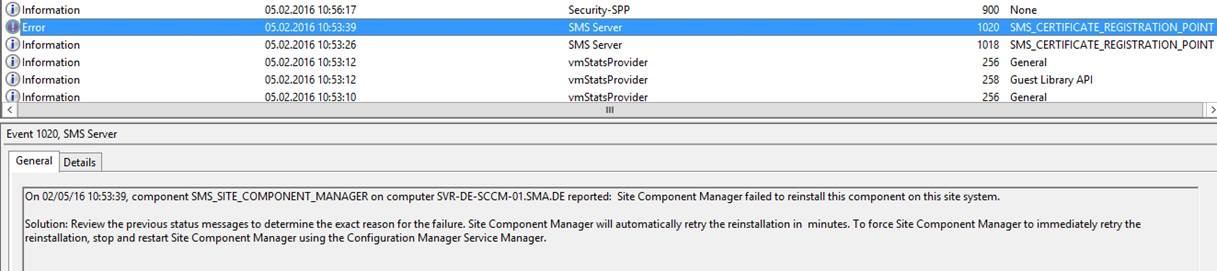
After the upgrade the following error was shown in the eventlog:
NDES: Event ID 29 (The password in the certificate request cannot be verified. It may have been used already. Obtain a new password to submit with this request.)

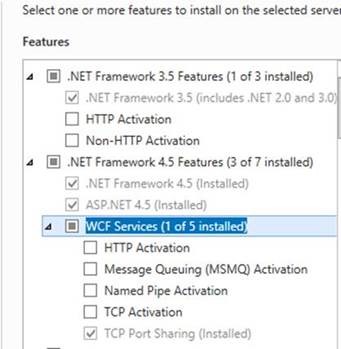
1) Check installed features
The following features are necesarry for ConfigMgr/NDES:
Install-WindowsFeature Web-Windows-Auth
Install-WindowsFeature Web-ISAPI-Ext
Install-WindowsFeature Web-Metabase
Install-WindowsFeature Web-WMI
Install-WindowsFeature BITS
Install-WindowsFeature RDC
Install-WindowsFeature NET-Framework-Features
Install-WindowsFeature Web-Asp-Net
Install-WindowsFeature Web-Asp-Net45
Install-WindowsFeature NET-HTTP-Activation
Install-WindowsFeature NET-Non-HTTP-Activ
The highlighted ones didn't appear as active as they got deactivated by the migration.
2) Install mising features
Executed this dism command (Attention: for installation is the ISO necessary):
dism /online /enable-feature /featurename:NetFX3 /all /Source:<d:\sources\sxs> /LimitAccess
Afterwards, for Framework 4.5, install "HTTP Activation"
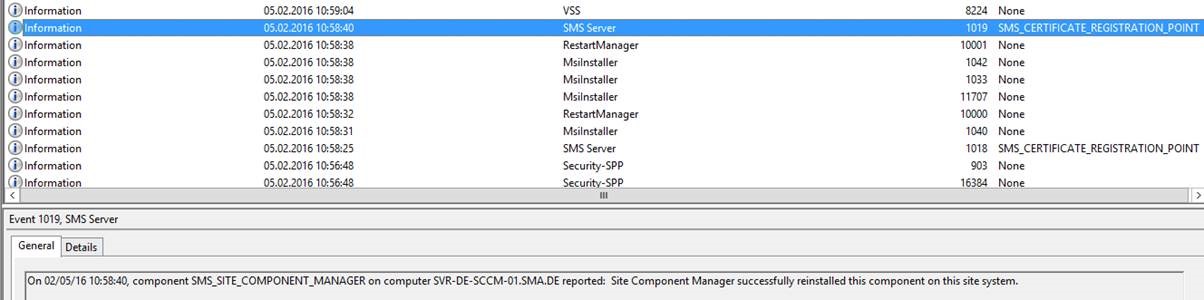
Restart SMA_Site_Component_Manager Service, which sorts out the CRP issue on the ConfigMgr and NDES server.
Eventlog after these changes:
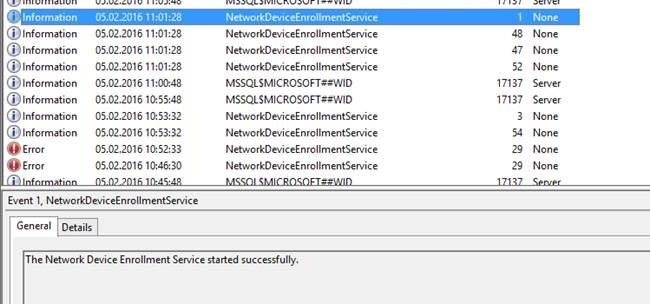
Additional information from Kevin Myrup (MSFT)
Whenever you see event id 29 on the NDES server: "NDES: Event ID 29 (The password in the certificate request cannot be verified. It may have been used already. Obtain a new password to submit with this request.)"
And the policymodule for Intune/ConfigMgr is installed, this always means something is wrong on the Certificate Registration Point (CRP) site role (or in the case of Intune Standalone, the CRP web service running on the NDES server itself). The case above is one example. But there are also other reasons it can happen.
The first place to look is the CRP.log. If the server is healthy, crp.log will show the reason why the cert request was rejected (there are several reasons this could happen, such as the challenge password has expired, the subject name doesn't match what is in the ConfigMgr database, for example when someone's display name or email address has changed in AD, or there is some problem with replication between Intune and ConfigMgr).
If the server is not healthy, as was the case for Bechir above, crpctrl.log will usually have some indication of this.
New Blog Location
My role has previously primarily focused on Microsoft Intune, nowadays it's more towards our whole Enterprise Mobility Suite. This includes Azure AD premium, Microsoft Intune and Azure Rights Management Service. Due to the change of focus (and name change of Microsoft Intune) I decided to create a new blog.
The new blog can be found here:
https://blogs.technet.com/b/ems/
New Technet articles published
After the recent announcements of the enhancements to Windows Intune, many new TechNet articles have been published. For your convenience I've listed these below in this blog post.
In case you have missed the announcements:
Based on the new functionality, TechNet has been updated with the following articles.
Windows Intune
Configuration Manager 2012
Configuration Manager 2007
PART 2 - SCEP certificate enrolling using ConfigMgr 2012, CRP, NDES and Windows Intune
After many feedback from customers and partners, I've decided to write another post with more detailed information on how to successfully implement NDES in combination with ConfigMgr and Intune. I hope this helps you implement quicker.
Update 1: Consider reading my other post on adding a reverse proxy.
Update 2: Publish NDES via Azure AD Application Proxy as described in my other post.
Update 3: Updated 16/3/2016 with more detailed info (thanks Kevin Myrup)
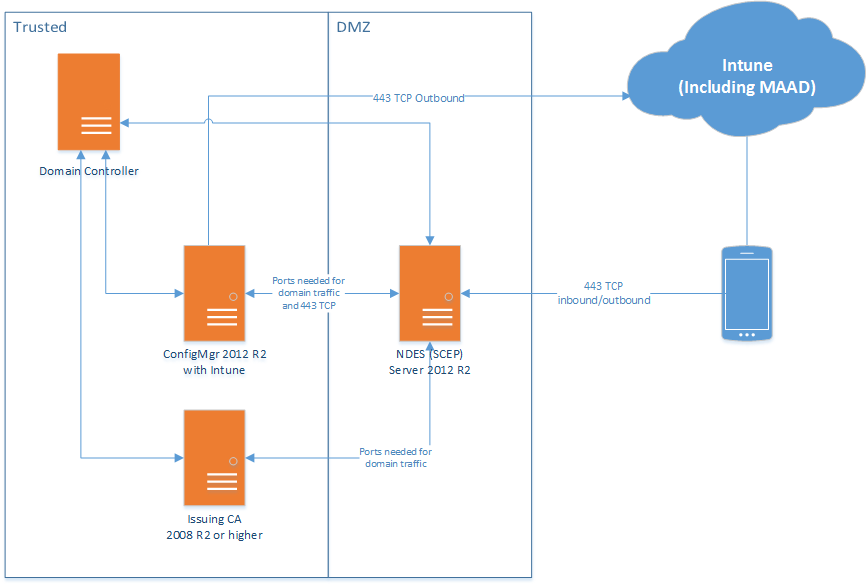
NDES Design High level architecture:
Pre-requirements:
- The issuing CA needs to be Windows Server 2008R2 (with KB2483564) or preferable an higher Windows Server OS.
- The NDES server needs to be Windows Server 2012 R2.
- The NDES server needs to be domain joined to the same domain as the issuing CA. Please consult this TechNet article in case you want to deploy in a separate forest, isolated network or internal domain.
- The NDES server cannot be the same as the issuing CA, even though that configuration is not blocked by setup, the policymodule will not work as expected in those conditions
Update 21/10/2014, please check my "Part 3" blog for more information on how to use an additional Web Application Proxy in front of the domain joined NDES server.
Network
From internet to DMZ:
- Allow port 443 from all hosts/IP's on the internet to the NDES server
From DMZ to trusted:
- Allow all ports and protocols needed for domain access on the domain joined NDES. The NDES servers needs access to the Certificates Servers, DNS Servers, ConfigMgr Server(s) and Domain Controllers.
Now let's start with the actual configuring, if something isn't clear please leave a reply (a reply is always welcome)
Issuing Certificate Authority:
- Log in as a Enterprise Administrator
- Install all Windows Updates.
- If your issuing Certificate Authority is Windows Server 2008 R2, install the hotfix mentioned earlier from here. Preferably use a newer Windows Operating system for your issuing CA.
- Create certificate template(s) on the CA by duplicating an existing one
- It's easiest to duplicate the template from the included "User Template" and modify that.
- Match purpose NDES template type (sig -> sig, crypt -> crypt, sig/crypt -> generalpurpose)
- Make sure "Supply in Request" is selected on Subject Name Tab
- Client Auth must be specified in the application policy
- Have a look at these template configurationscreenshots.
- Important note regarding the additional Application Policies (in the 4th screenshot), only add the application policies required. Consult your security department to ensure the appropiate configuration is done.
- Enable the certificate template on the issuing CA.
NDES Server:
- Log in as a Enterprise Administrator
- Install all Windows Updates.
- Make sure the NDES server is domain joined and has access to DNS, ConfigMgr, Certificate Authority and Domain Controller servers.
- Go to Add Roles and Features.
- Install Request Filtering which is located under Web Server (IIS) -> Web Server –> Security
- Install Active Directory Certificate Services (ADCS) role. (Uncheck Certificate Authority component, and instead check Network Device Enrollment Service)
- In parallel create a domain user/service account, e.g. "NDESUser"
- Make sure the user has the "Logon Localy", "Logon as a Service" and "Logon as a batch job" rights. This should be the case by default, however some companies have hardening policies in place to disallow/remove these rights.
- Make this user a member of the local IIS_IUSRS group.
- Make sure this user has Enroll permissions on he certificate templates which will be used to issue user certificates via NDES (and which later will be configured in the registry on the NDES server under HKLM\Software\Microsoft\Cryptography\MSCEP).
- Make sure the ConfigMgr admins who will create SCEP profiles have Read rights to the template so they can browse to it when creating SCEP profile configuration items in the ConfigMgr admin console.
- Create a Service Principal Name (SPN) for the NDESUser
- Open an elevated command prompt and type the following command (change the FQDN for the NDES server, Domain and NDESUser account to match your environment)
- setspn -s http/ndesserver.mydomain.local mydomain\NDESUser
If the SPN is not created; NDES to CA call may fail Kerberos authentication. If you are truly using a user account (not a service account e.g. network service or local service); then the fallback to NTLM will work just fine and you will not see any issues apart from some entries in security event log. If you block NTLM in your environment, this step is mandatory.
- Continue to configure the Network Device Enrollment Service
- CA for NDES – browse and locate your CA server using CA name or Computer name.
- RA Information – you can leave the defaults.
- Cryptography for NDES – Configure the CA value to be used by NDES server Make the key length match what is configured in your CA template – 1024 or 2048)
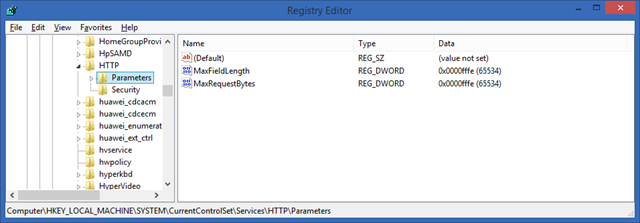
- The NDES server will receive very long URL's (queries) and therefore a few changes are needed. Open the registry editor and add two entries:
Location: HKLM\SYSTEM\CurrentControlSet\Services\HTTP\Parameters
Value: MaxFieldLength
Type DWORD
Data: 65534 (decimal)
Location: HKLM\SYSTEM\CurrentControlSet\Services\HTTP\Parameters
Value: MaxRequestBytes
Type DWORD
Data: 65534 (decimal)
- Open IIS manager, browse to the Default Web Site and select Request Filtering. On the right side of the console hit Edit Feature Setting and change the Maximum URL length and Maximum query string to 65534

- After this reboot the server. This is mandatory – restarting IIS is not sufficient.
- Next, browse to https://FQDN/certsrv/mscep/mscep.dll and you should receive a NDES page similar to the one below.

If you get an error 503 "Service unavailable", check the eventviewer. It's likely that the application pool is stopped due to a missing right for the NDESuser.
This website will be hardened later on – don't worry.
- The NDES server will need two certificates (or one with two EKU's - read on for more info), make sure you request those from the CA:
-
- Traffic between the NDES server and the CRP (Certificate Registration Point) needs to be encrypted using SSL. The NDES server needs a certificate with Client Authentication Enhanced Key Usages (EKU's)
- A certificate using with a Server authentication EKU that it will use as it's SSL certificate for the IIS web server (to supply an https url for NDES so clients can connect using https to NDES server – absolutely recommended but not required).
- If you request a certificate from your local CA, double check you have the correct EKU's in place.
- The two mentioned certificates can be the same certificate (if the certificate has both capabilities), but they do not have to be. In case you want to have different expire lifetimes of the certificates e.g. you could generate one SSL certificate to last for 2 years, but client authentication certificate to expire after 1 year.
- I prefer to take the easy way and requested a certificate with both the Client Authentication and Server Authentication EKU's and used them for both scenarios.

Update 16/3/2016 by request - for both NDES and CRP SSL certificates (and the NDES client auth certificate) some more info related to the Subject Alternative Name (SAN):
CRP:
SAN on the SSL certificate should contain the internal DNS name of the CRP server (which the NDES server will use when contacting it for cert verification requests). This DNS name should match what is entered as the CRP URL when installing the policymodule on the NDES server.
NDES:
SAN on the SSL certificate should contain the public external DNS name of the NDES server (the one which will be a part of the uURLrl that devices will be provided to use for certificate enrollment requests). If using a WAP or other reverse proxy, this name should match what is published there.
SAN on the client auth certificate should contain the internal DNS name of the NDES server (which it will use to authenticate itself over the internal network to the CRP server). It may also contain the public DNS name.
- In IIS manager, go to "Edit Bindings" of the Default Web Site and add a port 443 binding.
- Add the certificate to the HTTPS binding.
- Consider changing the SSL settings to "Require" SSL but "Ignore" client certificates.

CRP Site Server Role in ConfigMgr:
- Install IIS - if it isn't installed already.
- Make sure to add the following optional role services (which will trigger several other dependent components to be added also)
- Windows Server 2012 R2:
- ASP .NET 3.5
- ASP .NET 4.5
- WCF HTTP Activation
- Windows Server 2008 R2:
- ASP.NET
- WCF HTTP Activation
- (not in wizard but also do this) aspnet_regiis.exe –i (run this from .NET 4 folder: ex. C:\Windows\Microsoft.NET\Framework\v4.0.30319)
- IIS 6 Management Compatibility (including IIS 6 Management WMI Compatibility also)
- Bind the CRP cert to https 443:
- In IIS Manager select Default Web Site
- Right-click and choose Edit Bindings
- Choose https (it will use port 443 by default)
- Add or choose a CRP SSL certificate. (If you don't have this, request a default webserver certificate and add that)
- Make sure after the certificate is selected, you see bindings for all IP address - * like in below screenshot below

Note: If you are installing CRP to a remote machine from the site server, you will need to add the machine account of site server to the local administrators group on the CRP machine (by default remote site role is installed using site server machine account). Alternatively, you can specify a specific user to install as in the CRP site role installation wizard, and in that case this user would need to be added as a local administrator on the remote CRP site machine.
- Test if you can browse to the destination CRP server \\ipaddress\c$, if not make sure to enable "File and Sharing" firewall port
- Deploy CRP as new site system from site server (CAS or Primary Site)
- Open the Configuration Manager Admin Console
- Navigate to Administration -> Site Configuration -> Servers and Site System Roles
- Right click on primary site and select the Add Roles –> CRP
- If you are installing on a site server not CAS or Primary Site, configure an account that will perform the installation by changing the "Site System Installation Account"

- Specify the URL for NDES (for at least one NDES server), now this is important:
This URL will be part of the profile send to the devices. This means that the device – out there somewhere on the internet – needs to access this URL. Specify the internet facing URL, not any internal FQDN's.
E.g. https://ndes.contoso.com/certsrv/mscep/mscep.dll
- Specify/browse to the exported trusted root certificate (.cer file) for the server who signed the NDES client authentication certificate.

- Verify that the CRP installed successfully by opening the following logfiles (locations might be different depending on the ConfigMgr installation path):
- C:\Program Files\Microsoft Configuration Manager\Logs\CRPMSI.log
- This log must read "Installation success or error status: 0"
- C:\Program Files\Microsoft Configuration Manager\Logs\crpsetup.log
- This log must read "CRP.msi exited with return code: 0"
- If errors like "GetIISWebServiceStringProperty failed" are listed, make sure the correct SSL certificate is bound and no "hostname" is specified in the "Edit Site Bindings"
C:\Program Files\Microsoft Configuration Manager\Logs\crpctrl.log
- It should show that CRP status is 0 (online) like this line:
"CRP's previous status was 0 (0 = Online, 1 = Failed, 4 = Undefined) SMS_CERTIFICATE_REGISTRATION_POINT 4/25/2014 9:50:21 PM 6496 (0x1960)"
However, right after installation of CRP, it might not show that yet. The self-health check runs every 10 minutes, so after 10 minutes it should change from 4 to 0 (online). This can be speed up by restarting the SMS_CERTIFICATE_REGISTRATION_POINT thread if desired.

- C:\Program Files\SMS_CCM\CRP\Logs\CRP.log
- This log should not contain any errors.
- If you see a "Security Exception is thrown in reading inbox path" error, grant the "Network Service" account read permissions to the HKLM\SOFTWARE\Microsoft\SMS\MPFDM\Inboxes registry key.
- Open a browser on the CRP server and browse to https://FQDN/CMCertificateRegistration
- You should get a 403 Forbidden error. If you get anything else (e.g. a 404 or 500, stop right there and check all logs files and/or reboot the server)
- If you receive a 404, open IIS Manager and navigate to CMCertificateRegistration below the Default Website. Change the SSL settings to "Require SSL" and "Require Client Certificates". Restart the SMS_EXEC service.
- After the CRP is installed, the system will automatically export the certificate that will be used for NDES plugin (could take up to an hour or so) to the certmgr.box folder under inboxes on the site server. Be patient, it will be generated automatically.

- Copy this certificate the NDES server – we will need it soon.
- Copy the policymodule directory containing the installation files, you will find it in the ConfigMgr installation files under SMSSETUP\PolicyModule\X64 to the NDES server. We will need it at the next step.

Back to the NDES Server
- On the NDES server, start "PolicyModuleSetup.exe" (copied earlier from the ConfigMgr installation files)
- Specify the URL for the CRP e.g. https://crp.contoso.local/CMCertificateRegistration)
- Specify the CRP port (if using something other than 443 on CRP).
- Select a PKI certificate that supports client authentication. You might already have a suitable certificate installed on the computer that you can use, or you might have to (or prefer to) deploy a certificate specifically for this purpose. Hit next.
- Select the cert that was copied from the CRP's certmgr.box directory earlier.
- Open the registry editor and browse to HKLM\SOFTWARE\Microsoft\Cryptography\MSCEP
- Make sure that the values of "EncryptionTemplate", "GeneralPurposeTemplate" and "SignatureTemplate" match the names of the template on your CA, triple check this!

Update 16/3/2016:
They should not all be set to the same thing. Most configurations will simply use GeneralPurposeTemplate, but they could also be using SignatureTemplate and/or EncryptionTemplate. If they do, though, those would be set to use a different template name. The mapping of Key Usage to registry key is as follows:
Encryption -> EncryptionTemplate
Signature and Encryption -> GeneralPurposeTemplate
Signature -> SignatureTemplate
- Open an elevated command prompt and run "iisreset".
- Now open Internet Explorer on the NDES server and browse to https://ndesfqdn.com/certsrv/mscep/mscep.dll, you should no longer see the web page but instead you should see an http 403 - Forbidden error. This is expected.
- Logon to your ConfigMgr and open the console.
- Open the Assets and compliance tab -> Compliance Settings -> Company Resource Access -> Certificate Profiles
- Create a new profile, choose Trusted CA Certificate and hit next. Import your root CA certificate and hit next. Select which platforms you will be deploying this against. Hit finish at the end.

- Now deploy this profile to your choice of users or devices.

- Create a new Certificate Profile, this time a SCEP profile.
- Change the desired options in the "enrollment parameters" window, I would go for the defaults.
- Hit browse in the "Certificate template name", remember this name must match whatever you entered in the registry on the NDES server!!
- If the template they created on CA doesn't show when browsing from this wizard, it could be due to one of two likely causes:
- The ConfigMgr administrator does not have "Read" permissions to the template in AD (configure this on the template object from MMC on the CA).
- The template has been created, but not published to AD. (publishing to AD is done using the MMC snapin called "Certification Authority", and you right-click "Certificate Templates" folder, and choose New -> Certificate Template to Issue")

- At this point, be-aware that:
- iOS doesn't support fully distinguished name as the subject name format or including e-mail address in subject name.
- You configure the settings according to what you have specified in the template (e.g. SHA-1/SHA-2/SHA-3 and the key-length).
- If the template name contains non-ASCII characters the cert will not be deployed

- Select the Root CA certificate and you should be good to go!
- Hit next, select the destination platforms and finish the wizard.
- Deploy the profile to the desired user or device collection(s).
Communication workflow
- Administrator configures policy in SCCM.
- Policy is sent to Intune service where details about the cert policy are used to create the challenge for the device(s).
- Policy is pushed to mobile device by Intune service during the next check-in. This policy contains the URL of the NDES server as well as the challenge generated by Intune.
- Device contacts the NDES server using the URL from #3 and provides the challenge response. (This is why your NDES server needs to be available externally in some way.)
- NDES Server (using our SCCM policy module) talks to the SCCM Certificate Registration Point (CRP) to validate challenge. You'll need to make sure that 443 (SSL) is open between the NDES Server and the CRP for this validation to happen.
- CRP responds to NDES server with "true" or "false" to challenge verification. (Again, over 443 SSL.)
- If challenge is OK then the NDES server communicates with the CA to get a certificate for the device. You'll need to make sure that the appropriate ports are open between NDES and CA for this to happen.
- NDES delivers certificate to mobile device.
Thanks Bob Roudebush for sharing.
Now what if it doesn't work? Check these things first:
The device time should be accurate. If it's off 5 minutes or more, you will not get SCEP certificate.
Did the Root CA (of the issuing CA) certificate you deployed in ConfigMgr got pushed to the device?
Can you access the NDES URL from the internet using a browser?
- Are you getting any certificate errors?
- Make sure the URL corresponds with what is listed on the certificate (https://ndes.yourdomain.com and not https://ndes.yourinternaldomain.local)
Visit https://ndes.externalfqdn.com/certsrv/mscep?operation=GetCACert&message=MyDeviceID You should get a response and the option to download a file.
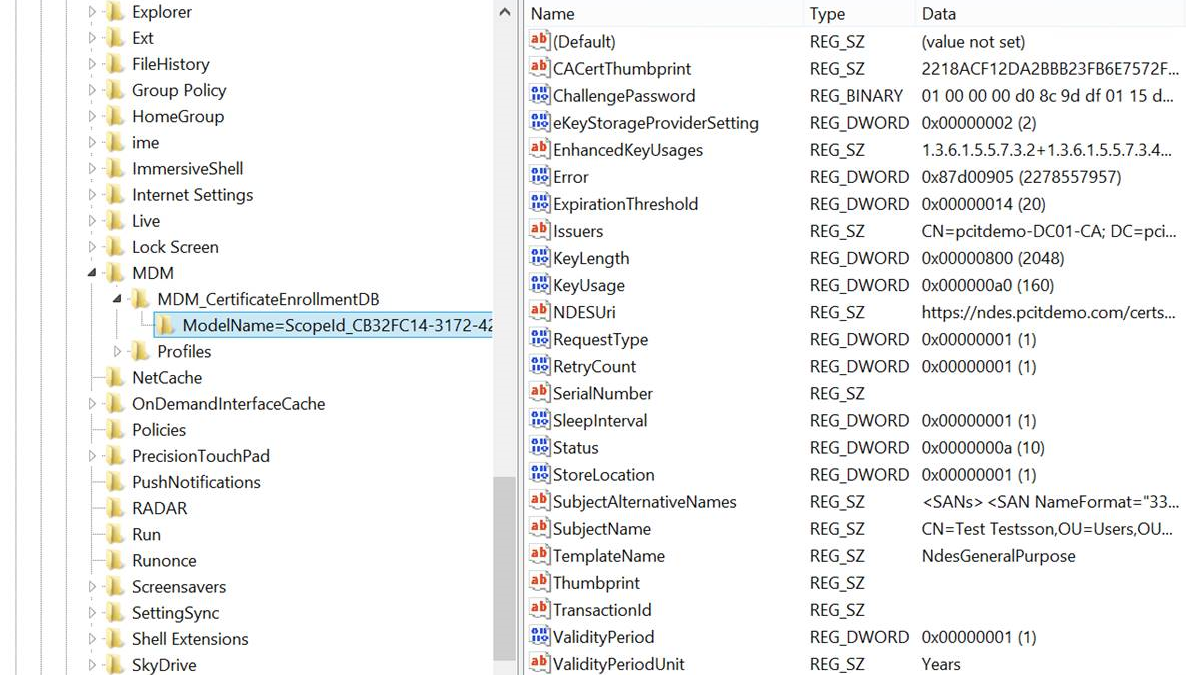
Push a certificate profile to a Windows device and check in the registry whether the request arrived.
- Open the registry editor and locate the following key: HKCU\Software\Microsoft\Windows\CurrentVersion\MDM
- The request will be visible as a subkey like shown in the screenshow below.
The certificate thumbprint will be populated when the actual certificate is received.
Open the CRPCTRL.LOG on the ConfigMgr server. The "previous status" should be 0.
Check out the file C:\Program Files\Configuration Manager\Logs\crpctrl.log (could also be in x86 program files folder)
There should be an entry as follows:
CRP's previous status was 0 (0 = Online, 1 = Failed, 4 = Undefined)
Do you get any requests logged on the IIS server of the NDES? What is the status code? Should be 200 in most cases!
Check out the last modified log in C:\inetpub\logs\LogFiles\W3SVC1
Entries should look similair to this (notice the port number 443):2014-07-07 13:45:27 10.0.0.6 GET /certsrv/mscep/mscep.dll/pkiclient.exe operation=GetCACert&message=MDM 443 - 80.81.82.83 - - 200 0 0 0
Do you see any requests logged in the NDES.log?
Check out the the log at C:\Program Files\Microsoft Configuration Manager\Logs\NDESPlugin.log
Entries should look similair to this:
<![LOG[==========[ NDES policy module started in process 2332 ]==========]LOG]!><time="22:37:15.204+00" date="03-18-2014" component="NDESPlugin" context="" type="1" thread="1356" file="ndesplugin.cpp:195">
<![LOG[Calling Initialize...]LOG]!><time="22:37:15.204+00" date="03-18-2014" component="NDESPlugin" context="" type="1" thread="1356" file="ndesplugin.cpp:226">
<![LOG[certificate registration point web server is sccm.internaldomain.local]LOG]!><time="22:37:15.204+00" date="03-18-2014" component="NDESPlugin" context="" type="1" thread="1356" file="ndesplugin.cpp:250">
<![LOG[NDES thumbprint is 874b8e5864139ad337be36fdd86937fbce1aff9f.]LOG]!><time="22:37:15.204+00" date="03-18-2014" component="NDESPlugin" context="" type="1" thread="1356" file="ndesplugin.cpp:272">
<![LOG[certificate registration point webservice URL is CMCertificateRegistration]LOG]!><time="22:37:15.204+00" date="03-18-2014" component="NDESPlugin" context="" type="1" thread="1356" file="ndesplugin.cpp:314">
<![LOG[CA Issuer Name is ca01.internaldomain.local\\pcitdemo-CA01-CA]LOG]!><time="22:37:15.204+00" date="03-18-2014" component="NDESPlugin" context="" type="1" thread="1356" file="ndesplugin.cpp:356">
<![LOG[Certificate registration port number is 443]LOG]!><time="22:37:15.204+00" date="03-18-2014" component="NDESPlugin" context="" type="1" thread="1356" file="ndesplugin.cpp:387">
<![LOG[Exiting Initialize with 0x0]LOG]!><time="22:37:15.204+00" date="03-18-2014" component="NDESPlugin" context="" type="1" thread="1356" file="ndesplugin.cpp:396">
<![LOG[Calling VerifyRequest ...]LOG]!><time="22:37:19.978+00" date="03-18-2014" component="NDESPlugin" context="" type="1" thread="1356" file="ndesplugin.cpp:646">
<![LOG[Sending request to certificate registration point.]LOG]!><time="22:37:19.978+00" date="03-18-2014" component="NDESPlugin" context="" type="1" thread="1356" file="httprequest.cpp:114">
<![LOG[Verify challenge returns false]LOG]!><time="22:37:20.563+00" date="03-18-2014" component="NDESPlugin" context="" type="1" thread="1356" file="ndesplugin.cpp:834">
<![LOG[Exiting VerifyRequest with 0x0]LOG]!><time="22:37:20.563+00" date="03-18-2014" component="NDESPlugin" context="" type="1" thread="1356" file="ndesplugin.cpp:874">
Do you see any request logged on the IIS server of the CRP? What is the status code? Should be 200 in most cases!
Check out the last modified log in C:\inetpub\logs\LogFiles\W3SVC1
Do you see any request logged in the CRP log on the CRP server?
C:\Program Files\SMS_CCM\CRP\Logs\crp.log
Are you getting this error:
CRP's previous status was 1 (0 = Online, 1 = Failed, 4 = Undefined)
Health check request failed, status code is 403, 'Forbidden'.
Make sure you change IIS on your ConfigMgr server - CMCertificateRegistration SSL Settings to Ignore Client Certificates
Do you see a certificate being issued on the issuing CA?

14. Are you getting this output in the ndes logfile?
<![LOG[Failed to retrieve client certificate. Error -2147467259]LOG]!><time="20:48:44.215+00" date="08-17-2015" component="NDESPlugin" context="" type="3" thread="4064" file="httprequest.cpp:240"> <![LOG[Exiting VerifyRequest with 0x80004005]LOG]!><time="20:48:44.215+00" date="08-17-2015" component="NDESPlugin" context="" type="1" thread="4064" file="ndesplugin.cpp:874">
The client auth cert needs to have the internal dns name to present to the CRP.The easiest way to do this is to put both DNS names in the SAN of the certificate. See this technet post for more info.
14. Are you getting Event ID 29 in the NDES Plugin Log? The eventlog might give you this entry:
Event ID: 29The password in the certificate request cannot be verified. It may have been used already. Obtain a new password to submit with this request.
Internal Name: EVENT_MSCEP_INVALID_PASSWORD
Source: Microsoft-Windows-NetworkDeviceEnrollmentService
Description: The Network Device Enrollment Service failed to process a client device's request because the submitted password is invalid.
Diagnose: Check the IIS log to find out what query string was submitted.
Check the device configuration to ensure that the correct password is being submitted as part of the request.
Use certutil to check whether the PKCS7 package from the client is valid (certutil -v p7request.txt, where p7request.txt is a file in which the query string is captured).
Otherwise, enable CAPI2 diagnostics and, if possible, reproduce the error. Resolve: If necessary, contact the vendor of the SCEP client and ensure that the request is being submitted correctly.
So what's up with that? Your service certificate (e.g. for Client Authentication) expired or was revoked.
Note: the registry value of HKEY_LOCAL_MACHINE\SOFTWARE\Microsoft\Cryptography\MSCEP\Modules\NDESPolicy\NDESCertThumbprint needs to be MANUALLY update with the thumbprint of the new service certificate, replacing the old certificate's thumbprint, else NDES will continue trying to use the old certificate, even if it's archived. Thanks Mr. Hammami for getting to this solution.
--------------
Hope this post helped you implement NDES with Microsoft Intune, please consider leaving a reply if it did!
Part 3 - Protecting NDES with Web Application Proxy (WAP) in the DMZ
As you might have learned from my previous blog post about certificate deployment to mobile devices via NDES it's mandatory to open port 443 (TCP) from any IP on the internet inbound to your NDES server. At the same time the NDES server needs to be domain joined to the same domain as your Certificate Authority/ConfigMgr Server and Domain Controllers.
The NDES server could either be placed in your trusted zone next to your CA/ConfigMgr server/DC's OR in the DMZ with a large amount of firewall exceptions required for a typical domain joined server.
Some of our customers don't prefer or allow such type of configuration and require a reverse proxy in front of the NDES server, preferably non-domain joined and in the DMZ.
Your reverse proxy is likely to block large GET requests
The interesting part is when a mobile device on the internet receives a certificate profile from Microsoft Intune, this profile includes an URL to the NDES server. From that point on the device will reach out to the NDES server with a massive GET request (including a challenge to secure any known SCEP vulnerabilities) – depending on your configured key length it can be up to 30kb or even 40kb. Many reverse proxy solutions do not allow such large URL's to be accepted, including UAG or Web Application Proxy (WAP). In my experience the only working solution is TMG however that product is discontinued and no longer recommended.
The good news
The good news is that we have been working on a fix to address this issue. As of today there is an hotfix that mitigates the maximum GET request size restriction in our Web Application Proxy solution. This hotfix is private for now, this means it's not tested extensively and therefore comes with limited support. Because of that it's not publically available without contacting Microsoft support, more information will be published at a later timeframe. In the future a KB will be posted that describes this issue and fix (KB523052).
Update: the hotfix is now generally available and part of the December Windows Update. Read more details in this post.
Design Overview
From a design perspective this is what it could look like:
Please do no note that Web Application Proxy is built on top of http.sys which has a similar restriction, however that restriction can be changed by altering the registry.
Open the registry editor on your Web Application Server and add the following two registry keys:
Location: HKLM\SYSTEM\CurrentControlSet\Services\HTTP\Parameters
Value: MaxFieldLength
Type DWORD
Data: 65534 (decimal)
Location: HKLM\SYSTEM\CurrentControlSet\Services\HTTP\Parameters
Value: MaxRequestBytes
Type DWORD
Data: 65534 (decimal)
Publishing the NDES server using the Remote Access Management Console on the WAP is fairly straight forward:

After changing the registry, applying the hotfix and rebooting your server, mobile devices should be able to request a certificate via the (workgroup) WAP from the NDES server. If the devices fails to receive a certificate, please refer to the troubleshooting section in my previous blog post regarding Windows Intune and NDES.
I hope this guide helps you secure NDES using Microsoft Technology (Web Application Proxy). If it helped, please consider leaving a reply.
Regards,
Pieter
Part 4 - Protecting NDES with Azure AD Application Proxy
In the past few months I published a series of posts on setting up certificate distribution to mobile devices. In summary this is what was discussed:
Part 1 – First tips and tricks on how to troubleshoot and check existing ConfigMgr/SCEP/NDES infrastructures.
Part 2 – After many asks for clarity, a full guide on how to install and troubleshoot ConfigMgr/SCEP/NDES.
Part 3– Using an additional reverse proxy in a DMZ in front of NDES. The reverse proxy of choice was Windows Server 2012 R2 with the Web Application Proxy role installed.
In this Part 4 we will discuss a cool solution that just have been made possible!
The Azure AD Application Proxy
Azure AD Application Proxy lets you publish applications, such as SharePoint sites, Outlook Web Access and other web application, inside your private network and provides secure access to users outside your network via Azure. The team has recently updated the Azure AD Application Proxy to allow NDES usage, great news!
Azure AD Application Proxy is built on Azure and gives you a massive amount of network bandwidth and server infrastructure to have better protection against DDOS attacks and superb availability. Furthermore there is no need to open external firewall ports to your on premise network and no DMZ server is required. All traffic is originated inbound. For a complete list of outbound ports take a look at this MSDN page.
Important notes:
Azure AD Application Proxy is a feature that is available only if you are using the Premium or Basic editions of Azure Active Directory. For more information, see Azure Active Directory Editions .
If you have Enterprise Mobility Suite (EMS) licenses you are eligible of using this solution.
The Azure AD Application Proxy connector only installs on a Windows Server 2012 R2 Operating system, this is also a requirement of the NDES server anyway.
Architecture
The architecture of this solution could look as follows:

Installation steps
During the next steps I assume you already got certificate distribution to work, if not please consult Part 2 on this topic.
1. On your PC browse to https://manage.windowsazure.comand login with an account that has Administrative permissions in your Azure AD tenant.
2. On the left side navigate to "Active Directory" and select the desired directory. 
3. After your Azure Active Directory is selected, hit the "Configure" section.
4. Scroll down to the "Application Proxy" and hit the "enabled" button. Afterwards download the Application Proxy connector (AADApplicationProxyConnectorInstaller.msi) to your local PC and transfer it to the NDES server.
5. On your NDES server(*), start the installation by executing the previously downloaded AADApplicationProxyConnectorInstaller.msi. Follow the wizard like shown in the print screens below.
(*) Important note: the connector could be installed on any server within your corporate network with access to NDES. It does not have to be installed on the NDES server itself.


6. During the installation wizard you will be prompted to authenticate to you Azure AD tenant by providing Azure AD Administrative credentials

7. If all goes well, you should be looking at this success message.
8. Go back to your Azure management portal (https://manage.windowsazure.com) but this time go to the "Application" section as illustrated in the next screenshot. 
9. After selecting the "Add" button select the option to "Publish an application that will be accessible from outside your network". Enter a descriptive name and hit the arrow button to proceed. 
10. In the next dialog look at the following three things:
- Make sure you change "preauthentication method" to "Passthrough". It's not possible to use any form of pre-authentication, the protocol used for Certificate Requests (SCEP) does not provide such option.
- Enter the internal URL/FQDN of your NDES server on which you installed the connector earlier.
- Copy the provided "External URL" to your clipboard.
Hit the checkmark to save your application.

11. Test whether you can access your NDES server via the Azure AD Application proxy by pasting the link from step 10 into a browser. You should see a default IIS welcome page
12. As a final test, add the mscep.dll path to the existing URL you pasted in the previous step:
https://scep-test93635307549127448334.msappproxy.net/**certsrv/mscep/mscep.dll**
13. You should receive a "HTTP Error 403 – Forbidden".
14. The last step is to change the NDES URL provided (via Microsoft Intune) to devices, this could either be in System Center Configuration Center or in Intune Cloud.
a. For System Center Configuration Center go to the Certificate Registration Point (CRP) and adjust the URL, this is what devices reach out to and present their challenge.

b. For Intune Cloud Only a.k.a. Intune Standalone, either Edit or Create a new SCEP policy and add the new URL
Hope this post helped you use Azure AD Application Proxy in combination with NDES, please consider leaving a reply if it did!
Replace certificates on ADFS 3.0
In my test environment I wanted to replace self-signed certificates with publicly trusted ones.
Follow these steps if you want to achieve the same:
- RDP to your ADFS 3.0 server
- Import the new certificate to the Machine's Personal Store
- Make sure you have a private key that corresponds to this certificate. If not, go to the PC you requested the certificate on, export it from there and make sure to include the private key,

- Assign the proper permissions to the Private Key for the ADFS Managed Service Account:

- Make sure to select "Service Accounts" in when searching for the account.

- Now switch to AD FS management, drill down to Certificates and select "Set Service Communication Certificate"

- You will be prompted for the required certificate. If you don't see the new certificate in the list of available certificates – it means you either don't have the private key that corresponds to this certificate OR you didn't import the cert correctly.
(next commands have to be done too - thanks Jaguar who mentioned this in a comment)
- Run Get-AdfsSslCertificate. Make a note of the thumbprint of the new certificate.
- If it's unclear which certificate is new, open MMC snappin, locate the new certificate and scroll down in the list of properties to see the thumbprint.
- Run Set-AdfsSslCertificate -Thumbprint xxxxthumbprintofthenewsslcertxxxxx (without spaces).
- Restart the ADFS service
Optionally when using Web Application Proxy(s):
- Copy and import the new certificate to the Web Application Proxy/Proxies which are not domain joined. Make sure the certificate is imported into the Machine Personal Store.
- Switch the certificate on the Web Application Proxy, I personally did this by reinstalling the Web Application Proxy (requires a reboot) but it's much easier to use the "Set-WebApplicationProxySslCertificate" cmdlet.
Consider leaving a reply in case this post helped you. Thanks!
SCEP certificate enrolling using ConfigMgr 2012, CRP, NDES and Windows Intune
In order to check for a valid configuration and start enrolling certificates using ConfigMgr 2012 and Windows Intune, please validate your setup using the steps below.
Update: please consult the newer and more complete blog post:
Tasks to check on the NDES Server
Use the registry editor to increase the IIS default URL size limit by setting the following registry keys:
Location: HKEY_LOCAL_MACHINE\ CurrentControlSet\Services\HTTP\Parameters
Set the MaxFieldLength DWORD key to 65534 (Decimal)
Set the MaxRequestBytes DWORD key to 65534 (Decimal)
You can also download the registry file from this location or compressed from here.

On the same server, in Internet Information Services (IIS) Manager, modify the request-filtering settings for the /certsrv/mscep application, and then restart the server. In the Edit Request Filtering Settings dialog box, the Request Limits settings should be as follows:
- Maximum allowed content length (Bytes): 30000000
- Maximum URL length (Bytes): 65534
- Maximum query string (Bytes): 65534
For more information about these settings and how to configure them, see Requests Limits in the IIS Reference Library.


Make sure to reboot the server after these changes, an IIS reset is not sufficient.
Assign the Certificate which will be used for NDES Server on Port 443 of the Default Website

If the port 443 does not exist, click "Add Port" instead of "Edit"

In case you pressed "Edit"

In case you pressed "Add"

Now open Internet Explorer and check access to
https://localhost/

In this case you receive a Certificate error, this is expected (remember that in the Certificate Request we have provided Netbios, FQDN and not localhost)
https://<NetbiosName>

">https://<FQDN>

On your ConfigMgr 2012 R2 server:
Create a new Site System Server if not yet part of your ConfigMgr environment

Provide Server name

You might want to provide a "Site Installation Account" if your Site Server does not have local admin rights on the target system
Select Certificate registration point as Site System Role


Add URL and Root CA Certificate. (This would be the Root CA Cert for the CA that signed the certificate that will be used for the NDES server policymodule client auth certificate)
Test if you can access the link using IE before https://<hostname>/certsrv/mscep/mscep.dll


Monitor Sitecomp.log file if the site system role installation has been started

On the Site Server which has been selected to be Certificate Registration Point check CRPSetup.log

Change the Template Name used by MSCEP to the one we have created for NDES Server.
You need to run iisreset on the NDES server for changes to be processed.

NDES can use 3 different templates if you want to issue different certs for different reasons. Each registry key maps to the "Purpose:" specified on the Request Handling tab of the Certificate template:
- "Signature and Encryption" purpose maps to the registry key GeneralPurposeTemplate
- "Signature" purpose maps to the registry key SignatureTemplate
- "Encryption" purpose maps to the registry key EncryptionTemplate
Note: Make sure to restart IIS (the command is "iisreset") after changing these registry keys.
Restart the Certificate Registration Point component. Verify crpctrl.log to see if the component is running correctly

On the ConfigMgr Site Server check your CertMgr.log file

Note the entry updated CRP database user account() on … which will have caused the creation of the CRP*.cer file in Program Files\Microsoft Configuration Manager\inboxes\certmgr.box

This Certificate is required for Configuration Manager Policy Module installer. Copy this certificate to your NDES Server.
On the CRP server, in IIS you will now have ConfigMgr CRP Service Pool with CMCertificateRegistration application

Depending on what you've changed, do an IISReset

Test NDES related Weblinks which should have following results now:
https://<fqdn>/certsrv/mscep/mscep.dll
Note this 403 error is expected!

/CMCertificateRegistration">https://<fqdn>/CMCertificateRegistration
If you are testing this on the local server you should get a 403.7
If you are testing this from a remote PC/server you should get a 403 (access denied)

Please consider leaving a reply if this post helped you.
Update: please consult the newer and more complete blog post:
Sync failed. Error: (0x80c81000) Data in the stream is not in the proper format.
When trying to sync folders, you might receive an "Error: (0x80c81000) Data in the stream is not in the proper format".

Make sure to install KB2883200 and KB2884846 on the Windows 8.1 Client and you should be good to go.
Please consider leaving a reply if this post helped you.
Test Workplace Join with a self-signed certificate
If you want to test Workplace Join with a self-signed certificate, you might encounter this error:
"Confirm you are using the correct sign-in information and that your workplace uses this feature. Also, the connection to your workplace might not be working at the moment. Please wait and try again."

Please note that the next step will explain how to work arround this error, however this is acceptable in test environments only. In a production environment we highly recommend to use publicly trusted SSL certificates.
- Open Internet Explorer, go to Options and select the Advanced tab.
- Scroll to the security section.
- Deselect "Check for server certificate revocation"
- Hit "Apply"

Go back to the Workplace Join and try again.

Consider leaving a reply in case this post helped you. Thanks!
The connection to adfs.domain.com Active Directory Federation Services 2.0 server failed due to invalid credentials
Are you getting a "failed due to invalid credentials" in PowerShell when executing Set-MsolADFSContext?
PS C:\Windows\system32> Set-MsolADFSContext -Computer adfs.intune-demo.com
Set-MsolADFSContext : The connection to adfs.publicdomain.com Active Directory
Federation Services 2.0 server failed due to invalid credentials.
Try the following:
- Start Windows PowerShell as an administrator and set up Windows PowerShell for remoting by typing Enable-PSRemoting –force
- Open port 5985 on your server firewall.
- Make sure to specify a logfile when entering the command: Set-MsolADFSContext -Computer adfs.publicdomain.com -logfile c:\log.txt
- Telnet from a remote location to the ADFS server on port 5985, a blinking cursor is good.
- In case this is a server hosted in Azure, configure an endpoint:

Consider leaving a reply in case this post helped you. Thanks!
Troubleshoot ConfigMgr 2012 and Intune SCEP/NDES
Troubleshooting SCEP enrollment on Mobile Devices can be tricky. Use the following logfiles to get a better understanding:
| Content | Location |
| Certificate registration point IIS logs | C:\inetpub\logs\LogFiles\W3SVC1 |
| Configuration Manager certificate registration point logs | C:\SMS_CCM\CRP\Logs\CRP.log |
| Component health status | SMS_CERTIFICATE_REGISTRATION_POINT |
| NDES | C:\Users\%username%\mscep.log |
| NDED Plug-in | C:\Program Files\Microsoft Configuration Manager\Logs\NDESPlugin.log |
Hope this helps to get the job done. Good luck!
Type mismatch: 'UBound' when using the Support Tool for Windows Intune Trial Management of Window Phone 8
The Support Tool for Windows Intune Trial Management of Window Phone 8 facilitates Microsoft System Center 2012 Configuration Manager admins and Windows Intune admins to try out Windows Phone 8 software distribution scenarios during the Trial period.
In some cases, you might run into an error "Type mismatch: 'UBound'.

This is fixed in the latest release (10th of December 2013) of the tools which can be found here.
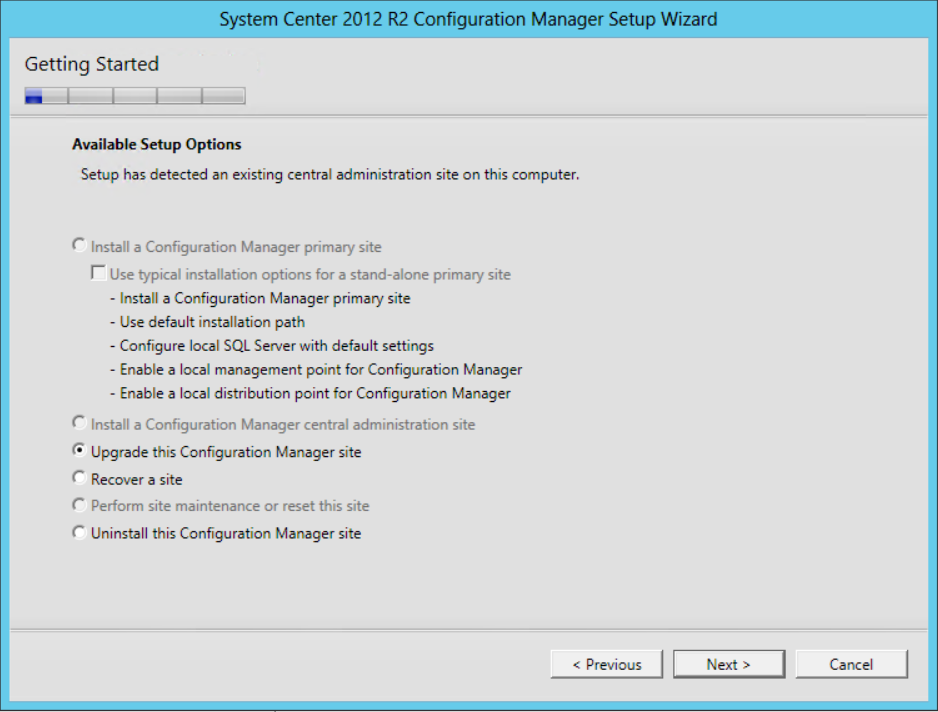
Upgrade System Center Configuration Manager SP1 to R2
In order to benefit from R2 enhancements, it's recommended to upgrade your ConfigMgr SP1 installation . Follow these steps minimize problems:
- Double check you are currently running ConfigMgr SP1, the CU update level is not relevant.
- Backup your current SQL database(s)
- Disable antivirus on your ConfigMgr server (Forefront Endpoint Protection can be left enabled)
- Uninstall the current ADK tools (version 8.59.225584)
- Install the following components from the 8.1 ADK
- User State Migration Tool (USMT)
- Windows Deployment Tools
- Windows PreInstallation Environment (Windows PE)
- Run "SMSSETUP\BIN\X64\prereqchk.exe"

Make sure to remediate any issue found.
Start setup and follow the wizard:

Follow the wizard for the remaining dialogs:
- Enter a serial, this can also be done afterwards
- Accept the license terms
- Choose to download the required files (you can not use the previously downloaded for SP1)
- If desired, select any extra languages
- Resolve any potential issues listed during the pre-req test
- Do not close setup until ALL blue actions are listed as green - even if the core setup is done and the close button becomes active!
Installation is likely to take somewhere around 30 minutes, we have seen 1,5 hours on very old hardware.
Good luck!
Useful ConfigMgr query for Intune Enrolled Devices
The following SQL query was shared by Gerjan Eghuizen an Unified Communications Consultant working at Enexis and Niels Buit (Microsoft), useful for anyone who has Mobile Devices enrolled via Microsoft Intune in ConfigMgr 2012 R2.
The end-result is a report with this information (clickable):

The SQL query:
CREATE TABLE
#machines
(
DeviceID uniqueidentifier, -- Remove GUID: FROM SMSID to get this
ResourceID int,
SMS_Unique_Identifier0 nvarchar(255),
Name0 nvarchar(255),
Netbios_Name0 nvarchar(255),
Client_Version0 nvarchar(256),
Client_Type0 int,
Operating_System_Name_and0 nvarchar(256),
DeviceOwner0 int,
DeviceUser nvarchar(255),
DeviceIMEI nvarchar(255)
)
CREATE INDEX ix_machines2 ON #machines (DeviceID)
INSERT INTO #machines(DeviceID, ResourceID, SMS_Unique_Identifier0, Name0, Netbios_Name0,
Client_Version0, Client_Type0, Operating_System_Name_and0, DeviceOwner0, DeviceUser, DeviceIMEI)
SELECT CONVERT(uniqueidentifier, CASE LEN(machines.SMS_Unique_Identifier0)
WHEN 36 then machines.SMS_Unique_Identifier0
ELSE SUBSTRING(machines.SMS_Unique_Identifier0,6,LEN(machines.SMS_Unique_Identifier0)-5) end),
machines.ResourceID,
machines.SMS_Unique_Identifier0,
machines.Name0,
machines.Netbios_Name0,
machines.Client_Version0,
machines.Client_Type0,
machines.Operating_System_Name_and0,
machines.DeviceOwner0,
(SELECT UniqueUserName FROM fn_rbac_usermachinerelation(@UserSIDs) relations WHERE relations.MachineResourceID=machines.ResourceID),
(SELECT IMEI0 FROM fn_rbac_GS_Device_COMPUTERSYSTEM(@UserSIDs) computersys WHERE computersys.ResourceID=machines.ResourceID) FROM fn_rbac_R_System(@UserSIDs) machines WHERE ISNULL(machines.Obsolete0, 0) <> 1 AND ISNULL(machines.Decommissioned0, 0) <> 1 AND machines.Client0 = 1
AND ISNULL(machines.AgentEdition0, 0) <> 5 AND machines.Client_Type0 = 3
Select
RS.SMS_Unique_Identifier0,
(case when RS.Name0 is not null then RS.Name0 else RS.Netbios_Name0 end) as DeviceName,
RS.DeviceUser as DeviceUser,
RS.DeviceIMEI as DeviceIMEI,
RS.Client_Version0 AS OSVersion,
(case when comp.OEM0 is not null then comp.OEM0 else mdmci.Manufacturer end) as DeviceOEMInfo,
(case when comp.PlatformType0 is not null then comp.PlatformType0 else compsys.SystemType0 end) as DeviceType,
(case when comp.Product0 is not null then comp.Product0 else mdmci.DeviceOperatingSystem end) as Product,
cs.LastPolicyRequest AS LastPolicyRequest,
(Select top(1) v.AgentTime from fn_rbac_AgentDiscoveries(@UserSIDs) v
where RS.ResourceID = v.ResourceId and
v.AgentName = 'Heartbeat Discovery' order by
v.AgentTime DESC) AS LastHeartbeatTime,
wks.LastHWScan as LastHWScan,
RS.DeviceOwner0
from #machines RS
left outer join fn_rbac_GS_DEVICE_COMPUTERSYSTEM(@UserSIDs) comp on comp.ResourceID=RS.ResourceID
left outer join fn_rbac_CH_ClientSummary(@UserSIDs) cs on cs.ResourceID=RS.ResourceID
left outer join fn_rbac_GS_WORKSTATION_STATUS(@UserSIDs) wks on wks.ResourceID = RS.ResourceID
left outer JOIN fn_rbac_mdmclientidentity(@UserSIDs) mdmci ON mdmci.DeviceID = RS.DeviceID
left outer join fn_rbac_GS_COMPUTER_SYSTEM(@UserSIDs) compsys on compsys.ResourceID = RS.ResourceID
where (@ProductName = '*' or comp.Product0 = @ProductName or mdmci.DeviceOperatingSystem = @ProductName)
Popular posts from this blog
视频教程和截图:Windows8.1 Update 1 [原文发表地址] : Video Tutorial and Screenshots: Windows 8.1 Update 1 [原文发表时间] : 4/3/2014 我有一个私人的MSDN账户,所以我第一时间下载安装了Windows8.1 Update,在未来的几周内他将会慢慢的被公诸于世。 这会是最终的版本吗?它只是一项显著的改进而已。我在用X1碳触摸屏的笔记本电脑,虽然他有一个触摸屏,但我经常用的却是鼠标和键盘。在Store应用程序(全屏)和桌面程序之间来回切换让我感到很惬意,但总是会有一点瑕疵。你正在跨越两个世界。我想要生活在统一的世界,而这个Windows的更新以统一的度量方式将他们二者合并到一起,这就意味着当我使用我的电脑的时候会非常流畅。 我刚刚公开了一个全新的5分钟长YouTube视频,它可以带你参观一下一些新功能。 https://www.youtube.com/watch?feature=player_embedded&v=BcW8wu0Qnew#t=0 在你升级完成之后,你会立刻注意到Windows Store-一个全屏的应用程序,请注意它是固定在你的桌面的任务栏上。现在你也可以把任何的应用程序固定到你的任务栏上。 甚至更好,你可以右键关闭它们,就像以前一样: 像Xbox Music这种使用媒体控件的Windows Store应用程序也能获得类似于任务栏按钮内嵌媒体控件的任务栏功能增强。在这里,当我在桌面的时候,我可以控制Windows Store里面的音乐。当你按音量键的时候,通用音乐的控件也会弹出来。 现在开始界面上会有一个电源按钮和搜索键 如果你用鼠标右键单击一个固定的磁片形图标(或按Shift+F10),你将会看到熟悉的菜单,通过菜单你可以改变大小,固定到任务栏等等。 还添加了一些不错的功能和微妙变化,这对经常出差的我来说非常棒。我现在可以管理我已知的Wi-Fi网络了,这在Win7里面是被去掉了或是隐藏了,以至于我曾经写了一个实用的 管理无线网络程序 。好了,现在它又可用了。 你可以将鼠标移至Windows Store应用程序的顶部,一个小标题栏会出现。单击标题栏的左边,然后你就可以...
ASP.NET AJAX RC 1 is here! Download now
Moving on with WebParticles 1 Deploying to the _app_bin folder This post adds to Tony Rabun's post "WebParticles: Developing and Using Web User Controls WebParts in Microsoft Office SharePoint Server 2007" . In the original post, the web part DLLs are deployed in the GAC. During the development period, this could become a bit of a pain as you will be doing numerous compile, deploy then test cycles. Putting the DLLs in the _app_bin folder of the SharePoint web application makes things a bit easier. Make sure the web part class that load the user control has the GUID attribute and the constructor sets the export mode to all. Figure 1 - The web part class 2. Add the AllowPartiallyTrustedCallers Attribute to the AssemblyInfo.cs file of the web part project and all other DLL projects it is referencing. Figure 2 - Marking the assembly with AllowPartiallyTrustedCallers attribute 3. Copy all the DLLs from the bin folder of the web part...
Announcing the AdventureWorks OData Feed sample
Update – Removing Built-in Applications from Windows 8 In October last year I published a script that is designed to remove the built-in Windows 8 applications when creating a Windows 8 image. After a reading some of the comments in that blog post I decided to create a new version of the script that is simpler to use. The new script removes the need to know the full name for the app and the different names for each architecture. I am sure you will agree that this name - Microsoft.Bing – is much easier to manage than this - Microsoft.Bing_1.2.0.137_x86__8wekyb3d8bbwe. The script below takes a simple list of Apps and then removes the provisioned package and the package that is installed for the Administrator. To adjust the script for your requirements simply update the $AppList comma separated list to include the Apps you want to remove. $AppsList = "Microsoft.Bing" , "Microsoft.BingFinance" , "Microsoft.BingMaps" , "Microsoft.Bing...


Comments
Post a Comment