Skip to main content
Architecture Testing Guide Released
视频教程和截图:Windows8.1 Update 1
[原文发表地址] : Video Tutorial and Screenshots: Windows 8.1 Update 1
[原文发表时间] : 4/3/2014
我有一个私人的MSDN账户,所以我第一时间下载安装了Windows8.1 Update,在未来的几周内他将会慢慢的被公诸于世。
这会是最终的版本吗?它只是一项显著的改进而已。我在用X1碳触摸屏的笔记本电脑,虽然他有一个触摸屏,但我经常用的却是鼠标和键盘。在Store应用程序(全屏)和桌面程序之间来回切换让我感到很惬意,但总是会有一点瑕疵。你正在跨越两个世界。我想要生活在统一的世界,而这个Windows的更新以统一的度量方式将他们二者合并到一起,这就意味着当我使用我的电脑的时候会非常流畅。
我刚刚公开了一个全新的5分钟长YouTube视频,它可以带你参观一下一些新功能。
https://www.youtube.com/watch?feature=player_embedded&v=BcW8wu0Qnew#t=0
在你升级完成之后,你会立刻注意到Windows Store-一个全屏的应用程序,请注意它是固定在你的桌面的任务栏上。现在你也可以把任何的应用程序固定到你的任务栏上。
甚至更好,你可以右键关闭它们,就像以前一样:

像Xbox Music这种使用媒体控件的Windows Store应用程序也能获得类似于任务栏按钮内嵌媒体控件的任务栏功能增强。在这里,当我在桌面的时候,我可以控制Windows Store里面的音乐。当你按音量键的时候,通用音乐的控件也会弹出来。

现在开始界面上会有一个电源按钮和搜索键

如果你用鼠标右键单击一个固定的磁片形图标(或按Shift+F10),你将会看到熟悉的菜单,通过菜单你可以改变大小,固定到任务栏等等。

还添加了一些不错的功能和微妙变化,这对经常出差的我来说非常棒。我现在可以管理我已知的Wi-Fi网络了,这在Win7里面是被去掉了或是隐藏了,以至于我曾经写了一个实用的管理无线网络程序。好了,现在它又可用了。

你可以将鼠标移至Windows Store应用程序的顶部,一个小标题栏会出现。单击标题栏的左边,然后你就可以拆分Windows了。

Windows Store应用程序也能被最小化或关闭。

新安装的程序更容易找,因为在Start Screen里面会有提示。

IE11全屏后会可选是否一直显示打开的页面,如果你是一个"眼不见,心不烦"的人,这个功能会非常有用的。

总之,这个更新非常好,Windows比以前运行更加流畅,但实际上我比以前用了更多的应用程序,像Mail和Music。
免费的Windows 8和8.1教程
我建了个简单的我的免费Windows8教程链接。YouTube里面有整个播放列表,从这里你可以看到它们:
https://hanselman.com/windows8
请把这个链接分享给你的家人和朋友,或者通过社交媒体。谢谢。
怎样不用微软账户登录Windows8或Windows8.1-创建一个本地用户
[原文发表地址]: How to sign into Windows 8 or 8.1 without a Microsoft account - make a local user
[原文发表时间]: November 3, '13
前不久我在电脑上装了一个Windows8.1的操作系统,而我又不想使用微软ID(Live ID)登陆。我不想让这个临时的机器关联到我现有的微软ID,仅仅想用一个普通的本地用户登录。现在,我意识到如果不是用Live ID登录的话,就会限制一些我能做的事情,比如说我在访问一些类似于音乐、商城、视频或者其他的一些应用时会弹出许多用户验证,但尽管如此,我还是想坚持我的选择。
目前,我还不是很清楚如何来创建一个本地登录用户。 因此我把它写到这里,快看看吧,网友们。
第一步
当你进入到设置的时候,选择快速设置还是用户自定义设置其实是没有多大区别的。挑一个你喜欢的就行。

第二步
安装程序在安装过程中会要求你登录微软账户。你可以登录,但却不是必须的。你也可以点击底部的"创建一个新用户",点击这个可以创建一个新的在线微软账户。很显然,这也是创建一个本地用户的方法。

第三步
从这点上,看起来你在创建一个微软账户, 但是你同样可以点击"使用非微软账户登录"。
你要清楚你现在所做的,不要仅仅是因为你不喜欢微软账户而做这个。要注意后果,就是说,你通常可以稍后添加一个账户。并且我发现当我用一个虚拟机的时候,使用本地用户的效果会更好。

第四步
这正是你使用的本地帐户,输入你经常用的一个用户名和密码。这就是一个没有网络连接的本地帐户。

希望这个可以帮到一些人。
用于Windows,Mac,和Linux的Visual Studio Code介绍
[原文发表地址] Introducing Visual Studio Code for Windows, Mac, and Linux
[原文发表时间] 4/30/2015

对开发人员来说,这是个多么美好的时代啊。我在旧金山的 BUILD 发布会上,微软刚刚推出了Visual Studio Code—— 一个用于Windows , Mac和Linux操作系统的优化代码的编辑器,现在它是Visual Studio 家族的新成员。
Visual Studio Code(我自己叫它 VSCode) 是一种新的免费开发工具。它是一个代码编辑器,但却很智能。它是跨平台的,用TypeScript和Electron构建的,并且可以在 Windows、 Mac 和 Linux 上运行。
Visual Studio Code可以将多语言语法突出显示,常规语言如:CoffeeScript、Python、Ruby、Jade、Clojure、Java、C++、R、Go、makefile,shell scripts、 PowerShell、 bat、xml、你都知道的。它不仅仅只是自动完成 (大家都知道这个吧?) 它拥有真正的智能感知能力。对于单个文件像HTML、 CSS、LESS、 SASS 和Markdown这样的单个文件,也具有智能感知功能。这个是Visual Studio Code支持的语言序列。
恕我直言,这个编辑器的真正功能其实是对C#、 TypeScript、 JavaScript/node,JSON 等工程项目的智能感知。例如,当您在 Visual Studio Code中正在编辑 ASP.NET 5 应用程序时,开源项目Roslyn和OmniSharp将会为Visual Studio Code提供智能感知。这意味着你可以得到真正的智能重构、 导航,还有更多。 Visual Studio Code对于TypeScript的支持是惊人的,因为在它的核心部分有 JavaScript 和TypeScript.
Visual Studio Code具有 git 支持、diff命令、对Gulp的可扩展性模式,对于JavaScript 和 Nodejs 的应用程序来说,它又是一个很好的调试器。他们也正在努力在所有平台上支持调试像.NET Core CLR 和Mono这样的内容。
这是一个注重代码和代码优化的轻量级工具,不是一个完整的 IDE。它没有文件 |新建工程或者可视化设计器。如果您正使用命令行,那么你可能就会想去使用这个免费工具。
您可以在这里下载Visual Studio Codehttps://code.visualstudio.com .
他们会在https://blogs.msdn.com/b/vscode的写博客,你可以通过电子邮件vscodefeedback@microsoft.com给他们发送反馈,然后再@code跟踪你的反馈。
下载 Visual Studio Code,并查阅文档。还有主要对ASP.NET和Node.js支持的文档。今天的Visual Studio Code只是一个预览版,但是它会发展很快。它会按星期,而不是月,自动更新。
这儿有一些 Visual Studio Code的截图,它很棒。无论您喜欢什么样的代码,无论您喜欢在什么样的平台上运行,您都可以使用它(顺便说说, 还支持Azure J)。


阅读愉快!
Xamarin.Forms - 编写一次,到处运行,而且是本机的?
[原文发表地址] Xamarin.Forms - Write Once, Run Everywhere, AND Be Native? [原文发表时间] 2014/05/28 
我在Nike工作的很多年,使用java编写了一个可以在四种平台上运行的订单管理应用程序。我们曾经经常开玩笑说:"编写一次,到处调试"。这是早期的java, 但现在的事实是,每一个窗体和控件都是"自绘的",这意味着一个按钮在所有的地方看起来都是一样的,因为它不是一个真实的按钮,当然这会因为操作系统而显示不一样。它只是一个按钮的图片。我们经常使用Spy++和不同的Windows检查程序来探索我们的应用程序,并且他们永远看不到一个java程序的控件。这意味着应用程序在任何地方都能工作的很好,而且总是看起来像是一个java应用程序。它们没有和底层平台整合。 使用MVVM(模型,视图,视图-模型)模式,以及在Windows Phone 8.1和windows 8.1上工作的通用应用程序技术,对于某些类型应用程序,代码共享最高可以达到90%。然而,即使一个简单的应用程序,针对每一个平台,你仍然得创建一个自定义的本机视图。大多数情况下,这是可取的,但是对于某些应用程序,它很让人厌烦的,很容易出错,而且很冗长。 Xamarin今天宣布了Xamarin.Forms,我认为它有效地 把本地控件抽象到一个更高级别的概念。过去,在我的眼里,这非常类似于我当年在java中写的代码-所有的都是以布局和流程背后的流利代码完成的。你创建一个控件树。 Xamarin.Forms是一个新的类库,对于iOS, Android和windows phone, 你都可以从一个单一的,共享的C# 代码库里生成本地的UIs。它提供了400多种跨平台的控件和布局,在运行时可以映射到本地控件,这意味着你的用户接口完全是本地的。 对于我来说,有趣的是这些"控件/概念"(我的术语)在一个很高的级别被编码,但却被当作本地对应的控件。所以在我 代码中的"选项卡"在移动设备上被描述为最具体的,并且是本地对应的控件,而不是我JAVA例子里的一个普通的选项卡控件。让我们看一个例子。 代码中的"选项卡"在移动设备上被描述为最具体的,并且是本地对应的控件,而不是我JAVA例子里的一个普通的选项卡控件。让我们看一个例子。 我的伙伴,James Montemagno,来自Xamarin,一个喜欢辣椒的人,在一个喝了咖啡的深夜,他把最终的跨平台的Hanselman的应用程序放在一起,来对我说明一些观点。这个小的应用程序是用C# 写的,可以运行在本地的Windows Phone,Android和iOS等系统中。它发表在我的博客和tweets上。 
这是视图之前切换的菜单: 和创建它的代码。为了明确起见,我已经简化了一点,但是想法全是MVVM:
这里有几个事情需要注意。看见 ListImageCell了吗? 它是 ImageCell的子类,这是个带有图片的 TextCell,并且可以给文本和图片设置数据绑定。普遍认为每种平台都有文本和图片,但是资源在每一个平台上是不一样的。这是为什么博客和twitter的图片是独一无二的对于各自的平台。概念是共享的,而且是本机实现的,并且看起来是本机的。 那是在UI方面,在逻辑方面,所有加载RSS feed 的代码和Tweets都是在3个平台上互相共享的。对于非阻塞式 I/O,它可以使用异步和等待,而且在twiiter的例子中,它使用了 LinqToTwitter作为一个PCL(便携式类库),这是非常酷的。对于RSS解析,它使用Ling to XML. private async Task ExecuteLoadItemsCommand() { if (IsBusy) return; IsBusy = true; try{ var httpClient = new HttpClient(); var feed = "https://feeds.hanselman.com/ScottHanselman"; var responseString = await httpClient.GetStringAsync(feed); FeedItems.Clear(); var items = await ParseFeed(responseString); foreach (var item in items) { FeedItems.Add(item); } } catch (Exception ex) { var page = new ContentPage(); var result = page.DisplayAlert ("Error", "Unable to load blog.", "OK", null); } IsBusy = false; }
| And ParseFeed: private async Task<List<FeedItem>> ParseFeed(string rss) { return await Task.Run(() => { var xdoc = XDocument.Parse(rss); var id = 0; return (from item in xdoc.Descendants("item") select new FeedItem { Title = (string)item.Element("title"), Description = (string)item.Element("description"), Link = (string)item.Element("link"), PublishDate = (string)item.Element("pubDate"), Category = (string)item.Element("category"), Id = id++ }).ToList(); }); }
| 再一次,共享所有。当到了 Windows Phone, Android, 和 iPhone列表输出数据的时候,在每一种平台上,它看起来都非常棒(读:本机的),它实际上没有做任何事情在具体的平台上。控件看起来是本机的,因为他们是本机的。 Xamarin.Forms 控件是本机控件的封装,它们本身不是一个新的控件。 
这里是 BlogView, Xamarin.Forms中像 ActivityIndicator一样的东西,它表现得像是一个本机的控件。 public BlogView () { BindingContext = new BlogFeedViewModel (); var refresh = new ToolbarItem { Command = ViewModel.LoadItemsCommand, Icon = "refresh.png", Name = "refresh", Priority = 0 }; ToolbarItems.Add (refresh); var stack = new StackLayout { Orientation = StackOrientation.Vertical, Padding = new Thickness(0, 8, 0, 8) }; var activity = new ActivityIndicator { Color = Helpers.Color.DarkBlue.ToFormsColor(), IsEnabled = true }; activity.SetBinding (ActivityIndicator.IsVisibleProperty, "IsBusy"); activity.SetBinding (ActivityIndicator.IsRunningProperty, "IsBusy"); stack.Children.Add (activity); var listView = new ListView (); listView.ItemsSource = ViewModel.FeedItems; var cell = new DataTemplate(typeof(ListTextCell)); cell.SetBinding (TextCell.TextProperty, "Title"); cell.SetBinding (TextCell.DetailProperty, "PublishDate"); cell.SetValue(TextCell.StyleProperty, TextCellStyle.Vertical); listView.ItemTapped += (sender, args) => { if(listView.SelectedItem == null) return; this.Navigation.PushAsync(new BlogDetailsView(listView.SelectedItem as FeedItem)); listView.SelectedItem = null; }; listView.ItemTemplate = cell; stack.Children.Add (listView); Content = stack; }
Xamarin Forms是一个非常灵敏的解决方案,有人可能会说,是优雅的,对于编写一次,到处运行,并且不会有麻烦。好的是当你想要关注底层的时候,你可以关心底层平台,当你不想关注的时候,就可以忽略它。一个隐藏了本机平台的解决方案不是本机,是吗?这将是一共同标准最低的解决方案。这个出现是为了隐藏跨平台和多设备程序的冗长和重复。 
|
在https://xamarin.com/forms和样本代码 ,还有更多的关于 Xamarin and Xamarin Forms信息。同时你可以在https://github.com/jamesmontemagno/Hanselman.Forms上查看 Hanselman 应用程序的代码。
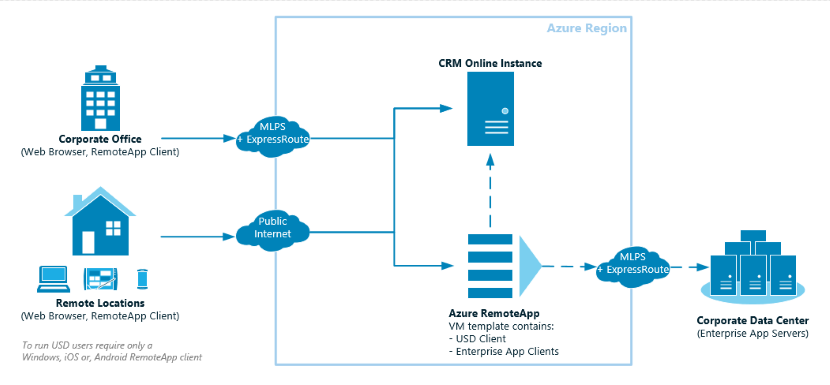
Add Flexibility to a Unified Service Desk Deployment with Azure RemoteApp
USD client-side dependencies and deployment management complexities represent some of the largest barriers to adoption. Extra latency between CRM Online and the USD client can also degrade performance.
This post describes how the combination of USD and Azure RemoteApp can address these issues without large upfront costs by:
- Reducing administrators workload. USD installation is limited to a single VM image (not every desktop).
- Providing users on-demand capability to run controlled instances of USD.
- Enabling users to run USD on any Windows, Android or iOS device via the RemoteApp client (granted, a phone is not a particularly effective form factor for USD) .
- Providing application virtualisation/hosting as-a-service. Dedicated servers or administrators of RDS environments aren't required. The instances can scale with the workforce.
- Pairing this model with Azure ExpressRoute gives the USD instance fast, secure access to the Enterprise App back end servers.
The diagram below illustrates a conceptual design for how this would fit together:
Publishing a USD instance on RemoteApp
There are four high level steps in the process:
- Preparing a VM Image
- Creating a RemoteApp Collection
- Publishing the USD to the collection
- Running USD from a client (I tested with Windows and iOS)
Prerequisites
The rest of the instructions assume that you have already sorted out the following dependencies:
Step 1: Preparing a RemoteApp Compatible VM Image
The basic requirement for an image is that it run Windows Server 2012 R2 and have the Remote Desktop Session Host (RDSH) role installed (more detail here). This goal can be achieved by creating an image from scratch or configuring an image from the Azure gallery.
Provision a VM Instance to use as Template
We are going to take the latter approach and perform the following steps
1. Log in to the new Azure portal (https://ms.portal.azure.com).
2. Browse the VM gallery and create a new VM Instance based on the "Windows Server Remote Desktop Session Host with Microsoft Office 365 ProPlus" template. Make sure you set the Select a deployment model dropdown to Classic. This is because at time of writing RemoteApp cannot import a template created on the Resource Manager model

Setup Software on Template VM Instance
1. Once the VM Instance is provisioned, Connect to the VM via Remote Desktop by using the Connect button in the portal
2. Now it's time to install software, first install the USD client. You can download the client from here: https://www.microsoft.com/en-us/download/details.aspx?id=50355
I installed the 64 bit client "CRM2016-USD-2.1.0-amd64.exe" . If you would like to run any other client applications on USD, this is the time to install it.
3. Test the USD client, enter in connection details (as per below for a CRM Online trial) .
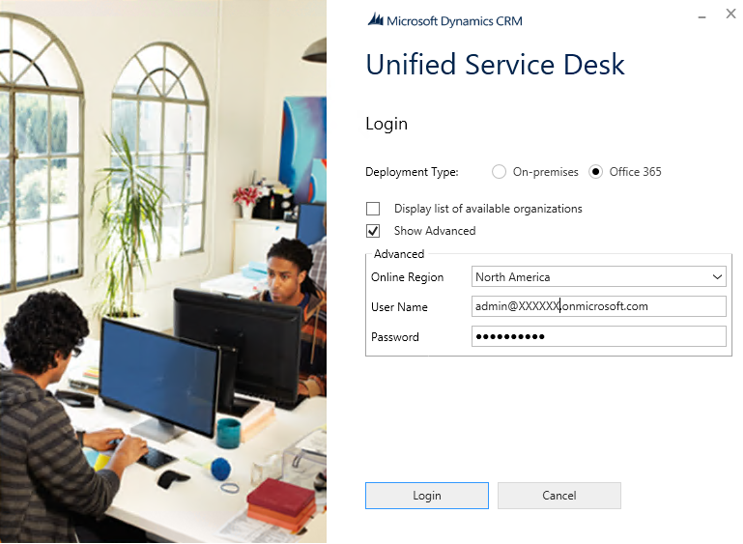
If you get issues with IE launching "event" pop ups refer to this blog post for a workaround
Prepare and Capture the VM Instance to your Local Gallery
Once all the software is setup, it's time to capture it in your gallery so RemoteApp can use it.
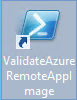
1. The first step is to validate the instance will be compatible. There is a ValidateAzureRemoteAppImage powershell script on the desktop which performs the required checks. Click the shortcut to run the script.
2. If all is well, you should receive the message "The current image satisfies all the requirements for Azure RemoteApp Template image."
3. You are then prompted to run Sysprep to capture the image. Click "Y". The result should look like this:
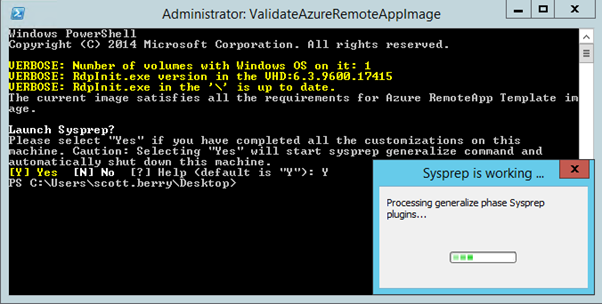
Note: once the VM has been sysprep'd, you wont be able to log back in to it. You will have to create new instances based on the template and repeat the process on that instance.
4. Once Sysprep is finished, the VM will be shutdown in a state ready to be captured. From the Azure portal, click the Capture option.
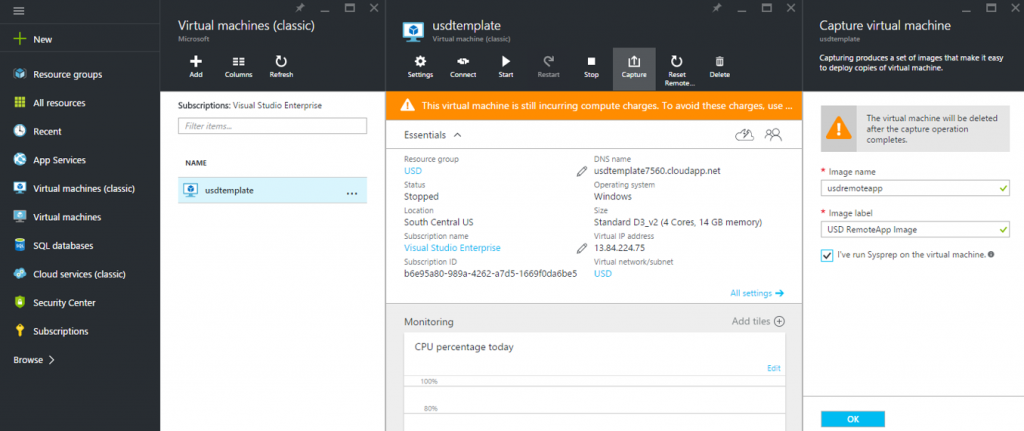
Be prepared to wait a while for this to complete.
Step 2: Creating an Azure RemoteApp Collection
Now that we have a RemoteApp compatible image containing USD in our gallery, we can create a RemoteApp Collection. This is a collection of applications installed on a template which are ready to be published. The following instructions are suitable for trialing. Setting up Hybrid RemoteApp connecting to on-prem infrastrcture has extra considerations, the RemoteApp documentation is a good place to start.
1. Log in to the legacy Azure Portal (https://manage.windowsazure.com). At time of writing RemoteApp is only available in the legacy Azure Portal (Note: If you are in the new portal and attempt to create a RemoteApp instance, it will redirect you to the new portal anyway).''
2. In the Azure Portal footer menu Click NEW --> APP SERVICES --> REMOTEAPP --> CREATE WITH VNET
3. Enter in a NAME.
4. Select a Basic PLAN.
5. Set JOIN LOCAL DOMAIN to NO 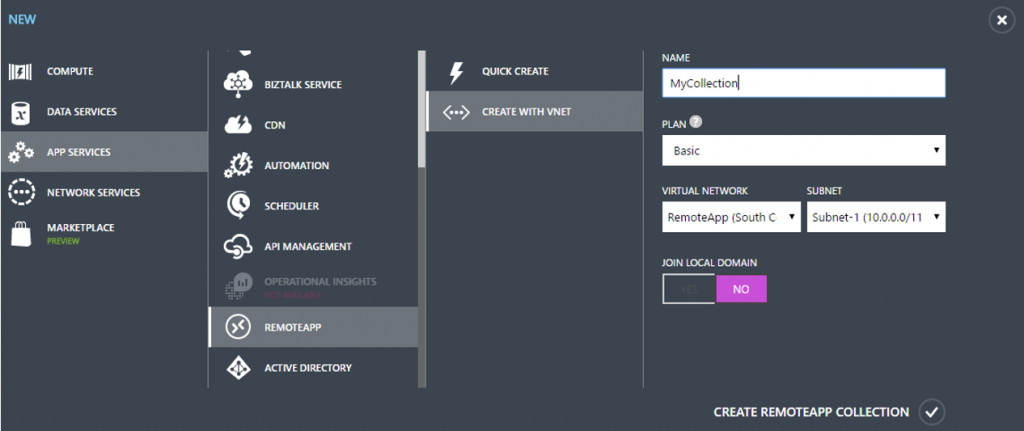
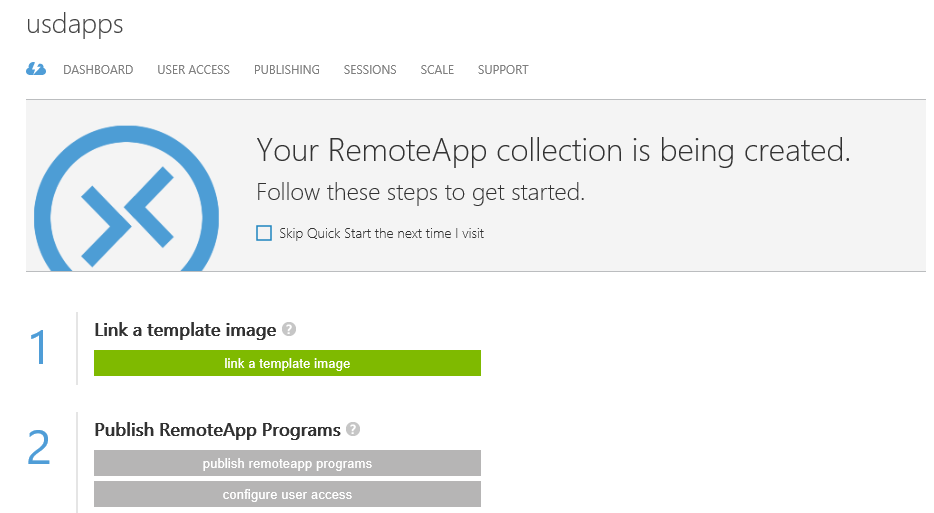
The new collection will appear in the list

6. Double click the collection to open it's configuration screen.
7. The link a template image button will be highlighted in green, click it
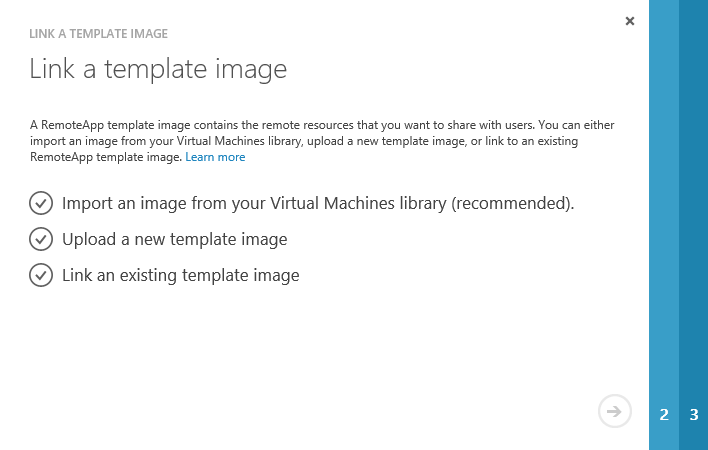
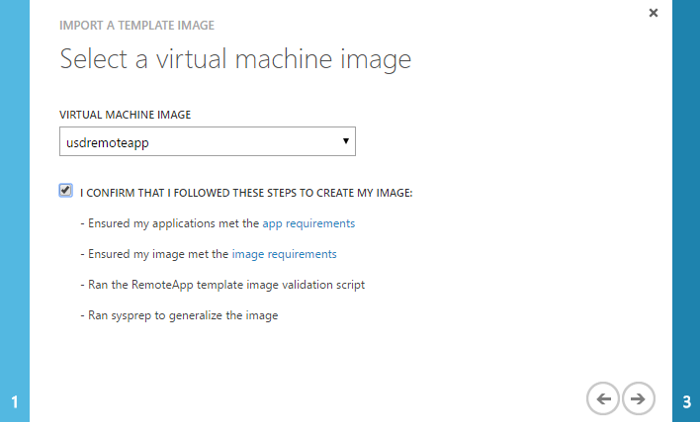
8. This will start the link template dialog. On Step 1 click the Import and image from you Virtual Machines library (recommended) option.
9. On step 2, in the VIRTUAL MACHINE IMAGE dropdown, select the remoteapp vm image you created earlier. If it doesn't appear in the list, you may have to reload (F5). Check the I CONFIRM ... checkbox and click next.
You will now need to wait for the template to be prepared and the RemoteApp Collecton to be provisioned. This can take up to an hour. You can click on the REMOTEAPPS COLLECTIONS and TEMPLATE IMAGES tabs of the Azure RemoteApp admin screen to check progress.
Step 3: Publishing Universal Service Desk
Now we have a collection ready, time to publish the USD client ready for users.
1. Open the RemoteApp Collection
2. Navigate to the PUBLISHING tab
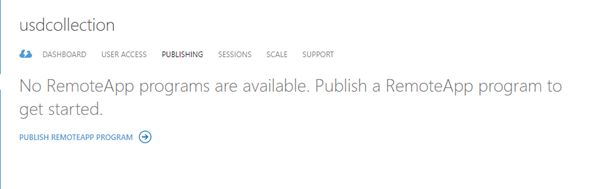
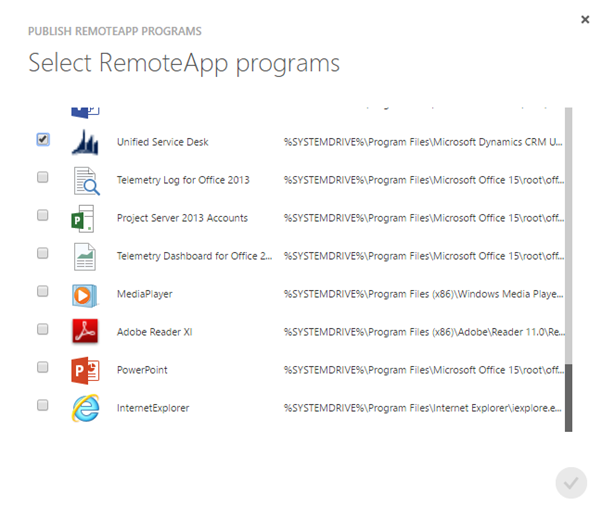
3. The PUBLISH PROGRAMS dialog will appear. Check Universal Service Desk ( and any other app you wish to publish). and Click Next.
Step 4: Running USD from a Remote Client
In this example, I'm going to use the windows client. All clients are available from https://www.remoteapp.windowsazure.com.
1. Once it is installed on your PC, run the Azure RemoteApp client. Click Get Started.
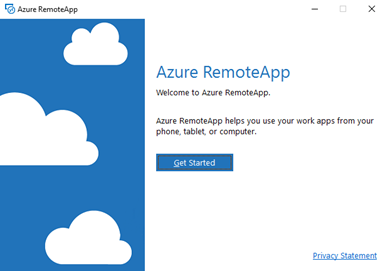
2. Click Unified Service Desk...
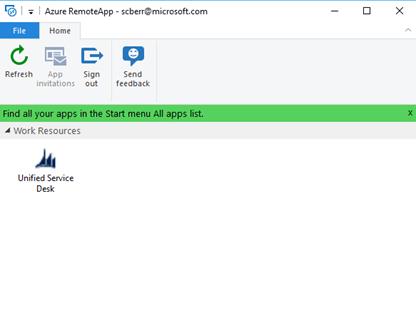
.. and it will start. Note that it is executing remotely in Azure not on your local machine.
Closing Thoughts
As mentioned in the introduction, this model provides a range of additional deployment and management scenarios. Maintaining a single hardware/OS footprint (i.e. the RemoteApp Collection) means simpler administration and deployment compared to supporting a fleet of differing OS/Hardware combinations, even when they share a SOE. It enables cloud scalability not possible on-premise, it eliminates the maintenance of a Remote Desktop Services application layer (which is still required in an IAAS cloud scenario).
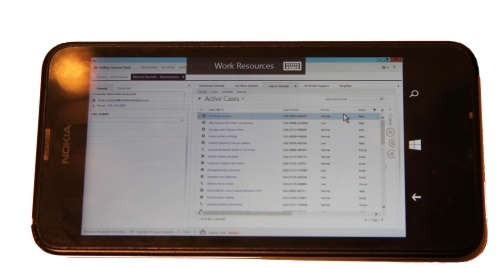
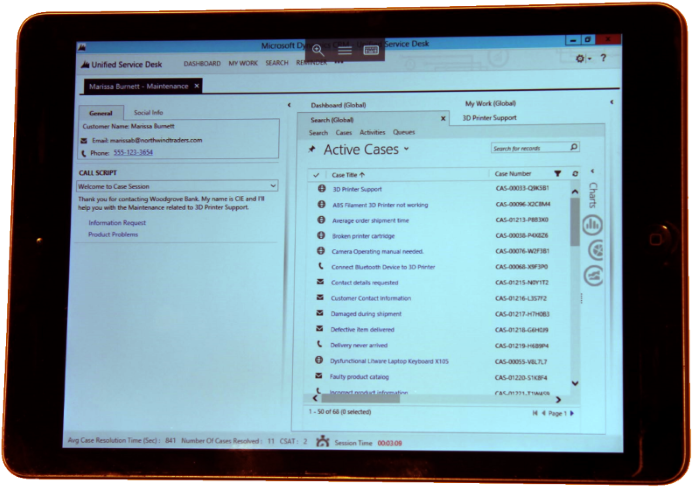
While a desktop form factor is the most practical, remote applications can be consumed from a variety of form factors and OS types. Here are some examples of USD running on a windows phone...
and an iPad...
Choosing The Right Device For The Right Person.
Persona is not a word I would normally use when having the headset discussion with a customer. However, a recent conversation with Julie Jass and Laura Neidel from Plantronics has enlightened me to why this is such an important topic to consider. And, why it is important to highlight in a detailed blog such as this why you should consider personas in your planning.
As you read that last paragraph, the thought may have occurred to you that not everyone will use the same headset, so why would the company purchase so many of the same kind. We don't need to justify the reason other than say it may have been easier, a purchasing agent made the final decision, or ultimately no one thought to stand back and analyze what people really wanted.
That was then. Nowadays headset models, features, colors, etc. come in many flavors and are nearly as numerous as the devices they connect to. In many cases, people have more than one headset to use based on what they are doing. For example, I have a Digital Enhanced Cordless Technologies (DECT) headset to use when I am in calls that don't require interaction. This headset provides a hi-fidelity connection and a long enough reception range for me to roam my house and yard. The range is simply amazing. However, if I am out and about I wear my over the ear Bluetooth device. When back in my company office I may choose to use the speaker phone device or an Active Noise Cancelling (ANC) Headset if the office becomes noisy.
It would be easy to say that each use case should be the deciding factor when purchasing headsets, but if that were true, each user would require more than one type. Most organizations are not going to purchase multiple devices for each individual.
This is where personas enter into the conversation. The word "persona," has many definitions. In the realm of Intelligent Communications however, it can be loosely defined as "The intersection of Job Function and Usage Profile." In more basic terms, what does each user do (job function) and how do they communicate (usage profile). The Microsoft Skype Operations Framework or SOF (now rebranded as MyAdvisor), identifies eight personas and includes a Persona Workshop to help companies group their employees by persona. Together these personas make up 90% of a company's workforce.
Based on research by UniComm Consulting, SOF defines the following eight personas for unified communications users:
Collaboration (On-Premises Mobile)
Field (Cell & Wi-Fi Mobile)
Retail (On-Premises Mobile)
Info Processing (Desk)
Production (On-Premises Mobile)
Administration (Desk, On-Premises Mobile)
Executives / Mgt. (Mobile On-Premises & Field)
While it is not my intention to take you walk through each step of a Persona workshop here, I will provide a brief explanation of each persona. Using the Microsoft SOF (MyAdvisor) resources, I will also provide a recommendation for the style of device each persona should use. You will find links to each device by hovering over the device.
Collaboration (On-Premises Mobile)
Definition: Mobile onsite at corporate office, but rarely at their desk
Audio Device Recommendations:
Bluetooth headset with noise cancellation for audio calls which can pair to PC, smartphone, and tablet

USB 'hockey puck' for impromptu conference calls and audio calls

Field (Cell & Wi-Fi Mobile)
Definition: Predominantly work outside of the office or organizational location
Audio Device Recommendations:
Bluetooth headset with noise cancellation for audio calls which can pair to PC, smartphone, and tablet
Definition:
100% connected to voice communications on the corporate network dedicated to inbound or outbound queues
Almost always working from a wired desk, whether office or home
Audio Device Recommendations:
Noise cancelling device
Hands-free devices: Headset that connects to phone or PC via USB to PC
Retail (On-Premises Mobile)
Definition:
Primary job is serving customers on premise with no assigned workspace, PC, or phone
Communication is on retail floor
Audio Device Recommendations:
Common area phone for general use
Potential use for kiosk device with audio/video

Info Processing (Desk)
Definition:
Operational role to process transactions for core business via defined workflows (CRM, ERP, etc)
Communication is at their desk (office, home, off-shore)
Audio Device Recommendations:
Basic single-line or multi-line phone
If phone not needed on desk, basic USB headset or Bluetooth/DECT headset with noise cancellation if in noisy environment

Production (On-Premises Mobile)
Definition:
Stream of activities to produce organization's products or services (many have physical aspect)
Few have an assigned desk, most are mobile within premises, some are mobile in a territory
Audio Device Recommendations:
Basic single-line or multi-line phone common area phone for general use
Bluetooth or DECT headsets to use with mobile devices
Administration (Desk, On-Premises Mobile)
Definition:
Provides organizational and functional support including Managers, Execs, Key Staff
Generally works in the corporate office
Audio Device Recommendations:
Multi-line desk phone
Bluetooth / DECT Headset for PC VoIP application & mobile phone
Executives / Mgt. (Mobile On-Premises & Field)
Definition:
Reviews and directs work of others with significant time in horizontal communication
Location of work takes place in the office, remote, and externally with customers
Audio Device Recommendations:
Multi-line desk phone
Bluetooth/ DECT Headset for PC VoIP application & mobile phone
Executive conference room device
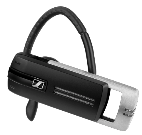
Jabra: Choose the right Headset Plantronics: Choose the Right Headset Sennheiser: Choose the Right Headset
Back to the top level page.
30 invaluable integrations that you should be using with Microsoft Teams (RE-BLOG)
Back to the top level page
Hello my faithful followers. I have again stumbled upon a great blog post that I wanted to share with you. If this is the first of my blogs that you are reading, I do sometimes reblog posts that I find. The reason for this is that none of us can follow everyone, so by reposting, I can share what I have found with you as it may not be "on your radar" so to speak.
The post itself comes from Penthara (https://www.penthara.com). They are a Microsoft Silver Partner based in India.
I have been given permission to repost their blog. I will both do that and give you the link.
It should be know that we do have more than the 30 addin APPs listed here.
Here are some helpful links and information on Teams:
The Complete list of Apps for Teams Microsoft Teams Official Microsoft Teams Blog The Microsoft Teams developer platform
Happy Reading
Scott
https://www.penthara.com/blog/30-invaluable-integrations-that-you-should-be-using-with-microsoft-teams/
30 invaluable integrations that you should be using with Microsoft Team
Microsoft Teams is the modern day chat service offering within the Office 365 collaboration portfolio. It is customizable in many different ways your teams work today. It also includes publicly available APIs and bot frameworks for further extensibility.We just wanted a very simple of list third party integrations available in Microsoft Teams. Turns out this does not exist on the web right now.
This post was last updated on June 28th 2017. We will keep this updated as new integration options become available.
Watch the Microsoft Teams Video
Here is the list:
| Add-In | Description | URL |
![]() Excel Excel | Add any Excel spreadsheet to a tab so your team can get to it quickly and easily. | https://products.office.com/excel |
![]() PowerPoint PowerPoint | Add any PowerPoint presentation to a tab so your team can get to it quickly and easily. | https://products.office.com/powerpoint |
![]() Planner Planner | Planner makes it easy for your team to stay organized, assign tasks, and keep track of your progress. Create a new plan so you can start getting things done. | https://tasks.office.com |
![]() Word Word | Add any Word doc to a tab so your team can get to it quickly and easily. | https://products.office.com/word |
![]() OneNote OneNote | Capture and share ideas, to-do lists and other thoughts with your team. You can also co-author anytime. | https://www.onenote.com |
![]() SharePoint SharePoint | Connect to a SharePoint document library. | https://products.office.com/sharepoint |
![]() Trello Trello | Trello lets your team work more collaboratively and get more done. Trello's boards, lists, and cards enable you to organize and prioritize your projects in a fun, flexible and rewarding way. | https://trello.com |
![]() YouTube YouTube | Share a YouTube video with other members of the channel. Simply search for the video you want or paste its URL. | https://www.youtube.com |
![]() Wrike Wrike | Wrike enables every type of team to accomplish more, at scale. Create, access, and update all your projects and collaborate more effectively by quickly connecting chats in Teams with tasks. | https://www.wrike.com/apps/chat-messaging/microsoft-teams |
![]() Hootsuite Hootsuite | Save time by managing all of your social media marketing efforts from a single dashboard. With Hootsuite's platform, you get the tools to manage all your social profiles and automatically find and schedule effective social content. | https://hootsuite.com |
![]() Smartsheet Smartsheet | Add a Sheet, Sight, or Report from Smartsheet to turn conversations into action. | https://www.smartsheet.com/microsoft-teams |
![]() Power BI Power BI | Add a Power BI report to your channel. You can even add multiple reports to the same tab. | https://powerbi.microsoft.com |
![]() PDF PDF | Add any PDF within your team to a tab so everyone can get to it easily. | https://office.microsoft.com |
![]() Stream Stream | Share a video from Microsoft Stream or Office 365 Video, or a channel from Microsoft Stream by pasting a link into the text box. | https://web.microsoftstream.com/ |
![]() Website Website | The website tab lets you pin a secure website at the top of a channel or conversation so everyone has easy access to important sites. | Your website URL |
![]() Visual Studio Visual Studio | Add a Visual Studio Team Services board to a tab so your team can track and monitor work together. | https://www.visualstudio.com/team-services |
![]() Polyscribe Polyscribe | Run more productive meetings. Polyscribe makes it easy to share, structure and collaborate on meeting notes with your team. | https://www.polyscribe.io |
![]() Intercom Intercom | See your Intercom data in Microsoft Teams. | https://docs.intercom.com/integrations/microsoft-teams-integration |
![]() Polly Polly | Poll your team with Polly! Mention @polly to get started. Analyze results by adding the Polly tab to your channels. | https://www.polly.ai |
![]() Zendesk Zendesk | Display a Zendesk Support ticket view and collaborate on tickets inside Microsoft Teams. | https://www.zendesk.com/microsoft-teams |
![]() Asana Asana | Asana helps you clarify who's doing what by when. Assign tasks and due dates to stay accountable to each other. | https://asana.com/apps/microsoft |
![]() Zenefits Zenefits | View your Zenefits org chart within Microsoft Teams. | https://www.zenefits.com |
![]() Sapho Sapho | Sapho makes it easy for employees to use Microsoft Teams to work with internal applications and databases, as well as cloud applications. Employees will be able to receive relevant cards with data and perform actions like approvals right from MS Teams. | https://www.sapho.com/microsoft-teams/ |
![]() Wiki Wiki | Open a Wiki tab so you can collaborate quickly and easily. Draft documents, track notes, share ideas, edit, and chat all in one place. | https://aka.ms/TeamsWikiOneNoteHelp |
![]() Empsense Empsense | Empsense your team right here | https://empsense.ramco.com |
![]() PowerApps PowerApps | Help your team work smarter by creating apps that connect to the services and data they use most. Add those apps to your channel so your team can quickly find them. | https://powerapps.microsoft.com |
![]() Dropbox Dropbox | Dropbox is a simple way to store and share your files. | https://www.dropbox.com |
![]() Box Box | Box is a secure content management and collaboration platform helping teams and organizations easily share, manage, and collaborate on their most important information. | https://www.box.com |
![]() ShareFile ShareFile | Citrix ShareFile helps people exchange files easily, securely, and professionally. | https://www.sharefile.com |
![]() Google Drive Google Drive | Get access to files anywhere through secure cloud storage and file backup for your photos, videos, files and more with Google Drive. | https://drive.google.com |
That's all folks. Let us know if you have any questions regarding Microsoft Teams for us.
To learn more about what Microsoft Teams has to offer please click on the link here: https://www.successwithteams.com
Back to the top level page
Active Noise Cancellation (Control)
Back to the top level page.
Active noise control (ANC), also known as active noise cancellation, or active noise reduction (ANR), is a method for reducing unwanted sound by the addition of a second sound specifically designed to cancel the first. (source – Wikipedia)
Active Noise Cancellation (ANC) is a rather new topic in the realm of Intelligent Communications Headsets, though it has been around for years in the Airline industry. We have all heard of noise cancelling microphones - which filter out noise from the room and focus solely on your voice, but that is on the "transmitting" side, ANC attempts to reduce the noise that makes it to your ears through the headset or the "receiving" side.
Picture this: You are on an airplane and wish to listen to music, a movie or podcast. You take out your earbuds and put them on to listen to your media. No matter how hard you try and no matter what volume, the noise of the plane seems to dominate the sounds making it to your ears. You can hear the people next to you talking and the person behind you snoring. These noises add up to a poor listening experience.
It's similar if you're in a busy office environment. Say you have to be on a conference call, but there are no quiet rooms available. You decide to sit in your cubicle or work station, and put on your Microsoft Qualified Headset and you think you're good to go. Unfortunately, the person in the next cubicle is on a call as well, and you hear all of it – it's quite distracting.
Standard earbuds and headsets provide a small amount of noise cancellation. This comes in the form of Passive Noise Cancellation (PNC). The simple physical attributes of the headset or earbud provide this. They do not have an active transmitter within them cancelling out the noise around you. This is where ANC comes in.
As was mentioned earlier, noise cancellation happens in 2 places. The microphone and the earpiece - or speaker (headset). For the purpose of this blog post, we will call what happens at the microphone "Noise Cancellation (NC)" and what happens at the ear piece "Active Noise Cancellation (ANC)."
To accomplish NC, the device must have at least 2 microphones built into it. One to pick up your voice and one facing away from you to pick up noise in the room. In this case, the cancellation will come from either active or passive circuitry that removes the noise picked up from the secondary microphone and subtracts it from that of the primary microphone.
ANC for headsets works the same way, with a couple of exceptions: 1) There is no primary microphone to remove sound from, and 2) ANC is always an Active technology. As I stated earlier, all headsets provide some PNC through the physical attributes of the device. Earbuds form an acoustical seal in the ear canal that help reduce the amount of external sound. Over the ear duo headsets do not provide as much passive noise cancellation but do cover more of the ear itself. Full over the ear headsets like those worn by pilots or ground personnel at the airport provide a greater form of PNC because they are typically foam filled, have hard cases and form a seal around the ear thus restricting the amount of sound that make it to the ear itself. This over-the-ear form factor combines PNC and ANC giving you the greatest amount of NC when it comes to ANC headsets. Companies like Jabra, Plantronics and Sennheiser each make a form of ANC headset of the style that was just described. But before I get you the links to them, I want to dive into the science behind ANC so that you can make the best decision when purchasing an ANC headset for use in your Intelligent Communications environment. However, the topics I speak of do carry over into personal ANC headsets as well. For example, Bose makes a number of headsets for listening to music and for the airline industry, CrazedPilot.com has a number of ANC headsets as well.
When measuring a device's ANC ability, the amount of sound removed is typically measured in dB or decibels. Wikipedia.com defines a decibel as "a logarithmic unit used to express the ratio of one value of a physical property to another, and may be used to express a change in value (e.g., +1 dB or -1 dB) or an absolute value." Typically, 3dB of cancellation is equal to that of one half the sound level. Therefore, if you turn up the stereo in your car to a level that sounds about twice as loud, you have increased the sound by 3dB. Similarly, if you turn the sound down to what seems to be half as loud, you have reduced the sound 3dB. So, while a dB can be an absolute measurement, it is also the delta between 2 measurements. This latter definition is how we measure ANC. It deals with how much sound is reduced at each frequency.
The human ear can generally hear frequencies from 20Hz to 20Khz as depicted by the graph below. Speakers therefore are designed to reproduce sound at these frequencies. Figure 1 depicts a common speaker frequency response range.
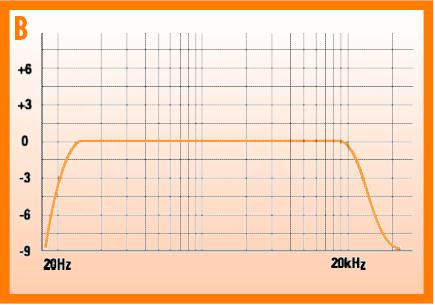
Figure 1: Courtesy of Ecoustics.com
While speakers reproduce sound, ANC subsequently tries to produce sound exactly opposite or 180 degrees out of phase, as depicted in Figure 2. So, if you think about it, the ANC headset you are wearing is an audio amplifier as well. This constitutes the "active" portion.

Figure 2: Courtesy of Cosmosmagazine.com
Companies that produce ANC technology will refer to the level of Active Noise Cancellation in dB, therefore the larger the dB the more noise cancellation you can expect. There is one little caveat to their declaration. They will typically give you the highest dB of cancellation they provide but not tell you at which frequency that cancellation happens. In a perfect world, noise cancellation would happen evenly across the audio spectrum. However, ANC in headsets have a cancellation pattern that generally gives greater amount of cancellation at lower frequencies.
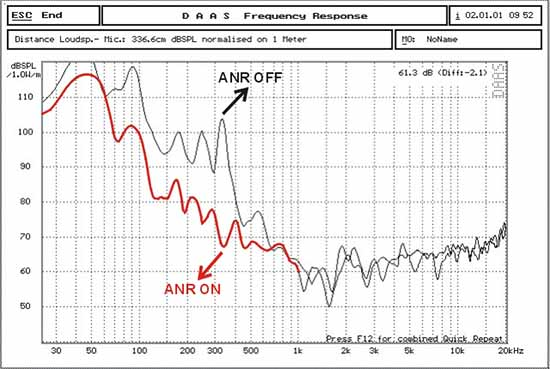
Figure 3: Courtesy of Crazedpilot.com
The graph in figure 3 shows the type of frequency response that ANC headsets give. The red line shows the level of sound at those frequencies with ANR/ANC active. While the actual noise level is not important, the delta between the black and red lines is. The arrows in this graph reference the 350Hz range. If we follow the horizontal axis it is at that frequency that we see the greatest delta, or difference between the sound with ANR on and ANR off. In this case it looks as if the black line is about 103 dBSPL and the red line is about 67 dbSPL thus giving us an ANC of 103-67=36 dB of cancellation.
Now what does all this technical jargon mean to us? Well, let's think back to our example of the plane. The normal rumble of a plane comes in the form of lower frequencies. Therefore, if you put on and ANC headset during the flight, you would notice a considerable reduction in the "plane noise." In an office environment, sounds like that of the heating and air conditioning as well as the normal rumble of office will be considerably muted.
For Intelligent Communications headsets with ANC, check out these links.
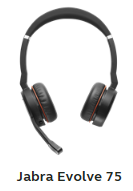
Jabra's Evolve 75 and Evolve 80 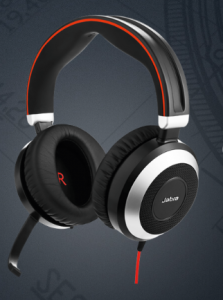
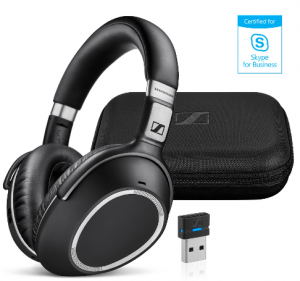
Plantronics Voyager 8200 and Voyager Focus 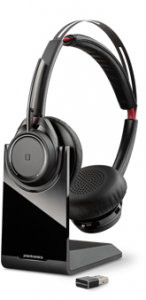
Sennheiser MB-660-UC-MS
Back to the top level page.
An introduction to Microsoft Qualified Intelligent Communication Devices
Back to the top level page.
As a Voice Technical Solutions Professional at Microsoft I have a passion for Skype for Business and Microsoft Teams. More specifically, the devices that connect to these wonderful services. Over the next few months, I will present my thoughts, relevant links, quotes, and information on the devices that connect to Skype for Business (SFB) Server, Skype for Business Online (SFBO) and Microsoft Teams.
When you think of Intelligent Communications (formally called Unified Communications), you may think of your favorite Instant Messaging app, or something your employer forces you to use. Whatever your collaboration program of choice, the audio/video component will most likely require some sort of device to make that portion work.
Many of us will unknowingly grab the first set of ear buds or cheap headset that we have laying around. The drawback to doing this is the potential for what we in the industry call a poor user experience. A Microsoft Qualified device should always be used to help ensure the user has a great experience. This does not guarantee a great user experience because there are many other factors that must also be accounted for, such as network performance. By using the proper headset, one more variable is removed when troubleshooting.
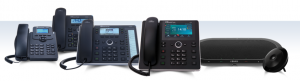
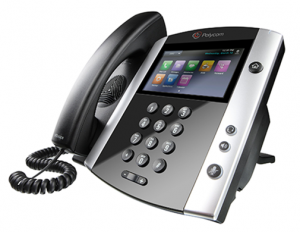
Qualified devices have passed a set of rigorous tests defined by Microsoft to ensure they meet the high standards for compatibility. Microsoft has an extensive qualification process outlined here. There are multiple Microsoft Partners who manufacture VoIP Phones and Headsets qualified under this program. A complete list is located here. The list includes phones, headsets, speakerphones, etc. from partners such as Audio Codes, Jabra, Plantronics, Polycom, Sennheiser, and Yealink .
Below is information on several categories of devices and examples:
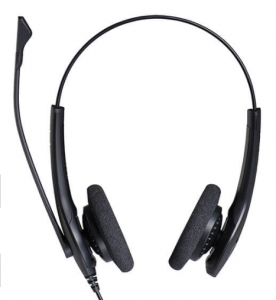
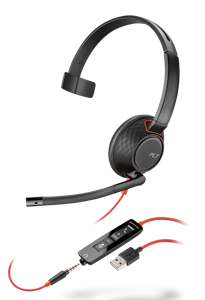
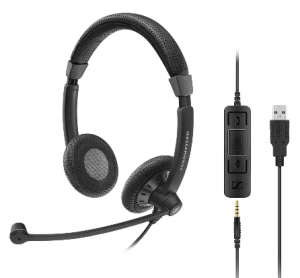
- Headsets come in two categories: Wired and Wireless. Wired headsets connect using a USB or 3.5 mm audio jack and the wireless utilize Bluetooth and Digital Enhanced Cordless Technologies or DECT. Presently, these devices come in one of several form factors: Speakerphone, Monaural (single earpiece), Duo (dual earpiece), and Over the Ear (OTE).
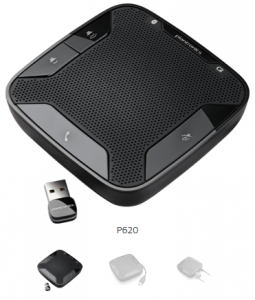
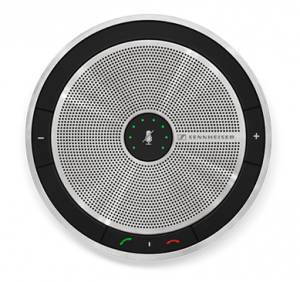
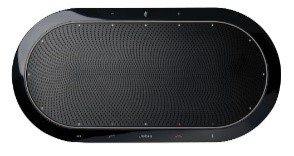
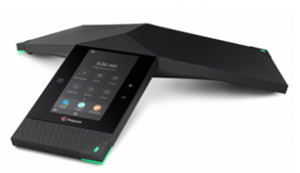
- Examples of speakerphone devices include the Jabra 710 series, Plantronics Calisto 600 Series, Polycom VoxBox, and the Sennheiser SP series. It should be noted that these speaker phone options are designed for individual use or small conference rooms. Each of the headset manufacturers also make board room level speaker phones as well. We will cover those in a later series. Examples of these speakerphone devices are below with a link to the manufacturer's website for additional information.
"The headset, speakerphone, and VoIP desk phone choices are vast and finding the right one generally comes down to comfort, user preference and price" according to Ted Estwan of Novus LLC, a Microsoft Gold Partner specializing in endpoint devices. Each of these manufacturers also have management software for use in deployment and monitoring or metrics. Additional information about management capabilities of each manufacturer is in this blog.
As I previously stated, this is the first of many blogs I am beginning to publish about a topic I am deeply passionate about. My goal is to highlight topics, questions, and other tips and suggestions I hear and often suggest to my customers. If you have a topic you would like to know more about, please leave a comment in the space below.
Back to the top level page.
Managing multiple devices at home and while you travel.
Back to the top level page.
If you are a mobile employee like myself, then you most likely have a static setup on your desk at home and a different setup when you travel. You might have multiple monitors, an external keyboard (wired or wireless), mouse (wired or wireless), webcam, headset, speakers and maybe even a port replicator or docking station to tie it all together. Keeping a familiar setup while traveling can be a bit of a challenge. For me staying productive means having a familiar setup so that I may continue to work in a manner I am used to. This blog will offer some practical suggestions as to how to keep a familiar setup for when you travel.
I will break these down by category:
Monitors Keyboards Mouse/trackball Webcam Headset Speakers Port replicator/docking station
My home office looks like this:
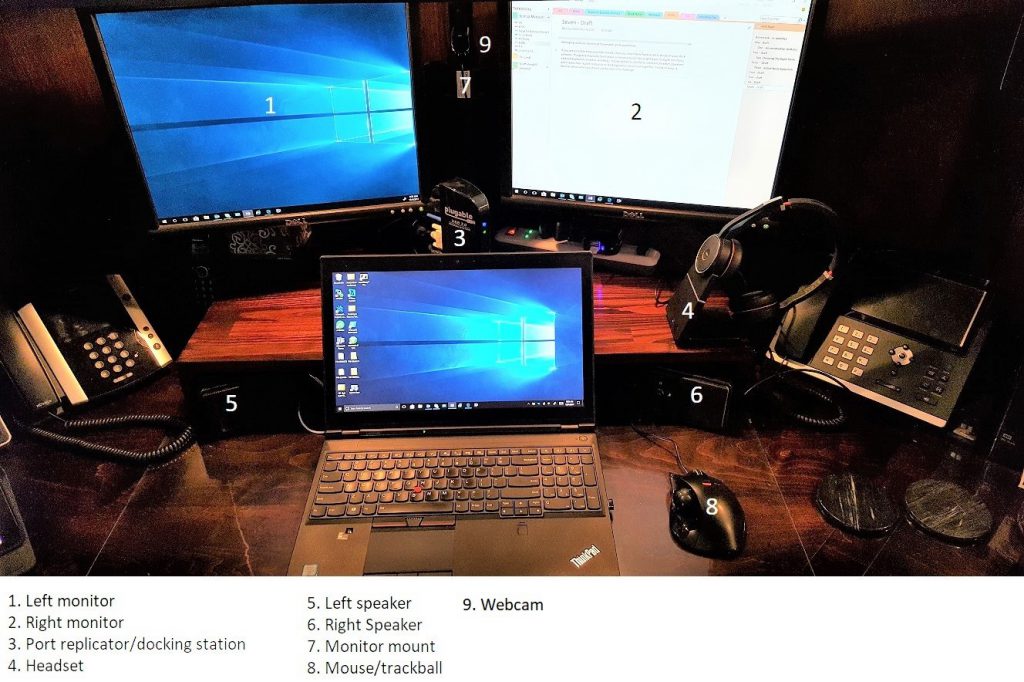
As you can see I have each of the devices I mentioned above. I will go into each as well as provide guidance on its mobile counterpart.
Here is my typical mobile setup:
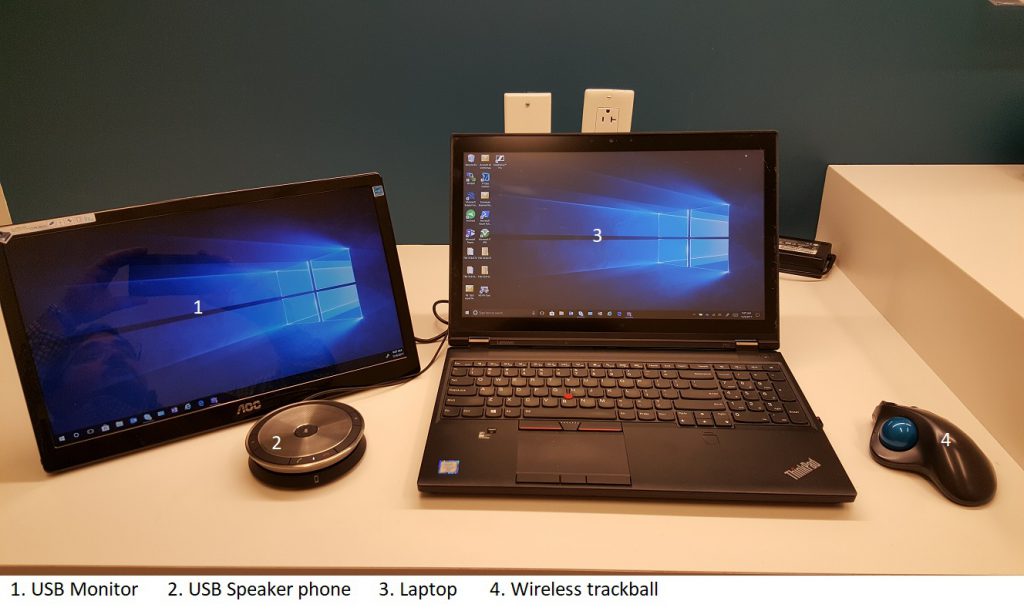
While traveling, I bring as few items as I can without sacrificing functionality. The integrated webcam, speakers, and multiple usb ports allow me to have the same functionality as my home office.
Monitors:
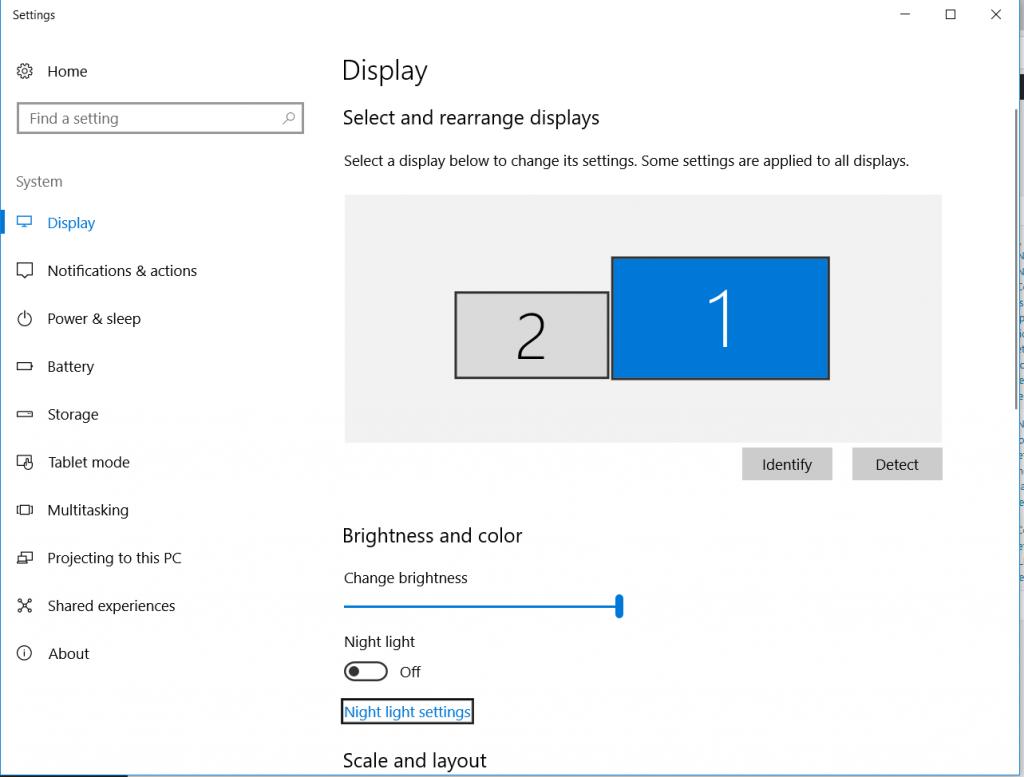
I have 2 DELL 1905FP monitors, they are 19 inch monitors on a single pole dual arm mount. This setup works well and I have it configured in a "T" pattern using the windows desktop multiple monitor feature. By pressing and holding the "windows key" and the letter "p", you will invoke a sidebar that will allow you to select the monitor configuration you desire.
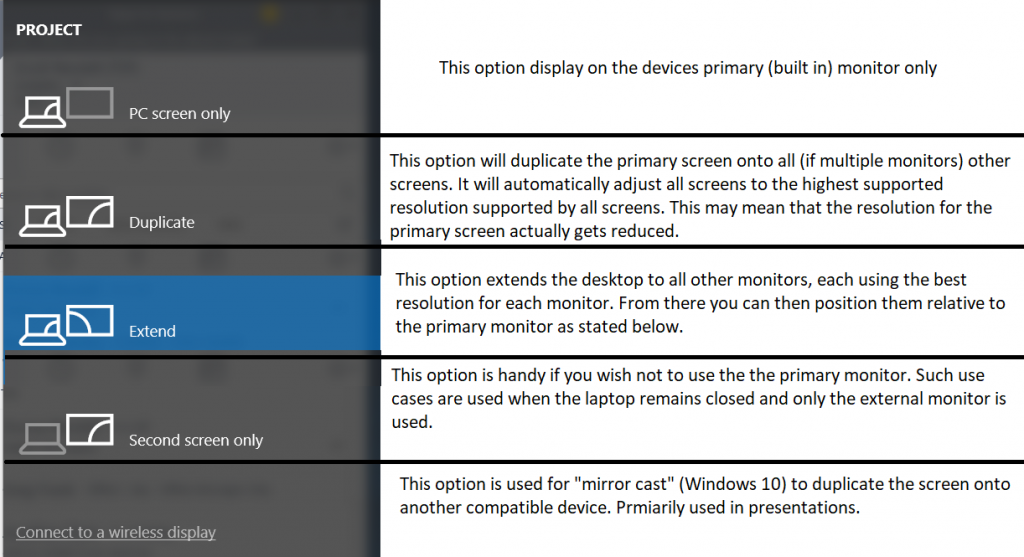
By selecting the "Extend" option, Windows will automatically enable your external monitor(s) with another desktop. You will need to then position them in reference to your primary display.
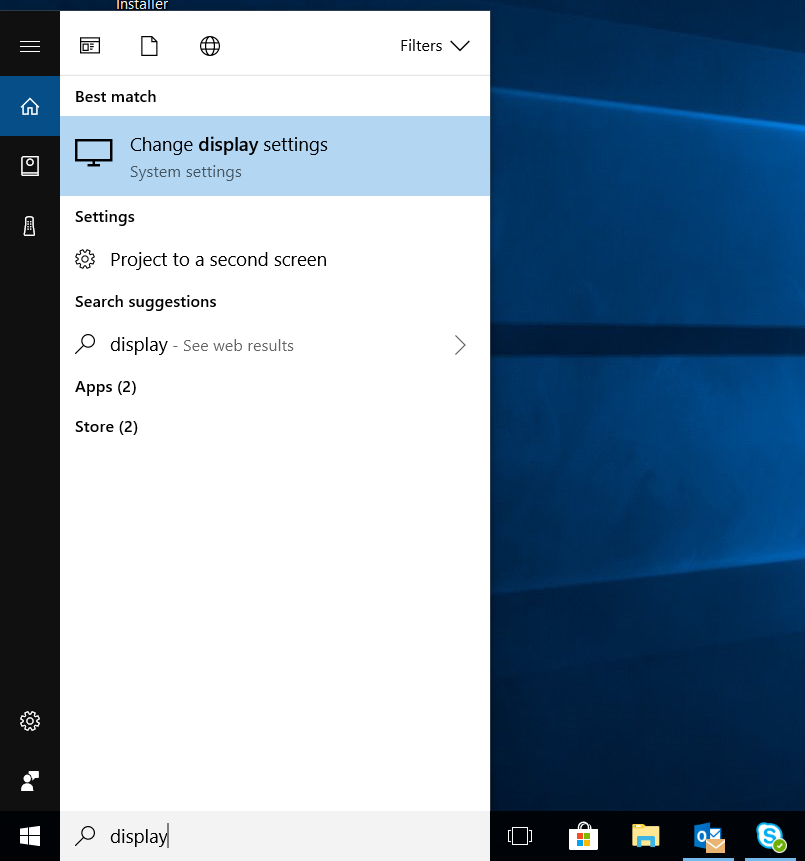
To view this configuration, type "display" in the windows search bar located at the bottom right hand of your primary screen, or right click an open area on your desktop and select display settings.
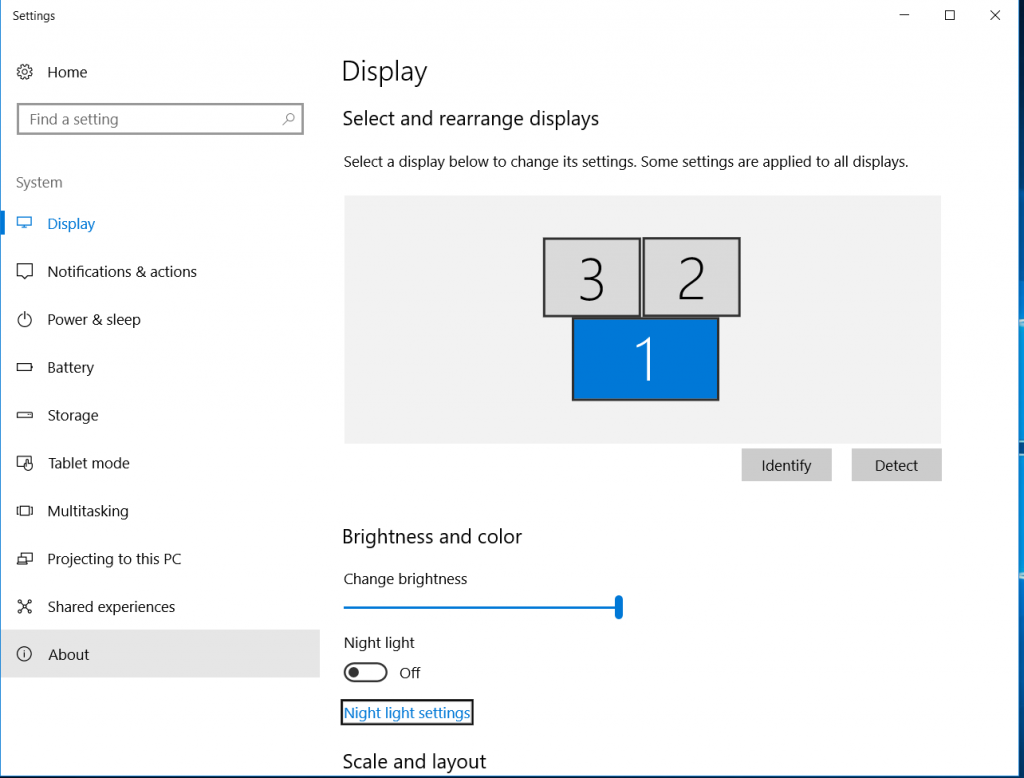
Now by selecting the desired monitor, you can left click and drag it to the desired location relative to the primary display.
As you can see, I have my monitors setup in a "T" with my primary being the laptop monitor and the 2 Dell monitors as monitors 2 & 3.
Incidentally, it makes no difference in what position monitors 2 & 3 are. In this case it just worked out that 3 was to the left and 2 was to the right.
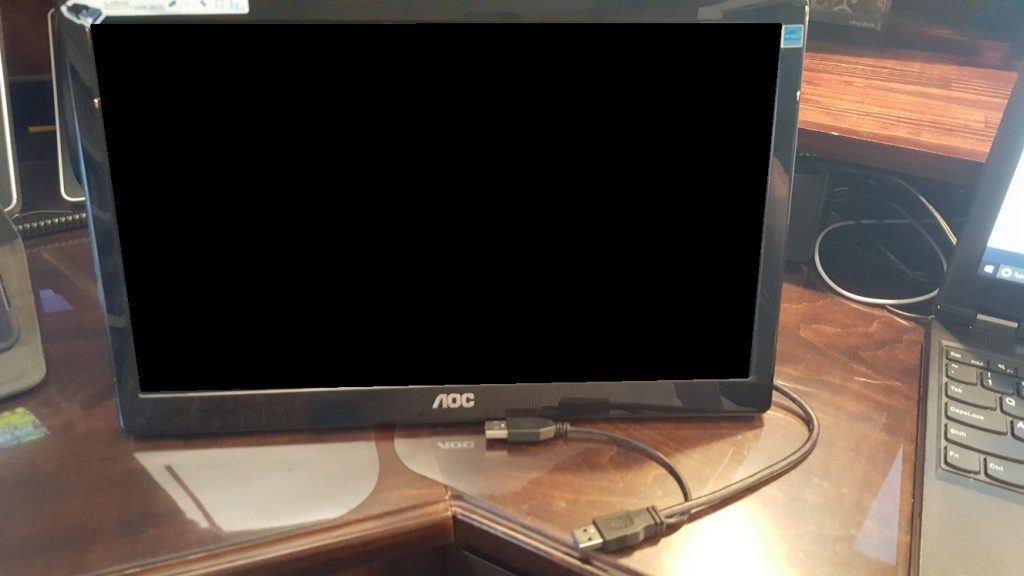
When I am traveling, I obviously cannot take this setup with me, but I do desire to work with multiple monitors. For that I have a USB external monitor from AOC. This is a great lightweight (3lbs) USB monitor that I carry around with me in my computer bag.
You will note that in this case the #2 monitor shows to be a lot smaller than monitor #1. This is because the screen resolution of monitor #2 is less than monitor #1. Windows then shows the aspect ratio graphically for you. Like before, I can click and drag monitor #2 left, right, up, or down to position it relative to where my laptop monitor is. In this case it sits on the desk to the left of my laptop.
Another advantage of carrying the USB monitor is the ability to use it in "Duplicate" mode. In this configuration I can use it in small conference room situations by facing the usb monitor towards others in the room so that they can see my screen wit out them having to look over my shoulder.
Probably the nicest feature of having multiple monitors and switching back and forth from at home to on the road is that windows remembers the resolution and position of your monitors based on where you last positioned them. So, you don't have to go thru the above procedure every time you leave or return home.
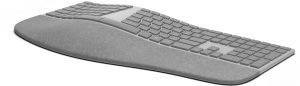
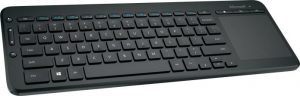
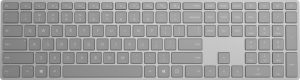
Keyboards:
For ease of use and to reduce the amount of desktop real estate, I use my laptop keyboard. For me it sits at the proper level and allows my fingers muscle memory to remain intact when I travel since I am using the same keyboard. Ever switched keyboards and found that it takes time for your fingers to find the right keys? For those of you that will use an external keyboard, there are great ergonomic keyboards out there and you can find a good selection here.
Mouse/trackball:
I have never been a fan of the mouse, or even the touchpad for that matter. I have always been a trackball guy, and truth be told, not just any trackball, it has to be a thumb trackball. The one on my desk is the Elecom USB Trackball. It is made for the standard right hand as are many mouse devices. Both Kensington and Logitech have center mount Trackball devices that are ambidextrous.
There have been some major overhauls in the mouse arena, size, shape function-keyless, etc. Many of which can be found at the Microsoft store. From a mobility standpoint, I leave my USB trackball at home and I have a Logitech wireless trackball that travels with me. While it is larger than a standard mouse, it does not require a special pad or desktop surface. This makes it much easier to use in many different and uneven surfaces.
Both Trackball and Mouse devices come with 3 connectivity methods: Bluetooth, USB Dongle, or USB.

Webcam:
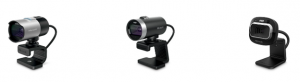
I have a USB HD webcam mounted on the monitor mount in my office. It is directly positioned so that it is leveled with my face. I cannot tell you how it frustrates me to have a video call and end up looking up someone's nose because of the position of their laptop/tablet relative to their face. When mobile, I am guilty of this as well since I choose not to carry around a USB webcam. While the laptop camera may not be all that great, here are a few HD webcams to consider.
Headset:
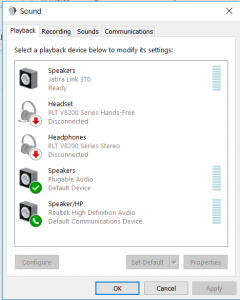
In the picture you see a headset in a stand. This is the Jabra Evolve 75. The charging base is actually the reason that I use this one at home versus any of the other Active Noise Cancelling (ANC) headsets I have. Having the base makes it convenient to store and charge. When traveling, I have the Sennheiser 660UC-MS or the Plantronics Voyager 8200. They are both Bluetooth and wired. At home I can choose between my pc integrated speakers, my Jabra Headset, or the USB powered analog speakers connected to the port replicator. I do switch based on what I am doing. If I simply want to listen in to a webcast or audio (music etc.) I will choose the speakers, but if I am attending an interactive session, I will use the headset. Having them both connected is nice and I can switch between them on the fly if needed.
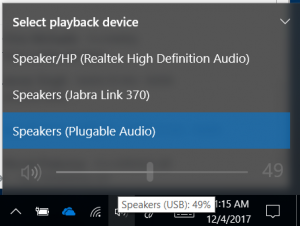
By clicking on the speaker icon in the system tray (lower right hand corner of my screen) I can then select on the fly which device to use. I can, of course, go to the control panel to set which one is default.
When using multiple devices with my Skype for Business client, I can set the device at logon, or change it on the fly during a conference call or audio call as needed.
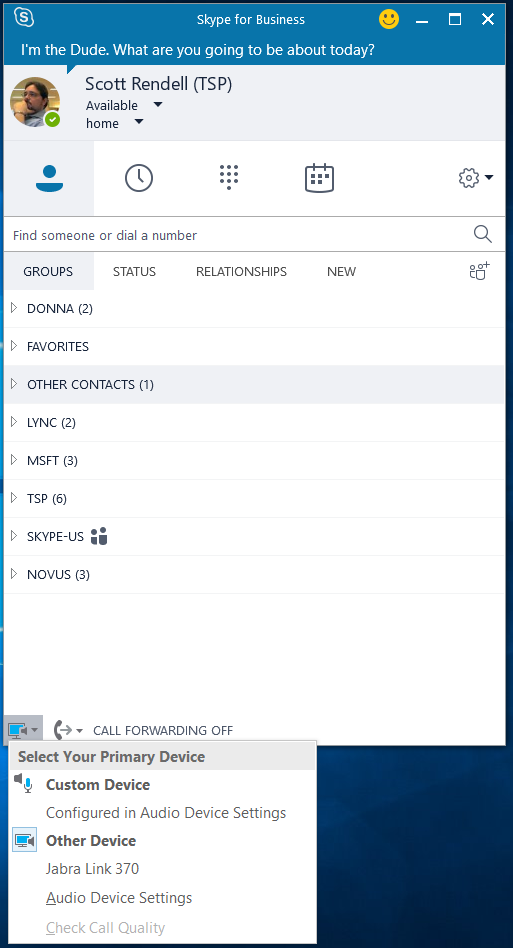
By clicking on the telephone icon here in the bottom right, I can then select devices which pops up the window you see here. I can then select the device I wish to use for the call. Skype for Business Online can be set to ask you which device to use per call, though that does add a step to your join process.
Speakers:
Listening to music, podcast, or attending webinar can all be a use case for speakers. If it does require you to be an active audio participant choosing which speaker device you will use can greatly enhance the listening experience. Much like the headset, you can select a default device and even switch devices on the fly. When you are mobile however, your speaker choices are limited to a headset, the pc speakers, or the ever so popular Bluetooth wireless speakers you can get almost anywhere. The Microsoft Store has a number of Speaker options that can be found here.
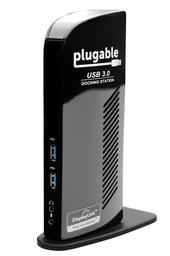
Port replicator/Docking station:
It used to be that only certain laptops came with a device known as a docking station. This device allowed you to slip your laptop into it and have it "dock" to make the connection to stationary devices like an ethernet connection, mouse, monitor, keyboard, and external power. These docking stations stayed on the desk and were only good for the model of laptop it was designed for.
With the advent of USB 3.0, USB Port replicators have now replaced the docking station and can be used with any device with a USB 3.0 port. As pictured above, I am using the Plugable USB 3.0 - they call it a docking station, but in all reality, it is a port replicator - it has multiple USB ports, multiple monitor ports, ethernet and analog audio ports as well. These work very well with today's tablets as they usually only have one USB port in them giving you the ability to connect multiple USB devices using only one USB port. This is similar in function to a USB hub. The major difference here is that a USB hub only handles other USB devices. It should be pointed out that most Laptops/PC/Tablets have a, limited amount of power per USB port therefore it is not uncommon to require an external power adapter to these USB hubs.
USB Hubs, whether externally power or not are generally good for mobile applications. This way you can still connect multiple devices while traveling.
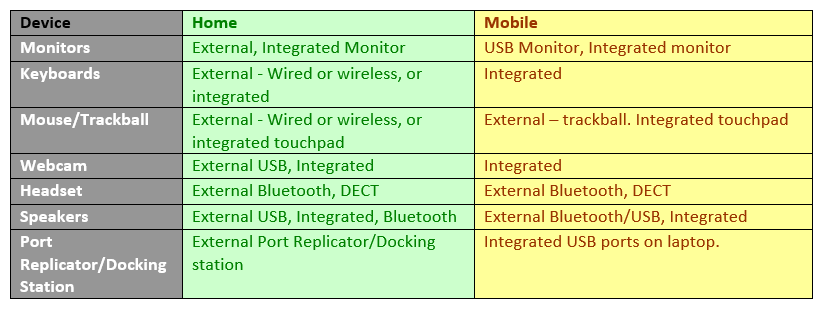
To recap, I am including a chart with the home based and mobile based solutions that I use for each of the items listed. I hope that this has given you some ideas of how you can have a similar experience at home and on the road when using your laptop computer or tablet.
Back to the top level page.
Simple custom Dial Plan (number normalization) for Skype for Business Online.
Back to the top level page.
Below is a quick "one off" and break from my Skype for Business Meetings series.
I created a unique dial plan for a customer the other day and learned so much during the process that once I got it, I had to document it to make it easier for everyone. I know there are other blogs out there that cover this as well, but if you are like me, I just want to get to the meat of it and go from there. For those of you that would like more context, please do check out my friend Kevin's blog.
What follows is the most basic set of commands to create a normalization rule in Skype for Business Online (SFBO) and assign it to a new Dial Plan. In this case, we are taking a 7-digit number with a 349 prefix (so 349-xxxx) and normalizing it to an E.164 formatted number (+1-613-222-xxxx). Of course, this could be modified for 3, 4, 5 digit easily enough.
NOTE: THESE ARE NOT THE CUSTOMER'S NUMBERS - SIMPLY EXAMPLES - PLEASE DO NOT CALL THEM.
The follow are the commands, in the order you should issue them, to create your new Dial Plan for SFBO.
This will allow both IP Phone users (on SFBO) and the SFBO clients to dial 349-XXXX and have it resolve to +1613222XXXX.
You will need to do all of this in the Skype for Business Online (SFBO) PowerShell. If you have not accessed this area before, this link has a great set of instructions: https://www.oxfordsbsguy.com/2015/11/14/how-to-connect-to-and-manage-connect-to-office365-using-powershell/
Once you get logged in with admin credentials for O365, you can then copy and paste these cmdlets into PowerShell.
NOTE: It took a good 15 minutes before the verification command and client picked up the changes. So be patient.
Below are the commands. I will explain what each command does.
The command below creates a Dial Plan within your tenant called 349dial
New-CsTenantDialPlan -Identity 349dial -Description "349-7 Digit Dialing" -SimpleName "349Dial" Link to this cmdlet
The command below creates a variable ($nr2) with the actual number normalizations within it. It will convert any 7-digit number that starts with 349 and convert it to +1613222XXXX
$nr2 = New-CsVoiceNormalizationRule -Identity Global/NR2 -Description "349dial" -Pattern '^349(\d{4})$' -Translation '+1613222$1' -InMemory Link to this cmdlet
Let look closer at the normalization rule:
Note: Below is the link to the common "regular expressions" language.
/en-us/dotnet/standard/base-types/regular-expression-language-quick-reference
PATTERN: ^349(\d{4})$
^ - start accepting the digit string
349 – place outside the () it will match anything that starts with 349 (but is only part of the equation)
(\d{4})$ - accept the next 4 digits and stored those digits as the variable $. This completes our 7-digit number. If say we wanted to accept a 10-digit number where the area code was 349, the we could change the {4} to {7} and so on.
The entire pattern match only 7-digit numbers starting with 349 and only stores the last 4 digits in the variable - $
The command below adds the number normalization rule that is stored in the variable "$nr2" to the new Dial Plan.
set-CsTenantDialPlan -Identity 349dial -NormalizationRules @{add=$nr2} Link to this cmdlet
The command below lists all Dial Plans in your tenant – verify that you see the "349Dial" Dial Plan and that is has the normalization in it.
Get-csTenantDialPlan Link to this cmdlet
It will look something like this:
PS C:\WINDOWS\system32> Get-CsTenantDialPlan
Identity : Global
Description :
NormalizationRules : {}
ExternalAccessPrefix :
SimpleName : DefaultTenantDialPlan
OptimizeDeviceDialing : False
Identity : Tag:349dial
Description : 349-7 Digit Dialing
NormalizationRules : {Description=Testcallnorm4;Pattern=^349(\d{4})$;Translation=+1613222$1;Name=NR2;IsInternalExten
sion=False}
ExternalAccessPrefix :
SimpleName : 349dial
OptimizeDeviceDialing : False
Notice the difference between the Global Dial Plan and the 349dial Dial Plan – the latter has a normalization rule in it. Yours should look like that.
Now you can add that Dial Plan to a test user.
Grant-CsTenantDialPlan -Identity adelev@ucdemo2017.onmicrosoft.com -PolicyName 349dial Link to this cmdlet
You will need to use one of your own user's SIP URIs at this point.
Next, we need to verify that the user has the Dial Plan applied.
get-csonlineuser -Identity adelev@ucdemo2017.onmicrosoft.com Link to this cmdlet
again, change the user.
You will see this in their profile:
TenantDialPlan : 349dial
After 15 minutes or so run this command to see if it has propagated.
get-cseffectivetenantdialplan -identity adelev@ucdemo2017.onmicrosoft.com | test-cseffectivetenantdialplan -dialednumber 3499815 Link to this cmdlet
change the user - you should get back something very close to this.
RunspaceId : e0598ac1-2d50-43f7-828c-fe59314f194c
TranslatedNumber : +16132229815
MatchingRule : Description=349dial;Pattern=^349(\d{4})$;Translation=+1613222$1;Name=NR2;IsInternalExtension=False
If you get this:
RunspaceId : e0598ac1-2d50-43f7-828c-fe59314f194c
TranslatedNumber :
MatchingRule :
Then it has not yet made it thru the system.
Finally, the "real" test – is to type 3499815 into the SFB client window and see +16132229815 below as a normalized number in the SFB client.
NOTE: Because of the propagation delay, the verification cmdlet and the client update may not occur at the same time.
If you dial it on the IP Phone, you may not see the normalization until you make the call. This as the behavior on the AudoCodes phone I was using in my testing.
I hope this will help you out and there is no reason it shouldn't work, but if it doesn't please reach out to me.
Good luck
Scott
Back to the top level page.
Skype for Business and Teams feature Comparison
Back to the top level page.
The topic of this blog will deviate a bit from my past device focused blogs. I do appreciate all of the support and page hits from you my blog fans. I was speaking with a vendor of mine and he told me of a feature comparison chart that he found. It was so good that I reached out to the owner to re-blog it. Many thanks to Ted Estwan from Novus LLC for turning me on to this.
This is not a practice I would normally do, but I had such an issue finding it that I figured re-blogging it would be one of the better ways to spread the word on this.
However, in my own true form., I will also add additional information on Microsoft Teams.
So, that said, I would like for you all to meet Luca Vitali, he is a Microsoft MVP and UC blogger. The blog in particular that I am referencing today is https://lucavitali.wordpress.com/2017/10/01/sfb-teams-features-comparison-table/ . From his blog, you will find the link to this page for the Skype/Teams Feature comparison he built.
Here is a picture of it, but I recommend that you download it instead.
Listed below are some great Microsoft Teams resources. I know this one is short, but I wanted to get this information out to you - my ever faithful blogees….
https://aka.ms/skypeandteams https://products.office.com/en-US/business/office-365-roadmap https://aka.ms/successwithteams
Have a great day!
Scott
Back to the top level page.
Skype for Business and Teams feature Comparison - UPDATED
Back to the top level page.
Here is an update to a previous post with the same name.
Link to the original post. https://gallery.technet.microsoft.com/lync/Skype-for-Business-and-aa1c8daa
Many thanks to Luca Vitali for his update. (https://lucavitali.wordpress.com)
Listed below are some great Microsoft Teams resources. I know this one is short, but I wanted to get this information out to you - my ever faithful blogees….
https://aka.ms/skypeandteams https://products.office.com/en-US/business/office-365-roadmap https://aka.ms/successwithteams
Have a great day!
Scott
Back to the top level page.
Successful Skype for Business Meetings (Series - Module #1 Meeting Basics)
Back to the top level page.
For my next series of blogs, I will be focusing on the Intelligent Communications Meetings. You can expect to see Skype for Business meetings, Skype for Business Broadcast meeting, and Microsoft Teams Meetings. Hopefully by the time I get to Teams Meetings, Broadcast meetings will be enabled for Teams.
This blog will focus on Skype for Business meetings. While there are many resources for this. It is my plan, via screen shots, to step you thru the different type of meetings within Skype for Business (SFB) and offer some helpful suggestions to optimize these meetings.
( Note: This blog assumes the user has basic knowledge for Skype for Business there fore certain steps may not be called out )
I will primarily focus on Skype for Business Online (SFBO). Many of the features are the same as compared toSkype for Business On-Premises, and I will attempt call out where there are variances.
- What constitutes a Skype for Business meeting?
- Presenters and Attendees.
- Recording options.
- Promoting a Peer to Peer session to a meeting.
- 4 ways to start a meeting.
What constitutes a Skype for Business meeting?
While it is technically possible to be in a Skype for Business meeting with just 2 people, we generally consider a Skype for Business meeting as having 3 or more users with a maximum of 250 users in any given meeting. ( Skype for Business On-Premise can be enabled for more depending on infrastructure). Broadcast meetings can serve up to 10,000 attendees.
Presenters and Attendees
There are 2 status' available in Skype for Business Online meetings. Presenters and Attendees. These status' determine what functions you will have available to you within the meeting.
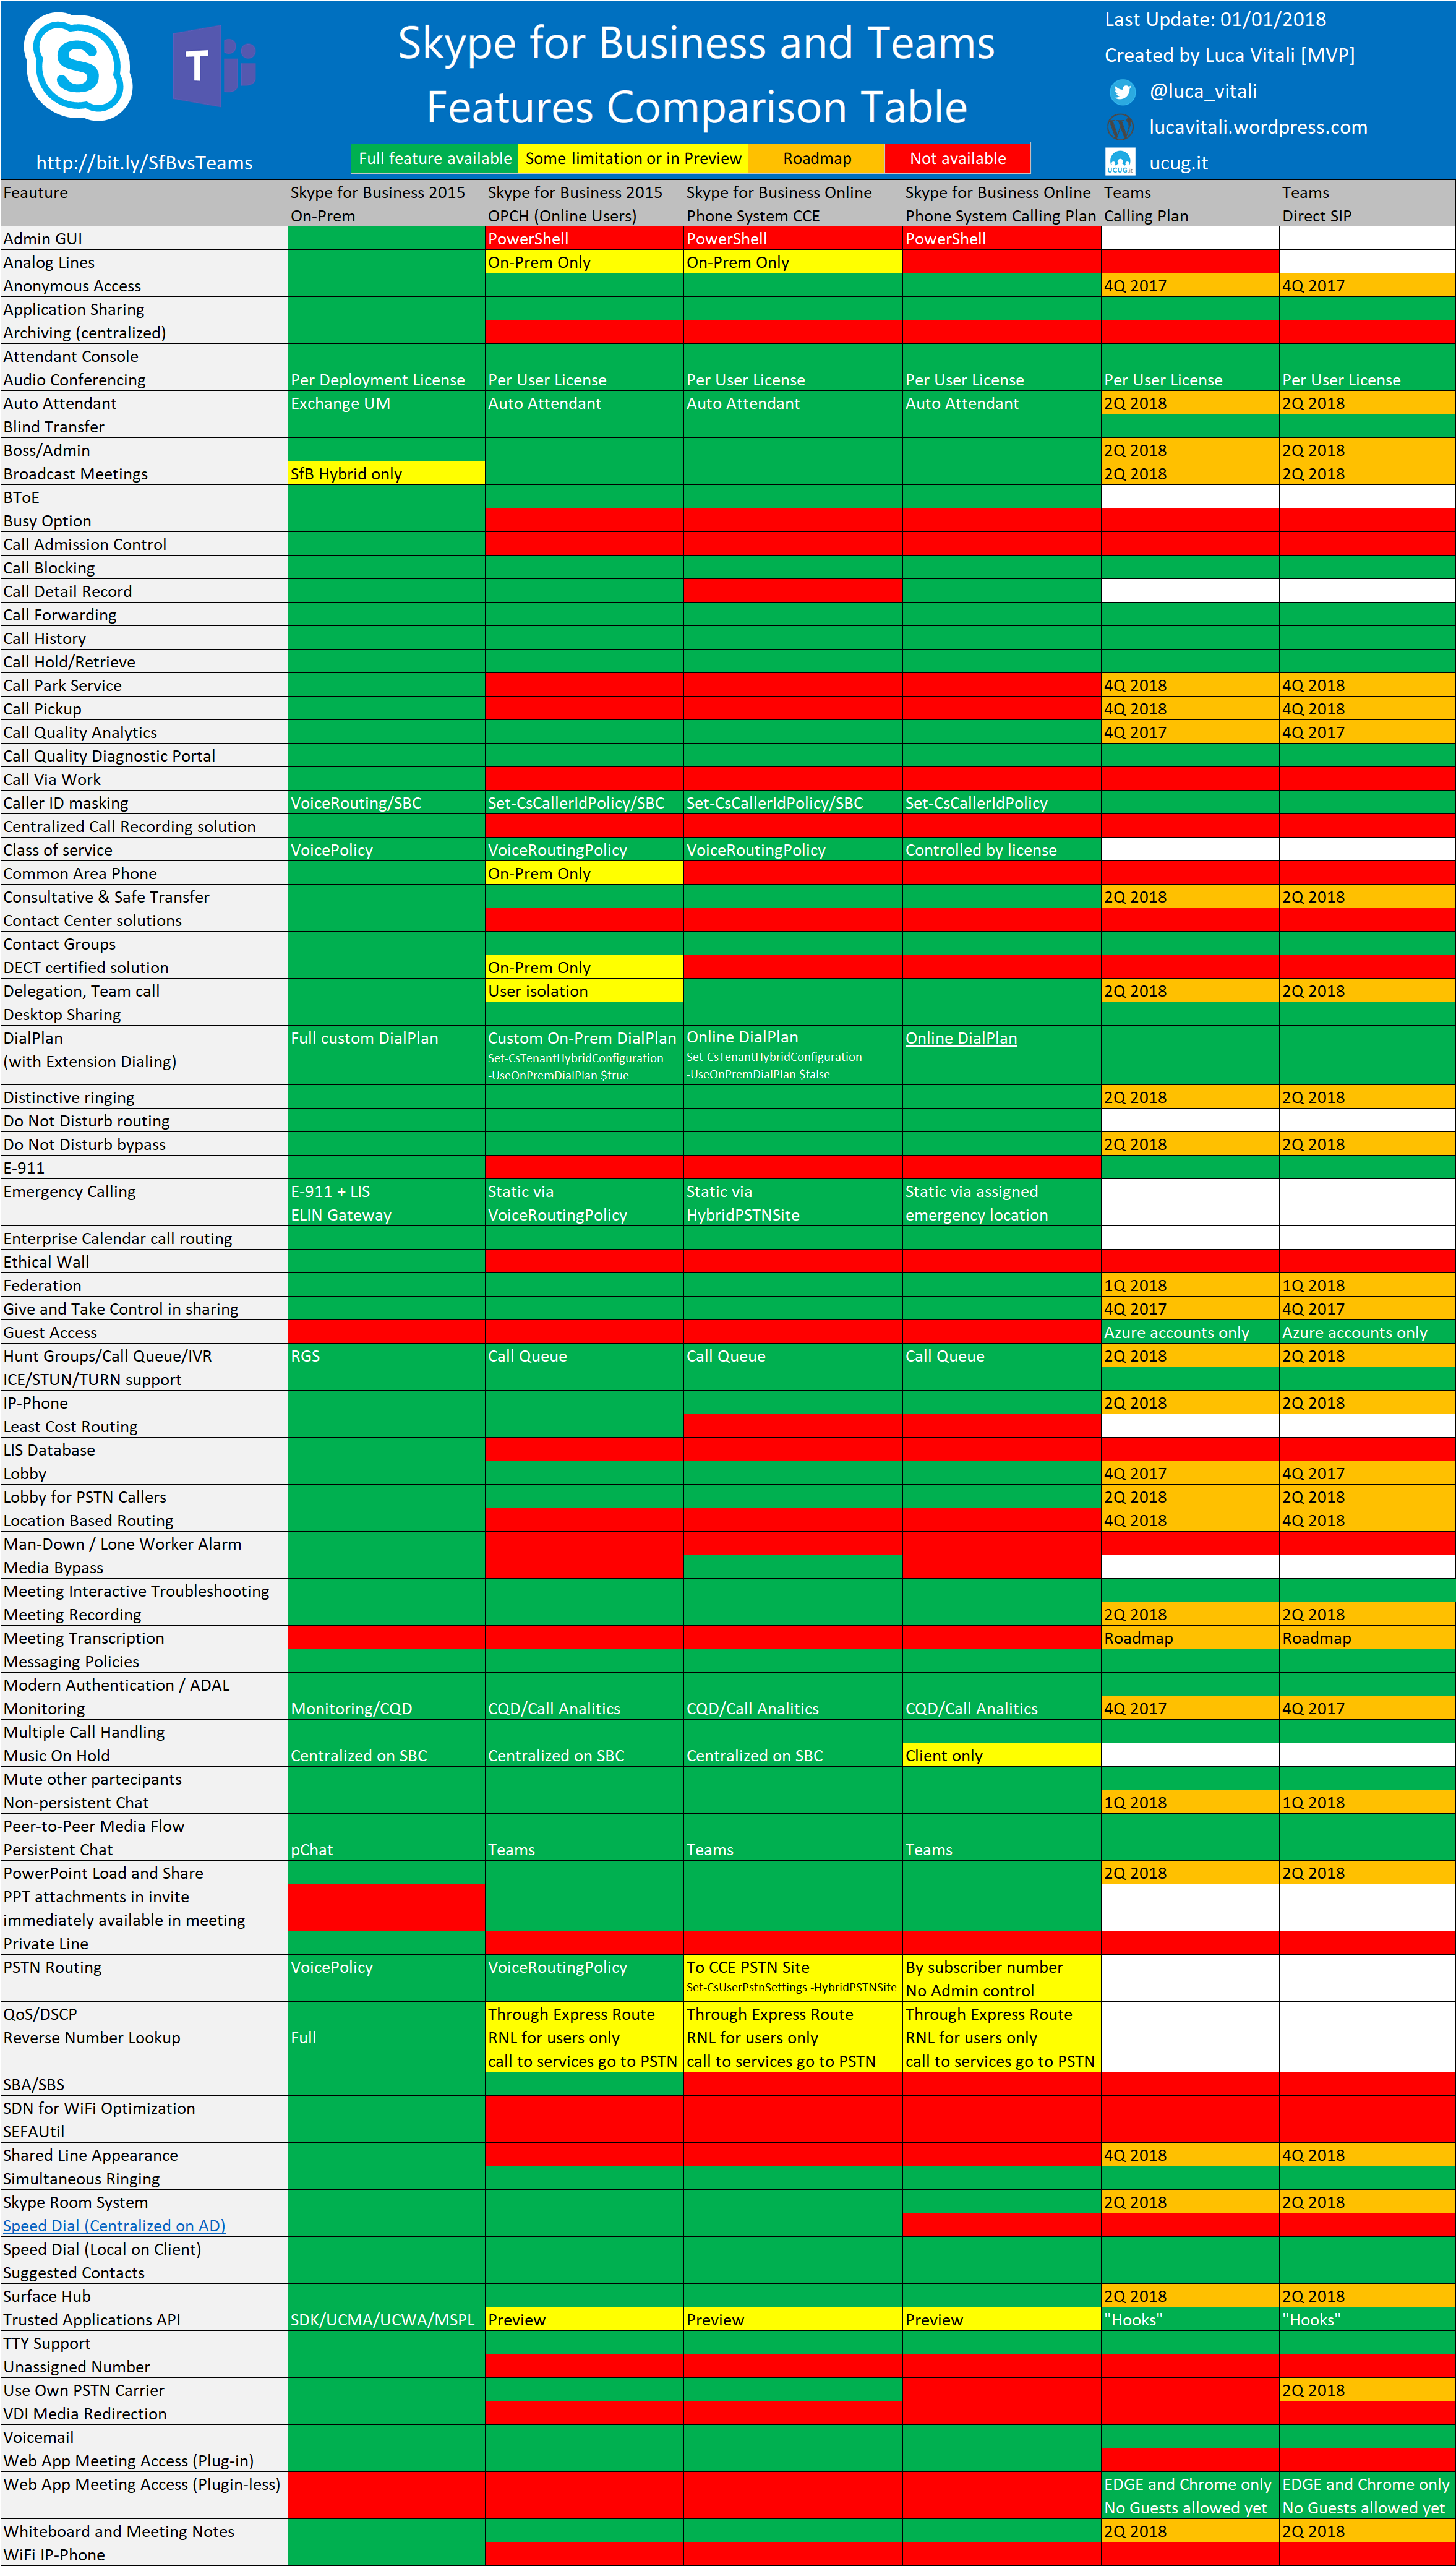
The Presenter has 2 forms, the Meeting Organizer, or simply Presenter status. The main difference here is that the Presenters cannot remove the Meeting organizer nor make him/her an Attendee. In the example shown, Alex is the meeting organizer, while Scott and Adele have presenter status.
The screen shot are from Scott's login. As you see here, Scott can remove or demote Adele.
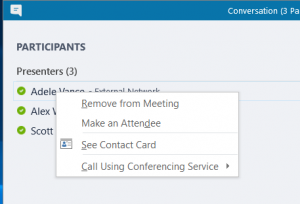
He cannot make any changes to Alex – the meeting organizer.
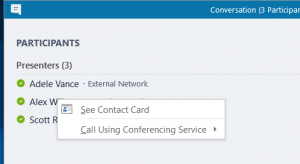
Scott has now been demoted to Attendee status and can do nothing to either Adele nor Alex.
Attendees have limited control, however, if allowed in the meeting, can IM, and start Video or Audio. They cannot present anything as their status does not allow it. They also have no control over others users whereas Presenter can mute others and remove them from the meeting as well.
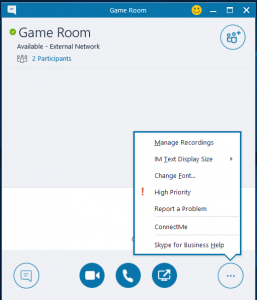
Recording Options.
Once conferencing resources have been assigned (by promoting or converting to a meeting), the recording option will be available if enabled in the policy. Recordings are kept locally on the PC recording it and multiple participants can record the same meeting at the same time.
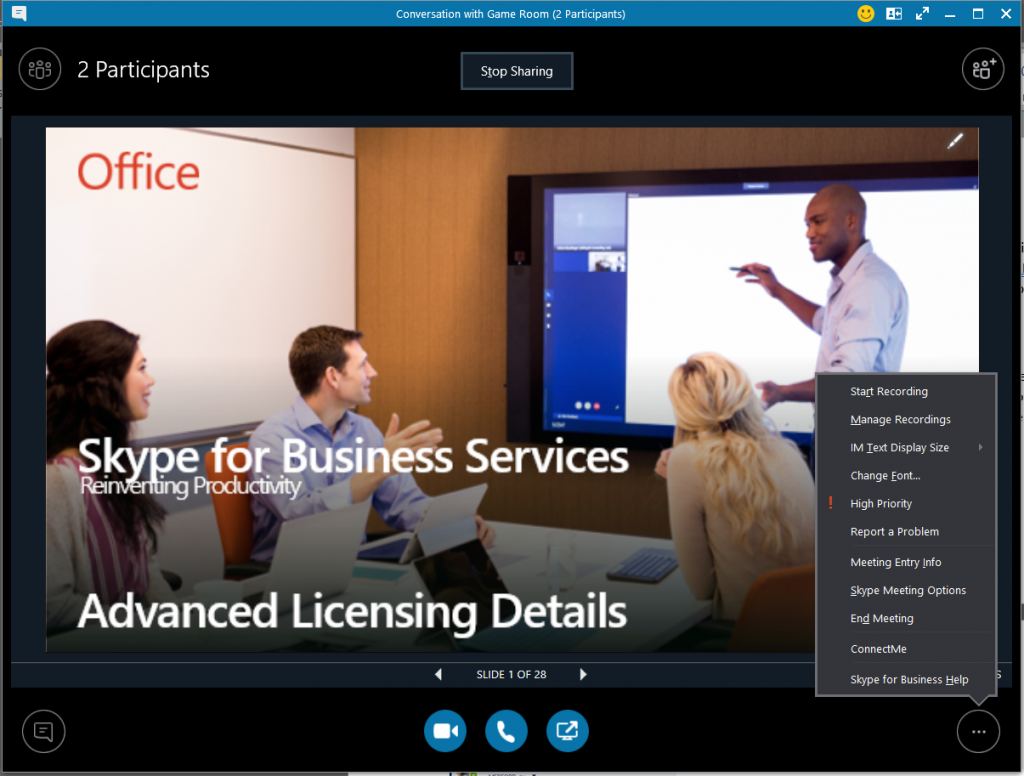
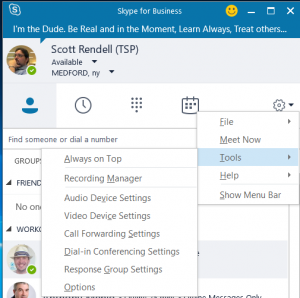
The Skype for Business client has built into it a Recording Manager that can be accessed from any IM window or the Skype for Business main menu.
When a session is recorded, the entire raw session is captured as an .MP4 formatted file. The recording manager gives you the option to publish the recording as well as the ability to remove certain aspects should you choose to remove them.
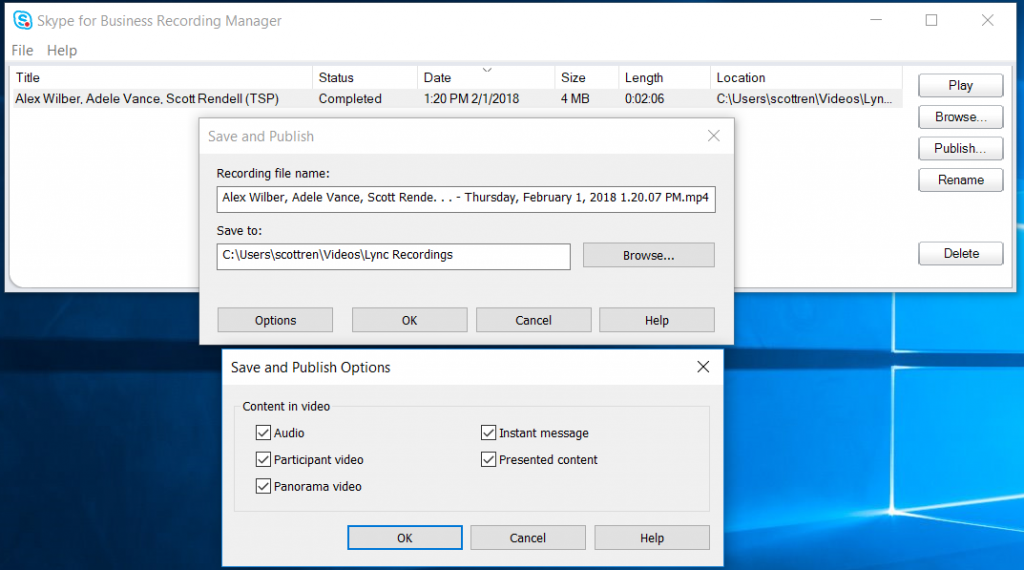
For example, you may wish to remove user video or IM so as not to distract from the presentation when replayed.
The new "published" .mp4 will reside in the directory of your choosing while the original raw .mp4 file stays in the default folder.
References:
Skype for Business Online Limits Meetings with Skype for Business Start using Skype for Business for IM and online meetings https://www.youtube.com/watch?v=cYnN7E1ZFYo (Get to know Skype for Business Meetings: your complete meeting solution)
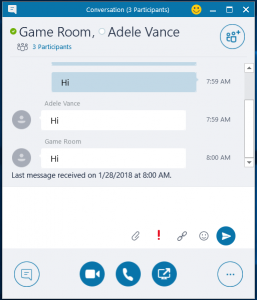
A Peer to Peer (P2P) session is any session in which you and one other person are collaborating, whether it be IM, Audio only, Audio and Video (A/V), screen sharing and the like. To promote this P2P session to a meeting, you can do one of 2 things:
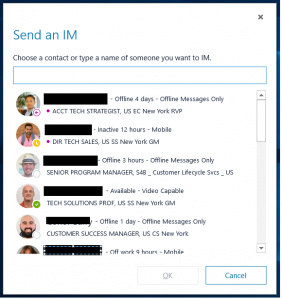
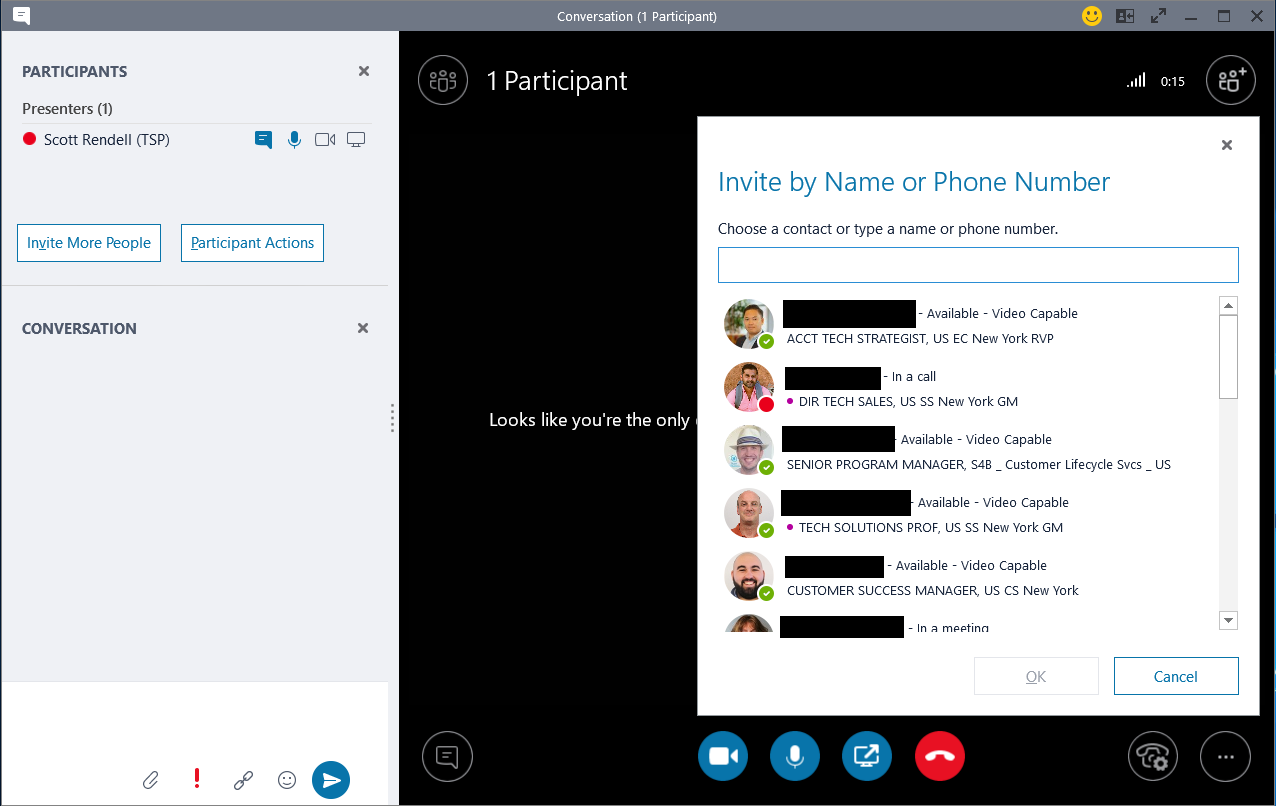
- Add a 3rd person. This is done by clicking the
 icon in the top right corner of the IM window. Simply select another user from the list or enter the persons SIP address, then click ok. You will notice that the session appears to change. You will notice, if you happen to check, the recording option is now available. (If it is enabled within the conferencing policy)
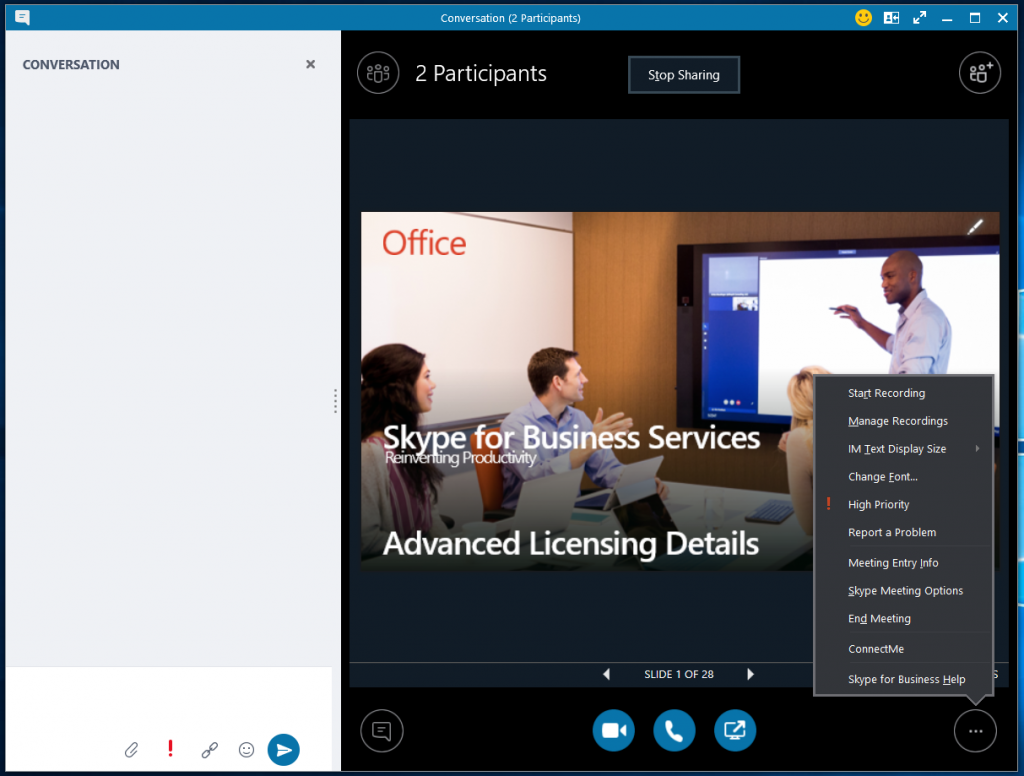
- Uploading a PowerPoint to an existing P2P session.
This will convert it to a meeting as well since meetings services are now used to load and share the PowerPoint. We see this because we can now record the session. (showing a Power Point via a desktop share will NOT convert the P2P session to a meeting).
4 ways to start a meeting.
While not widely known, there are 4 ways in which you can start a meeting in Skype for Business.
- Promote a Peer to Peer session (previous section)
- Outlook – Schedule a meeting.
- From scratch
- Reply with meeting in an email.
- Meet Now – start pulling people into a meeting one at a time.
- Right-clicking a group of contacts and starting the meeting.
This was covered in the previous section.
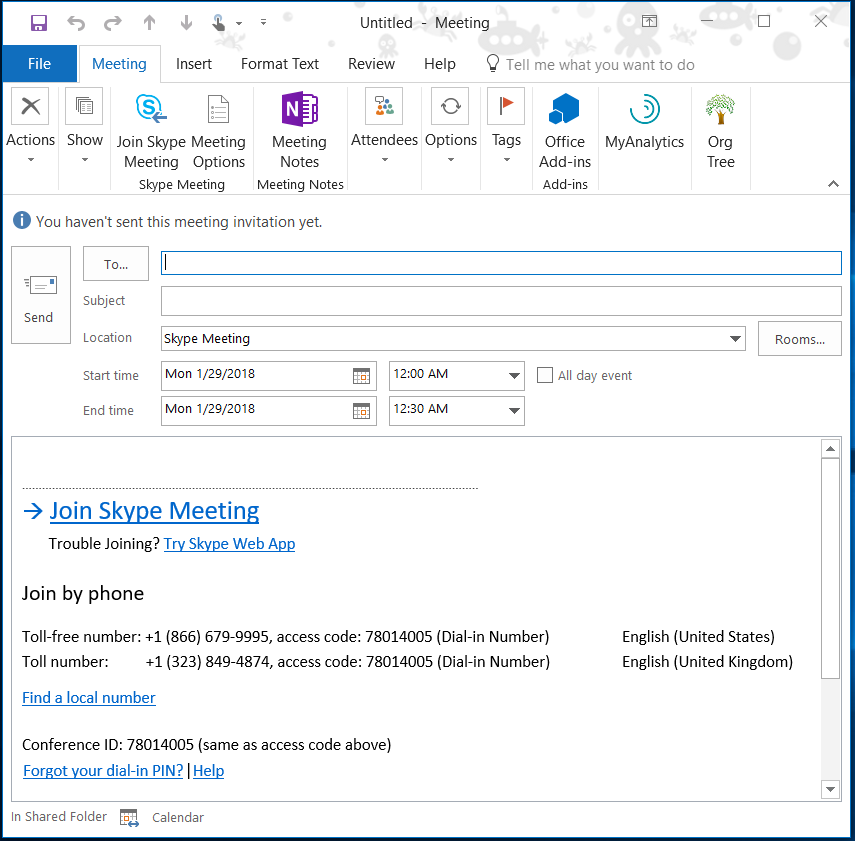
Outlook – Schedule a meeting.
From Scratch
Probably the most familiar method of creating and joining a meeting. This entails creating a meeting in Outlook, sending the meeting invite, and then joining the meeting once it begins.
There are 2 ways to do this. Creating a meeting from scratch in your calendar, or by replying to an email with the "Reply with Meeting" option explained below.
To schedule a meeting, go to your calendar and select the 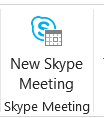 button in the tool bar.
Next, set the meeting options.  by clicking the button.
Rather than go thru each of the options, I have linked the article that explains them. Here.
When you are finished setting your meeting options, click "Remember Settings" so that each time you create a meeting, these options will be applied.
Finally, select a date and time for the meeting, add your recipients and send the invite.
Enjoy your scheduled meeting.
Reply with meeting in an email.
Should you want to preserve information from an email and have it included in a meeting invite, you can create a meeting by responding to an email.
With the email in question open, click the reply with meeting icon.
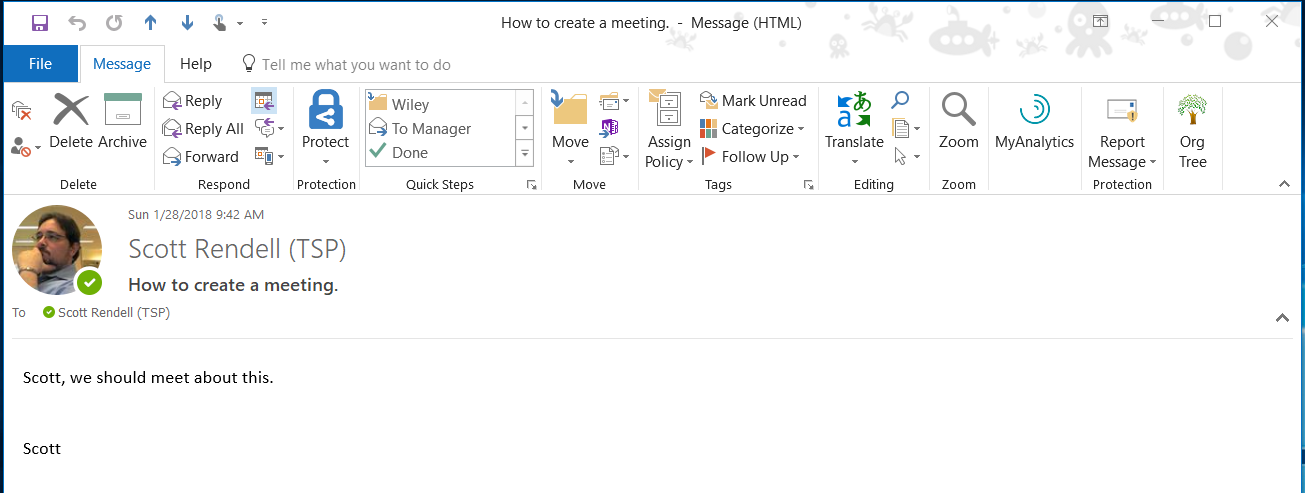
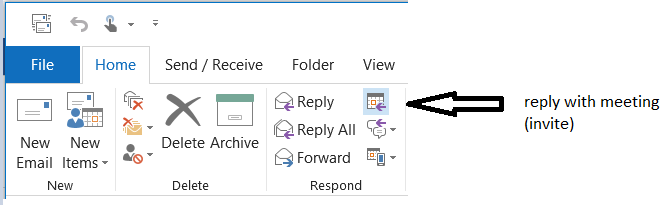
Then click Skype Meeting.
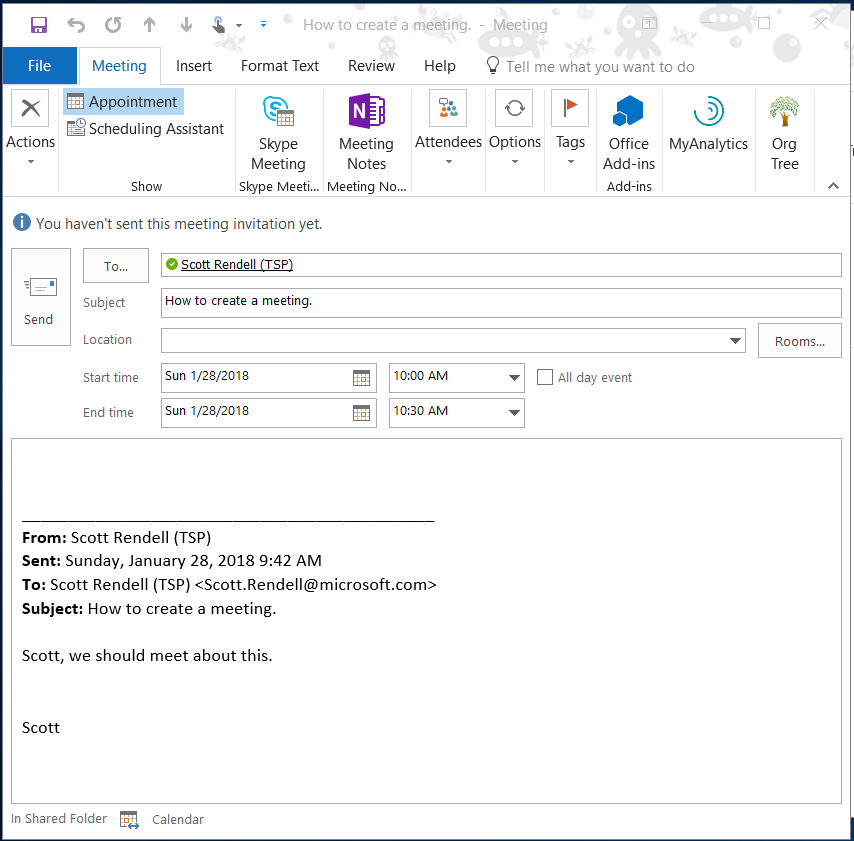
Notice that the original email is now in the invite and the Skype for Business info has been added.
All that is left to do, like above, is set the date/time and send the invite.
Enjoy your meeting.
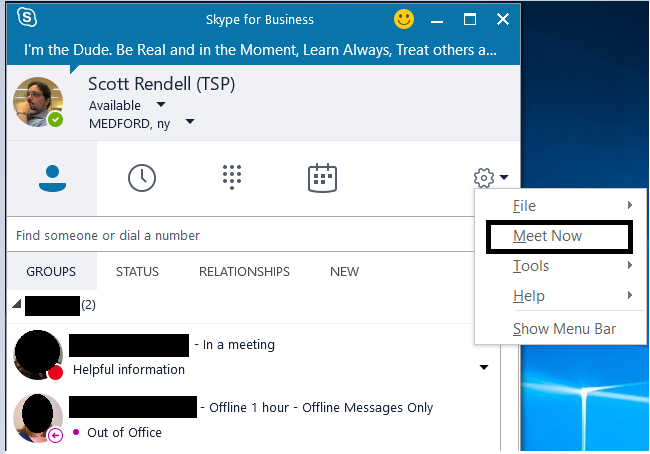
Meet Now
The "Meet Now" feature tells Skype for Business Online that you wish to engage a conference service immediately. This way any and all people you bring into the meeting will instantly be joining a meeting rather than a P2P session
With this option, you can only bring people into your meeting one at a time. This option is most useful if you know that you are going to be adding people later in the meeting, but want to start with a single individual. In a case like this, you could have an impromptu meeting, or send out a meeting invite with no Skype for Business options and let the users know that you will be bringing them in when they are needed. It should be noted that you can "call" someone to bring them into a Meet Now by putting their phone number in the search field. For this to occur, you will need the Phone System License on your user account. Without it, the outbound call will fail.
A "Meet Now" functionally is no different then joining a meeting via email invite. Just the join experience is different. Once in the meeting, all meeting options are available.
To start a "Meet Now" , select Meet Now from the pull down menu.
You can then click the people icon to add members.
One notable difference to a Meet Now vs. an emailed invite is that the meeting options may not be the same. You can click the  button to bring up the menu to then select meeting options. These options are ad-hoc and changes will not be saved and may have to be reset during the next meeting. These options do not affect the values you set in the Outlook client.
Enjoy your Meet Now meeting.
This 4th and final method of starting a meeting allows you the option to pre-select those contacts you wish to join you in an Ad-hoc meeting.
By highlighting those contacts in your contact list, you will then right-click those contact and choose the type of meeting you wish to start.
Once the meeting is established, all other features are identical to that with a Meet Now.
Enjoy your meeting.
Next up Audio Meetings. Stay tuned.
Back to the top level page.
Successful Skype for Business Meetings (Series - Module #2 Audio Conferencing)
Back to the top level page.
The next module in this series will focus on Skype for Business Audio Conferencing.
Audio Conferencing in Skype for Business Online comes in 3 forms:
- Audio only meeting - Voice Over IP only (VoIP)
- Audio only meeting - Dial in Only (No VoIP)
- Audio only meeting - VoIP and Dial in.
As a reminder, it is assumed that the reader is familiar with Skype for Business, therefore certain steps are assumed when reading thru this blog.
Audio only meeting. VoIP.
Up until now, the meetings I have been demonstrating were "online" meetings. It is possible to have audio only meetings should you prefer. These are commonly called audio conference or tele-conferences some people even still call them Conference Calls.
If you already have Skype for Business Online (without the Audio Conferencing add-0n), then you can schedule VoIP only meetings. (some might call them online or web conferences). There is no dial in phone number and all attendees/presenters must join using a Skype for Business client. This constitutes a VoIP meeting. To add the dial in component, you will need to add the Audio Conferencing License (formerly PSTN Conferencing).
All meetings in Skype for Business Online have all of the features already built into them, it is simply a decision on your part to allow/restrict which features will be used during the call. For example, for an Audio only call to be turned into a video conference, someone must enable their web camera. Unless specifically denied in the meeting options, anyone can add video to what started out as an Audio only meeting.
To create a true audio only meetings and restrict it so that no one can enable video or begin to IM, you will need to lock down the meeting options to disable video and IM as well as make everyone an attendee so that they cannot override the meeting options restricted for attendees. If you left others in your organization as presenters, they would have options that would override the attendee restrictions. To accomplish this, create a meeting in Outlook and then go into the meeting options.
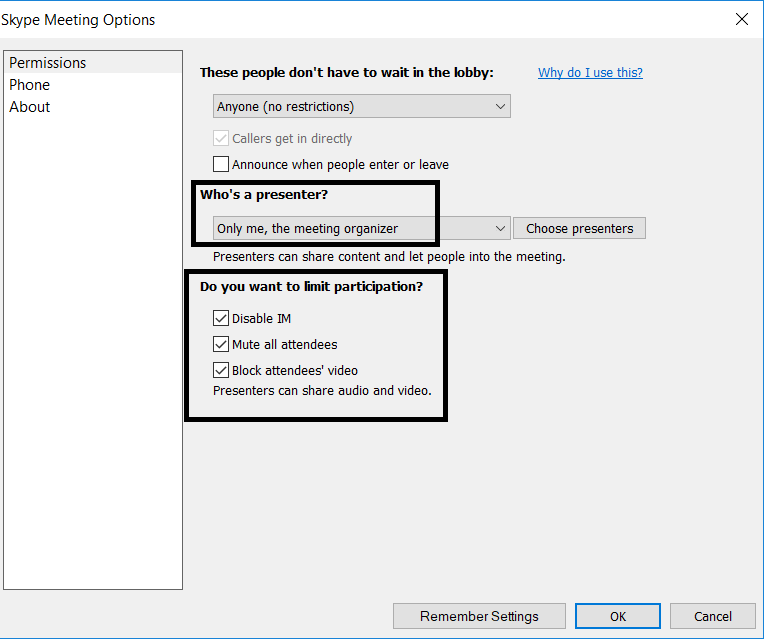
Notice that it says "Mute all attendees" and "Block Attendees Video", doing so still allows Presenters the option to speak at will and use video. Should you wish to block everyone but yourself, you would need to make sure that the "Who is a Presenter" options is set to "Only me". As it shown above. This makes everyone but you an attendee, and in this case, they cannot IM, talk, or start their webcam.
In the example above, "Mute All Attendees" is set. Since this is a VoIP only meeting - meaning that all attendees are joining via the Skype for Business app - you , as the meeting organizer have full control over who can come off of mute.
Enjoy your Audio only meeting.
Audio only meeting Dial in only.
This type of meeting is similar to the "Audio only meeting VoIP" accept all users will join via the PSTN. Some would consider this a true Conference Call.
Licensing for this now requires the Audio Conferencing license (formerly PSTN Conferencing) for users that create meetings. Attendees do not have to have the Audio Conferencing license to join.
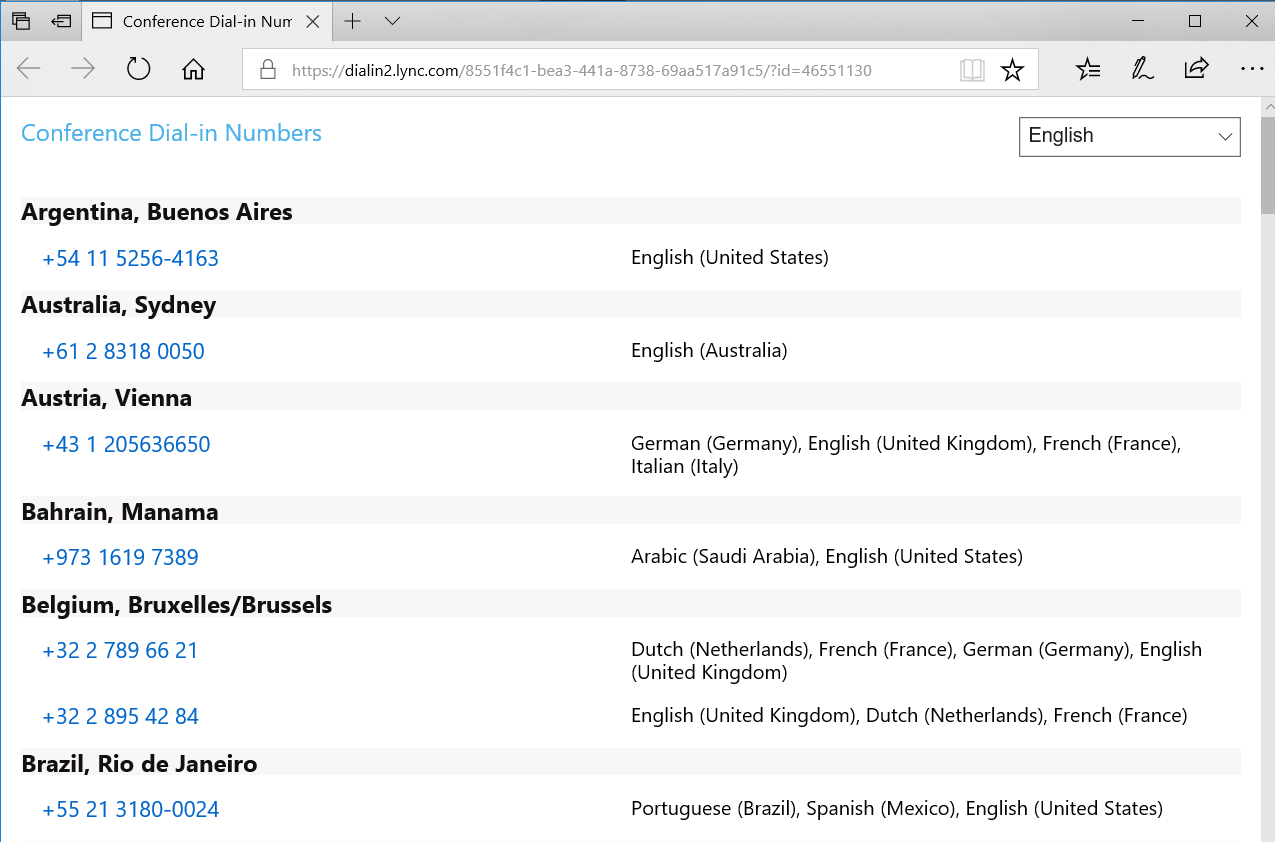
The email invite for an Audio Conference call with dial in is similar to a non-dial in invite except it has the additional Phone number options for you to choose from that you would not see in a VoIP only Conference call.
If the numbers listed aren't local to you, you can click the hyper-link "Find a local number" which will bring up a website for you to choose a more suitable-local number for you to dial in to for the conference call.
To restrict the conference call to audio only, you will need to follow the suggestions from the "Audio only meeting VoIP" section above.
In the example above, "Mute All Attendees" is set. This would not be a good thing for an Audio Conference only as you and all attendees would be connected via Dial In. This gives you very little control over the meeting. In this case, you may want to allow attendees to speak freely, and simply allow them to mute themselves, using *6, or by muting their device at will.
Enjoy your audio conference call meeting.
Audio Only Conference Call - VoIP and Dial In
Finally, as I have previously stated, once you create a meeting within Skype for Business, you already have all modalities available to you. This includes Dial In capabilities as well as VoIP (provided you have the Audio Conferencing License for the creator). The ability for you to join via VoIP or Dial In automatically exists (again given proper licensing). You can still restrict the meeting using meeting options, and each user will have to option to join via a client, or via the PSTN.
For the purpose of control of the meeting, it is suggested that the creator of the meeting join via VoIP (client) so that they may more easily manage the meeting. For example, if you see a contact in the meeting that you cannot verify or get to respond, you may wish to remove the user from the meeting. This can be accomplished only via the client app. The other added benefit is that as the creator joined via the client, you will have the option to record the meeting.
Enjoy you Audio only conference calls.
Next up - Video Conference Calls.
Back to the top level page.
Successful Skype for Business Meetings (Series – Module #3 Broadcast Meetings - part #1)
Back to the top level page.
Taking a short detour from the Skype for Business meetings to do a quick 2 part series on Broadcast Meetings. Because this module is quite large I am breaking it up in to 2 parts. The setup, and the Broadcast itself.
Skype for Business Broadcast Meetings
When discussing Skype for Business Meetings, you cannot ignore that fact that sometimes 250 participants just isn't enough. That or the need to have a massive Town Hall style meeting. This is where Skype for Business Broadcast meetings comes in.
Unlike Skype for Business meetings that we have been discussing during this series, Skype for Business Broadcast meetings allow for some unique features not found in your typical Skype for Business Meetings.
Some of the key features of Skype for Business Broadcast Meetings:
- Up to 10K attendees ( I say attendee for a reason)
- Live transcription
- FF, REW, Replay during a Broadcast
- Live Q&A
- Downloadable and redistributable
- Live Polling and Yammer feeds
- Generate Meeting reports.
https://support.office.com/en-us/article/What-is-a-Skype-Meeting-Broadcast-c472c76b-21f1-4e4b-ab58-329a6c33757d
The setup experience for Skype for Business Broadcast meeting is much different from the of a Skype for Business Online Meeting and so I will take you through this process start to finish as well as calling out some of the uniqueness of the features.
For starters, Skype for Business Broadcast is an online only service. This means at the very least, the creator of the meeting must be homed in Skype for Business Online. This of course means that you have a O365 tenant and that Skype for Business is in Hybrid mode – OR – you have a 100% online only tenant. If either of those conditions exist, you must then also enable your tenant for Skype for Business Broadcast. Next, it is important to note that while a Skype for Business Broadcast Meeting is live, there can be anywhere from a 30-60 sec delay from what is going on live until the attendees see it. This is important to note when setting feedback options such as Yammer, Q&A and Pulse. While the Presenter(s) are communicating in realtime, the attendees are seeing it up to 60 seconds after it happened. Therefore, the responses from attendees might appear to be non-existent to an impatient Presenter. The key here is to know this and to create a sort of time filler if you are expecting responses.
Once enabled, your users that are licensed and homed in Skype for Business Online can create Skype for Business Broadcast Meetings. Here are links to the licensing requirements for Skype for Business Broadcast
https://support.office.com/en-us/article/what-is-a-skype-meeting-broadcast-c472c76b-21f1-4e4b-ab58-329a6c33757d?ui=en-US&rs=en-US&ad=US
and
/en-us/SkypeForBusiness/set-up-your-network-for-skype-meeting-broadcast/blocked-user-licenses-for-skype-meeting-broadcast?ui=en-US&rs=en-US&ad=US
Creating a meeting
Creating meeting consist of a few steps:
- Creating the meeting.
- Setting attendee qualification.
- Adding Options to the meeting.
- Sending out the meeting invite.
To create a Skype for Business Broadcast meeting start by going and logging into this page. https://broadcast.skype.com 
From this page you will be able to see older meeting that have already past. (For the sake of screen shots, I created meetings that never were "run" which is why they show as "not started". Should you have set certain feature which we will discuss in the future, you could click back into these meetings and get the meeting report, go thru the recorded video and see the security features that were set for that meeting. As you can see the calendar highlights dates where meetings exist.
Our next step would be to create a meeting. Click the  plus sign.
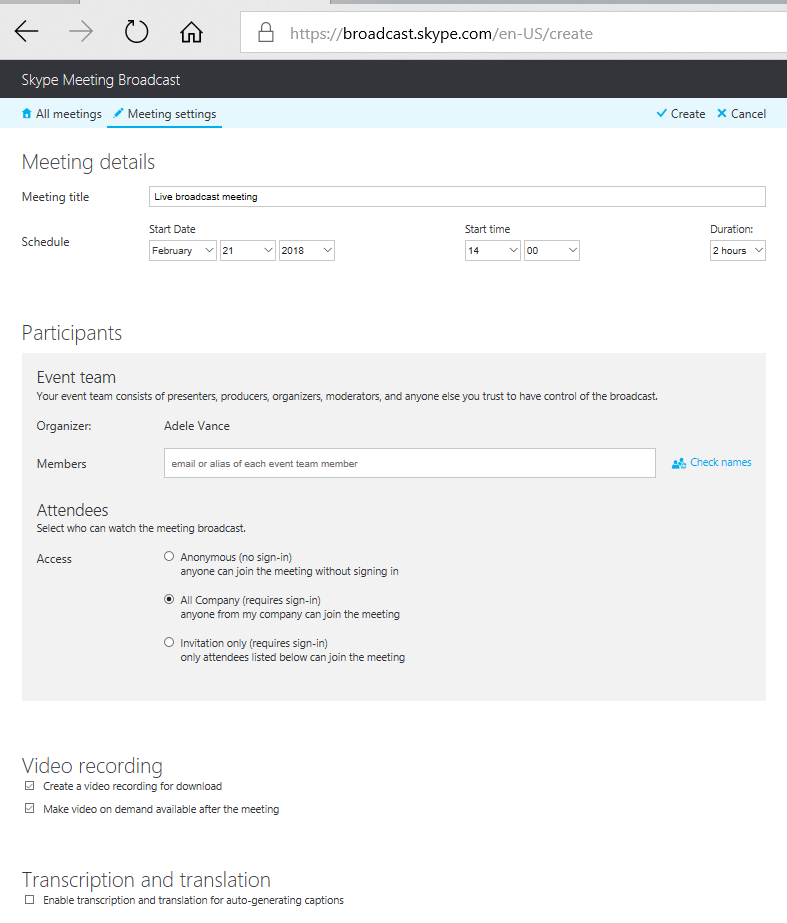
There are a number of options here so lets break them down.
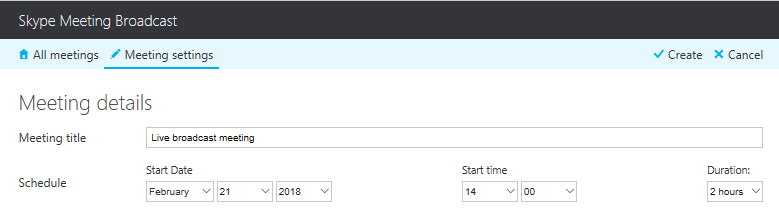
This section allows you to name the meeting, specify the date/time and rough duration of the call. This might lead you to believe that the meeting will expire after the duration expires. This is NOT the case. The meeting will continue as long as there is an active Presenter in the meeting.

Next we will set the attendee qualification level. You can see that the Organizer is already populated, you are then given the opportunity to add other presenters from within your organization only. We will have the ability to add federated outsiders at a later time. This is a "hidden feature" so I will call it out later in this article.
Now then, the attendees. I say attendees because these will be the viewers of this meeting. Their interaction with the presenters will be limited to the features that have been added to the meeting. (Yammer, Q&A, and Pulse). All attendees join via a web browser – not matter what. Listed Presenters (Team Members) will join via their Skype for Business Client and will have an entirely different set of features which I will list out later in this article.
Attendees fall into 3 categories:
- Anonymous – This can be anyone with an internet connection and the link to the meeting.
- All Company – Anyone who shares the same domain name as the Organizer and has a link to the meeting.
- Invitation Only – Those specific set of attendees within your organization that you have specifically invited via this form.
Note: The latter 2 type require a login from the attendees Azure Active directory (cloud) account. So as long as the attendee is listed in the tenant (native or hybrid) they can login with their user credentials.
Anonymous attendees do not need to login.
OK, now that we have set the attendees, we can move on with the rest of the meeting options.
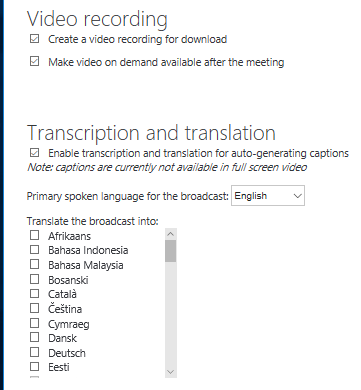
By checking "Create a video recording for download" You get just that. The meeting will automatically be recorded and be downloadable once the meeting ends.
Enabling "Make video on demand available after the meeting" allows attendees to join after the meeting ends and watch it in its entirety. (subject to retention times)
Should you wish to have a live transcript be displayed during the meeting, you will check the Transcription and Translation box. This allow you to pick up to 6 languages that attendees can choose from during the broadcast. The transcription will then be displayed as the meeting occurs. Attendees can switch between the allowed languages as the meeting is in progress or afterwards during the playback.
Let be clear about this point. This is a speech to text translation, not a speech to speech translation. That ability exists only in Skype Consumer.
Now that we have configured the basics for our meeting, click Create at the top right hand side.

Your meeting review page will now be shown.
If a basic town hall style meeting is all you needed, then you are set. You can now expose the link and email it , or create an Outlook invite and email that. If you selected others to be presenters, I recommend using the Outlook invite as they will already be added to the invite.
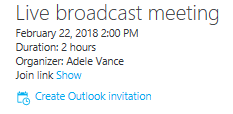
Clicking "show" will expose the meeting link.
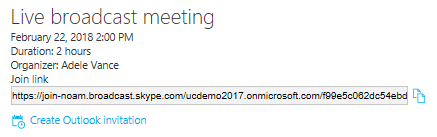
Note, if you selected the "Invitation only" Attendee option, each attendee will already be populated in the Outlook invite as well as the Presenters.

Click send and you now have a meetings scheduled in Outlook.
Should you choose to add attendee feedback options, you would then click Customize in the upper right hand corner.

This takes you to the meeting customization page where you can add attendee feedback options.
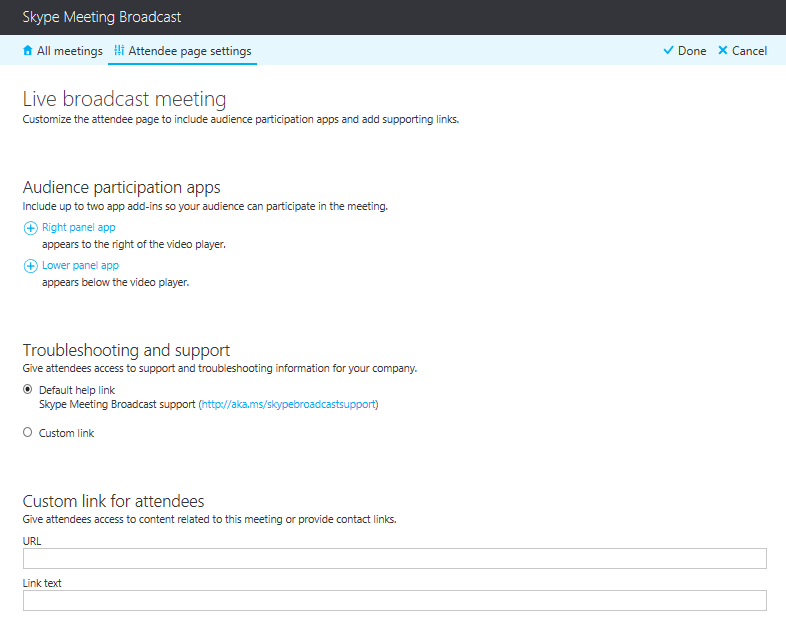
You can add 1 or 2 attendee options. One in the right hand panel and one in the lower panel which will show up below the presentation.
Your options are Yammer, Q&A and Pulse.
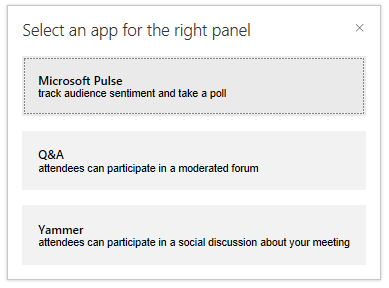
For Pulse you will have had to previously setup a Pulse account. We will not be covering that in this segment.
For Yammer, similarly, you will need the Yammer feed information as shown below.
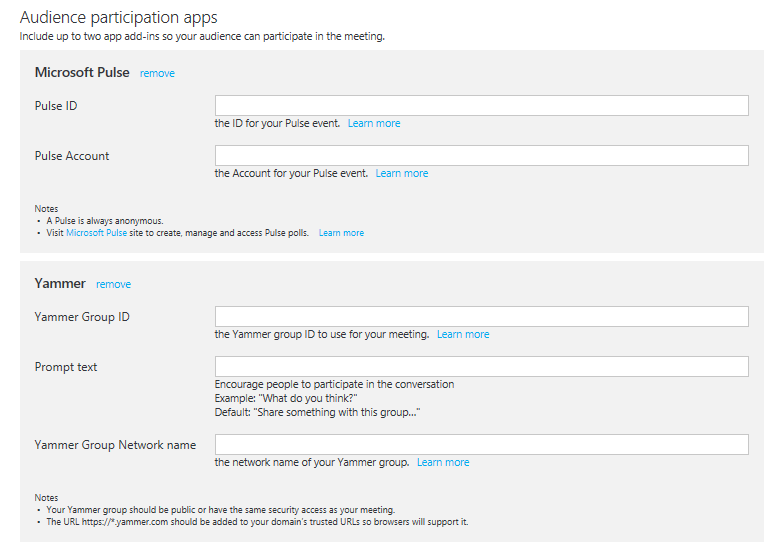
Q&A is a different animal altogether. Once added to a meeting some forethought must be put into the Presenter roles. A Predetermined Presenter must be allocated to login to the Q&A panel and act as the moderator.

To finish off this page, you have the ability to add customized hyper-links for troubleshooting support and other items that may be of use to attendees in your meeting. This could be a link to an embedded video or a website that contains pertinent information to your meeting or organization.
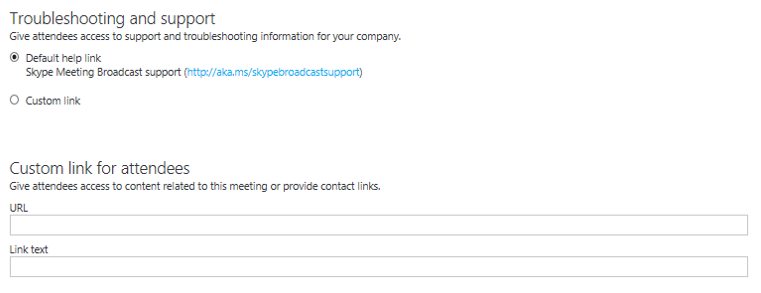
Once you have added your content, click "DONE" in the upper right hand corner. This will take you back to the meeting summary page that you will notice has now changed to include the added content.
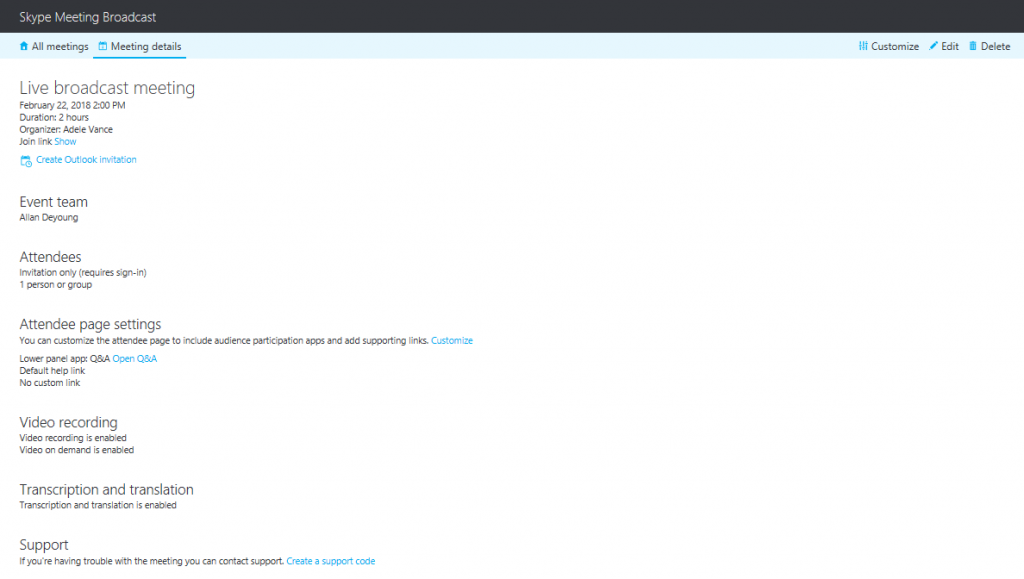
At this point you would want to then create the Outlook email invite – or copy the link and send it out – which ever way you choose.
In part #2, we will take you thru logging in and both attending as well as presenting in Broadcast meetings.
Stay tuned
Back to the top level page.
Successful Skype for Business Meetings (Series – Module #4 Broadcast Meetings - part #2)
Back to the top level page.
In Broadcast Meetings Part #1 we showed you all that it takes to create a Broadcast Meeting.
We are now ready to start our meeting. As I stated before, certain steps are assumed known by the reader.
From an attendee standpoint there is not much more to do than join the meeting so we will begin there.
After clicking the link to the meeting (or the join button in the outlook invite)
You will be taken to this page.
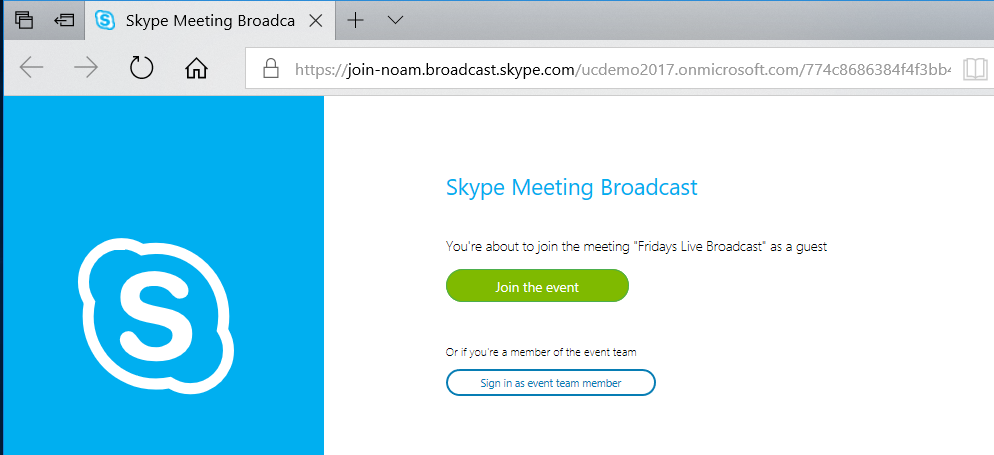
As an attendee you will click the Green "Join the event" button.
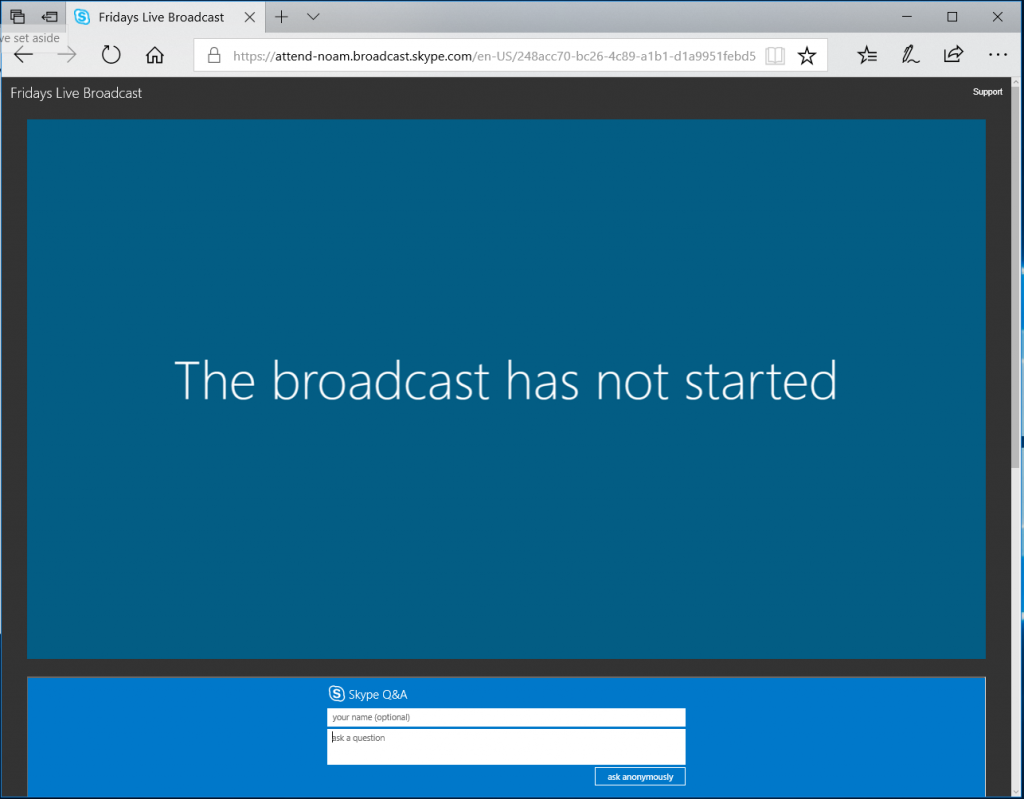
Here you can see that we are now waiting for the event to start. It also seems that this event will allow Q&A since we see the Q&A panel at the bottom. More on this later.
A Presenter will also access the web-join page however they will follow the Team Member login which will then launch the Skype for Business app.
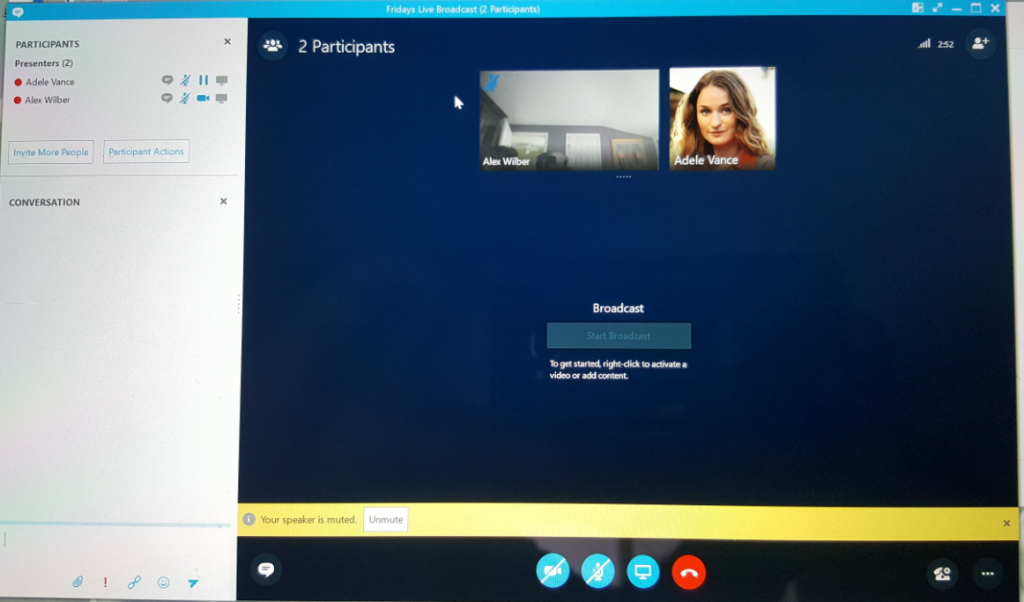
As you can see, both Alex and Adele are in the meeting as Presenters – as we specified previously in the creation example. A couple of things to note. Presenters can be demoted to attendees, but will remain in the "live" portion of the meeting. Meaning they are still considered active participants in the Skype for Business window, but can no longer present content. There is really no benefit in making a Presenter an Attendee while in a Broadcast meeting, but you will have the ability to do so.
You will notice that even though we have Presenters in the meeting, our meeting Broadcast has not yet started. In order to start the meeting, one of the Presenters has to offer content (video or PPT). In this example, Alex has started his video. We will then right click his video and click "Make Video active for Broadcasting". All Presenters can have active audio/video during the meeting, but only one can be active for the broadcast. This makes it easier to switch between video stream as the meeting goes on.
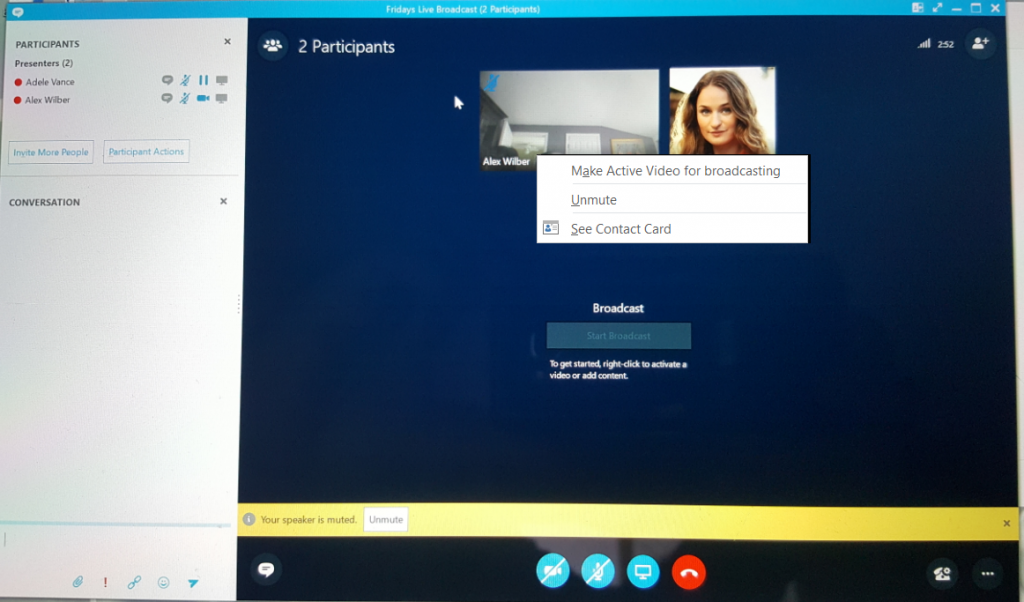
Once you have marked a video window active for broadcast, you will notice that the "Start Broadcast" button is no longer subdued. To begin Broadcasting click the "Start Broadcast" button. 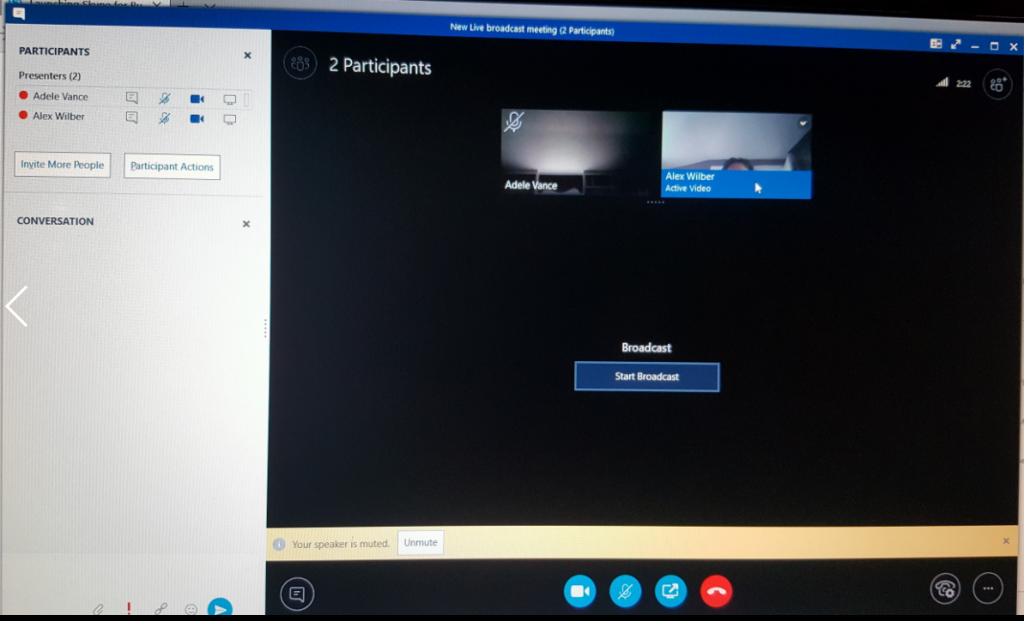
Once you do this, you will receive a msg stating "Ready to start? . The "warning message" is very important as it reminds you that if you, by accident or otherwise, stop broadcasting, the meeting is over. You cannot broadcast any longer in that meeting and the meeting is basically over for the attendees. Should that occur, you will have to create new meeting and send out a new invite.
After accepting the "Ready to Start" msg, You will see you are "live" in the Presenter window.
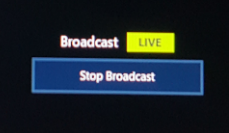
From an attendee standpoint, you can see that the broadcast has started.
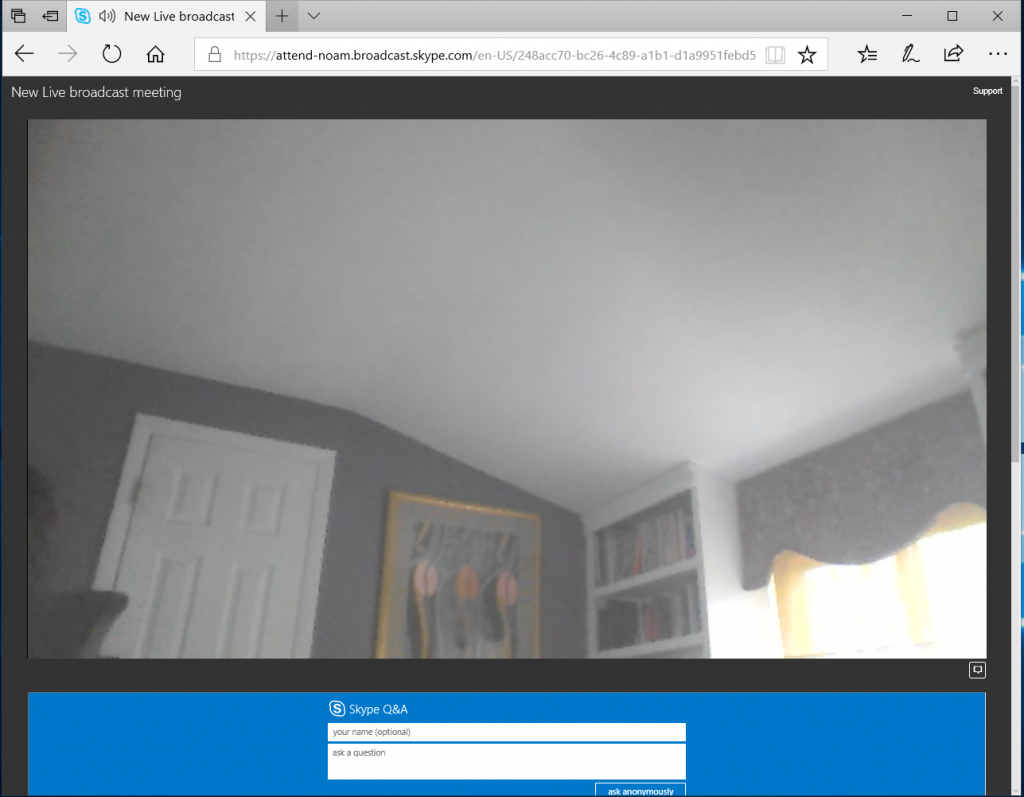
Notice that there is the Q&A panel. Lets ask a question.

Once we have clicked the ask button our question appears below.
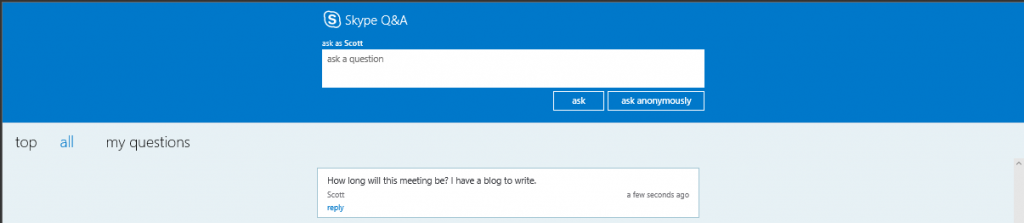
You may remember that I mentioned that someone has to monitor the Q&A when we setup the Q&A.
Once in a meeting a Prensenter will need to go back to the meeting summary page and click the "open Q&A" link to access it. This can be done by the creator or the link can be copied and sent to another Presenter.
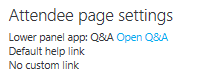
As the Q&A moderator, you can now respond individually, or broadcast the question out for all to see.
The Moderator will see the graphic below. In this case the Moderator choose to broadcast the question.
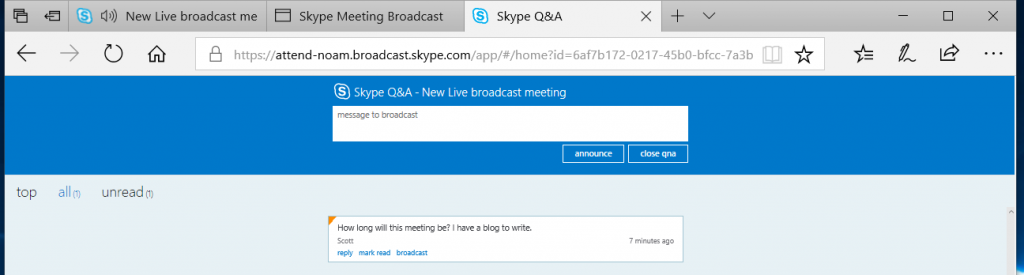
And the attendees will see…
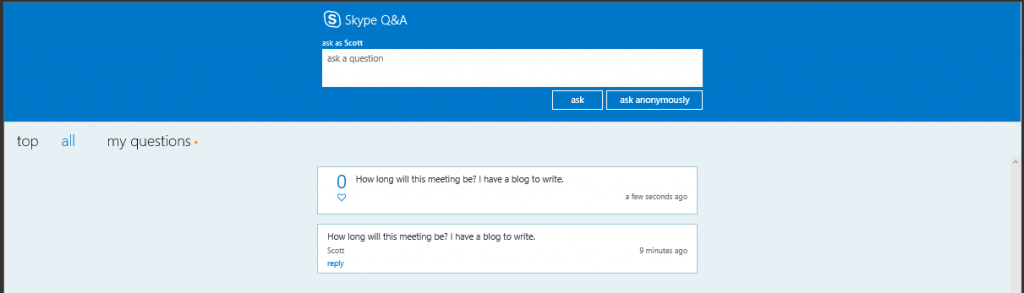
thus verifying that the message was broadcast to all. (notice that you can "like" the comment or question)
If the question was to remain private, it would look like this.
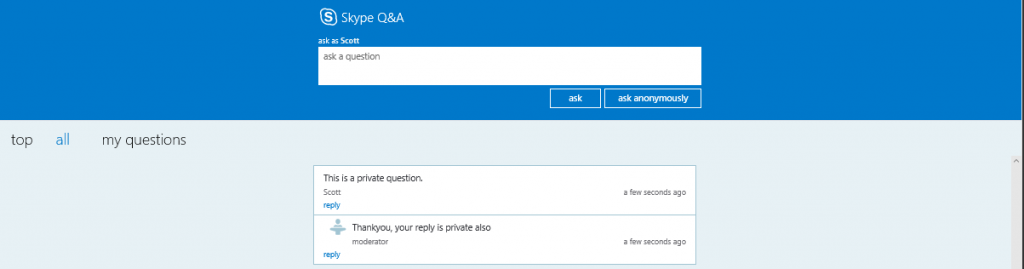
Finally, from the moderators standpoint, he/she can broadcast a message to the group if needed by once again using the broadcast box.
NOTE: Q&A and Broadcasts messages are live and not delayed. Please keep that in mind during the broadcast. You might actually ask a question that prompts the Presenter to reply verbally which will be delayed up to 60 seconds. It does get a bit confusing if you are not aware of the broadcast delay.
Another feature I mentioned briefly in the meeting setup was that the attendees have the ability to view a live transcript in one of 6 languages chosen by the meeting organizer.
As an attendee you will notice in the bottom right hand corner a little box, by clicking this box you can choose the captioning language allowed for this meeting.

You can also change the caption language as it appears. Here is the same message in a different language.

To re-iterate, only 6 languages can be pre-selected (in addition to the default – English) for captioning (translation) for any meeting.
One last point about video, we have all heard that in order to show a video, it must be embedded into Power Point. While this is ONE way, it is not the only way. Using the Newtek TriCaster Mini, you can create virtual sets, share a pc's desktop or any other feed from either a video camera or PC and broadcast it to the meeting thru a Presenter's Skype for Business client.
The TriCaster's output along with a client app on a Skype for Business enabled laptop or desktop becomes the Audio and Video feed for the Skype for Business client, therefore if this particular client is a presenter in a Broadcast meeting, whatever output you have from the TriCaster becomes the feed for the Presenter role in the Broadcast. You can read more about the Tricaster series of products from Newtek's web page.
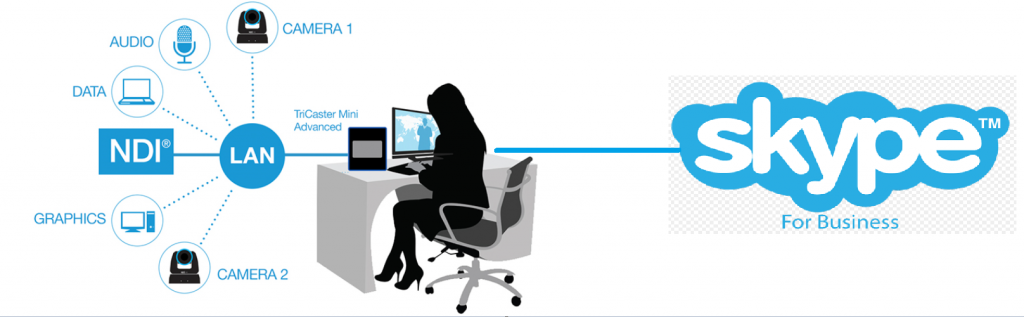
In my next blog, we will add Power Point to a Broadcast Meeting. Stay tuned.
Back to the top level page.
Successful Skype for Business Meetings (Series – Module #5 Broadcast Meetings - part #3 )
Back to the top level page.
This is the final Module for the Skype for Business Broadcast Series - but we are still not finished with the Skype for Business Online Meeting Series so stay tuned for more.
Up until now we have focused on Video only within a Skype for Business Broadcast Meeting, to finish up this series we will show you how to add content to a broadcast.
When mixing video and PPT content, the presenters are given new presentation options. While it is not all that difficult to figure out, sometimes its just easier to see first hand.
So, with that in mind, we will jump right into a Broadcast already in progress.
So here we are in a meeting as a Presenter, Our Video is already active and we are broadcasting.
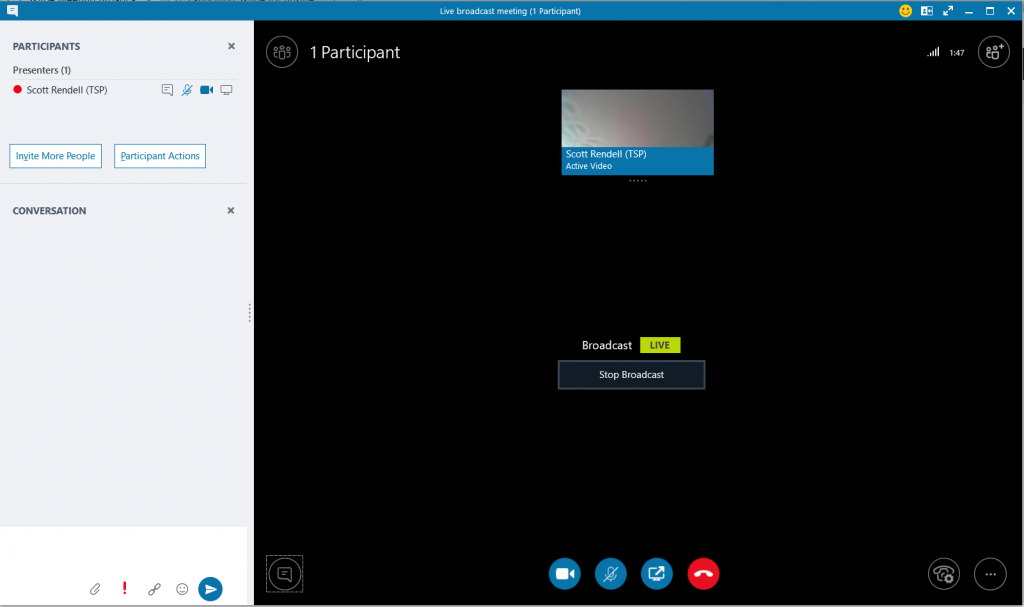
And from the attendee side, we see that Video is active. 
So now the Presenter can add a PPT. By clicking the content icon (seen below), you have the option to "Share PowerPoint files". Select this option and then select a PowerPoint presentation to upload. 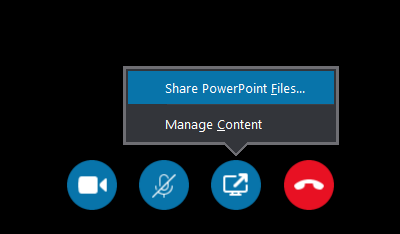
Once the Powerpoint is loaded, we have new options from a display point of view. "Video Only", "Video and Content", and "Content Only". We have already covered "Video Only", no need to show it again.
Though the PowerPoint is displaying on the Presenter's window, it has not yet been broadcast to the meeting. WE will need to select a layout that allows the PowerPoint to be seen by attendees.
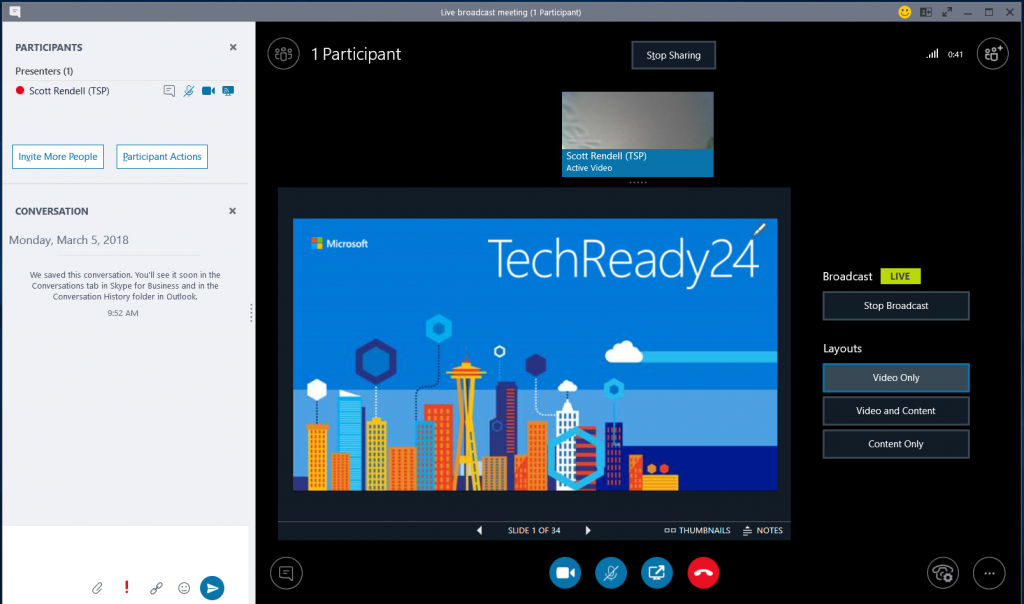
Selecting "Content only" gives us the view below.
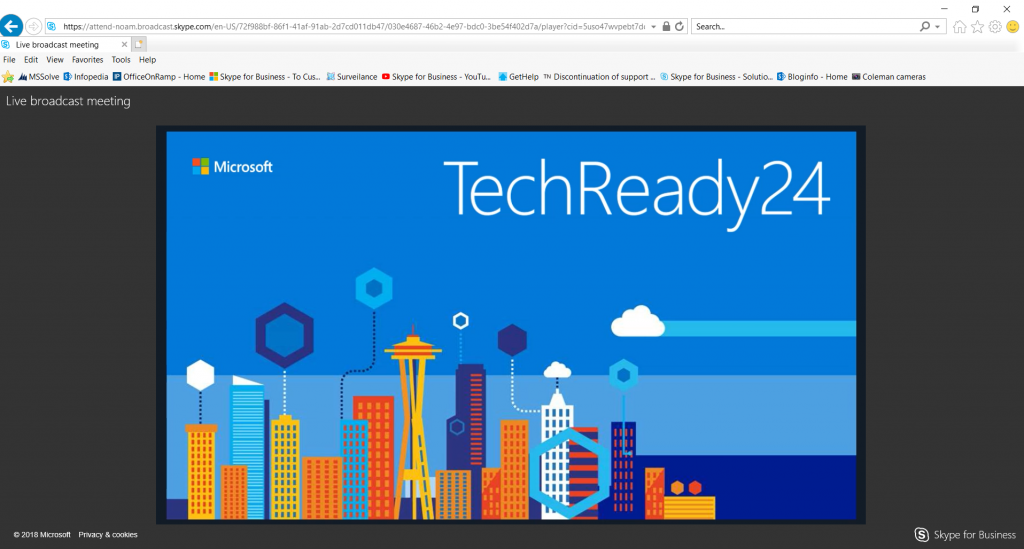
Selecting "Video and Content", will add a smaller Video window to the right of the content. This way not only can the attendee see the content, but the Presenter as well to allow for a more personalized experience as well as taking non-verbal queues from the Presenter now that you can see him/her.
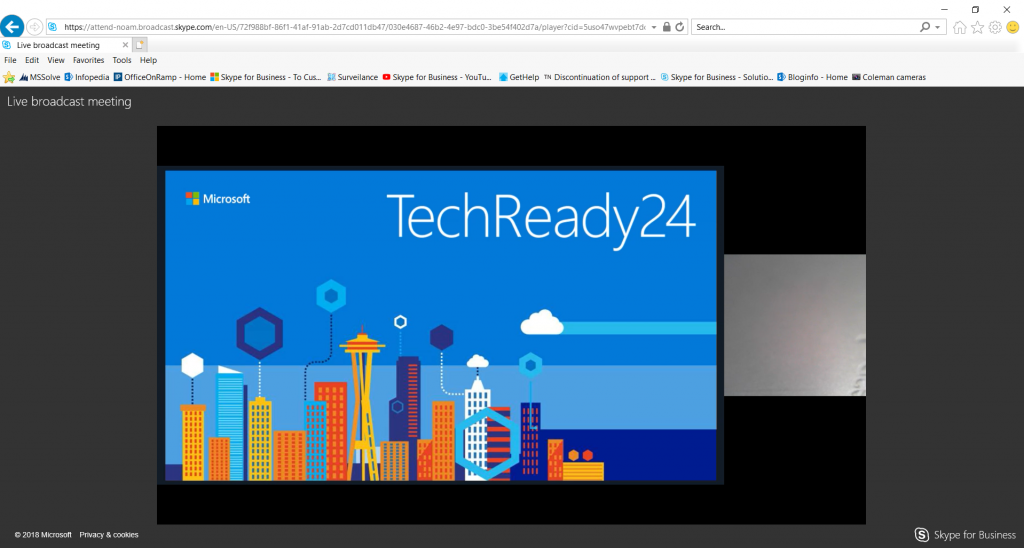
There are no other views to discuss, so the meeting may continue until its normal end. Like before though, if for any reason the Broadcast is stopped, the it is over and cannot be restarted. Once you are finished with the Broadcast, you would then click the "Stop Broadcast" button and then exist the meetings.
Thanks you for taking the time to go thru the Skype for Business Broadcast meeting blog. I hope that you have learned at least one thing from this Skype for Business Broadcast Series. Please feel free to ask questions, or post comments.
Enjoy your Broadcast meetings.
Back to the top level page.
Successful Skype for Business Meetings (Series – Module #6 Video Conferencing and Screensharing )
Back to the top level page
Video Only Conference.
As I have previously stated, all SFBO (Skype for Business Online) conferences have all modalities/features/workloads (pick one) already baked into the meeting – no matter what the creation method. The type of conference you wish to have is simply a choice of using the features along with the meeting options selected. In the audio conferencing sections above, you saw a screen shot where video for attendees was disabled. You will need to make sure that is unchecked should you wish to allow video for attendee – presenters automatically can use video.
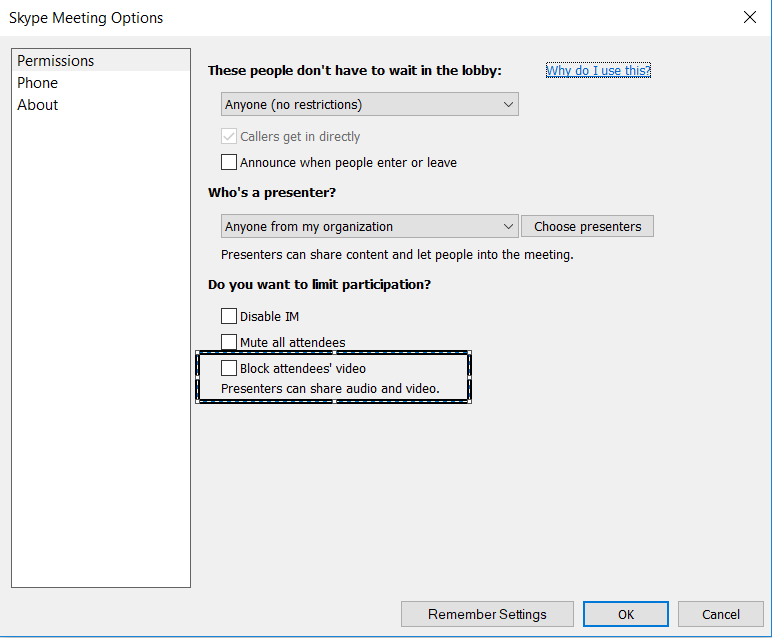
The join experience can vary a bit depending on the method in which you created the meeting.
If you are being pulled into a meeting that already has video enabled, the invite might look like this:
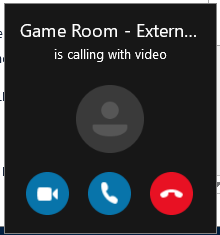
In which case you can answer with video by clicking the  icon, or by audio without video, by clicking the
  icon.
icon.
Should you have joined via an email invite, it is up to you to start your video if you choose. As an added bonus, when you click the icon, you will see a preview of your video – you are not yet broadcasting video. This is just a preview so that you can check your surroundings, your hair, make sure nothing is in your teeth etc., prior to broadcasting your video. Once you click the "start my video" area, video broadcast starts.
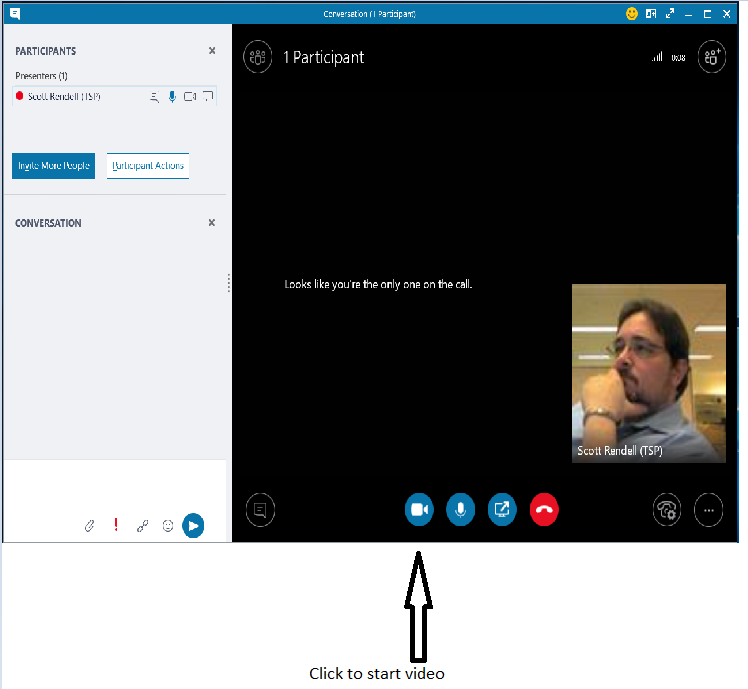
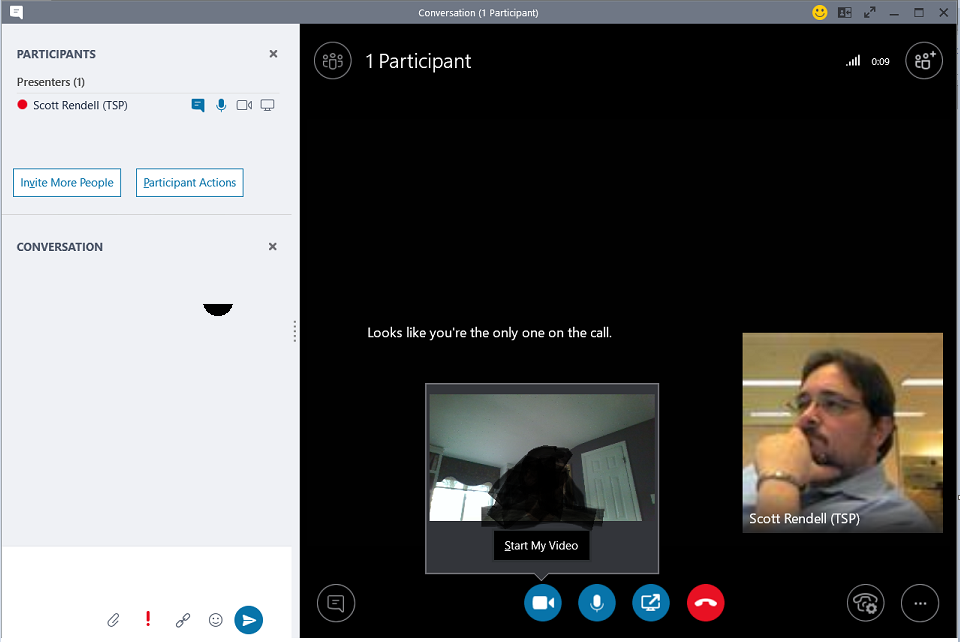
Once video has started (assuming others have video on as well) you will see your video plus 5 others video stream in what is called the "standing row".

Other presenter/attendees will have smaller, non-active video, icons below the standing row This is called the "sitting row". If no content is being resented then this is the default display. You will notice that your video is to the right of the standing row.
There are a few options that presenters have at this point.
- The ability to pin participants to the standing row rather than having it switch based on who is talking. This happens at the client level. Each client can customize their standing row. Simply right click a participant's video/icon and then click the pin option.
- The ability to "lock the video spotlight" by right clicking a single participant and selecting that option thus enlarging that video stream for the entire meeting. This happens at the meeting level and changes all participants client to "lock" onto the single video stream. You must be a Presenter in order to lock users video.
One final Skype for Business Video layout is when someone on the call is using video from a Polycom "round table" device or CX-5500. This is a 360 degree camera system meant for small conference rooms. It has the ability to display a panoramic view within the Skype for Business client. With 5 cameras, it will switch to the camera closest to the active speaker as well as show the panoramic display as the graphic below shows.
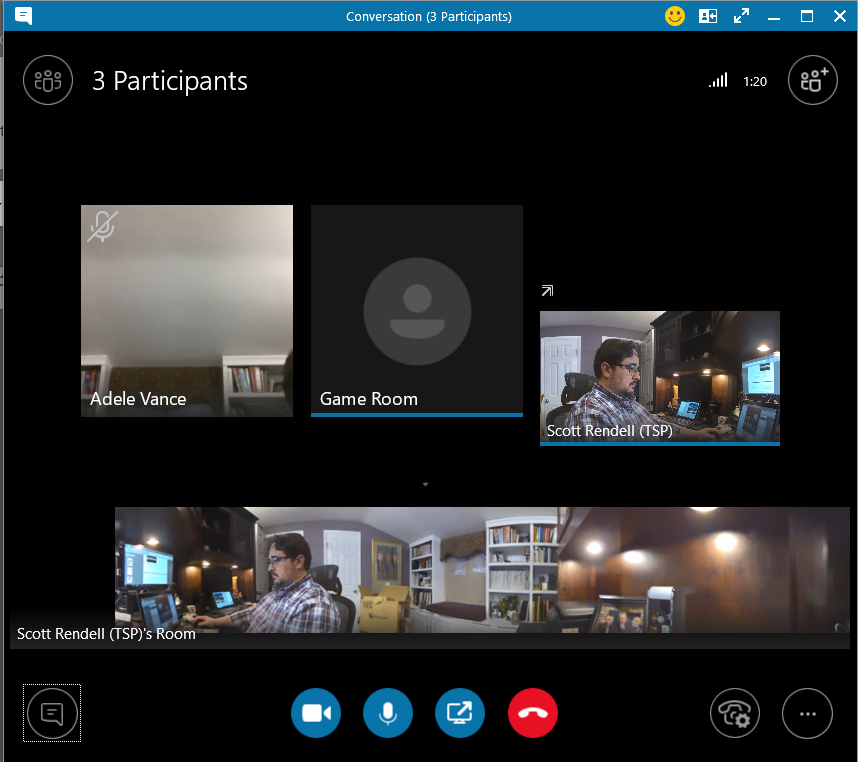
Many people I work with have now begun to use video in their meetings, I personally will turn on video for most of my meetings, especially peer to peer. I find that it requires me to be more focused on the meeting as others can see if I am engaged in the meeting or doing other things. This truly helps keep the meetings focused.
Enjoy your video only conference.
Web (Video) Conference Screen Sharing.
When using the SFBO client to join a meeting, you technically are joining a "Web Conference" since SFBO is cloud based and you are going over the "web" to join it. Again, all SFBO meetings have all modalities/features/workloads (pick one) already baked into the meeting – no matter what the creation method.
In this scenario, our meeting has IM and screen sharing. We could easily add audio or video by clicking the corresponding icon.

To begin a screen sharing session, click the  icon and choose the screen that you wish to share.
Screen sharing is useful if you want to show others what you are seeing on screen. Some examples might be remote troubleshooting, showing content you cannot give out, or demoing an application.
Some notable items on the screen include the IM window and participant window.
These are sometimes enabled by default, but can be turned on and off by clicking the corresponding icon.
 In the upper left hand corner enables/disables the participant list. In the figure above the list is enabled. By disabling it, you remove the list as shown here.
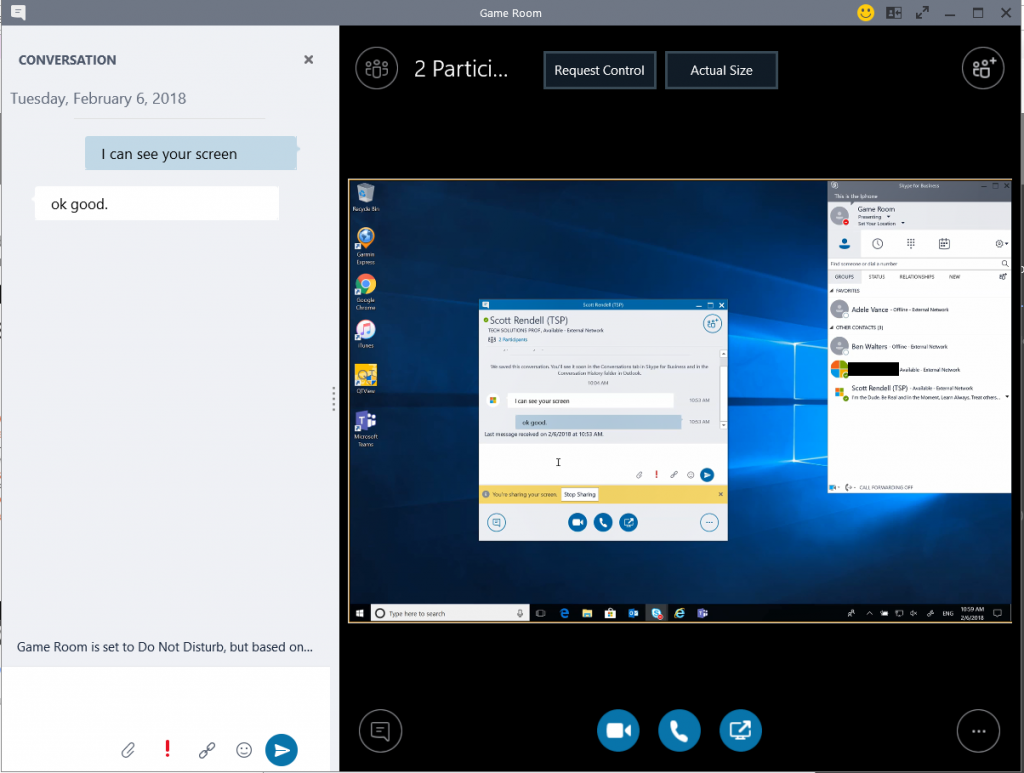
You can also remove the IM window to give yourself a larger view of the presented material.
 removes the IM window, but does NOT disable IM, it simply removes your ability to see it live. You will still get notifications as IMs come in. You will need to re-enable the IM window in order to respond.
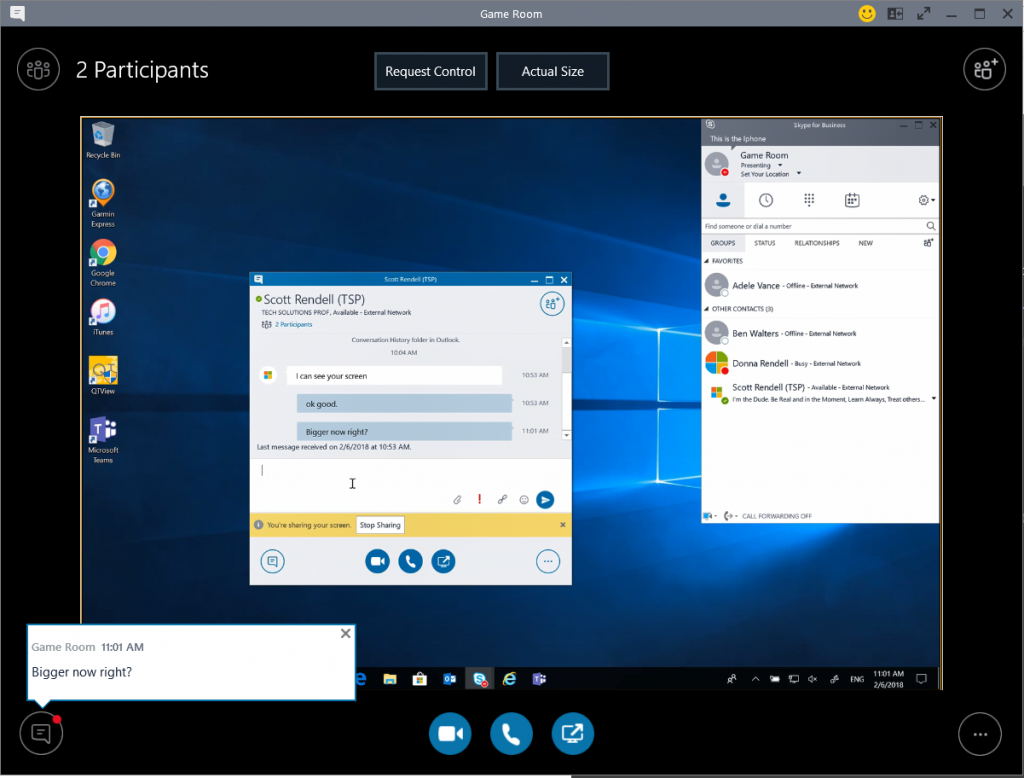
As with any IM, or conference, once you are finished, you can simply click the "x" in the upper right hand corner to leave the meeting.
Enjoy your Web Conference with Screen sharing.
Back to the top level page
Architecture Testing Guide Released
The patterns & practices Architecture Testing Guide is designed to help project stakeholders, software designers, developers, and testers understand the process of testing software architecture before the code is implemented. The paper describes an approach and methodology for testing the design of a system, and describes the user-specific viewpoints that you must consider during the testing process. The Architecture Testing Guide walks through the process of testing a system from each viewpoint, and provides instructions, examples, and best practices along the way. A draft version of the paper is for download here.
You can download it from GDN.
Popular posts from this blog
[Excel] 문서에 오류가 있는지 확인하는 방법 Excel 문서를 편집하는 도중에 "셀 서식이 너무 많습니다." 메시지가 나오면서 서식을 더 이상 추가할 수 없거나, 문서의 크기가 예상보다 너무 클 때 , 특정 이름이 이미 있다는 메시지가 나오면서 '이름 충돌' 메시지가 계속 나올 때 가 있을 것입니다. 문서에 오류가 있는지 확인하는 방법에 대해서 설명합니다. ※ 문서를 수정하기 전에 수정 과정에서 데이터가 손실될 가능성이 있으므로 백업 본을 하나 만들어 놓습니다. 현상 및 원인 "셀 서식이 너무 많습니다." Excel의 Workbook은 97-2003 버전의 경우 약 4,000개 2007 버전의 경우 약 64,000개 의 서로 다른 셀 서식 조합을 가질 수 있습니다. 셀 서식 조합이라는 것은 글꼴 서식(예- 글꼴 종류, 크기, 기울임, 굵은 글꼴, 밑줄 등)이나 괘선(괘선의 위치, 색상 등), 무늬나 음영, 표시 형식, 맞춤, 셀 보호 등 을 포함합니다. Excel 2007에서는 1,024개의 전역 글꼴 종류를 사용할 수 있고 통합 문서당 512개까지 사용할 수 있습니다. 따라서 셀 서식 조합의 개수 제한을 초과한 경우에는 "셀 서식이 너무 많습니다." 메시지가 발생하는 것입니다. 그러나 대부분의 경우, 사용자가 직접 넣은 서식으로 개수 제한을 초과하는 경우는 드뭅니다. 셀 서식이 개수 제한을 넘도록 자동으로 서식을 추가해 주는 Laroux나 Pldt 같은 매크로 바이러스 에 감염이 되었거나, 매크로 바이러스에 감염이 되었던 문서의 시트를 [시트 이동/복사]하여 가져온 경우 시트의 서식, 스타일이 옮겨와 문제가 될 수 있습니다. "셀 서식이 너무 많습니다." 메시지가 발생하지 않도록 하기 위한 예방법 글꼴(종류, 크기, 색, 굵기, 기울임, 밑줄), 셀 채우기 색, 행 높이, 열 너비, 테두리(선 종류, ...
ASP.NET AJAX RC 1 is here! Download now
Moving on with WebParticles 1 Deploying to the _app_bin folder This post adds to Tony Rabun's post "WebParticles: Developing and Using Web User Controls WebParts in Microsoft Office SharePoint Server 2007" . In the original post, the web part DLLs are deployed in the GAC. During the development period, this could become a bit of a pain as you will be doing numerous compile, deploy then test cycles. Putting the DLLs in the _app_bin folder of the SharePoint web application makes things a bit easier. Make sure the web part class that load the user control has the GUID attribute and the constructor sets the export mode to all. Figure 1 - The web part class 2. Add the AllowPartiallyTrustedCallers Attribute to the AssemblyInfo.cs file of the web part project and all other DLL projects it is referencing. Figure 2 - Marking the assembly with AllowPartiallyTrustedCallers attribute 3. Copy all the DLLs from the bin folder of the web part...


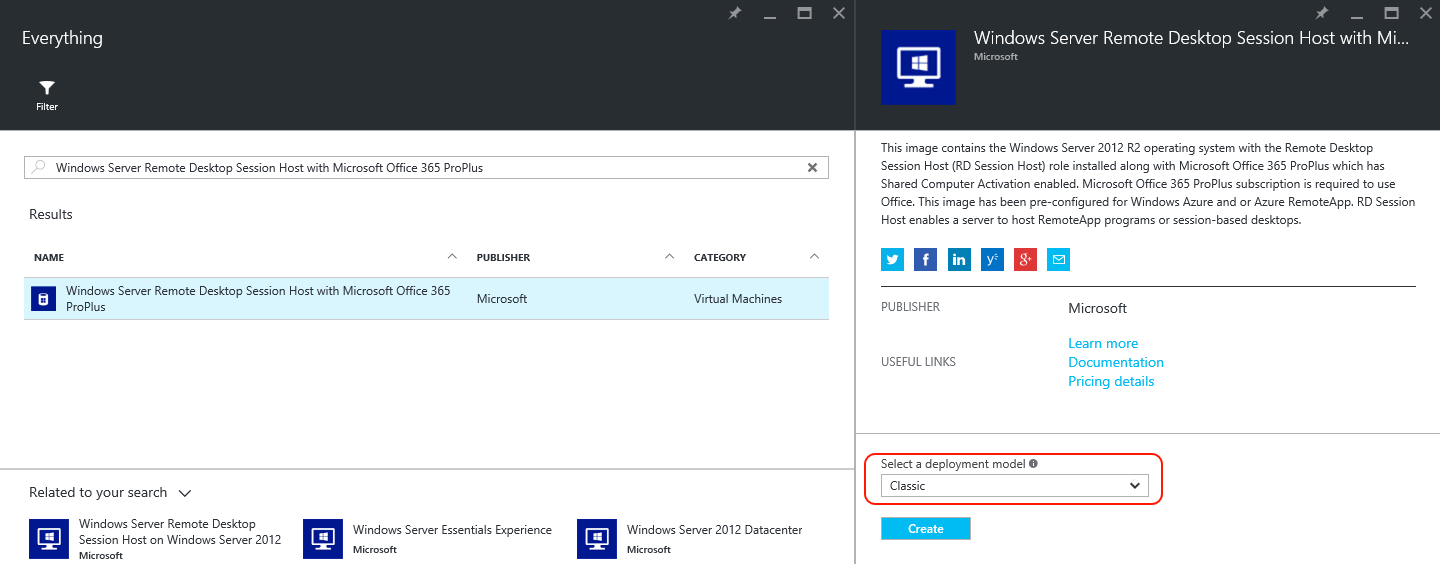

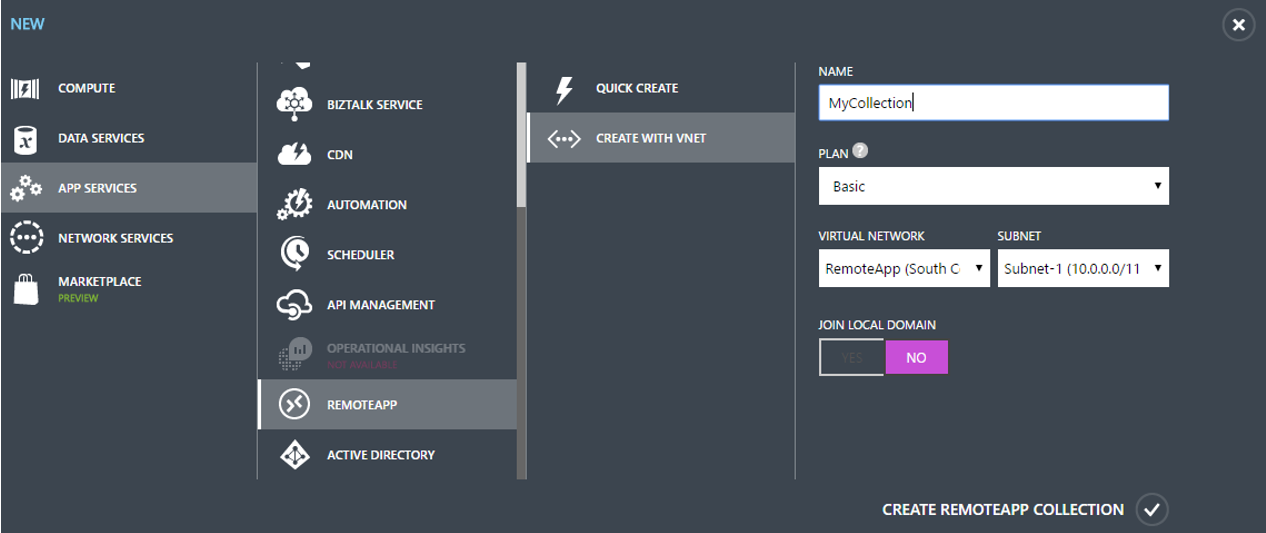


Comments
Post a Comment