Skip to main content
Announcing the AdventureWorks OData Feed sample
Update – Removing Built-in Applications from Windows 8
In October last year I published a script that is designed to remove the built-in Windows 8 applications when creating a Windows 8 image. After a reading some of the comments in that blog post I decided to create a new version of the script that is simpler to use. The new script removes the need to know the full name for the app and the different names for each architecture. I am sure you will agree that this name - Microsoft.Bing – is much easier to manage than this - Microsoft.Bing_1.2.0.137_x86__8wekyb3d8bbwe.
The script below takes a simple list of Apps and then removes the provisioned package and the package that is installed for the Administrator. To adjust the script for your requirements simply update the $AppList comma separated list to include the Apps you want to remove.
$AppsList = "Microsoft.Bing" , "Microsoft.BingFinance" , "Microsoft.BingMaps" , "Microsoft.BingNews",`
"Microsoft.BingSports" , "Microsoft.BingTravel" , "Microsoft.BingWeather" , "Microsoft.Camera",`
"microsoft.microsoftskydrive" , "Microsoft.Reader" , "microsoft.windowscommunicationsapps",`
"microsoft.windowsphotos" , "Microsoft.XboxLIVEGames" , "Microsoft.ZuneMusic",`
"Microsoft.ZuneVideo" , "Microsoft.Media.PlayReadyClient"
ForEach ($App in $AppsList)
{
$PackageFullName = (Get-AppxPackage $App).PackageFullName
if ((Get-AppxPackage $App).PackageFullName)
{
Write-Host "Removing Package: $App"
remove-AppxProvisionedPackage -online -packagename $PackageFullName
remove-AppxPackage -package $PackageFullName
}
else
{
Write-Host "Unable to find package: $App"
}
}
When deleting applications I also recommend that you create and deploy a custom start screen layout using the export-layout command to export a layout they want to use and then apply the layout during deployment to the default user profile. If you do not use a custom start screen layout you may see a version of the start screen that only contains five tiles. For more information see my previous post - https://blogs.technet.com/b/deploymentguys/archive/2012/10/26/start-screen-customization-with-mdt-.aspx?pi36647=2.
For more information on adding and removing apps please refer to this TechNet article..
This post was contributed by Ben Hunter, a Solution Architect with Microsoft Consulting Services.
Disclaimer: The information on this site is provided "AS IS" with no warranties, confers no rights, and is not supported by the authors or Microsoft Corporation. Use of included script samples are subject to the terms specified in the Terms of Use .
Using MBAM to start BitLocker Encryption in a Task Sequence
The script has been updated to abort if the TPM is not Active and to create Endorsement Key Pair if it does not exist on the TPM.
Microsoft BitLocker Administration and Monitoring (MBAM) provides features to manage BitLocker encryption of computers in an enterprise. More information on MBAM can be found here.
BitLocker creates recovery information at the time of encryption and MBAM stores that information in the recovery data store. While MBAM can update its recovery data store when the agent is installed on a system that is already encrypted, it is preferable to have MBAM control the encryption process. MBAM Encryption is controlled by Group Policy. Group Policy is not applied during a SCCM Task Sequence. It is possible to have MBAM start encryption during the task sequence, the techniques are described in the following whitepaper Using MBAM Data Encryption With MDT https://go.microsoft.com/fwlink/?LinkId=229053
Manually starting BitLocker Encryption with MBAM
Manually starting encryption with MABM requires five steps:
- Install the MBAM Agent.
- Stop the MBAM agent
- Import registry settings that will instruct the agent to start encryption.
- Wait for encryption to start
- Remove the most of the imported registry settings
Installing MBAM Agent
The MBAM agent can be installed during Windows 7 Image creation.
To install MBAM during the deployment, just create a SCCM package/program to install the agent.
Creating the registry import files.
Create a .reg file that contains the required MBAM entries. There is a template in Program Files\Microsoft\MDOP MBAM\MBAMDeploymentKeyTemplate.reg. This template will become the basis for the AddMBAMRegEntries.reg file.
Do the following on an unencrypted system with the MBAM Agent installed(from an elevated command prompt):
- Net Stop MBAMAGENT
- reg import "c:\Program Files\Microsoft\MDOP MBAM\MBAMDeploymentKeyTemplate.reg"
- using regedit make the following changes:
- Change the KeyRecoveryServiceEndPoint key to have the URL of the MBAM recovery server.
- Add NoStartupDelay as a DWORD with a value of one.
- Export the MBAM key to a file (AddMBAMRegEntries.reg)
Next, create a .reg file to remove the entries
- Copy AddMBAMRegEntries.reg to RemoveMBAMRegEntries.reg
- Open RemoveMBAMEntries.reg in notepad
- Delete the line: "Installed"=dword:00000001
- for all the other keys in the file replace everything after the equals sign with a minus sign (E.G. "NoStartupDelay"=dword:00000001 becomes "NoStartupDelay"=-)
- Save RemoveMBAMRegEntries.reg
Note: More information on creating and editing .reg files is available here.
At this point test that the .reg files are correct by starting the MBAM agent (net Start MBAMAGENT), encryption will begin within a couple of minutes. After encryption begins, run the removeMBAMEntries.reg file to remove the unneeded entries.
For encryption to begin, the MBAM agent needs to talk to the server. If this server communication fails the encryption will not start. If there is a problem, verify that the URL is correct and the MBAM server is functioning correctly.
Sample AddMBAMRegEntries.reg file
Windows Registry Editor Version 5.00
[HKEY_LOCAL_MACHINE\SOFTWARE\Microsoft\MBAM]
"Installed"=dword:00000001
"KeyRecoveryOptions"=dword:00000001
"UseKeyRecoveryService"=dword:00000001
"KeyRecoveryServiceEndPoint"=hex(2):68,00,74,00,74,00,70,00,73,00,3a,00,2f,00,\
2f,00,63,00,69,00,73,00,35,00,33,00,33,00,76,00,6d,00,6d,00,62,00,61,00,6d,\
00,2e,00,61,00,76,00,6e,00,65,00,74,00,2e,00,63,00,6f,00,6d,00,2f,00,4d,00,\
42,00,41,00,4d,00,52,00,65,00,63,00,6f,00,76,00,65,00,72,00,79,00,41,00,6e,\
00,64,00,48,00,61,00,72,00,64,00,77,00,61,00,72,00,65,00,53,00,65,00,72,00,\
76,00,69,00,63,00,65,00,2f,00,43,00,6f,00,72,00,65,00,53,00,65,00,72,00,76,\
00,69,00,63,00,65,00,2e,00,73,00,76,00,63,00,00,00
"DeploymentTime"=dword:00000001
"NoStartupDelay"=dword:00000001
Sample RemoveMBAMRegEntries.reg file
Windows Registry Editor Version 5.00
[HKEY_LOCAL_MACHINE\SOFTWARE\Microsoft\MBAM]
"KeyRecoveryOptions"=-
"UseKeyRecoveryService"=-
"KeyRecoveryServiceEndPoint"=-
"DeploymentTime"=-
"NoStartupDelay"=-
Automating the process with a script
StartMBAMEncryption.wsf is a MDT 2010 style script that will automate the last four steps To use this script create a folder that contains StartMBAMEncryption.wsf, ZTIUtility.vbs from the MDT toolkit, and the two .reg files created above.
To start Encryption run the following from an elevated command prompt:
cscript StartMBAMEncryption.wsf /AddRegFile:AddMBAMRegEntries.reg /RemoveRegFile:RemoveMBAMRegEntries.reg
How does the script work?
Make sure that MBAM is installed, do a WMI query for the MBAMAGENT service. If the service does not exist, fail.
Set oServices = objWMI.ExecQuery("Select * from win32_service where name='MBAMAgent'")
TestAndFail (oServices.count = 1), 10005, "MBAM Client Agent is not installed"
The service exists, stop the service. Using the result of the previous query, call the StopService method. Note that the query will return at most one item.
'Stop the service
for each oService in oServices
oService.StopService()
Next
Use the REG IMPORT command to import the AddMBAMRegEntries.reg file, this will give the MBAM agent instruction to start encryption.
sCMD = "Reg IMPORT """ & sAddRefFilePath & """"
iRetVal = oUtility.RunWithHeartbeat(sCMD)
TestAndFail iretVal, 10006, "Importing AddRegFile: " & sAddRefFilePath
Now, using the result of the original WMI query again, start the MBAM agent
' Restart the MBAMAgent Service
for each oService in oServices
oService.StartService()
Next
Since BitLocker information is in a different Namespace, the script must create a connection to that Namespace.
strConnectionStr1 = "winmgmts:{impersonationLevel=impersonate,authenticationLevel=pktPrivacy}!root\cimv2\Security\MicrosoftVolumeEncryption"
On Error resume Next
Set objWMIBDE = GetObject(strConnectionStr1)
on error goto 0
TestAndFail Err, 10007, "Unable to connect to Bitlocker WMI Object - bitlocker not installed"
Using the object just created, query for a Win32_EncryptableVolume for the C: drive. Once that object is obtained, go into a loop sleeping 30 seconds, updating the Task Sequence progress bar, and checking to see if the encryption is in progress. Note that the script is checking for both in progress (EncryptionStatus = 2) and Encrypted (EncryptionStatus = 1). This loop will wait 10 minutes for the encryption to start. In testing the encryption has started within 2 minutes.
iCount = 0
iLoopCount = 0
oLogging.CreateEntry "Waiting for Encryption to Start", LogTypeInfo
Do
oLogging.ReportProgress "Waiting For Encryptiont to Start", iLoopCount/20
wscript.Sleep 30000
Set colEnVol = objWMIBDE.ExecQuery("Select * from Win32_EncryptableVolume where DriveLetter='C:'")
for each oEncVol in colEnVol
oEncVol.GetConversionStatus iEncryptionStatus, iPercentComplete
Next
ILoopCount = iLoopCount + 1
If iLoopCount >= 20 then
TestAndFail False, 10008, "Timeout: Encryption did not start"
End If
Loop Until ((iEncryptionStatus = 1) or (iEncryptionStatus = 2))
oLogging.ReportProgress "Encryptiont Started", 100
oLogging.CreateEntry "Encryptiont Started", LogTypeInfo
All that is left to do is cleanup the registry by importing the removeMBAMEntries.reg file
sCMD = "Reg IMPORT """ & sRemoveRegFilePath & """"
iRetVal = oUtility.RunWithHeartbeat(sCMD)
TestAndFail iretVal, 10009, "Importing RemoveRegFile: " & sRemoveRegFilePath
Creating the MBAM Support Task Sequence Package
Create a new folder and add the two .reg files created above, a copy of ZTIUTILITY.VBS from the MDT scripts package, and StartMBAMEncryption.wsf. In you SCCM console, create a new package, and program. The program command line will be:
cscript StartMBAMEncryption.wsf /AddRegFile:AddMBAMRegEntries.reg /RemoveRegFile:RemoveMBAMRegEntries.reg
Or, to wait until encryption is finished, before the task sequence continues, the program command line will be:
cscript StartMBAMEncryption.wsf /AddRegFile:AddMBAMRegEntries.reg /RemoveRegFile:RemoveMBAMRegEntries.reg /WaitForEncryption:true
Changes to the Task Sequence
TPM Issues
The Trusted Platform Module (TPM) must be visible to the OS and enabled. making the TPM visible, varies by hardware vendor and system. There is a script that will check if the TPM is visible Here. For information on how to enable the TPM from a task sequence see the table below.
Disk Partitioning
BitLocker requires an unencrypted partition that will hold the Boot files and boot database. This partition has to be at least 100MB, but it is recommended that it be 300MB. A 300MB partition will allow recovery environment (WinRE) to be copied to the unencrypted drive. WinRE is automatically copied when BitLocker is enabled if there is enough space on the boot partition.
- Create a 300MB primary partition and mark it Active (Make Bootable)
- Create a primary partition that uses 100% of the remaining disk Assign a variable to this disk (OSDISK)
- Change the Apply Operating System step to put the Operating System on the disk specified in the variable OSDISK


For refresh from XP or Windows 7 system that does not have a separate boot partition, use the following steps:
The following steps should be added before the step that installs the MBAM support package created above.
Using ZTIBDE.WSF (from MDT)
Add a Run Command Line step that runs ZTIBDE.WSF
Cscript %ScriptRoot%\ztibde.wsf
Using BdeHDCfg
Add a Run Command Line step with the following command line:
BdeHdCfg -target default -quiet
This will create a 300MB partition for the boot files.
Add a Reboot System step following this step.
Additional information on BitLocker, Configuration Manager 2007, and disk partitions can be found on the Configuration manager Support Team blog https://blogs.technet.com/b/configurationmgr/archive/2011/01/20/solution-the-enable-bitlocker-task-fails-to-run-during-a-configmgr-2007-task-sequence.aspx
Join the Domain
The computer system must be in a Domain in order for MBAM to escrow the BitLocker Keys.
Joining a domain is required for this process to work correctly.
Enabling BitLocker
To enable BitLocker, simply add an install software step to install the package/program created above. It is recommended that this be one of the last steps in the Task Sequence because encrypting the disk will consume many system resources until the disk is fully encrypted.
Waiting for Encryption to Finish
To ensure the highest security level, the system should not be released to a user until the disk is completely encrypted. The /WaitForEncryption:True option will force the script to wait up to 5 hours for the encryption to finish. If the encryption doesn't finish within 5 hours, the fact will be logged but the script will not abort. This option can be useful if there are business requirements that the system be fully encrypted before any data is restored.
cscript StartMBAMEncryption.wsf /AddRegFile:AddMBAMRegEntries.reg /RemoveRegFile:RemoveMBAMRegEntries.reg /WaitForEncryption:true
This post was contributed by David Hornbaker, a Senior Consultant with Microsoft Services - U.S. East Region.
Special thanks to Manoj Sehgal, Senior Support Escalation Engineer, Platforms core, Microsoft Services, and William Lees, Principal SDE, Microsoft Corporation, for their assistance with this post.
Disclaimer: The information on this site is provided "AS IS" with no warranties, confers no rights, and is not supported by the authors or Microsoft Corporation. Use of included script samples are subject to the terms specified in the Terms of Use
StartMBAMEncryption.zip
USMT: Architecture-Independent Rules for Migrating 32-bit Applications
| Update 2014-04-16: I forgot to include that fact that a locationModify rule is required when using the %HklmWowSoftware% variable. The post has been updated to reflect this. |
One challenge with capturing the settings for a 32-bit applications with USMT is that some file and Registry paths will be different on 32-bit operating systems and 64-bit operating systems. On a 32-bit operating system 32-bit programs typically get installed to C:\Program Files and local machine Registry entries are written to a subkey of HKLM\Software. However, on a 64-bit operating system , 32-bit programs get installed to C:\Program Files (x86) and HKLM\Software Registry entries are redirected to HKLM\SOFTWARE\Wow6432Node. (I have oversimplified this here for brevity's sake. See this section of the Programming Guide for 64-bit Windows for more details: https://msdn.microsoft.com/en-us/library/aa384249(v=vs.85).aspx.)
Because of this, you might think you would need to different components to migrate 32-bit application settings depending on the source and destination operating system architecture. For example, I had a customer that was using three different XML files with components for 32-bit applications. I'll illustrate this using a fictitious 32-bit application called MyApp. This application is installed by default to C:\Program Files\MyApp and creates machine-based settings in HKLM\Software\MyApp on a 32-bit OS. For the sake of simplicity for this example, lets say that the desired way to migrate this app is to capture all the files in the C:\Program Files\MyApp\Config folder and to capture all of HKLM\Software\MyApp (or the equivalent locations on a 64-bit OS).
The customer had three different migration scenarios:
- Windows XP 32-bit to Windows XP 32-bit (break/fix rebuilds, etc.)
- Windows XP 32-bit to Windows 7 64-bit (OS migration)
- Windows 7 64-bit to Windows 7 64-bit (break/fix rebuilds, etc.)
For Windows XP 32-bit to Windows XP 32-bit migrations they had a component like this for MyApp.
<component type="Application" context="System">
<displayName>Migrate MyApp - XP to XP</displayName>
<role role="Settings">
<rules>
<include>
<objectSet>
<pattern type="File">%CSIDL_PROGRAM_FILES%\MyApp\Config\* [*]</pattern>
<pattern type="Registry">HKLM\Software\MyApp\* [*]</pattern>
</objectSet>
</include>
</rules>
</role>
</component>
For Windows XP 32-bit to Windows 7 64-bit migrations they had a component like this for MyApp. This has locationModify rules to move the migrated items to the redirected locations for 32-bit apps on 64-bit Windows.
<component type="Application" context="System">
<displayName>Migrate MyApp - XP to Win7</displayName>
<role role="Settings">
<rules>
<include>
<objectSet>
<pattern type="File">%CSIDL_PROGRAM_FILES%\MyApp\Config\* [*]</pattern>
<pattern type="Registry">HKLM\Software\MyApp\* [*]</pattern>
</objectSet>
</include>
<locationModify script="MigXmlHelper.RelativeMove('%CSIDL_PROGRAM_FILES%\MyApp\Config','%CSIDL_PROGRAM_FILESX86%\MyApp\Config')">
<objectSet>
<pattern type="File">%CSIDL_PROGRAM_FILES%\MyApp\Config\* [*]</pattern>
</objectSet>
</locationModify>
<locationModify script="MigXmlHelper.RelativeMove('HKLM\Software\MyApp','HKLM\SOFTWARE\Wow6432Node\MyApp')">
<objectSet>
<pattern type="Registry">HKLM\Software\MyApp\* [*]</pattern>
</objectSet>
</locationModify>
</rules>
</role>
</component>
For Windows 7 64-bit to Windows 7 64-bit migrations they had a component like this for MyApp which directly captured/restored the redirected locations for the 32-bit app on 64-bit Windows.
<component type="Application" context="System">
<displayName>Migrate MyApp - Win7 to Win7</displayName>
<role role="Settings">
<rules>
<include>
<objectSet>
<pattern type="File">%CSIDL_PROGRAM_FILESX86%\MyApp\Config\* [*]</pattern>
<pattern type="Registry">HKLM\SOFTWARE\Wow6432Node\MyApp\* [*]</pattern>
</objectSet>
</include>
</rules>
</role>
</component>
Of course, this makes it complicated to call USMT with the correct XML file depending on what source and destination operating systems were involved. Fortunately, there is a way to avoid this. It involves using a technique I lifted directly from MigApp.xml. MigApp.xml contains a namedElements node that defines a bunch of global items. Some of these items define single variables representing the file and local machine Registry locations for 32-bit applications independent of the operating system architecture. You can copy this into your own custom XML files and use those variables in the same way. Copy the XML content below into your custom XML files (just after the migration node at the top)
<library prefix="MigSysHelper">MigSys.dll</library>
<_locDefinition>
<_locDefault _loc="locNone"/>
<_locTag _loc="locData">displayName</_locTag>
</_locDefinition>
<namedElements>
<!-- Global -->
<environment name="GlobalEnvX64">
<conditions>
<condition>MigXmlHelper.IsNative64Bit()</condition>
</conditions>
<variable name="HklmWowSoftware">
<text>HKLM\SOFTWARE\Wow6432Node</text>
</variable>
<variable name="ProgramFiles32bit">
<text>%ProgramFiles(x86)%</text>
</variable>
<variable name="CommonProgramFiles32bit">
<text>%CommonProgramFiles(x86)%</text>
</variable>
</environment>
<environment name="GlobalEnv">
<conditions>
<condition negation="Yes">MigXmlHelper.IsNative64Bit()</condition>
</conditions>
<variable name="HklmWowSoftware">
<text>HKLM\Software</text>
</variable>
<variable name="ProgramFiles32bit">
<text>%ProgramFiles%</text>
</variable>
<variable name="CommonProgramFiles32bit">
<text>%CommonProgramFiles%</text>
</variable>
</environment>
<!-- Global USER -->
<environment context="USER" name="GlobalEnvX64User">
<conditions>
<condition>MigXmlHelper.IsNative64Bit()</condition>
</conditions>
<variable name="VirtualStore_ProgramFiles32bit">
<text>%CSIDL_VIRTUALSTORE_PROGRAMFILES(X86)%</text>
</variable>
<variable name="VirtualStore_CommonProgramFiles32bit">
<text>%CSIDL_VIRTUALSTORE_COMMONPROGRAMFILES(X86)%</text>
</variable>
</environment>
<environment context="USER" name="GlobalEnvUser">
<conditions>
<condition negation="Yes">MigXmlHelper.IsNative64Bit()</condition>
</conditions>
<variable name="VirtualStore_ProgramFiles32bit">
<text>%CSIDL_VIRTUALSTORE_PROGRAMFILES%</text>
</variable>
<variable name="VirtualStore_CommonProgramFiles32bit">
<text>%CSIDL_VIRTUALSTORE_COMMONPROGRAMFILES%</text>
</variable>
</environment>
</namedElements>
Once you add this, you can now define one component to migrate MyApp that will work in all three scenarios:
<component type="Application" context="System">
<displayName>Migrate MyApp</displayName>
<environment name="GlobalEnv"/>
<environment name="GlobalEnvX64"/>
<environment name="GlobalEnvUser"/>
<environment name="GlobalEnvX64User"/>
<role role="Settings">
<rules>
<include>
<objectSet>
<pattern type="File">%ProgramFiles32bit%\MyApp\Config\* [*]</pattern>
<pattern type="Registry">%HklmWowSoftware%\MyApp\* [*]</pattern>
</objectSet>
</include>
<locationModify script="MigXmlHelper.RelativeMove('%HklmWowSoftware%','%HklmWowSoftware%')">
<objectSet>
<pattern type="Registry">%HklmWowSoftware%\MyApp\* [*]</pattern>
</objectSet>
</locationModify>
</rules>
</role>
</component>
The variable %ProgramFiles32bit% will resolve correctly to C:\Program Files on a 32-bit OS and C:\Program Files (x86) on a 64-bit OS. The variable %HklmWowSoftware% will resolve correctly to HKLM\Software on a 32-bit OS and HKLM\SOFTWARE\Wow6432Node on a 64-bit OS.
Note that you need to add four environment nodes shown in the above example into your components that will use these variables. This is essentially adding a "reference" to the namedElements items that define the variables.
You also need a locationModify rule like the one show above when using the %HklmWowSoftware% variable. It may seem odd to need a location modify that has the same source and destination location. However, this is needed because USMT does not automatically redirect Registry locations. It will try to write them back to the original location. Fortunately, the locationModify RelativeMove function will expand the environment variables of the first parameter in the context of the source machine and the second parameter in the context of the destination machine. This will cause the Registry entries to be redirected properly.
You may be wondering if you need to worry about redirection of HKCU Registry entries for 32-bit applications. You don't. For most of HKCU, 32-bit apps write to HKCU without redirection (See https://msdn.microsoft.com/en-us/library/aa384232(v=vs.85).aspx for details).
Disclaimer: The information on this site is provided "AS IS" with no warranties, confers no rights, and is not supported by the authors or Microsoft Corporation. Use of included script samples are subject to the terms specified in the Terms of Use .
This post was contributed by Michael Murgolo, a Senior Consultant with Microsoft Services - U.S. East Region
USMT Capture Status Notification HTA in Full Operating System
Recently, I had a customer that wanted separate, stand-alone USMT Capture and USMT Restore task sequences. They had key depot locations that would allow users to drop off an old machine, and have the depot technicians image and restore data to a new device. They would then repurpose the old machine.
Evidently, they had issues with USMT not running successfully or perhaps it was forgotten by the technician in the first place. So they asked for a notification box to pop up and let the technician know the data was, in fact, captured successfully.
The requirement was to make a notification box pop up and pause the task sequence until it is acknowledged or closed.
I created a simple HTA that will look for the scanstate.log in the CCM\Logs\SMSTSlog folder based on architecture. As I am sure you are aware, the SMSTSLog folder is where the logs are placed during the task sequence, so they are always guaranteed to be current. It isn't until the task sequence is closed out that the logs are moved one level up and the SMSTSLog folder removed.
If they are running on a Windows XP machine the path is:
C:\Windows\System32\CCM\Logs\SMSTSLog\scanstate.log.
If they are running on a Windows 7 x64 machine, the path is:
C:\Windows\SysWow64\CCM\Logs\SMSTSLog\scanstate.log
The HTA then parses this log file looking for 'MIGACTIVITY_SUCCESS'. If this message exists in the log file, the HTA returns the following box…

If it doesn't exist, they see the following box…

Now that the HTA is functional, I have to put it in the task sequence and make it visible while running inside the full operating system. This is where the fun really begins…
Luckily, we can take advantage of ServiceUi.exe that exists in the Tools\x86 or Tools\x64 folders within the Microsoft Deployment Toolkit package. We can launch this by calling it from %toolroot%.
Placing my HTA file in a folder called CustomScripts underneath the Scripts folder in the toolkit package allows me to use the command line…
%toolroot%\serviceui.exe –process:tsprogressui.exe %systemroot%\system32\mshta.exe %scriptroot%\CustomScripts\USMTCaptureStatus.hta
Here is an example of how to call my HTA using the ServiceUi.exe…

For more information on the use of ServiceUI.exe, see 'Can I use ServiceUI.exe to launch other programs besides the UDI Setup Wizard?' on Cameron's Blog – Cravings of System Center.
USMTCaptureStatus.hta
<html>
< head>
< title>USMT Capture Status</title>
< HTA:APPLICATION
APPLICATIONNAME="USMT Capture Status"
ID="USMTCaptureStatus"
SCROLL="no"/>
< /head>
<script language="VBScript">
' *****************
' * Window_OnLoad *
' *****************
Sub Window_OnLoad
'This method will be called when the application loads
window.resizeTo 600,300
window.moveto 1,1
USMTStatus
End Sub
' *****************
' * USMTStatus *
' *****************
Sub USMTStatus
Const ForReading = 1
' Set the search parameter
Set objRegEx = CreateObject("VBScript.RegExp")
objRegEx.Pattern = "MIGACTIVITY_SUCCESS"
' Prepare log file connectivity
Set objFSO = CreateObject("Scripting.FileSystemObject")
' WMI Connectivity
strComputer = "."
Set objWMIService = GetObject("winmgmts:" & "{impersonationLevel=impersonate}!\\" & strComputer & "\root\cimv2")
' Query WMI for processor architecture type
Set colProcessors= objWMIService.ExecQuery ("Select * From Win32_Processor")
' Set log file location based on processor architecture type
For Each objProcessor in colProcessors
If objProcessor.Architecture = 0 Then
Set objFile = objFSO.OpenTextFile("C:\windows\system32\ccm\logs\SMSTSLog\scanstate.log", ForReading)
Else
Set objFile = objFSO.OpenTextFile("C:\windows\syswow64\ccm\logs\SMSTSLog\scanstate.log", ForReading)
End If
' Set initial returnSuccess to 'False'
returnSuccess = False
' Parse the scanstate.log file for search parameters
Do Until objFile.AtEndOfStream
strSearchString = objFile.ReadLine
Set colMatches = objRegEx.Execute(strSearchString)
If colMatches.Count > 0 Then
For Each strMatch in colMatches
returnSuccess = True
Next
End If
Loop
' Set HTA pop-up box text based on search results
If returnSuccess = True Then
DataArea.InnerHTML = "The user state was SUCCESSFULLY captured.<br><br>PLEASE CLOSE THIS BOX TO END THE TASK SEQUENCE."
Else
DataArea.InnerHTML = "The user state was NOT SUCCESSFULLY captured.<br><br>PLEASE CLOSE THIS BOX TO END THE TASK SEQUENCE."
End If
Next
End Sub
< /script>
<body bgcolor= "white">
<span id = "DataArea"> </span>
<!--{{InsertControlsHere}}-Do not remove this line-->
</body>
< /html>
USMTCaptureStatus.zip
This post was contributed by Brad Tucker, a Senior Consultant with Microsoft Services, East Region, United States
Disclaimer: The information on this site is provided "AS IS" with no warranties, confers no rights, and is not supported by the authors or Microsoft Corporation. Use of included script samples are subject to the terms specified in the Terms of Use
USMT Restore Status Notification HTA in Full Operating System
In my previous blog entry, I explained my customer's need for stand-alone USMT Capture and USMT Restore task sequences and their need for a notification box to pop up and let the technicians know the process completed successfully. This post will continue in that vein and discuss the notification HTA for the USMT Restore task sequence.
The requirement was to make a notification box pop up and pause the task sequence until it is acknowledged or closed.
I created a simple HTA that will look for the loadstate.log in the CCM\Logs\SMSTSlog folder based on architecture. As I am sure you are aware, the SMSTSLog folder is where the logs are placed during the task sequence, so they are always guaranteed to be current. It isn't until the task sequence is closed out that the logs are moved one level up and the SMSTSLog folder removed.
If they are running on a Windows XP machine the path is:
C:\Windows\System32\CCM\Logs\SMSTSLog\loadstate.log.
If they are running on a Windows 7 x64 machine, the path is:
C:\Windows\SysWow64\CCM\Logs\SMSTSLog\loadstate.log
The HTA then parses this log file looking for 'MIGACTIVITY_SUCCESS'. If this message exists in the log file, the HTA returns the following box…

If it doesn't exist, they see the following box…

Now that the HTA is functional, I have to put it in the task sequence and make it visible while running inside the full operating system. This is where the fun really begins…
Luckily, we can take advantage of ServiceUi.exe that exists in the Tools\x86 or Tools\x64 folders within the Microsoft Deployment Toolkit package. We can launch this by calling it from %toolroot%.
Placing my HTA file in a folder called CustomScripts underneath the Scripts folder in the toolkit package allows me to use the command line…
%toolroot%\serviceui.exe –process:tsprogressui.exe %systemroot%\system32\mshta.exe %scriptroot%\CustomScripts\USMTRestoreStatus.hta
Here is an example of how to call my HTA using the ServiceUi.exe…

For more information on the use of ServiceUI.exe, see 'Can I use ServiceUI.exe to launch other programs besides the UDI Setup Wizard?' on Cameron's Blog – Cravings of System Center.
USMTRestoreStatus.hta
<html>
< head>
< title>USMT Restore Status</title>
< HTA:APPLICATION
APPLICATIONNAME="USMT Restore Status"
ID="USMTRestoreStatus"
SCROLL="no"/>
< /head>
<script language="VBScript">
' *****************
' * Window_OnLoad *
' *****************
Sub Window_OnLoad
'This method will be called when the application loads
window.resizeTo 600,300
window.moveto 1,1
USMTStatus
End Sub
' *****************
' * USMTStatus *
' *****************
Sub USMTStatus
Const ForReading = 1
' Set the search parameter
Set objRegEx = CreateObject("VBScript.RegExp")
objRegEx.Pattern = "MIGACTIVITY_SUCCESS"
' Prepare log file connectivity
Set objFSO = CreateObject("Scripting.FileSystemObject")
' WMI Connectivity
strComputer = "."
Set objWMIService = GetObject("winmgmts:" & "{impersonationLevel=impersonate}!\\" & strComputer & "\root\cimv2")
' Query WMI for processor architecture type
Set colProcessors= objWMIService.ExecQuery ("Select * From Win32_Processor")
' Set log file location based on processor architecture type
For Each objProcessor in colProcessors
If objProcessor.Architecture = 0 Then
Set objFile = objFSO.OpenTextFile("C:\windows\system32\ccm\logs\SMSTSLog\loadstate.log", ForReading)
Else
Set objFile = objFSO.OpenTextFile("C:\windows\syswow64\ccm\logs\SMSTSLog\loadstate.log", ForReading)
End If
' Set initial returnSuccess to 'False'
returnSuccess = False
' Parse the scanstate.log file for search parameters
Do Until objFile.AtEndOfStream
strSearchString = objFile.ReadLine
Set colMatches = objRegEx.Execute(strSearchString)
If colMatches.Count > 0 Then
For Each strMatch in colMatches
returnSuccess = True
Next
End If
Loop
' Set HTA pop-up box text based on search results
If returnSuccess = True Then
DataArea.InnerHTML = "The user state was SUCCESSFULLY restored.<br><br>PLEASE CLOSE THIS BOX TO END THE TASK SEQUENCE."
Else
DataArea.InnerHTML = "The user state was NOT SUCCESSFULLY restored.<br><br>PLEASE CLOSE THIS BOX TO END THE TASK SEQUENCE."
End If
Next
End Sub
< /script>
<body bgcolor= "white">
<span id = "DataArea"> </span>
<!--{{InsertControlsHere}}-Do not remove this line-->
</body>
< /html>
USMTRestoreStatus.hta
This post was contributed by Brad Tucker, a Senior Consultant with Microsoft Services, East Region, United States
Disclaimer: The information on this site is provided "AS IS" with no warranties, confers no rights, and is not supported by the authors or Microsoft Corporation. Use of included script samples are subject to the terms specified in the Terms of Use
Windows 10 Start Layout Customization
This Windows 10 Start Layout Customization guide provides detailed guidance on how organizations can customize the Windows 10 Start layout. Organizations often desire to deploy a customized Start layout on their devices to help direct users to specific applications.
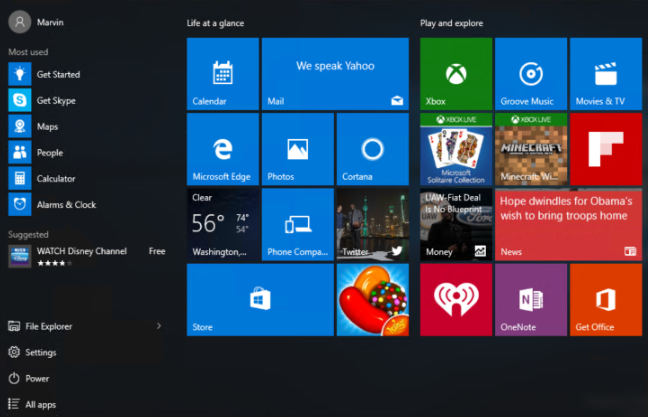
Figure 1. Default Windows 10 Start Layout
In previous editions of Windows (Windows 10 RTM and Windows 8.1) it was possible to create customized Start layouts for an organization. However, there were only two options available to control these start layout customizations:
- Locked Down Start Layout – The start layout was customized to meet an organizations requirement but it was entirely locked down and could not be customized by users
- Customizable Start Layout – The start layout was customized to meet an organizations requirement but there was nothing to prevent the user from removing all of the organizations customizations,
Windows 10 version 1511 has introduced a new feature which makes it possible for an organization to customize the start layout by locking down individual groups within the Start layout. This allows an organization to customize their start layout and ensure that their corporate applications are always present on Start while allowing the end user the freedom to customize the start layout with their own applications.
In this topic:
Exporting a Start layout
The simplest way to create customized Start layouts to apply to an organization is to manually create a sample layout on a test machine and then export that layout. The exported Start layout can then be deployed to all machines in the organization. To prepare a Start layout for export, you simply customize the Start layout on a test computer.
Prepare a test computer
- Set up a test computer on which to customize the Start screen. Your test computer should have the either Windows 10 Enterprise or Windows 10 Education. Install all the applications and services that the Start screen should display.
- Create a new user account that you will use to customize the Start screen layout.
- Sign in to your test computer with the user account that you created.
- Customize the Start screen as you want users to see it by using the following techniques:
Customize the Start Layout
- Pin apps to the Start screen. From the Start screen, type the name of the app. When the app appears in the search results, right-click the app, and then click Pin to Start.
To view all apps, click All apps in the bottom-left corner of the Start screen. Right-click any app, and pin or unpin it from the Start screen.
- Unpin apps that you don't want to display. To unpin an app, right-click the app, and then click Unpin from Start.
- Drag tiles on the Start screen to reorder or group apps.
- Resize tiles. To resize tiles, right-click the tile and then click Resize.
- Create your own app groups. Drag the apps to an empty area. To name a group, click above the group of tiles and then type the name in the Name group field that appears above the group.
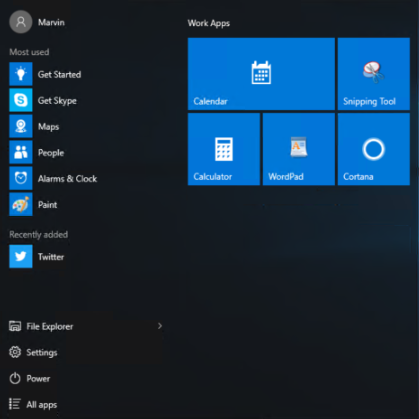
Figure 2. Customized Windows 10 Start Layout
Export the Start Layout
When you have the Start screen layout that you want your users to see, use the Export-StartLayout cmdlet in Windows PowerShell to export the Start screen to an .xml file.
- From Start, open Windows PowerShell.
- At the Windows PowerShell command prompt, enter the following command:
Export-StartLayout –path <path><file name>.xml

Figure 3. Export-StartLayout cmdlet
In the previous command, -path is a required parameter that specifies the path and file name for the export file. You can specify a local path or a UNC path (for example, \\FileServer01\StartLayouts\StartLayoutMarketing.xml). The file must be accessible on the local computer when a user signs in (the user must have Read-only access). If the file is not available, the Start screen layout is not deployed during that session, and the user can make changes to the Start screen.
If you plan to deploy a GPO that customizes Start screen layouts for domain users, store the .xml file in shared network storage that all of the users can access.
Use a file name of your choice - for example, StartLayoutMarketing.xml. Include the .xml file name extension. The Export-StartLayout cmdlet does not append the file name extension, and the policy settings require the extension.
Applying a Start layout
Once you have an exported Start Layout you can use the XML file to apply this start layout to your entire organization using PowerShell or Group Policy.
PowerShell
When you have the Start screen layout exported, use the Import-StartLayout cmdlet in Windows PowerShell to manually import the .xml file into the system.
- From Start, open Windows PowerShell.
- At the Windows PowerShell command prompt, enter the following command:
Import-StartLayout –LayoutPath <path><file name>.xml –MountPath %systemdrive%

Figure 4. Import-StartLayout cmdlet
Important
Applying a Start Layout through the Import-StartLayout cmdlet will not enforce the layout and users will have an option to perform changes. This will only apply to new user profiles created in the machine after applying the custom Start Layout.
Group Policy
To apply the Start layout to users in a domain, use the Group Policy Management Console (GPMC) to configure a domain-based Group Policy Object (GPO) that sets Start Layout policy settings in the Start Menu and Taskbar administrative template for users in a domain.
The GPO applies the Start layout at the next user sign-in. Each time the user signs in, the timestamp of the .xml file with the Start layout is checked and if a newer version of the file is available, the settings in the latest version of the file are applied.
The GPO can be configured from any computer on which the necessary ADMX and ADML files (StartMenu.admx and StartMenu.adml) for Windows 10 are installed.
The .xml file with the Start layout must be located on shared network storage that is available to the users' computers when they sign in and the users must have Read-only access to the file. If the file is not available at sign-in, the Start screen is not customized during the session, and the user can make changes to the Start screen.
- On a Domain Controller, open the Group Policy Management Console (gpmc.msc).
- In the Group Policy Management Console, browse to Group Policy Management > Forest: <forest name> > Domains > <domain name> > Group Policy Objects.
- Right-click on Group Policy Objects and select New.
- In the New GPO dialog box, provide a Name then click OK.
- Right-click on the GPO created from the previous step then select Edit.
- Go to User Configuration or Computer Configuration > Policies > Administrative Templates >Start Menu and Taskbar.
- Right-click Start Layout in the right pane, and click Edit. This opens the Start Layout policy settings.
- Enter the following settings, and then click OK:
- Select Enabled.
- Under Options, specify the path to the .xml file that contains the Start layout. For example, type C:\Users\Test01\StartScreen.xml or \\ShareName\StartScreen.xml.
- Optionally, enter a comment to identify the Start layout.
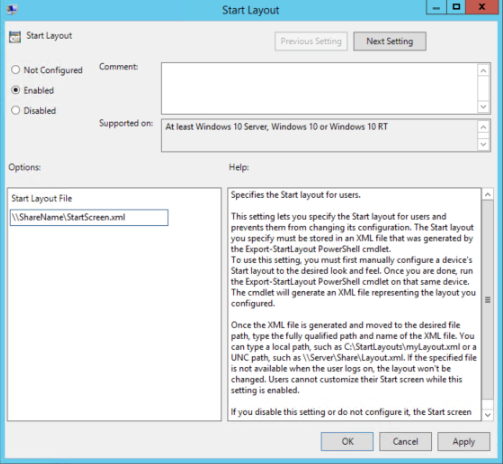
Figure 5. Start Layout Group Policy Setting
Important
By default, applying Start Layout customizations via GPO will enforce the layout and prevent users from performing changes. To allow users to modify the Start Layout, go to the Partial Lockdown section.
Provisioning Packages
Use the Imaging and Configuration Designer (ICD) tool included in the Windows Assessment and Deployment Kit (ADK) for Windows 10 to create a provisioning package that applies a customized Start layout. Install the ADK.
- Open ICD (by default, %windir%\Program Files (x86)\Windows Kits\10\Assessment and Deployment Kit\Imaging and Configuration Designer\x86\ICD.exe).
- Choose New provisioning package.
- Name your project, and click Next.
- Choose Common to all Windows editions and click Next.
- On New project, click Finish. The workspace for your package opens.
- Expand Runtime settings > Start, and click StartLayout.
- Specify the path and file name of the Start layout .xml that you created with the Export-StartLayout cmdlet.
- On the File menu, select Save.
- On the Export menu, select Provisioning package.
- Change Owner to IT Admin, which will set the precedence of this provisioning package higher than provisioning packages applied to this device from other sources, and then select Next.
- Optional. In the Provisioning package security window, you can choose to encrypt the package and enable package signing.
- Enable package encryption - If you select this option, an auto-generated password will be shown on the screen.
- Enable package signing - If you select this option, you must select a valid certificate to use for signing the package. You can specify the certificate by clicking Select... and choosing the certificate you want to use to sign the package.
- Click Next to specify the output location where you want the provisioning package to go when it's built. By default, Windows Imaging and Configuration Designer (ICD) uses the project folder as the output location.
- Optionally, you can click Browse to change the default output location.
- Click Next.
- Click Build to start building the package. The provisioning package doesn't take long to build. The project information is displayed in the build page and the progress bar indicates the build status. If you need to cancel the build, click Cancel. This cancels the current build process, closes the wizard, and takes you back to the Customizations Page.
- If your build fails, an error message will show up that includes a link to the project folder. You can scan the logs to determine what caused the error. Once you fix the issue, try building the package again.
If your build is successful, the name of the provisioning package, output directory, and project directory will be shown.
- If you choose, you can build the provisioning package again and pick a different path for the output package. To do this, click Back to change the output package name and path, and then click Next to start another build.
- If you are done, click Finish to close the wizard and go back to the Customizations Page.
16. Copy the provisioning package to the target device.
17. Double-click the ppkg file and allow it to install.
Important
By default, applying Start Layout customizations via Provisioning Packages will enforce the layout and prevent users from performing changes. To allow users to modify the Start Layout, go to the Partial Lockdown section.
Updating a Start layout
General
After you use Group Policy to apply a customized Start layout on a computer or in a domain, you can update the layout simply by replacing the .xml file that is specified in the Start Layout policy settings with a file with a newer timestamp.
- Customize the Start screen on your test computer the way that you want it to look for users.
- Run the Export-StartLayout cmdlet, with the following format, to export the new Start screen layout to an .xml file that overwrites the original file:
Export-StartLayout –path <path><file name>.xml
Partial Lockdown
By default, applying a custom Start Layout via Group Policy enforces and locks down the Start Layout which prohibits users in making any modifications. For Enterprises that would like to provide users the ability to personalize or modify the Start Layout while only partially locking down certain groups they can update the custom Start Layout xml file to support this capability. This feature is only available in Windows 10 version 1511.
- Open the exported Start Layout .xml file
- Locate the <DefaultLayoutOverride> section and add a parameter as detailed below.
<DefaultLayoutOverride LayoutCustomizationRestrictionType="OnlySpecifiedGroups">
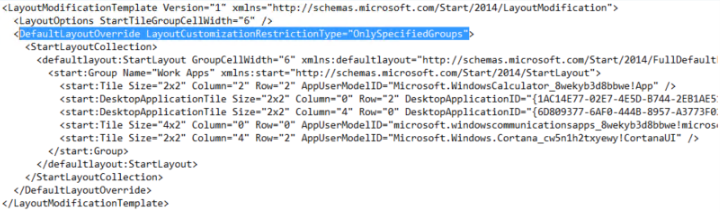
Figure 6. Partial Lockdown Parameter
3. Save the update Start Layout .xml file and apply via Group Policy or Provisioning Packages.
Figure 7. Start Layout applied with Partial Lockdown setting
Important
Applying a Start Layout using the "OnlySpecifiedGroups" parameter using Group Policy or provisioning packs will only lock the groups specified in the Start Layout xml. file All other groups in the Start Layout can be controlled by the user.
Frequently Asked Questions
Q) Is it possible to programmatically modify the start screen through an API.
A) No. There is no API that allows programmatic access to the Start Layout. The Start Layout XML could be programmatically edited to automatically customize the Start Layout.
Additional Resources
Disclaimer: The information on this site is provided "AS IS" with no warranties, confers no rights, and is not supported by the authors or Microsoft Corporation. Use of included script samples are subject to the terms specified in the Terms of Use .
This post was contributed by Mark Hooks and Marvin Quinzon , both architects within Microsoft Services.
Windows 7 Deployment Options for Small and Midsize Businesses
Happy new year to everyone! It looks like I am making the first blog post here for 2012 :-)
To get the year rolling I thought I'd share anexcellent resource that I stumbled across this week, even though it was published back in November. If you follow the link below you can download a printable overview poster of the Windows 7 deployment options that has been specifically designed for small and midsize organizations. As you can see in the small extract below each option is shown as a simple diagram and then the advantages and limitations of each one are discussed in detail further on. Also included in the poster are the limitations, basic requirements and helpful links to tools and further guidance, as well as a step-by-step overview of the Windows 7 deployment process.
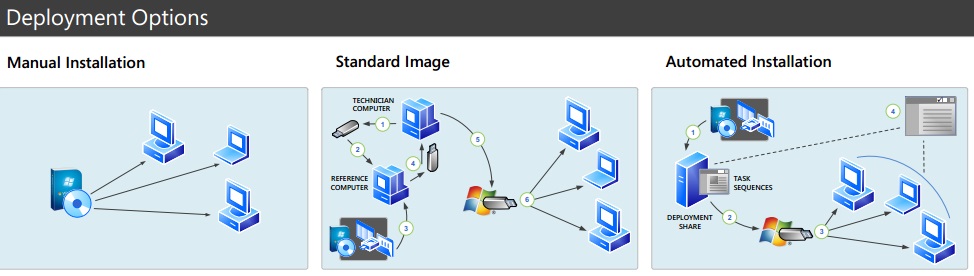
I hope it is of use, and if you know of any other similar resources (both Microsoft and non-Microsoft) feel free to share them with our readers using the comments section below. See here for more information and the download links.
This post was contributed by Daniel Oxley, a Senior Consultant with Microsoft Services UK
Disclaimer: The information on this site is provided "AS IS" with no warranties, confers no rights, and is not supported by the authors or Microsoft Corporation. Use of included script samples are subject to the terms specified in the Terms of Use
Windows 8: Automating the installation of .NET Framework 3.5 with MDT
[Correction – November 14th 2012]
I have been informed that the new built in roles and features functionality of MDT 2012 Update 1 has the following very useful functionality.
- It will automatically try to find the SXS folder in the deployment share that you are using to deploy the image.
- You can specify the a variable in the Customsettings.ini file that points to an alternative location for the SXS folder, here is an example:
WindowsSource=%DeployRoot%\Operating Systems\Windows 8\Sources\sxs
This is a nice and simple approach to installing the .Net Framework 3.5. I have left the blog post below in case you need to install is in a scripted manner.
[End of Correction]
When creating a Windows 8 master image one of the few applications that I include in the image is .NET Framework 3.5.
To automate the installation you must run the following DISM command and specify the source file location:
DISM.exe /online /enable-feature /featurename:NetFX3 /All /Source:"D:\Sources\SXS" /LimitAccess
The key to getting this to work is to specify the "Source" path correctly, this must point to the SXS folder from the Windows 8 Media. With this process in mind I have created a PowerShell script that uses two methods to install .NET Framework 3.5:
- Use Source files from the Windows 8 media that you are using to install the OS itself.
- Use a copy of the SXS folder - If we cannot find the source files there then we look for them subfolder (called source) of the folder that the script is located in and install from there.
The first method is very simple, the script simply looks for the OS source files that are being used to install Windows 8 and uses the SXS folder included with this media. However, this approach does not work well when we are deploying a custom image and this folder is not available. In this case we use the second method.
To make the second method work you must copy all of files in the SXS folder on the Windows 8 media to a folder called source that is located in the application folder, this folder will then be referenced directly during installation. Here is an example of the folder structure:

I have created an MDT application for this script which you can download from here.
To import this application to your deployment share and add it to your task sequence do the following:
1. Download and Extract the Zip file to a temporary folder
2. Locate the SXS folder on your Windows 8 media and copy the contents to the INSTALL – NET Framework 3.5\Source folder that you extracted to the temporary folder.
3. Import the application into the MDT Deployment Workbench using Create Application with Source Files, with the following options:
Application Name: INSTALL – NET Framework 3.5
Source Directory: <Temp Folder>\INSTALL – NET Framework 3.5
Command Line: Leave this field empty
4. Open the task sequence that you want to use to install .NET Framework 3.5 and navigate to the State Restore Phase.
5. Add a PowerShell task sequence action to the task sequence by navigating to Add>General>Run PowerShell Script, use the following settings:
Name: INSTALL – NET Framework 3.5
Command Line: %DEPLOYROOT%\Applications\INSTALL - NET Framework 3.5\INSTALL_NET35Framework.ps1
6. Click OK to close the task sequence editor.
You may have noticed that I am using the Run PowerShell Script task sequence action directly rather than calling the PowerShell from the application command line. This is because the task sequence action allows me to leverage the MDT logging and access to MDT variables. For more information on this please see Michael Niehaus' blog - https://blogs.technet.com/b/mniehaus/archive/2012/07/23/mdt-2012-update-1-powershell-3-0-support.aspx
This post was contributed by Ben Hunter, a Solution Architect with Microsoft Consulting Services.
Disclaimer: The information on this site is provided "AS IS" with no warranties, confers no rights, and is not supported by the authors or Microsoft Corporation. Use of included script samples are subject to the terms specified in the Terms of Use .
Windows 8 BitLocker Deployment and PowerShell
With Windows 7 deployments, BitLocker installation for Operating System and data volumes has typically been configured as a post Operating System deployment activity – usually using the Enable BitLocker task sequence actions or by using the manage-bde.exe command line.
The impact on the Windows 7 deployment process is that the full volume encryption process may take several hours as BitLocker requires that all data and free space on the drive is encrypted. This is especially true with the large volumes.
With Windows 8, BitLocker can also be provisioned before the Operating System is installed, from within Windows PE. This is achieved by using a randomly generated protector that is stored clearly on the volume. The volume is then encrypted, all before the Windows setup process has started.
That's a great feature, however you'll be thinking it will still take time to encrypt your entire disk – however Windows 8 also includes the option to encrypt only used disk space.
When the Used Disk Space Only encryption option is configured during BitLocker setup, only the area of the drive that has data will be encrypted with free disk space remaining unencrypted. The result is that the encryption completes much faster – which will speed up the Windows provisioning process.
The great news is that MDT 2012 Update 1 will handle this for us. The ZTIBDE.wsf script is executed during the PreInstall phase and will automatically enable BitLocker Offline from with Windows PE, using the UsedSpaceOnly parameter (if the partition is not already encrypted). This will literally take seconds to run. The data written to the volume during OS and application installation is then encrypted as it is written to the disk, with a very small impact on performance (less than 1%)

Once the OS image, applications and configurations have been installed, we include the standard Enable BitLocker task to configure the encryption protectors as required.

One challenge is configuring BitLocker on additional data partitions. Using the Enable BitLocker task sequence action will not allow us to set the parameters for Used Space Only. This is where we can use the new BitLocker PowerShell cmdlets.
There are a host of new BitLocker cmdlets available in Windows 8, all described in the TechNet article at the end of this post. For this example, I am going to use the Enable-BitLocker cmdlet to encrypt my extra data partition and specify the –UsedSpaceOnly parameter.

Then literally by the time I had typed Enable-BitLockerAutoUnlock D: to configure Autounlock for the D partition, the encryption process had completed and the Protection Status had changed to On.

The PowerShell cmdlets can be called during the deployment process using the Run Command Line or even better, put together in a PowerShell script and called using the new Run PowerShell Script action in MDT 2012 Update 1 (thus making use of the integrated logging features with BDD.Log). A very simple example is illustrated below.

The output from the script will be logged into the BDD log file automatically, as highlighted below:

Take a look at the new BitLocker cmdlets documented in the following article:
https://technet.microsoft.com/en-us/library/jj647767.aspx#BKMK_blcmdlets
Disclaimer: The information on this site is provided "AS IS" with no warranties, confers no rights, and is not supported by the authors or Microsoft Corporation. Use of included script samples are subject to the terms specified in the Terms of Use
This post was contributed by Matt Bailey , a Consultant with Microsoft Services - UK .
Windows 8 – Customizing the Default Lock Screen
Have you tried to change the default wallpaper on the Windows 8 lock screen? Now I live in Seattle and quite like the stylized picture of Seattle but in an enterprise environment you may want a more "corporate" image.
Until now you have not been able to do this without using an unsupported method of "hacking" file permissions and replacing the default wallpaper file.
Well this has now changed , the Windows 8 and Windows Server 2012 cumulative update: November 2012 allows us to customize the start screen.
There is a new Group Policy that allows you to "Force a specific default lock screen image". For all the details on using this group policy setting please refer to the following TechNet article - https://support.microsoft.com/kb/2787100/EN-US.
This post was contributed by Ben Hunter, a Solution Architect with Microsoft Consulting Services.
Disclaimer: The information on this site is provided "AS IS" with no warranties, confers no rights, and is not supported by the authors or Microsoft Corporation. Use of included script samples are subject to the terms specified in the Terms of Use .
Windows 8 Start Screen Customization with MDT
If you are creating a Windows 8 image then you most likely want to customize the Start Screen layout that users see when they logon for the first time. However the question is "how should I customize the Start Screen?"
There are three approaches that you can use:
- Use the Unattend.xml file to define which applications will appear in each "slot" on the Start Screen as detailed here.
- Manually customize the Start Screen, then use CopyProfile to apply the customizations to the default user profile.
- Manually customize the Start Screen and capture the layout file created, then copy this file to the default user during image deployment.
The main approach that I use is CopyProfile. I use this approach because this gives me control over the process and captures all customizations in the image, not just the Start Screen customizations. The one drawback is that it requires manual steps in the image creating process, and I love to automate everything! However at present the really isn't a viable alternative to manual steps. In the rest of this post I will detail how to customize the Start Screen using options 2 and 3 when building an image using MDT 2012 Update 1.
Customizing the Start Screen
As mentioned above when I create a Windows 8 image I always like to fully automate the process. This provides a consistent and repeatable image engineering process, however the customization of the Start Screen must be performed manually. To minimize the manual steps I pause the task sequence using the little know built-in MDT script - LTISuspend.wsf. I then perform the customization and resume the task sequence. The following steps outline this process:
1. Add the LTISuspend.wsf script to the task sequence. This action should be added as highlighted in the picture below.

2. During the deployment you will see the following prompt.

3. Bring up the Start Screen and manually arrange the tiles and label groups as needed.
Before:

After:

4. Resume Task Sequence and automatically capture the image by clicking on the Resume Task Sequence shortcut on the desktop.
Once the image has been captured there are two options for replicating these changes to the default user profile.
Customization using CopyProfile
The CopyProfile process has been well documented in a this Deployment Guys post. In summary you must add the CopyProfile option to the unattend.xml used to deploy the image (NOT the unattend.xml used to create the image). This will then copy the Start Screen layout from the local administrator profile (that you manually customized) to the default user profile. Then when a user logs in for the first time they receive this layout.
The CopyProfile option should be added to Microsoft-Windows-Shell-Setup in the specialize pass section as follows:
< CopyProfile>true</CopyProfile>
Customization using App Layout file
During the Sysprep generalization process a file is created called AppsFolderLayout.bin. This file contains the layout for the local administrator in a generalized form which can be applied to other users. To use this file we simply copy the file from:
C:\Users\Administrator\AppData\Local\Microsoft\Windows\AppsFolderLayout.bin
To:
C:\Users\Default\AppData\Local\Microsoft\Windows\AppsFolderLayout.bin
The script located here will perform this process. Simply add this script to the task sequence immediately after the Postinstall \ Configure step as shown below.
- Copy the attached file to the scripts folder of your Deployment Share
- Add a new Run Command Line Task sequence action as shown in the screenshot below:

Here are few extra tips that will help with your Start Screen customization:
- If you want to change the color scheme then then use the SystemDefaultBackgroundColor setting in the unattend.xml as detailed on TechNet.
- You can only customize the Start Screen layout for Windows 8 Enterprise or domain-joined Windows 8 Pro machines.
- Links to websites will be maintained during the copy process however the icons for these links will not be retained.
- You cannot add non-default Windows Store Apps to the image. This will cause Sysprep to fail. However you can side load applications.
For more information on customizing the Start Screen please refer to this TechNet article.
This post was contributed by Ben Hunter, a Solution Architect with Microsoft Consulting Services.
Disclaimer: The information on this site is provided "AS IS" with no warranties, confers no rights, and is not supported by the authors or Microsoft Corporation. Use of included script samples are subject to the terms specified in the Terms of Use .
Windows 8 – Supporting proxy services with Static Configurations, Web Hosted PAC files and Domain Policy Configured Proxy
Many companies have started using Windows 8 and have noticed with some of the new features there are times when things just don't seem to work the way they expected them too; this was due to configuration needs and not actual issues in many cases. We have found this is normally due to some additional configurations that are required to enable the newer features and applications that have been introduced with the new OS.
I would like to focus on one that I have been putting some extra effort towards to help customers get the best experience they can when the enterprise has proxy services enabled and they see issues such as the Windows 8 apps and basic services are not communicating with web services.
Sometimes communities identify issues and is important that we help improve the user experience when issues are identified. There are a couple articles currently articles addressing some of the original issues. Specifically the need to use the NETSH commands to correct the WINHTTP Proxy service; see the reference articles within this blog for links to them. This include transitioning to new networks and the use of WPAD for the most robust model for Windows 8.
Note: It is important to also understand before we review these scenarios and options that for the best Windows 8 experience it is recommended to use WPAD to enable all the features of Windows 8 without additional work for the client. Use these links to understand how to implement WPAD and enabling Authenticated Proxy support.
Supporting Articles:
Implementing WPAD: KB2777643
Authenticated Proxy Support: KB2778122
Proxy Service in the Enterprise:
Key Scenarios: Typical results in the following scenarios with "Static Proxy", "Web Hosted Proxy PAC Files" and "Domain Policy Defined Proxy", hosted PAC files is the following:
- Window 8 Network Location Awareness: NLA is required for Windows 8 applications to function properly by determining that you are connected to the internet by looking for a file called ncsi.txt on the internet and is the feature that tells the Windows 8 applications if your online. When this is working right your Network Icon will reflect your online and when you access Windows 8 Application such as Bing Sports it will identify your access and function properly. Properly define proxy services will enable this.
- Windows 8 Applications: In general testing Windows 8 applications will function as designed. Note: This is not a blanket statement for all Windows store application due to the lack of testing. I have tested the normal inbox apps and some additional application downloaded.
- The Windows Store Application updates: This feature is functioning while using Static or PAC files when the user is on public networks only. In some cases it has been noticed that the Inbox Windows 8 apps will be able to update while connected to the corporate network. If the updating is needed internally and you must use a PAC file you may wish to look at using WPAD. Another option is to use the PAC file model I describe below.
- The Windows Store Catalogue: Can be viewed and searched.
- Windows Store Apps Downloads: This feature is functioning while using Static or PAC files when the user is on public networks only to purchase apps and download. If the download is needed internally and you must use a PAC file you may wish to look at using WPAD. Another option is to use the PAC file model I describe below.
- Windows Update: For Windows updates it has been observed that Automatic Updates do not work with Proxy configuration but both User Activated updates in the Windows 8 WU and the Classic Update model they will work. Once the computer is on the public network it will be able to receive Automatic Updates or with the user checking for updates.
Note: There is a known Issue for Authenticating Proxies Solutions: You will need to follow the guidance in the KB2778122 for whitelisting certain HTTP address's listed in article to ensure the best experience while on the corporate network.
Note: Known issue with local installed PAC files: Local install of PAC files will not work for more than Local Browser services.
Enabling these PROXY scenarios:
We will walk through the simplest implementation which also has most limitation to the preferred method and options for configuration of PAC files.
Static Proxy Services:
Note: Only noted to help customers understand chance for negative experience. This is not preferred, this shouldn't be used unless you are supporting desktop only. I just wanted to make people aware of it. Preferred approach is WPAD and then Web Proxy PAC file
This model is a direct insertion of the proxy server address and port used for communication via Internet Explore through the configuration via "Internet Options" and clicking on "Connections Tab" then "LAN Settings" and setting up your proxy definition under Proxy Server"
Load Internet Explorer and open Settings / Internet Options


With this implementation you will find that as long as your computer is on the proper network where the proxy server can be found your services as described above will work. If the Proxy Server is not locatable the following error will be observed due to WEB services not routing properly. Resolution will be to connect the system back to the proper network.

Put the system back onto the proper network or remove the static proxy setting.
Web Based Proxy PAC File:
Note: Using the following two configuration options in the Proxy path configuration do not work:
If Proxy PAC files need to be used in the enterprise environment using a web hosted service is the preferred method. This can be hosted on the proxy server or any other IIS services hosting the file so it can be accessed by the computer at boot. To do this you need to configure the PROXY setting in the manner below.
This model is a direct insertion of the web server address for the PAC file for communication via Internet Explore through the configuration via "Internet Options" and clicking on "Connections Tab" then "LAN Settings" and setting up your proxy definition under Proxy Server
Load Internet Explorer and open Settings / Internet Options


In this case you will have the expected results I noted above in the top of this Blog. I also want to provide a couple sample PAC files that I have found to help make the user experience work well. I also will discuss a model where you could potentially enable the Windows 8 App Store for downloading applications that was mentioned above where it may potentially not work with PAC files.
Sample PAC file #1:
Net Results will be that your system will function with new Windows 8 Apps but you will not be able to download new apps till the device is placed outside the corporate network. The proxy will be offline and your system will default to standard full internet access allowing the download of the selected applications. If for some reason you have an external Proxy you will need to consider the second sample file for the best results.
This file is the simplest and will identify your host network and then designate the Proxy Server for that network. If the network host is not found it instructs the WINHTTP services to use the default gateway of the computer. While on the company network Windows 8 App Store Downloads may not work but when the computer is on a public network it will be able to download Windows Store Apps.
You can use notepad.exe to create a simple test file, example: Sample1.PAC
//Begin
function FindProxyForURL(url, host)
{
if (isInNet(myIpAddress(), "10.0.0.0", "255.255.255.0"))
return "PROXY ProxyServerName:8080";
else "Proxy Direct";
}
//End
Sample PAC File #2:
Note: This will require corporate review and approval most likely. The purpose of this Script is to enable Windows Application Store Downloads within the corporate network with proxy services or if the company is using an External Web based Proxy Service.
In this scenario you have a Default Gateway on the corporate network that is open to the internet but normal traffic is always processed through the Proxy server. With this configuration we have directed any traffic required to communicate with Microsoft to be allowed to operate through the default gateway and the limited capabilities are now removed and Windows Store Apps will now be successfully downloaded on the corporate network.
You can use notepad.exe to create a simple test file, example: Sample2.PAC
//Begin
function FindProxyForURL(url, host)
{
// variable strings to return
var proxy_online = "PROXY ProxyServer:8080";
var proxy_offline = "DIRECT";
if (shExpMatch(url, "https://*.microsoft.com*"))
{ return proxy_offline; }
if (shExpMatch(url, "https://*.microsoft.com*"))
{ return proxy_offline; }
// Proxy anything else
return proxy_online;
}
//END
Domain Policy Configuration for a PAC File:
This procedure assumes you are familiar will traversing the Group Policy Management tool using either Server 2012 or the Remote Server Administration Toolkit for Windows 8.
First create a policy for Internet Explorer 10 for the proxy configuration under "User Settings" Preference – Control panel settings.

Wizard will pull up and then you can select "Connection" Tab and then "LAN settings" Radio Button
Enter the required Proxy settings and then link the GPO to you target OU

Make sure to select F5 on the Field when you enter the Name so it is accepted.

This will allow you to now set the Proxy GPO on your system.
Additional information for PAC Files Scripting options can be found here: MS TechNet on PAC File Scripting
This post was contributed by Scott Culbertson , a Solution Architect with Microsoft Consulting Services.
The information on this site is provided "AS IS" with no warranties, confers no rights, and is not supported by the authors or Microsoft Corporation. Use of included script samples are subject to the terms specified in the Terms of Use.
Writing Data to the MDT Database During Gather
MDT allow you to query the MDT Database during a Gather step using database sections in CustomSetting.ini. This is great for retrieving settings to drive the deployment. However, there are occasions where you may want to write information back to the database. MDT provides no built-in way to do this. Michael Niehaus provided a PowerShell module to manipulate the database on his blog (get it here). However, this is really more for provisioning entries into the database before the deployment. It could be used during the task sequence but is much less convenient than something like a database section in CustomSettings.ini. You could create stored procedures in SQL to do this as well but this also isn't very convenient and creates a dependency have someone who can write and maintain T-SQL code.
I wanted something that would work like a database section in CustomSettings.ini but allow modifications of the database. So I took the code in ZTIDataAccess.vbs (the MDT script that actually does the work of the database queries for ZTIGather.wsf) and created a new script, MDTDataModify.vbs, that allows you to add sections to CustomSettings.ini that are very similar to the database query section but do database modify operations instead.
To use this script, the account used to access the database (MDT user account or ConfigMgr Network Access Account) must have at least db_datareader and db_datawriter on the MDT database.
Since this script contains a VBScript Class it must be loaded during in CustomSettings.ini using MDTExitInclude.vbs from this previous post.
[Settings]
Priority=IncludeExitScripts, Default
Properties=ExitScripts
[IncludeExitScripts]
UserExit=MDTExitInclude.vbs
ExitScripts=#IncludeFiles("MDTDataModify.vbs")#
This script allow 3 different types of table operations: Update, Insert, and Delete. Update allows you to modify an existing record. Insert allows you to add a new record. Delete allows you to delete a record.
The CustomSettings.ini sections that are used with MDTDataModify.vbs are very similar to the standard database query sections supported by ZTIGather.wsf. The following properties are used:
SQLServer | Specifies the name of the computer running SQL Server to use in the operation |
Instance | Specifies the name of the SQL Server instance on the computer specified in the SQLServer property. If you are using: - SQL Server installed as the default instances, you can leave Instance blank
- SQL Server Express, type SQLExpress for the instance name
|
Database | Specifies the name of the MDT DB in the SQL Server instance specified in the Instance property. |
Netlib | Specifies the network library to be used in connecting to the MDT DB specified in the Database property and can be either Named Pipes (DBNDPNTW) or TCP/IP Sockets (DBMSSOCN). |
SQLShare | Specifies a network shared folder on the computer specified in the SQLServer property, which is used when performing user authentication using Windows Integrated Authentication with Named Pipes protocol. |
Table | Specifies the table or view to be used in the operation. |
Statement | Specifies the operation to be performed and can be Update, Insert, or Delete. |
Parameters | Specifies the selection criteria for finding rows for the operation. Conceptually, this property is the WHERE clause in an SQL SELECT statement. |
ParameterCondition | Specifies the Boolean operation to be performed when you specify more than one selection criterion in the Parameters property. You can select either Boolean AND (the default) or OR operations. If you want to use a Boolean OR operation, you must specify ParameterCondition=OR. |
WriteParameters | Specifies properties to write back to the table or view during an Update or Insert operation. |
All the properties except the new Statement and WriteParameters properties work the same way as standard MDT database query section.
These sections also support variable remapping as a described in this post: https://blogs.technet.com/b/deploymentguys/archive/2013/08/12/remapping-variables-in-mdt-database-queries.aspx.
To have a database modify section run in CustomSetting.ini, you DO NOT add it to the Priority line directly. If you do ZTIGather.wsf would treat it as standard database query section. Instead, you need to use the ModifySQL function that is included in MDTDataModify.vbs to run the section. Here are a few examples.
Database Update
In this example, the computer name (OSDComputerName) is generated based on the string "ws" and the first 10 characters of the serial number. Since this name is generated during the deployment it would be nice to have this value written back to the computer record for reference later. The following sample CustomSettings.ini will update an existing computer record:
[Settings]
Priority=Common, IncludeExitScripts, RunDBChanges
Properties=ExitScripts(*), Type, ID, ComputerID, DBChanges(*), MDTSQLServer, MDTDatabase, MDTNetlib, MDTSQLShare
[Common]
MDTSQLServer=SQLServer1
MDTDatabase=MDT
MDTNetlib=DBNMPNTW
MDTSQLShare=SQLShare$
OSDComputerName=ws#Right("%SerialNumber%", 10)#
[IncludeExitScripts]
; Load all user exit scripts
UserExit=MDTExitInclude.vbs
ExitScripts001=#Include("MDTDataModify.vbs")#
[RunDBChanges]
DBChanges001=#ModifySQL("UpdateCSettings")#
[UpdateCSettings]
SQLServer=%MDTSQLServer%
Database=%MDTDatabase%
Netlib=%MDTNetlib%
SQLShare=%MDTSQLShare%
Table=ComputerSettings
Parameters=UUID, AssetTag, SerialNumber, MacAddress
ParameterCondition=OR
Statement=Update
WriteParameters=OSDComputerName
Database Insert
In this example I show how you can create the record for a computer by simply running a Gather step will the following sample CustomSetting.ini. This is useful if you are unboxing a new computer and don't want to depend on manually entering a record in the database by hand (which can be error prone). For example, you could create MDT or ConfigMgr task sequence media with a two step task sequence (Use Toolkit Package and Gather steps only) and boot the new machine with this media. The following sample CustomSettings.ini will insert a new computer record by first creating the ComputerIdentity table entry with the hardware variable values and then creating the associated Settings table entry (Type=C and ID that matches the ID of the ComputerIdentity table entry). The ModifySQL function with return an InsertID value if it creates a record with an identity value. I remap this to ComputerID to use it as an input to the second Insert section, remapping it to the ID field in the table.
In this sample I add the record with OSInstall set to NO so that a deployment cannot happen until the rest of the values needed for the record are populated.
[Settings]
Priority=Common, IncludeExitScripts, RunDBChanges
Properties=ExitScripts(*), Type, ID, ComputerID, DBChanges(*), MDTSQLServer, MDTDatabase, MDTNetlib, MDTSQLShare
[Common]
MDTSQLServer=SQLServer1
MDTDatabase=MDT
MDTNetlib=DBNMPNTW
MDTSQLShare=SQLShare$
OSInstall=NO
Type=C
[IncludeExitScripts]
; Load all user exit scripts
UserExit=MDTExitInclude.vbs
ExitScripts001=#Include("MDTDataModify.vbs")#
[RunDBChanges]
DBChanges001=#ModifySQL("InsertCIdentity")#
DBChanges002=#ModifySQL("InsertCSettings")#
[InsertCIdentity]
SQLServer=%MDTSQLServer%
Database=%MDTDatabase%
Netlib=%MDTNetlib%
SQLShare=%MDTSQLShare%
Table=ComputerIdentity
Statement=Insert
WriteParameters=AssetTag, SerialNumber, MacAddress, UUID, Description
InsertID=ComputerID
[InsertCSettings]
SQLServer=%MDTSQLServer%
Database=%MDTDatabase%
Netlib=%MDTNetlib%
SQLShare=%MDTSQLShare%
Table=Settings
Statement=Insert
WriteParameters=Type, ComputerID, OSInstall
ComputerID=ID
Database Delete
In the final example I demonstrate how you can delete the computer record. If you want to delete the record at the end of a successful deployment (groom records that are no longer needed) you can add a Gather step at the end of the task sequence that uses this sample CustomSettings.ini:
[Settings]
Priority=Common, IncludeExitScripts, RunDBChanges
Properties=ExitScripts(*), Type, ID, ComputerID, DBChanges(*), MDTSQLServer, MDTDatabase, MDTNetlib, MDTSQLShare
[Common]
MDTSQLServer=SQLServer1
MDTDatabase=MDT
MDTNetlib=DBNMPNTW
MDTSQLShare=SQLShare$
[IncludeExitScripts]
; Load all user exit scripts
UserExit=MDTExitInclude.vbs
ExitScripts001=#Include("MDTDataModify.vbs")#
[RunDBChanges]
DBChanges001=#ModifySQL("DeleteCSettings")#
[DeleteCSettings]
SQLServer=%MDTSQLServer%
Database=%MDTDatabase%
Netlib=%MDTNetlib%
SQLShare=%MDTSQLShare%
Table=ComputerIdentity
Parameters=UUID, AssetTag, SerialNumber, MacAddress
ParameterCondition=OR
Statement=Delete
MDTDataModify.vbs is provided below.
Disclaimer: The information on this site is provided "AS IS" with no warranties, confers no rights, and is not supported by the authors or Microsoft Corporation. Use of included script samples are subject to the terms specified in the Terms of Use .
This post was contributed by Michael Murgolo, a Senior Consultant with Microsoft Services - U.S. East Region.
MDTDataModify.zip
Customize Approval Workflow in Logic Apps
Recently I had a Logic Apps customer asking me how to customize "Send Approval Email". For those who are not familiar with the action, it sends out an e-mail with options that recipient can choose, and the selection will be passed back into Logic Apps, and you can use "Conditions" or "Switch case" to execute different logic.
However, this customer want to allow the recipient to add a comment, or upload a file when making the selection. This is not something Logic Apps support out-of-box. But because of the modality of Logic Apps, it is possible to implement this yourself, and I thought I'd share it with you.
Our implementation requires three Logic Apps:
- The first Logic App will be triggered by the event you specified -I just used a "Request" trigger for demo purpose- and process any business logic after user made a selection.
- The second Logic App will start with a request trigger, to be called by the first Logic App, and sends out the e-mail.
- The third Logic App will serve a single-page web application for user to make selection, and supply supplemental data.
Let's get started.
The first Logic App is very simple:
Second Logic App is as follows. I used Campaign Monitor's Bulletproof email buttons to generate the button with some nice visual. But the key part is to stitch the 3rd Logic App's request url, with 1st Logic Aapp's callback Url.
The 3rd Logic App will serve as the single-page web app, here I used form to allow user to specify a comment, and the action will make a POST call to 1st Logic App's callback url. I'm sure any web developer can make a better looking UI than what I have here.

Now all three Logic Apps are built, we can trigger a manual run on the 1st Logic App, and the email address you specified in the 2nd Logic App should receive an e-mail that looks something like below.
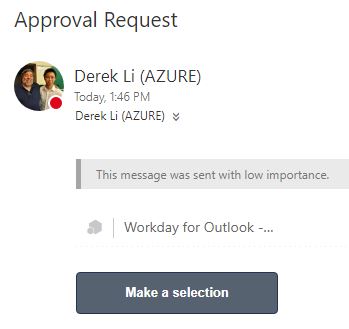
Clicking the button should take you to a web page:
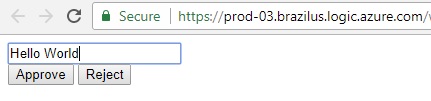
Type in some comment, and click "Reject". Now navigate back to the 1st Logic App, you should see the webhook action completed with the data we just entered.
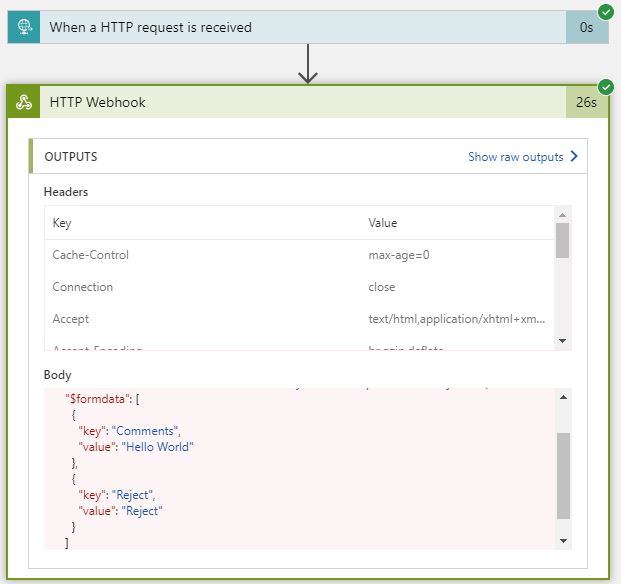
What's next?
- Add more actions to the first Logic App, you will want to check the body of the request in webhook with a "Condition" or "Switch case" and execute different business logics.
- The email approval request is sent to can come from the first Logic App and passed into the second. Similarly, approval options from the 3rd Logic Apps can also be passed in from upstream.
- Make the single-page web app looks prettier. The response to the callback url request is always a 200 with no data, but you may be able to add a 4th Logic App to serve better content upon receiving the response. (The form would submit payload to the 4th Logic App, which will response a prettier message, and then pass the data to Logic App #1)
Use API-M To Mask Async APIs When Moving Implementation to Logic Apps/Functions
I recently talked to a customer who is in the process of moving API implementation to Logic Apps (with request trigger and response action).
The Logic App act as an Azure Function orchestrator, connecting them together and pass data along from one to the other. A single run usually complete within 2 minutes, however, if the Function App went cold it may take more than 2 minutes.
Here's a mock Logic App to simulate this scenario, notice the 150 seconds delay.
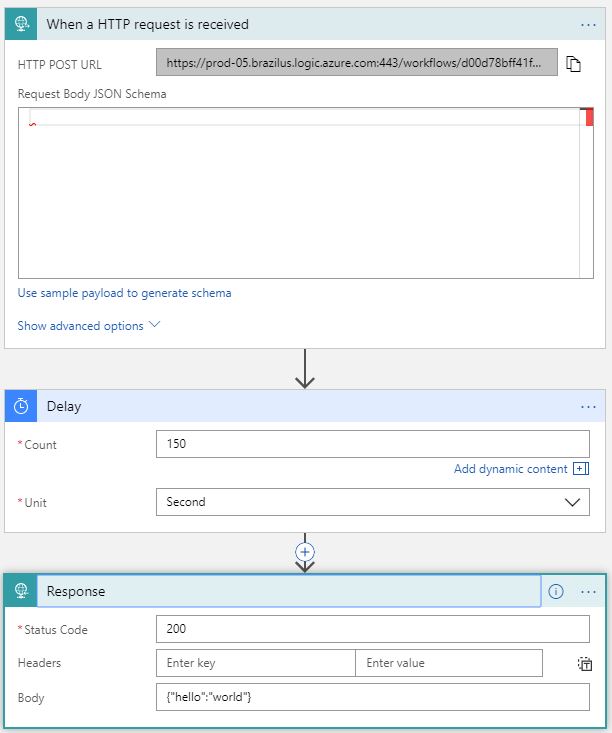
Logic Apps has a 120-second request timeout, as documented here, so if the run last more than 2 minutes, the connection will be closed and respond will not be available to the caller.
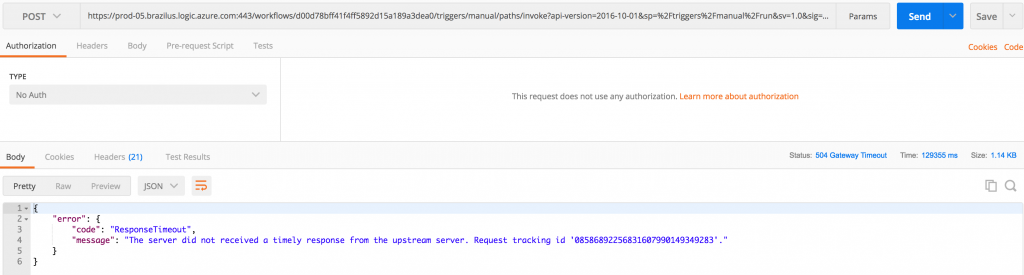
The recommended approach is to enable "Async response" on the settings page of the response action, in which the Logic App will return 202 with a location header immediately, and the caller can check the location url until the run reaches its terminal state.
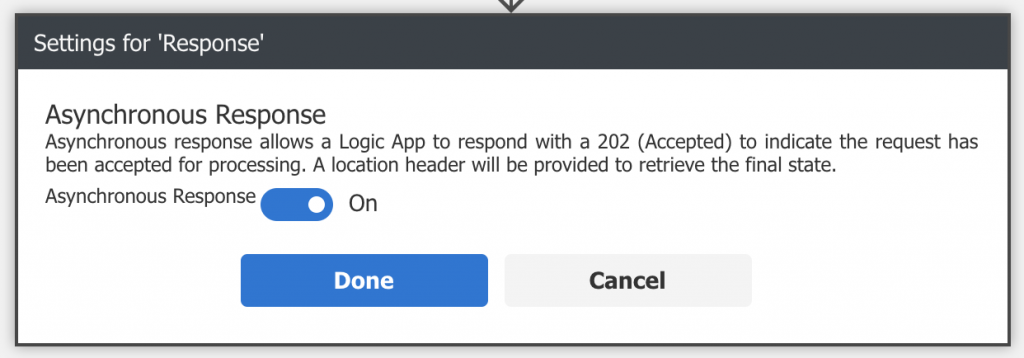
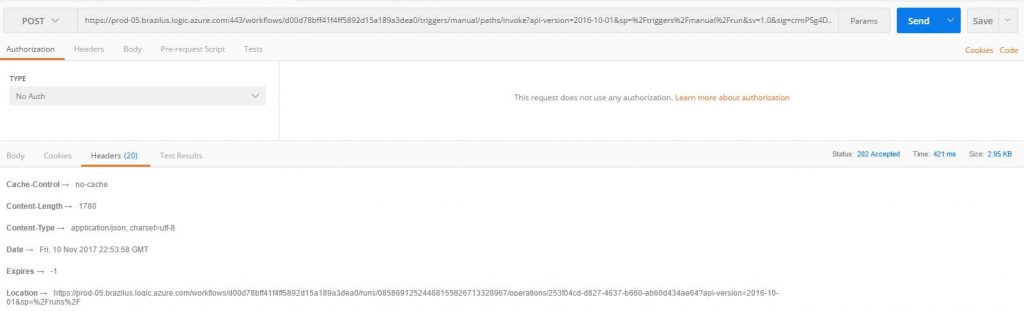
However, this would require updating the client (caller) to follow location header on 202, which is not possible in this case.
API Management came to the rescue.
With API Management policy, it could allow us to enable "Async response" in Logic Apps, yet expose (or in other word, mask) the request trigger as if it's a synchronous call.
<outbound>
<base />
<retry condition="@(((IResponse)context.Variables["var"]).StatusCode == 202)" count="10" interval="30">
<send-request mode="new" response-variable-name="var" ignore-error="false">
<set-url>@(context.Response.Headers["location"][0])</set-url>
<set-method>GET</set-method>
</send-request>
</retry>
<return-response response-variable-name="var" />
</outbound>
Above outbound policy will keep retry the url specified in header "location" at a pre-defined interval (30 seconds in my case), and only return the terminal payload to the caller. And calling the API-M endpoint appears as a synchronous call.
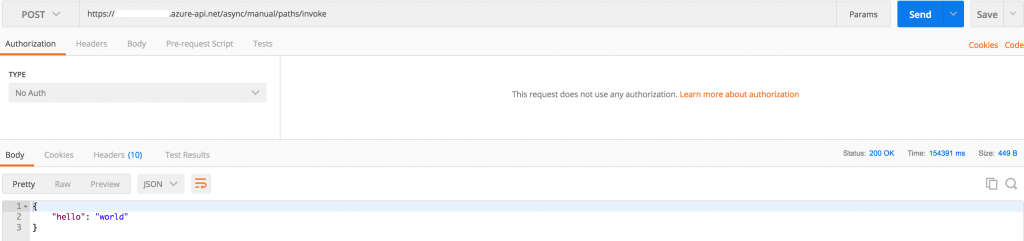
Use Azure Scheduler to Enable/Disable Your Azure Resources On A Set Schedule
There may comes time when you want to enable/disable your Azure resources on a pre-defined schedule for many reasons, in this post, I want to share one such example using Azure Logic Apps.
Many of our Azure Logic Apps customers created workflows with a polling trigger (a type of trigger that performs the check on a set interval). Because Logic Apps charges based on number of executions, depending on the workflow scenario, there may be times when disable such Logic Apps outside of business hours make sense.
While Logic Apps doesn't support this natively yet, it's very easy to do with the help of Azure Scheduler, let's get started.
First, you need to set up a service principle, this can be done either via the Portal, PowerShell, or CLI. You will need to record Tenant, Client ID, and generate a Key, I called mine "LogicAppsManagement".
Next, find the Logic App that you want to apply the schedule, under "Access control (IAM)", add a new user. Select "Logic App Operator" for role, and search for the name of the service principle you just created as the user, in my case, it's "LogicAppsManagement".

Last, create a Scheduler job (and Scheduler job collection if you don't have one already, which is just a container for jobs) with the following action settings:
Action: Https
Method: Post
Url: https://management.azure.com/subscriptions/{subscriptionGuid}/resourceGroups/{resourceGroupName}/providers/Microsoft.Logic/workflows/{LogicAppName}/Enable?api-version=2016-06-01 (you can find the documentation for this RESTful API here)
Body: Leave empty
Headers: Leave empty
For Authentication settings:
Authentication type: Active Directory OAuth
Tenant: Tenant value obtained in step 1.
Client id: Client id obtained in step 1.
Secret: Secret obtained in step 1.
Audience: https://management.core.windows.net/

Now configure schedule the way you want. For me, I choose to enable my Logic App during workdays at 8am.
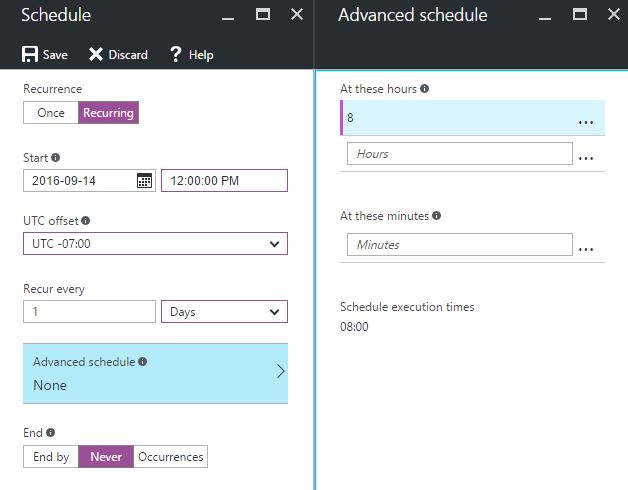
Now, create another Scheduler job, but change the recurrence to when you want to disable the Logic App, and update the Url accordingly: https://management.azure.com/subscriptions/{subscriptionGuid}/resourceGroups/{resourceGroupName}/providers/Microsoft.Logic/workflows/{LogicAppName}/Disable?api-version=2016-06-01
10 reasons to use Data Explorer from the Community
Before starting this post, I want to thank all of our customers for commenting about how much they love Data Explorer. Keep on giving us your feedback, we are reading your comments, and plan to create more tutorials based on your comments. In fact, please let me know what tutorials you would like in our product documentation that would help the Data Explorer community the most.
As of today, here is a partial list of how customers plan to use Data Explorer.
- Build a simple table showing your sales broken down by product in an Excel spreadsheet, you could build this quite easily with Data Explorer. Thanks Chris Webb for this observation.
- Create a query from your Facebook likes that render an Excel chart. Check out pic.twitter.com/QjuuYZAbcx.
- Import data from multiple log files. Check out this blog post.
- Traverse the Facebook Graph. Check out this blog post.
- Pull data into PowerPivot from new data sources, such as XML, Facebook, and File Folders as refreshable connections. Check out this blog post.
- Import data from a wide variety of traditional and non-traditional data sources including CSV, Windows Azure SQL Database, Oracle, MySQL, SharePoint list, OData Feed, Facebook.
- Merge and shape data sources to match your data analysis requirements or prepare it for further analysis and modeling by tools such as PowerPivot and PowerView.
- Connect to Big Data in Excel 2013.
- Self-service ETL tool for the Excel power user. Enhances the self-service Business Intelligence experience in Excel by simplifying data discovery and access. Check out this blog post.
- Create dynamic lookups. Check out this blog post.
AdventureWorks OData sample with Named Resource Streams
As a continuation of my previous blog post, the AdventureWorks QueryFeed OData sample now shows how to implement Named Resource Streams to stream AdventureWorks product images. In addition, I added the ability to select Named Resource Streams (product images) within a business workflow to the QueryFeed activity, and render a stream in a Word document.
The AdventureWorks QueryFeed OData sample illustrates an end to end OData workflow with Office scenario. Starting with SQL Server views, the sample shows how to expose selective AdventureWorks views as an OData service. The AdventureWorks product catalog contains two product images: LargePhoto and ThumbNailPhoto. By implementing WCF Data Services 5.0 Named Resource Streams, the sample shows how to stream LargePhoto and ThumbNailPhoto into a Word document. You can select named resources in the QueryFeed workflow activity and select the default named resource that the client host will render in the TablePartPublisher workflow activity.

By providing feedback on this blog, or sending me an email, you can help define any part of the sample. My email address is derrickv@microsoft.com.
The source code is available at CodePlex.
The sample shows how to integrate the following technologies to address the business scenario of consuming any OData service in an Office application. The sample uses the AdventureWorks database as an example line-of-business database with selective views exposed as OData resources.
- SQL Server 2008R2 or above including views with joins, ROW_NUMBER() OVER, functions, xpath queries, and configuring a NT AUTHORITY\NETWORK SERVICE login and role for IIS.
- Windows Workflow 4.0 including custom activities, activity designers, OData schema aware expression lists, practical use of ModelItem and ModelItemTree, child activities, XML LINQ projections into entity properties, a custom workflow designer, and variables.
- Office (Excel and Word) including hosting an OData related workflow, consuming workflow activity states using tracking participants, extension methods, embedding OData properties into Content Controls, and Open XML.
The attached document explains more about the latest iteration. Also, I added a section on creating a new QueryFeed OData workflow application using the sample workflow designer.
The sample uses several LINQ queries to combine elements to form IEnumerable<EntityProperty>. I would like to use fewer LINQ queries, but ran out of time. The QueryFeed.Execute() method shows how various metadata elements are combined to form an IEnumerable<EntityProperty>.
Named Resource Streams and product photos
A data service can expose binary data. Starting with version 3 of OData, an entity can have multiple related resource streams, which are accessed by name. The sample illustrates how to implement IDataServiceStreamProvider2 to expose AdventureWorks ThumbNailPhoto and LargePhoto product images.
Configuring a data service to support the streaming of binary data requires five steps.
- Attribute the target entity that has resource streams.
- Implement IDataServiceStreamProvider2 – required only for named resource streams.
- Implement IDataServiceStreamProvider – required to support both kinds of binary resource stream.
- Define a data service that implements the IServiceProvider interface. The data service uses the GetService implementation to access the streaming data provider implementation. This method returns the appropriate streaming provider implementation.
- Enable large message streams in the Web application configuration and access to binary resources on the server or in a data source.
Step 1 - Attribute the target entity that has resource streams.
The AdevntureWorks sample attributes vProductCatalog. See AdventureWorksModel.Extensions.cs within the code sample.
using System.Data.Services.Common; namespace Microsoft.Samples.SqlServer.AdventureWorksService { [NamedStream("LargePhoto")] [NamedStream("ThumbNailPhoto")] public partial class vProductCatalog { } }
Step 2 - Implement IDataServiceStreamProvider2 – required only for named resource streams.
public class ProductCatalogResourceProvider : IDataServiceStreamProvider2 { … public Stream GetReadStream(object entity, ResourceProperty resourceProperty, string etag, bool? checkETagForEquality, DataServiceOperationContext operationContext) { vProductCatalog image = entity as vProductCatalog; if (image == null) { throw new DataServiceException(500, "Internal Server Error."); } // Return a stream that contains the requested ThumbnailPhoto or LargePhoto return ProductPhoto(image.ProductID, resourceProperty.Name); }
//The sample uses .NET Framework 4.5 SqlDataReader.GetStream(); private Stream ProductPhoto(int productID, string columnName) { Stream productPhoto = null; using (SqlConnection connection = new SqlConnection (Properties.Settings.Default.Setting.ToString())) { using (SqlCommand command = connection.CreateCommand()) { // Setup the command command.CommandText = string.Format("SELECT {0} FROM Production.vProductCatalogImages WHERE ProductID=@ProductID", columnName); command.CommandType = CommandType.Text; // Declare the parameter SqlParameter paramID = new SqlParameter("@ProductID", SqlDbType.Int); paramID.Value = productID; command.Parameters.Add(paramID); connection.Open(); try { using (SqlDataReader reader = command.ExecuteReader(CommandBehavior.CloseConnection)) { reader.Read(); if (reader.HasRows) productPhoto = reader.GetStream(0); } } catch (SqlException ex) { //Log the SqlException, such as Invalid column name, in a production application } return productPhoto; } } }
Step 3 - Implement IDataServiceStreamProvider – required to support both kinds of binary resource stream. The sample only implements IDataServiceStreamProvider2.GetReadStream().
Step 4 - Define a data service that implements the IServiceProvider interface.
public object GetService(Type serviceType) { if(serviceType == typeof(IDataServiceStreamProvider2)) { //Return the stream provider to the data service. return new ProductCatalogResourceProvider(); } return null; }
Step 4 - Enable large message streams in the Web application configuration.
When you create a data service in an ASP.NET Web application, Windows Communication Foundation (WCF) is used to provide the HTTP protocol implementation. By default, WCF limits the size of HTTP messages to only 65K bytes. To stream large binary data to and from the data service, you configure the Web application to enable large binary files and to use streams for transfer. To do this, add <services> element and <bindings> element to the application's Web.config file:
<system.serviceModel>
<services>
<!--The name of the service-->
<service name="AdventureWorks_ODataService.AdventureWorks">
<!--you can leave the address blank or specify your end point URI-->
<endpoint binding="webHttpBinding" bindingConfiguration="higherMessageSize"
contract="System.Data.Services.IRequestHandler" />
</service>
</services>
<bindings>
<webHttpBinding>
<!-- configure the maxReceivedMessageSize value to suit the max size of
the request (in bytes) you want the service to recieve-->
<binding name="higherMessageSize" maxReceivedMessageSize="500000" />
</webHttpBinding>
</bindings>
</system.serviceModel>
See AdventureWorks.OData.Service.sln for a complete sample service. For more information, see Streaming Provider (WCF Data Services).
QueryFeed activity
The sample QueryFeed activity now allows you to select Named Resources.

In addition, you can select a default resource to render in the TablePartPublisher activity.

Finally, as mentioned in my previous post, the attached document details how to edit a QueryFeed workflow using a hosted Windows Workflow designer. After creating a product catalog workflow application, you can render a Word table. The images in the sample table were rendered using Named Resource Streams.

AdventureWorks OData-Named Resource Streams.docx
AdventureWorks2012 OData service sample - Introduction
This post introduces the AdventureWorks2012 OData service sample. This is our second sample that uses an agile approach to develop and deliver samples. During our first agile samples project, I learned how to write more concise user stories as follows:
As a (persona) I want to (feature) so that (benefit)
This sample will follow this pattern. Before writing any code, I wrote the sample themes and user stories.
AdventureWorks2012 OData service sample themes
- As an IT Administrator, I want to expose a selection of AdventureWorks2012 views as an OData service so that internal teams, vendors, or our customers can view selected AdventureWorks2012 resources from any device.
- As a developer, I want to consume the AdventureWorks2012 ProductCatalog resource so that a Usability Designer can bind to a user interface to create an application.
- As a Usability Designer, I want to create a customer-facing product catalog application so that our customers can view our products from a device.
From these themes, I created eight user stories that will be delivered in six iterations. The final sample will be an MVVM application that pulls together each user story. One advantage of an agile project is that you do not need to have a complete design before starting. With that said, I have only written the SQL views that will be used as OData resources. By providing feedback on this blog, or sending me an email, you can help define any part of the sample. My email address is derrickv@microsoft.com.
AdventureWorks2012 OData User Stories
1. As an IT Administrator, I want to only allow views of the AdventureWorks2012 database to be exposed as an OData public view so that the information about the AdventureWorks2012 schema is not compromised. | Iteration 1: AdventureWorks2012 Views · Production.vProductCatalog · Production.vManufacturingInstructions · Production.vWorkOrderRouting · Sales.vCompanySales · Sales.vTerritorySalesDrilldown · Production.vDocument |
2. As a Developer, I want to create a WCF 5.0 service that exposes views approved and set up by central IT so that developers can consume the OData service resources. | Iteration 1: How to create a WCF Data Services 5.0 service exposing resources from specific AdventureWorks2012views. Run the AdventureWorks2012 service from localhost. |
3. As an IT Administrator, I want to publish the AdventureWorks2012 product catalog view as a WCF 5.0 service so that any OData application can consume the feed. | Iteration 2: How to publish the AdventureWorks2012 OData service. |
4. As a Developer, I want to create an asynchronous model that maps to the ProductCatalog OData resource so that the model can make asynchronous calls to a live OData feed. | Iteration 2: Asynchronous ProductCatalog model as a set of Unit Tests published to CodePlex. |
5. As a Developer, I want to create a ProductCatalog view model so that other developers can bind device views to the view model. | Iteration 3: ProductCatalog view model as a set of Unit Tests published to CodePlex. |
6. As an IT Administrator, I want to set up appropriate permissions on the AW database so that sensitive data will not be exposed as an OData feed. | Iteration 4: How to set up appropriate OData feed permissions. |
7. As an IT Administrator, I want guidance on best practices to expose our database as an OData feed so that our database is secure and the service is relevant and easy to consume. | Iteration 4: General guidance on how to expose a database as an OData feed. |
8. As a Usability Designer, I want to create a device view (device TBD) that binds to the ProductCatalog view model so that our customers can view the product catalog from a device (device TBD). | Iteration 5: A sample device view that binds to the ProductCatalog view model such as a Windows 8 app or HTML 5 Office 2013 app published to CodePlex. |
I created a step diagram to illustrate each iteration:

The AdventureWorks2012 OData views are complete and will be provided in iteration 1. Iteration 1 will be available in about a week. For now, I have attached the SQL script to create the views on AdventureWorks2012. You can download AdventureWorks2012 at https://msftdbprodsamples.codeplex.com/releases/view/55330.
Your feedback is appreciated,
Derrick
derrickv@microsoft.com
Views.sql
Announcing the AdventureWorks OData Feed sample
Overview
As a continuation of my previous blog post, we created a live AdventureWorks OData feed at https://services.odata.org/AdventureWorksV3/AdventureWorks.svc. The AdventureWorks OData service exposes resources based on specific SQL views. The SQL views are a limited subset of the AdventureWorks database that results in several consuming scenarios:
- CompanySales
- Documents
- ManufacturingInstructions
- ProductCatalog
- TerritorySalesDrilldown
- WorkOrderRouting
We will be iterating on this sample, so expect it to improve over time. For instance, the Documents feed currently exposes the document entity type property as an Edm.Binary type. An upcoming iteration will show how to implement Named Resource Streams for the Documents.Document entity type property.
User Story
This sample iteration, on our CodePlex site, addresses the following user story:
As a backend developer, I want to only allow views of the AdventureWorks2012 database to be exposed as an OData public resource so that the underlying schema can be modified without affecting the service.
Source Download
How to install the sample
You can consume the AdventureWorks OData feed from https://services.odata.org/AdventureWorksV3/AdventureWorks.svc. You can also consume the AdventureWorks OData feed by running the sample service from a local ASP.NET Development Server.
To run the service on a local ASP.NET Development Server
- Download the sample from CodePlex.
- Attach the AdventureWorks2012 database. The AdventureWorks2012 database can be downloaded from https://msftdbprodsamples.codeplex.com/releases/view/93587
- From Microsoft SQL Server Management Studio, run \AdventureWorks.OData.Service\SQL Scripts\Views.sql to create the OData feed SQL views.
- Open \AdventureWorks.OData.Service\AdventureWorks.OData.Service.sln in Visual Studio 2012.
- In Solution Explorer, select AdventureWorks.svc.
- Press F5 to run the service on https://localhost:1234/AdventureWorks.svc/.
AdventureWorks OData Service Resources

Iteration 2 will address the following user story:
As a frontend developer, I want to consume the AdventureWorks OData feed so that I can use entity data within a business workflow.
The sample will show how to create a QueryFeed workflow activity that can consume any OData feed url and return an enumeration of entity properties. The sample further shows how to create an EntityProperties activity which allows a user designing a workflow to drop a TablePartPublisher into the activity. A TablePartPublisher can be consumed by any client to render entity properties. For example, a Word Add-in can consume EntityProperties and a TablePartPublisher to render an Open XML table. Iteration 2 will show how this is done.
I have most of the code for iteration 2 complete, but not quite ready to publish. I plan to publish iteration 2 in about two weeks. For now, I'll show you a sample of each AdventureWorks OData resource. Each example table was created by running the custom activities from within Word.
My next blog post will dive into how to create OData workflow activates. Custom activity designers that consume OData metadata and use LINQ to project entity xml into entity classes will be discussed. The metadata entity classes are used to provide expression editor items.
CompanySales Example

QueryFeed Url
https://localhost:1234/AdventureWorks.svc/CompanySales?$top=2&$orderby=OrderYear asc
Result
ProductCategory | ProductSubCategory | OrderYear | OrderQtr | Sales |
Accessories | Bike Racks | 2007 | Q4 | 60883.2000 |
Accessories | Bike Racks | 2007 | Q3 | 75920.4000 |
ManufacturingInstructions Example

QueryFeed Url
https://localhost:1234/AdventureWorks.svc/ManufacturingInstructions?$top=2&$select=ProductName,Instructions,SetupHours
Result
ProductName | Instructions | SetupHours |
HL Touring Frame | Adventure Works CyclesFR-210B Instructions for Manufacturing HL Touring Frame. Summary: This document contains manufacturing instructions for manufacturing the HL Touring Frame, Product Model 7. Instructions are work center specific and are identified by Work Center ID. These instructions must be followed in the order presented. Deviation from the instructions is not permitted unless an authorized Change Order detailing the deviation is provided by the Engineering Manager. | 0.5000 |
HL Touring Frame | Adventure Works CyclesFR-210B Instructions for Manufacturing HL Touring Frame. Summary: This document contains manufacturing instructions for manufacturing the HL Touring Frame, Product Model 7. Instructions are work center specific and are identified by Work Center ID. These instructions must be followed in the order presented. Deviation from the instructions is not permitted unless an authorized Change Order detailing the deviation is provided by the Engineering Manager. | 0.5000 |
ProductCatalog Example

QueryFeed Url
https://localhost:1234/AdventureWorks.svc/ProductCatalog?$filter=CultureID eq 'en' and ProductSubcategory eq 'Pedals'&$top=2&$select=ProductName,ProductSubcategory,Description,ListPrice
Results
ProductName | ProductSubcategory | Description | ListPrice |
Touring Pedal | Pedals | A stable pedal for all-day riding. | 80.9900 |
LL Road Pedal | Pedals | Clipless pedals - aluminum. | 40.4900 |
LL Mountain Pedal | Pedals | Expanded platform so you can ride in any shoes; great for all-around riding. | 40.4900 |
ML Road Pedal | Pedals | Lightweight aluminum alloy construction. | 62.0900 |
ML Mountain Pedal | Pedals | Lightweight, durable, clipless pedal with adjustable tension. | 62.0900 |
HL Mountain Pedal | Pedals | Stainless steel; designed to shed mud easily. | 80.9900 |
HL Road Pedal | Pedals | Top-of-the-line clipless pedals with adjustable tension. | 80.9900 |
TerritorySalesDrilldown Example

QueryFeed Url
https://localhost:1234/AdventureWorks.svc/TerritorySalesDrilldown?$filter=SalesPersonID eq 275&$top=2
Result
TerritoryName | SalesPersonID | EmployeeFirstName | EmployeeLastName | SalesOrderNumber | Total |
Northeast | 275 | Michael | Blythe | SO43670 | 6893.2549 |
Northeast | 275 | Michael | Blythe | SO43673 | 4216.0258 |
WorkOrderRouting Example

QueryFeed Url
https://localhost:1234/AdventureWorks.svc/WorkOrderRouting?$top=2&$select=WorkOrderID,ProductNumber,ProductName,ScheduledStartDate,ActualStartDate,ScheduledEndDate,ActualEndDate
Result
WorkOrderID | ProductName | ScheduledStartDate | ActualStartDate |
36651 | LL Mountain Seat Assembly | 2007-07-04T00:00:00 | 2007-07-04T00:00:00 |
36651 | LL Mountain Seat Assembly | 2007-07-04T00:00:00 | 2007-07-04T00:00:00 |
Popular posts from this blog
VSS yedekleme testi nasıl yapılır Exchange üzerinde bulunan verilerin yedeklenmesi (backup) ve geri yüklenmesi (restore) baslibasina çok önemli bir konudur. Bir yedegin saglikli alinmasi kadar restore isleminin basarili bir biçimde yapilabilmesi de test edilmesi gereken önemli bir islem. Exchange destegi olan (aware) diye adlandirdigimiz yazilimlar exchange writer'lari kullanarak VSS teknolojisi ile yedek alirlar. Yedekleme esnasinda karsilasilan sorunlarin büyük bölümünün nedeni, yazilimlarin uyumsuzlugu ya da bu yazilimlardaki yanlis bir ayar olabilmektedir. Bunun tespiti için, yani yedek alma sirasinda sorunun VSS Writer'dan mi, disk sisteminden mi ve/veya yedekleme yazilimindan mi kaynaklandigini anlayabilmek için Betest aracini kullanabilirsiniz. BETEST, Windows SDK yada Volume Shadow Copy Service SDK 7.2 (sonraki versiyonlarda mevcut) içerisinde bulunan yardimci bir araçtir. Araci kolaylikla bulabilir ve kurabilirsiniz. Kurulum islemini exchange sunucunuz...
ASP.NET AJAX RC 1 is here! Download now
Moving on with WebParticles 1 Deploying to the _app_bin folder This post adds to Tony Rabun's post "WebParticles: Developing and Using Web User Controls WebParts in Microsoft Office SharePoint Server 2007" . In the original post, the web part DLLs are deployed in the GAC. During the development period, this could become a bit of a pain as you will be doing numerous compile, deploy then test cycles. Putting the DLLs in the _app_bin folder of the SharePoint web application makes things a bit easier. Make sure the web part class that load the user control has the GUID attribute and the constructor sets the export mode to all. Figure 1 - The web part class 2. Add the AllowPartiallyTrustedCallers Attribute to the AssemblyInfo.cs file of the web part project and all other DLL projects it is referencing. Figure 2 - Marking the assembly with AllowPartiallyTrustedCallers attribute 3. Copy all the DLLs from the bin folder of the web part...


Comments
Post a Comment