Skip to main content
Secure RDWeb using Azure Multi-Factor Authentication
ADFS WAP: How to configure SSO with RDWeb
1. System Deploy
- ADFS : th-adfs2012.mfalab3.com
- ADFS WAP : th-adfs2012wap.mfalab3.com
- RDWeb : th-rds.mfalab3.com
A public IP for ADFS WAP points to ADFS/RDS as well
![]()
2. Setting on ADFS
Create a Relying Parth Trust
![]()
3. Setting on ADFS WAP
Create WAP Application,
Add-WebApplicationProxyApplication -Name 'rdweb' -ExternalUrl 'https://th-rds.mfalab3.com/rdweb/' -BackendServerURL 'https://th-rds.mfalab3.com/rdweb/' -ExternalPreAuthentication ADFS -ADFSRelyingPartyName rdweb1 -ExternalCertificateThumbprint '67D438BDDBB455E53CA83D6F5DEC34CC546F711A' ![]()
4. Setting on RDS
![]()
Important : Change authentication method to "Windows"
https://social.technet.microsoft.com/Forums/office/en-US/999f56fa-a218-41b0-86ee-2845269d93ef/rdweb-authentication?forum=winserverTS
5. Setting on the Client Computers
![]()
![]()
6. See how it works
![]()
![]()
![]()
Azure Automation step-by-step guide for Auto-Shutdown Virtual Machine.
- Create an Azure account
![]()
- Go "setting" and assign the user as the Co-administrator
![]() - Select automation and create an Automation Account, in this example "gwauto"
- Select automation and create an Automation Account, in this example "gwauto"
![]() - Select the created Automation Account
- Select the created Automation Account
![]() - Create a new runbook, in the example, "shutdown-vm"
- Create a new runbook, in the example, "shutdown-vm"
![]() - Click runbook "shutdown-vm" to create/edit a script
- Click runbook "shutdown-vm" to create/edit a script
![]() - Click Author -> insert script -> Test -> Publish
- Click Author -> insert script -> Test -> Publish
![]()
===================== Script example of shutdown-vm=====================
workflow shutdown-vm
{
$username = "azureauto@mfa01.onmicrosoft.com"
$pass = " "
$password=$pass|ConvertTo-SecureString -AsPlainText -Force
$mycred = new-object -typename System.Management.Automation.PSCredential -argumentlist $username,$password
Add-AzureAccount -Credential $mycred
$AzureSubscriptions = Get-AzureSubscription
foreach ($subscription in $AzureSubscriptions)
{
Select-AzureSubscription -SubscriptionName $subscription.SubscriptionName
#Write-Host $subscription.SubscriptionName
foreach ($vm in Get-AzureVM)
{
$name = $vm.Name
$servicename = $vm.ServiceName
If($vm.Status -ne 'StoppedDeallocated')
{
# Add the VM's which should not be shutdown
Stop-AzureVM -Service $servicename -name $name -Force
}
}
}
}
- Schedule the runbook
![]()
Azure: How to unregister and register ADFS Authentication Provider (MFA)
When Azure subscription is changed,due to a provider change, Azure Multi-Factor Authentication(AKA, MFA) must be unregistered and registered again by following method.
1. Un-register MFA provider, on ADFS Global Authentication Policy, uncheck WindowsAzureMultiFactorAuthentication checkbox.
![]()
Go to PowerShell prompt, then run
PS C:\Program Files\Multi-Factor Authentication Server> Unregister-AdfsAuthenticationProvider –Name"WindowsAzureMultiFactorAuthentication"
WARNING: PS0103: The authentication provider was successfully unregistered from the policy store. Restart the A
D FS Windows Service on each server in the farm.
Restart ADFS services
PS C:\Program Files\Multi-Factor Authentication Server> net stop adfssrv
The Active Directory Federation Services service is stopping.....
The Active Directory Federation Services service was stopped successfully.
PS C:\Program Files\Multi-Factor Authentication Server> net start adfssrv
The Active Directory Federation Services service is starting....
The Active Directory Federation Services service was started successfully.
Go back to ADFS Global Authentication Policy and see if there is no "WindowsAzureMultiFactorAuthentication" ![]()
2. Register MFA provider again,
To register again, run following from PowerShell prompt
PS C:\Program Files\Multi-Factor Authentication Server> .\Register-MultiFactorAuthenticationAdfsAdapter.ps1
WARNING: PS0114: The authentication provider was successfully registered with the policy store. To enable this
provider, you must restart the AD FS Windows Service on each server in the farm.
Restart ADFS services
PS C:\Program Files\Multi-Factor Authentication Server> net stop adfssrv
The Active Directory Federation Services service is stopping.....
The Active Directory Federation Services service was stopped successfully.
PS C:\Program Files\Multi-Factor Authentication Server> net start adfssrv
The Active Directory Federation Services service is starting....
The Active Directory Federation Services service was started successfully.
Go back to ADFS Global Authentication Policy and see if "WindowsAzureMultiFactorAuthentication" is back. ![]()
Azure Multi-Factor Authentication : Import users from multiple domains(Forest Trust)
Here are a simple step by step guide and instruction how to import/synchronize users from forest/domain trust
- System deployment example
- AD netbios 1 : th–ad02, Domain 1 : mfalab4.com
- AD netbios 2 : th–ad03, Domain 2 : mfalab5.com
- Configuration of Forest/Domain trust
![]()
![]()
- Check if both domain trust are listed from Multi-Factor Authentication Directory Sync
![]()
Configure Sharepoint access from External network
Step 1. From Central Administration, select "Configure alternative access mapping".
![]()
Step 2. Select URL to be edited and click "Edit Public URLs". ![]()
Step 3. Enter desired IP or URL shown below.
![]()
Step 4. Enter desired IP or URL shown below.
![]()
See Also
Create a custom VM into Existing Resource Group using Azure RM PowerShell
#Install Azure RM module if missing and Login to Azure
Install-Module -name AzureRM -AllowClobber
Login-AzureRmAccount
Get-AzureRmSubscription
#Set Variables
$subscriptionId = 'd855443e-XXXX-4a82-9a63-XXXXXXXXXXXX
$storageAccountName = 'YourStorageAccountName'
$sourceImageUri = https://YourStorageAccountName.blob.core.windows.net/vhds/YourUploadedVHDName.vhd'
$resourceGroupName = "YourResourceGroupName"
$locationName = "YourLocationName" => Ex) Japan East
$vnetName = "YourExistingVirtualNetworkName"
$vmnetinf = "YourNewNetworkInterfaceName"
$backendSubnetName = "YourExistingSubNetName"
$remoteAccessNSGName = "YourNewNSGName "
$vmname = "YourNewVMName"
$vmSize = "YourNewVMSize" => Ex) Standard_D1
$osDiskName = $vmname+'_osDisk'
$virtualNetwork = Get-AzureRmVirtualNetwork -ResourceGroupName $resourceGroupName -Name $vnetName
$publicIp = New-AzureRmPublicIpAddress -Name $vmname -ResourceGroupName $ResourceGroupName -Location $locationName -AllocationMethod Dynamic
$networkInterface = New-AzureRmNetworkInterface -ResourceGroupName $resourceGroupName -Name $vmnetinf -Location $locationName -SubnetId $virtualNetwork.Subnets[0].Id -PublicIpAddressId $publicIp.Id
$vmConfig = New-AzureRmVMConfig -VMName $vmname -VMSize $vmSize
$vmConfig = Set-AzureRmVMOSDisk -VM $vmConfig -Name $osDiskName -VhdUri $sourceImageUri -CreateOption Attach -Windows
$vmConfig = Add-AzureRmVMNetworkInterface -VM $vmConfig -Id $networkInterface.Id
$vm = New-AzureRmVM -VM $vmConfig -Location $locationName -ResourceGroupName $resourceGroupName
Hello world!
Welcome to Technet. This is your first post. Edit or delete it, then start blogging!
How to add Apps like Facebook, Google, Twitter to Azure AD
This is a step-by-step guide for enabling Azure Multi-Factor Authentication when logging in Azure AD liked Apps (such as Google App/Facebook/Twitter...).
The example I have used is for Facebook here.
Before get started, please enable Multi-Factor Authentication for users to log in using the link below:
https://social.technet.microsoft.com/wiki/contents/articles/32129.how-to-enable-multi-factor-authentication-for-azure-ad-account-login.aspx
1. Navigate to Active Directory and select a Directory
![]()
2. Go to APPLICATIONS and select one, "Facebook selected here"
![]()
3. Click CONFIGURE, turn "ENABLE ACCESS RULES" "ON"
![]()
4. To assign users/groups
![]()
5. To assign users/groups continue
![]()
6. Enter Login ID and Password for App (ex. Facebook)
![]()
7. Verify a user has been added
![]()
8. Click "DASHBOARD" to check login URL
![]()
9. Browse copy URL
![]()
10. Log in again
![]()
11. Installation pop-up for application dashboard
![]()
12. Here you go !!
![]()
How to enable Multi-Factor Authentication for Azure AD account login
This is a step by step guide for enabling Azure Multi-Factor Authentication for Azure AD Users.
The procedure is pretty straight forward,
1. Login into Azure Portal -> Active Directory -> Users -> Manage MULTI-FACTOR AUTH at the bottom
![]()
2. Select a user/users to enable Multi-Factor Authentication
![]()
3. Pop-up displays, continue "enable Multi-Factor Authentication"
![]()
4. Confirm "enabled"
![]()
5. Continue "Enforce"
![]()
6. Continue "Enforce"
![]()
7. Navigate to "Manage user settings"
![]()
8. Select the option below then save
![]()
9. Log out and log back in to Azure portal using "Multi-Factor Auth enabled user account"
![]()
10. You are redirected to the authentication method page
![]()
Select the authentication method then log back in, you will get with a phone call/SMS/Phone App notification depends on the method selected above.
11. Log back into Azure Portal
![]()
Thanks !!
How to guide : Graphical desktop (X Windows System) access to Azure Linux VM
From the client,
Download x2goclient, https://wiki.x2go.org/doku.php/doc:installation:x2goclient
From the server
Install X2Go Server
sudo apt-get install python-software-properties
sudo apt-get install software-properties-common
sudo add-apt-repository ppa:x2go/stable
sudo apt-get update
sudo apt-get install x2goserver x2goserver-xsession
MATE Bindings
sudo apt-get install x2gomatebindings
KDE Plasma Bindings
sudo apt-get install plasma-desktop
XFCE Bindings
sudo apt-get install xfce4
LXDE Bindings
sudo apt-get all x2golxdebindings
RDP Bindings
sudo apt-get install xrdp
Check if x2goserver is running
ubuntu:~$ service --status-all | grep x2go
[ + ] x2goserver
How to request an Azure Support.
Please follow the simple procedure below to create an Azure Support for Technical, Billing and Subscription issues.
To begin with, check the link to make sure if you have support plans https://azure.microsoft.com/en-us/support/plans/
1. Browse Azure Portal, https://portal.azure.com
2. Click "?" at top-right corner à New Support Request 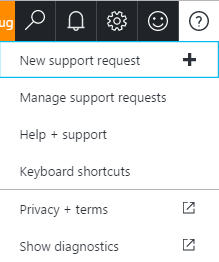
3. Select Basic information, then Next 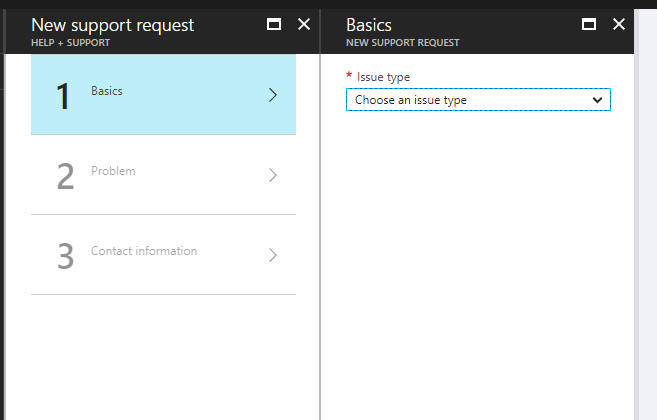
4. Fill up Problem information, then Next 
5. Fill up Contact information, then Create 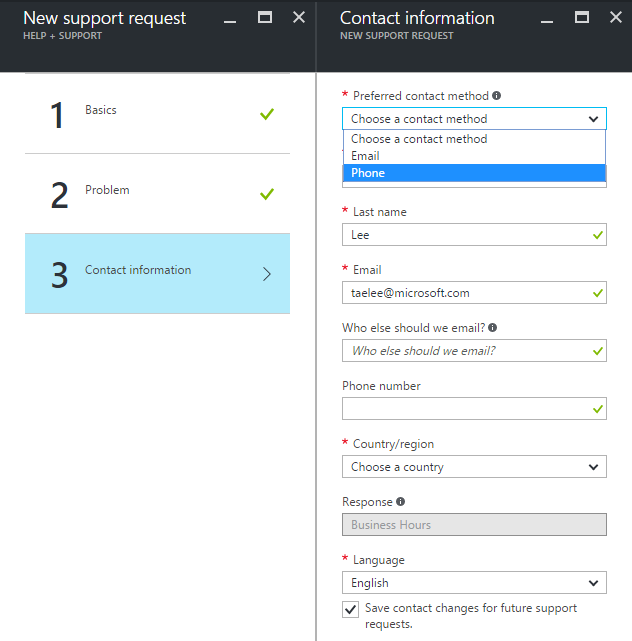
6. Support case has been created 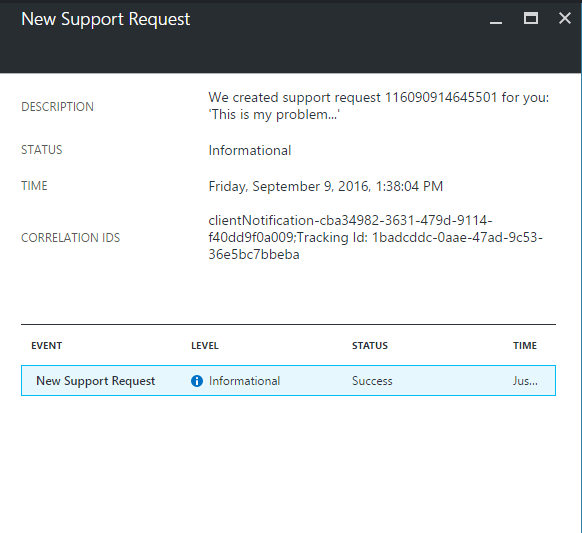
That's it !! You will be contacted by Microsoft Azure Support Engineer as your support plans.
https://azure.microsoft.com/en-us/support/plans/
How to use Azure Linux VM as an FTP server
The following resources are used for setting up Azure Linux VM for FTP server.
- Linux OS : ubuntu
- vsftpd
1. Create a Linux VM with Ubuntu : th-ubuntu.cloudapp.net
2. Setup end point : port 60001, 60002 are added in the example
![]()
3. Install vsftpd
sudo apt-get install vsftpd
4. Configure /etc/vsftpd.conf : an example attached
listen=YES
#anonymous_enable=YES
local_enable=YES
write_enable=YES
ls_recurse_enable=NO
dirmessage_enable=YES
use_localtime=YES
xferlog_enable=YES
xferlog_std_format=NO
log_ftp_protocol=YES
connect_from_port_20=YES
chown_uploads=NO
xferlog_file=/var/log/vsftpd.log
ascii_upload_enable=NO
ascii_download_enable=NO
ftpd_banner=Welcome to Taehee's FTP service.
local_root=/home/ftp
pam_service_name=vsftpd
rsa_cert_file=/etc/ssl/private/vsftpd.pem
pasv_enable=YES
pasv_min_port=60001
pasv_max_port=60002
port_enable=YES
pasv_addr_resolve=NO
file_open_mode=0666
local_umask=0022
5. Restart vsftpd,
root@th-ubuntu:~# service vsftpd restart
6. Create a user, "ftpuser" in this example
![]()
7. Change directory ownership
root@th-ubuntu:~# chown ftpuser:ftpuser /home/ftp
8. Test from winscp, click "Advanced and set Directories with /home/ftp".
![]()
HowTo : Azure Linux VM OS partition expansion
- Run followin Azure powershell,
Login-AzureRmAccount
Get-AzureRmSubscription
$subscriptionId = "Your Subscription ID"
$rgName = "YourResourceGroupName"
$vmName = "th-centos"
$vm = Get-AzureRmVM -ResourceGroupName $rgName -Name $vmName
PS C:\> Stop-AzureRmVM -ResourceGroupName $rgName -Name $vmName
OperationId :
Status : Succeeded
StartTime : 2016-11-28 PM 2:44:30
EndTime : 2016-11-28 PM 2:46:41
Error :
PS C:\> $vm.StorageProfile.OSDisk.DiskSizeGB = 130
PS C:\> Update-AzureRmVM -ResourceGroupName $rgName -VM $vm
RequestId IsSuccessStatusCode StatusCode ReasonPhrase
--------- ------------------- ---------- ------------
True OK OK
PS C:\Users\taelee> Start-AzureRmVM -ResourceGroupName $rgName -Name $vmName
OperationId :
Status : Succeeded
StartTime : 2016-11-28 PM 3:07:53
EndTime : 2016-11-28 PM 3:08:26
Error :
- Ubuntu would not require the following, for CentOS in this example
[taehee@th-centos ~]$ hostnamectl
Static hostname: th-centos
Icon name: computer-vm
Chassis: vm
Machine ID: e57a6b05e3d34a59b561f002e224d65a
Boot ID: 7348830553774bbe90f54883d716ef2a
Virtualization: microsoft
Operating System: CentOS Linux 7 (Core)
CPE OS Name: cpe:/o:centos:centos:7
Kernel: Linux 3.10.0-327.18.2.el7.x86_64
Architecture: x86-64
[root@th-centos /]# fdisk /dev/sda
Welcome to fdisk (util-linux 2.23.2).
Changes will remain in memory only, until you decide to write them.
Be careful before using the write command.
Command (m for help): u
Changing display/entry units to cylinders (DEPRECATED!).
Command (m for help): p
Disk /dev/sda: 136.4 GB, 136365211648 bytes, 266338304 sectors
Units = cylinders of 16065 * 512 = 8225280 bytes
Sector size (logical/physical): 512 bytes / 512 bytes
I/O size (minimum/optimal): 512 bytes / 512 bytes
Disk label type: dos
Disk identifier: 0x000dd16b
Device Boot Start End Blocks Id System
/dev/sda1 * 1 3917 31456256 83 Linux
Command (m for help): d
Selected partition 1
Partition 1 is deleted
Command (m for help): n
Partition type:
p primary (0 primary, 0 extended, 4 free)
e extended
Select (default p): p
Partition number (1-4, default 1): 1
First cylinder (1-16578, default 1):
Using default value 1
Last cylinder, +cylinders or +size{K,M,G} (1-16578, default 16578):
Using default value 16578
Partition 1 of type Linux and of size 127 GiB is set
Command (m for help): w
The partition table has been altered!
Calling ioctl() to re-read partition table.
WARNING: Re-reading the partition table failed with error 16: Device or resource busy.
The kernel still uses the old table. The new table will be used at
the next reboot or after you run partprobe(8) or kpartx(8)
Syncing disks.
[root@th-centos /]# shutdown -r -t 0
Shutdown scheduled for Mon 2016-11-28 06:35:04 UTC, use 'shutdown -c' to cancel.
[root@th-centos /]#
Broadcast message from root@th-centos (Mon 2016-11-28 06:34:04 UTC):
The system is going down for reboot at Mon 2016-11-28 06:35:04 UTC!
- Log back in to "th-centos"
[root@th-centos ~]# xfs_growfs -d /dev/sda1
meta-data=/dev/sda1 isize=256 agcount=4, agsize=1966016 blks
= sectsz=512 attr=2, projid32bit=1
= crc=0 finobt=0
data = bsize=4096 blocks=7864064, imaxpct=25
= sunit=0 swidth=0 blks
naming =version 2 bsize=4096 ascii-ci=0 ftype=0
log =internal bsize=4096 blocks=3839, version=2
= sectsz=512 sunit=0 blks, lazy-count=1
realtime =none extsz=4096 blocks=0, rtextents=0
data blocks changed from 7864064 to 33290440
[root@th-centos ~]# df -h
Filesystem Size Used Avail Use% Mounted on
/dev/sda1 127G 1.5G 126G 2% /
devtmpfs 1.7G 0 1.7G 0% /dev
tmpfs 1.7G 0 1.7G 0% /dev/shm
tmpfs 1.7G 8.3M 1.7G 1% /run
tmpfs 1.7G 0 1.7G 0% /sys/fs/cgroup
/dev/sdb1 50G 53M 47G 1% /mnt/resource
tmpfs 345M 0 345M 0% /run/user/1000
Implementation Azure Multi-Factor Authentication with Citrix XenApp
This guide will show how to secure Citrix XepApp server using Azure Multi-Factor Authentication
1. Configuration on XenApp server
![]()
2. Configuration on IIS server
![]()
3. Configuration on Azure Multi-Factor Authentication server
![]()
4. Test authentication
![]()
5. Test result - cont.
![]()
6. Authenticated
![]()
Multi-Factor Authentication for Securing RD Gateway Server
System Environment
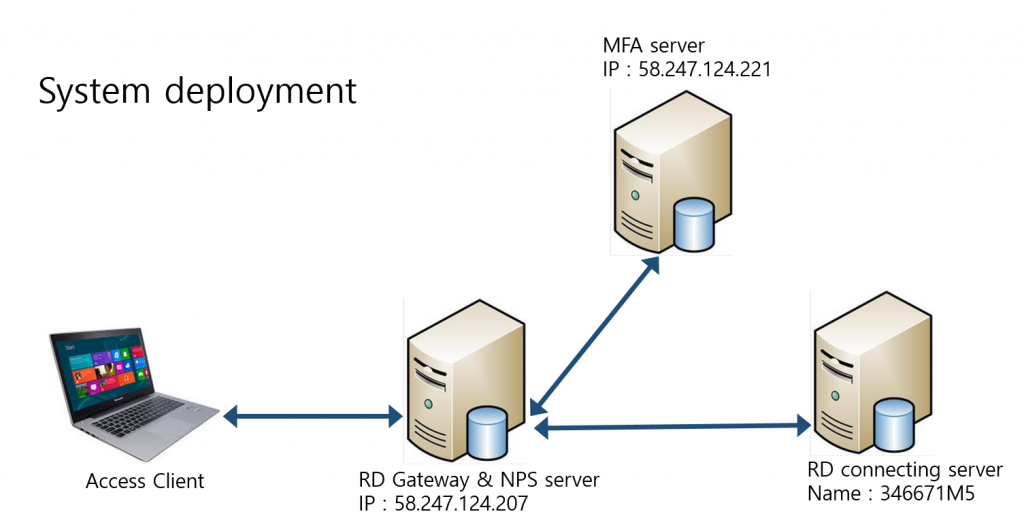
Configuration
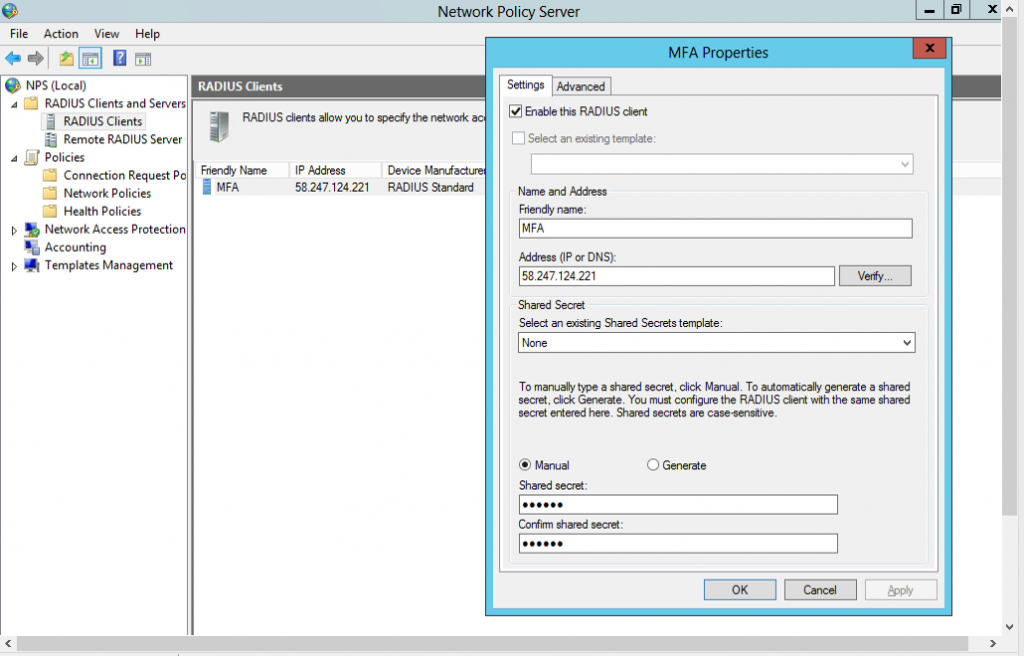
1. Select MFA as an RADIUS Proxy

2. NPS server configuration
3. NPS server configuration - cont #1
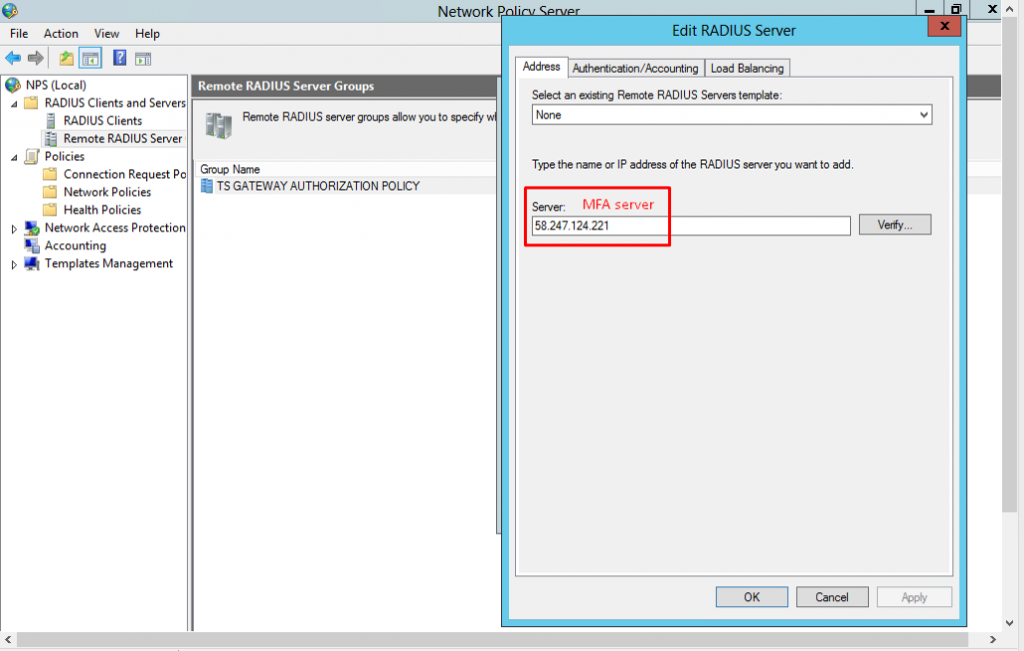
4. NPS server configuration - cont #2
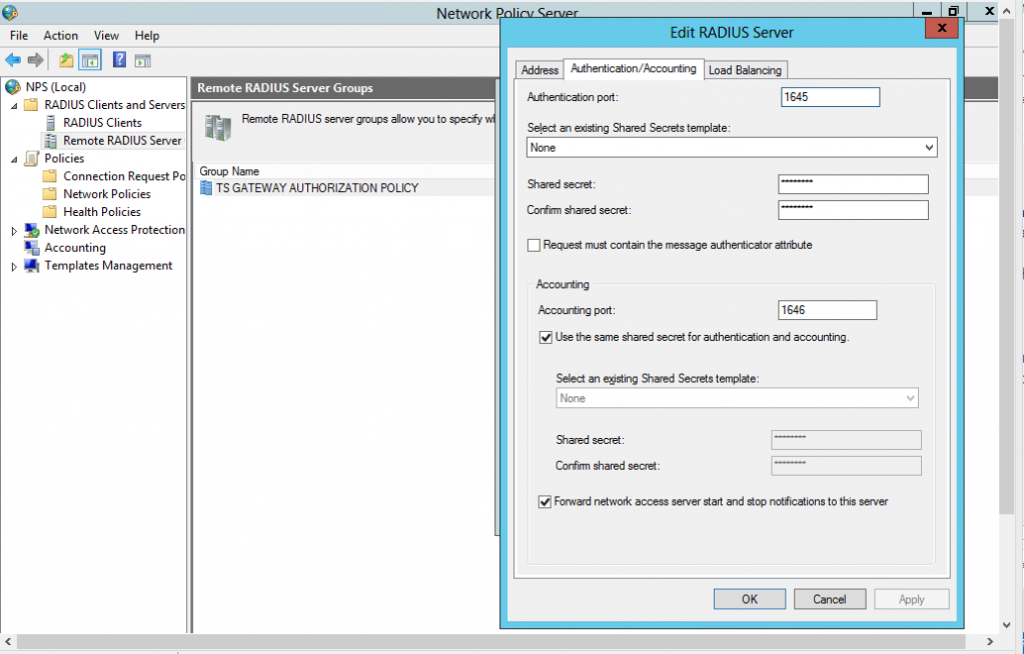
5. NPS server configuration – cont #3
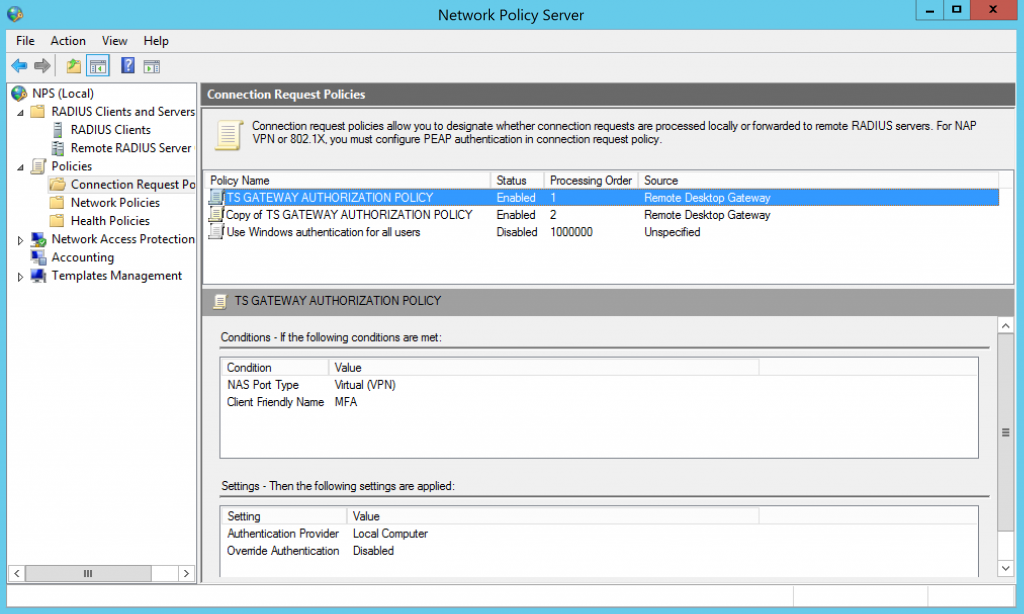
6. NPS server configuration – cont #4
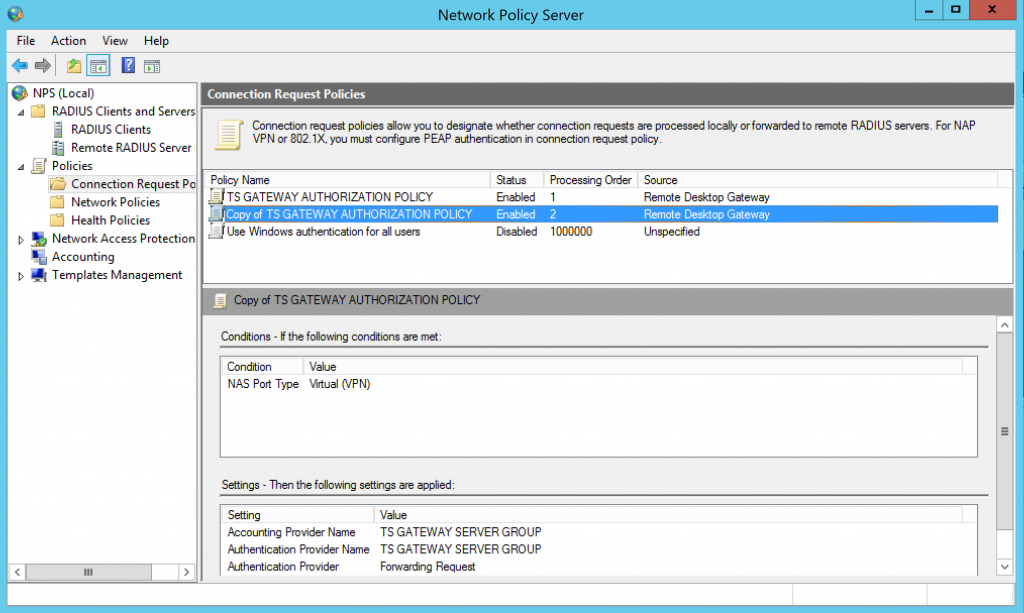
7. NPS server configuration – cont #5
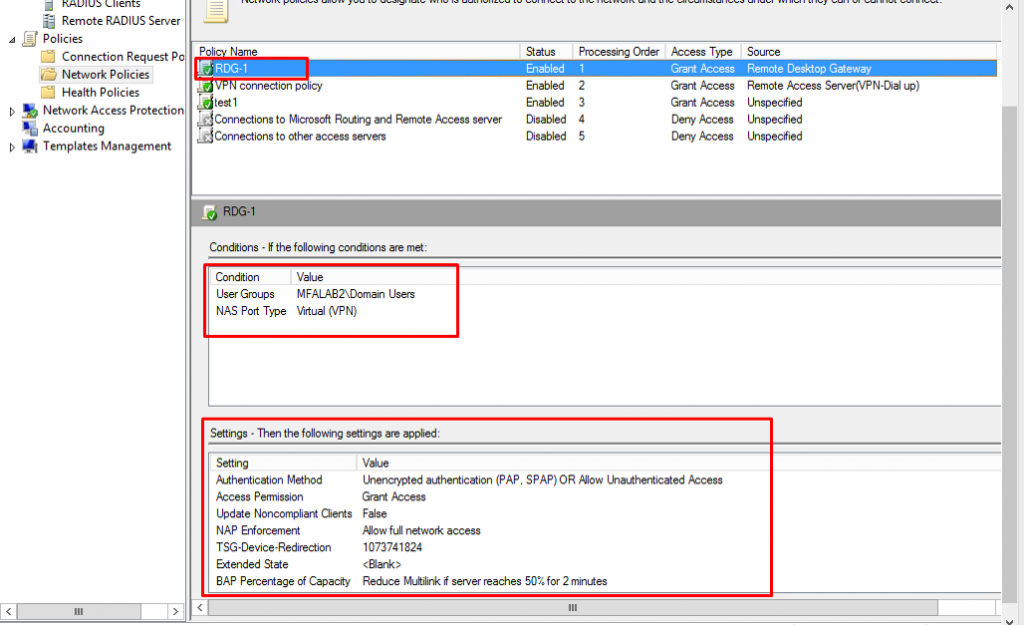
8. MFA server configuration - Client
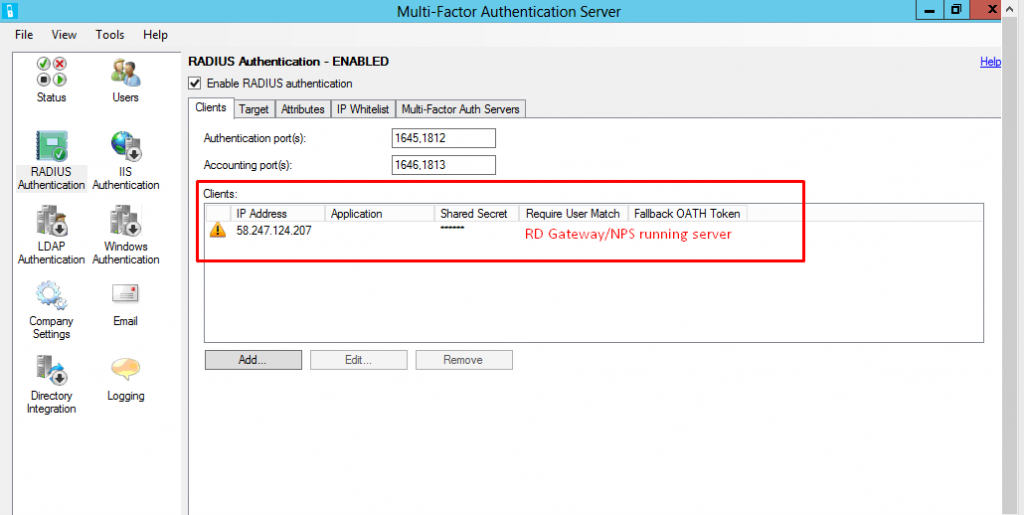
9. MFA server configuration - Target
10. Testing
When connecting Remote Computer via RD Gateway server, MFA will proceed upon entering login credentials.
Powershell Script: Task scheduler - Scheduling shutdown Azure VMs
In this article, you will be able to setup TASK schedule to run Azure PowerShell script.
Automatic shutdown VMs will be used as an example – Save Money!!
Table of Contents
1. Create a schedule
![]()
2. Triggers(Daily in the example)
![]()
3. Enter "powershell.exe" and location of the script in "Add arguments"
![]()
Example of "PowerShell scripts to shutdown VM script"
Download script from : https://social.technet.microsoft.com/wiki/contents/articles/30929.azure-automation-step-by-step-guide-for-auto-shutdown-virtual-machine.aspx
Publish Azure MFA user portal via ADFS WAP(Web Access Proxy)
I often wonder why most of ADFS WAP technet articles are verbose,
Here goes important checkpoints to publish a web page via ADFS WAP, an example of page used here is Azure MFA(Multi-Factor Authentication) User Portal.
The page won't cover ADFS installation but ADFS WAP.
1. System Diagram
Hostname FQDN Intranet IP
ADFS WAP th-adfs2012WAP.mfalab3.com 10.0.0.6 ==> !! Not domain joined !!
ADFS server th-adfs2012.mfalab3.com 10.0.0.5
AD/MFA : th-ad01.mfalab3.com 10.0.0.4 ![]()
2. Check Certificate issued and distributed, type the command "dir Cert:\LocalMachine\My" on both ADFS and ADFS WAP
PS C:\Users\taehee\Desktop> dir Cert:\LocalMachine\My
Directory: Microsoft.PowerShell.Security\Certificate::LocalMachine\My
Thumbprint Subject
---------- -------
EF623C4A0FE2C4E3A43CA4B8F4F0C9410393E5DB CN=th-adfs2012.mfalab3.com
3. Install ADFS WAP PS C:\Users\taehee\Desktop> Install-WebApplicationProxy -CertificateThumbprint 'EF623C4A0FE2C4E3A43CA4B8F4F0C9410393E5DB' -FederationServiceName th-adfs2012.mfalab3.com
cmdlet Install-WebApplicationProxy at command pipeline position 1
Supply values for the following parameters:
Message Context Status
------- ------- ------
The configuration completed successfully. DeploymentSucceeded Success
4. Check the certificate
PS C:\Users\administrator\Desktop> netsh http show sslcert
SSL Certificate bindings:
-------------------------
IP:port : 0.0.0.0:443
Certificate Hash : ef623c4a0fe2c4e3a43ca4b8f4f0c9410393e5db
Application ID : {4dc3e181-e14b-4a21-b022-59fc669b0914}
Certificate Store Name : My
Verify Client Certificate Revocation : Enabled
Verify Revocation Using Cached Client Certificate Only : Disabled
Usage Check : Enabled
Revocation Freshness Time : 0
URL Retrieval Timeout : 0
Ctl Identifier : (null)
Ctl Store Name : (null)
DS Mapper Usage : Disabled
Negotiate Client Certificate : Disabled
Hostname:port : th-adfs2012.mfalab3.com:443
Certificate Hash : ef623c4a0fe2c4e3a43ca4b8f4f0c9410393e5db
Application ID : {5d89a20c-beab-4389-9447-324788eb944a}
Certificate Store Name : MY
Verify Client Certificate Revocation : Enabled
Verify Revocation Using Cached Client Certificate Only : Disabled
Usage Check : Enabled
Revocation Freshness Time : 0
URL Retrieval Timeout : 0
Ctl Identifier : (null)
Ctl Store Name : AdfsTrustedDevices
DS Mapper Usage : Disabled
Negotiate Client Certificate : Disabled
Hostname:port : localhost:443
Certificate Hash : ef623c4a0fe2c4e3a43ca4b8f4f0c9410393e5db
Application ID : {5d89a20c-beab-4389-9447-324788eb944a}
Certificate Store Name : MY
Verify Client Certificate Revocation : Enabled
Verify Revocation Using Cached Client Certificate Only : Disabled
Usage Check : Enabled
Revocation Freshness Time : 0
URL Retrieval Timeout : 0
Ctl Identifier : (null)
Ctl Store Name : AdfsTrustedDevices
DS Mapper Usage : Disabled
Negotiate Client Certificate : Disabled
Hostname:port : th-adfs2012.mfalab3.com:49443
Certificate Hash : ef623c4a0fe2c4e3a43ca4b8f4f0c9410393e5db
Application ID : {5d89a20c-beab-4389-9447-324788eb944a}
Certificate Store Name : MY
Verify Client Certificate Revocation : Enabled
Verify Revocation Using Cached Client Certificate Only : Disabled
Usage Check : Enabled
Revocation Freshness Time : 0
URL Retrieval Timeout : 0
Ctl Identifier : (null)
Ctl Store Name : (null)
DS Mapper Usage : Disabled
Negotiate Client Certificate : Enabled
PS C:\Users\administrator\Desktop> Get-AdfsSslCertificate
HostName PortNumber CertificateHash
-------- ---------- ---------------
th-adfs2012.mfalab3.com 443 EF623C4A0FE2C4E3A43CA4B8F4F0C9410393E5DB
localhost 443 EF623C4A0FE2C4E3A43CA4B8F4F0C9410393E5DB
th-adfs2012.mfalab3.com 49443 EF623C4A0FE2C4E3A43CA4B8F4F0C9410393E5DB
5. Publish Azure MFA user portal(Pass Through)
PS C:\Users\taehee\Desktop> Add-WebApplicationProxyApplication -BackendServerURL 'https://th-ad01.mfalab3.com/MultiFactorAuth/' -ExternalCertificateThumbprint 'EF623C4A0FE2C4E3A43CA4B8F4F0C9410393E5DB'-ExternalURL 'https://th-adfs2012wap.mfalab3.com/MultiFactorAuth/' -Name 'MFA User Portal' -ExternalPreAuthentication PassThrough
PS C:\Users\taehee\Desktop> Get-WebApplicationProxyApplication
Name ExternalUrl BackendServerUrl ExternalPreauthentication ID
---- ----------- ---------------- ----------------- --
MFA User Portal https://th-adfs2012wap.mfalab... https://th-ad01.mfalab3.com/M... PassThrough 54CA9F83-3689-C58C-0A6F-950EC262DF0F
6. Confirm Publishing from ADFS WAP management console ![]()
7. Error messages and troubleshooting : Most likely related to Certificates
Problem -
Install-WebApplicationProxy : An error occurred when attempting to establish a trust relationship with the federation service.
Error: The underlying connection was closed: Could not establish trust relationship for the SSL/TLS secure channel.
Solution -
On ADFS WAP server, install certificate and check " netsh http show sslcert" or "Get-AdfsSslCertificate"
Problem -
Install-WebApplicationProxy : An error occurred when attempting to establish a trust relationship with the federation service.
Error: Unauthorized. Verify that the service account has administrative access on the target Federation Server.
Solution -
Check if adfssrv(ADFS service) account is a member of "domain administrators".
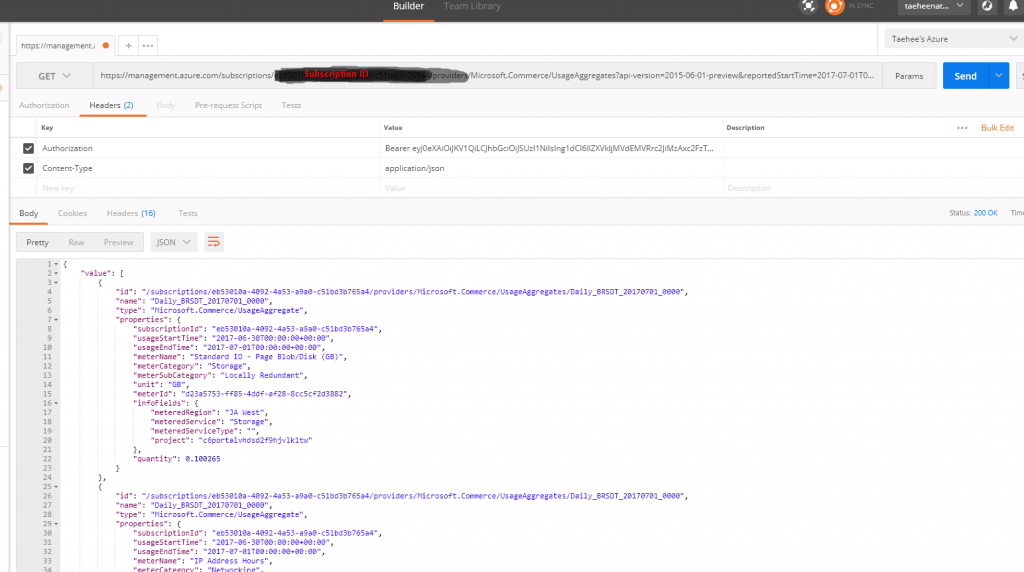
Query request for Azure Usage/Billing API using Postman
Reference Link to query report.
https://msdn.microsoft.com/library/en-us/Mt218998.aspx
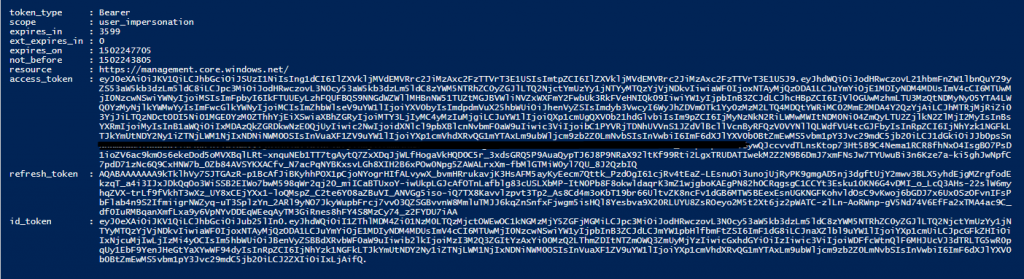
Generate Bearer Token
Login-AzureRmAccount
$AccountName ="azureauto@AADTenants.onmicrosoft.com"
$Password = "UserPassword"
$PayLoad="resource=https://management.core.windows.net/&client_id=xxxxxxxxxxxxxxxxxxxxx&grant_type=password&username="+$AccountName+"&scope=openid&password="+$Password
$Response=Invoke-WebRequest -Uri "https://login.microsoftonline.com/Common/oauth2/token" -Method POST -Body $PayLoad
$ResponseJSON=$Response|ConvertFrom-Json
$ResponseJSON
Results,
From Postman
Remove Office 365 federation from ADFS server
1. Check federation status,
PS C:\Users\administrator> Get-MsolDomain | fl name,status,auth*
Name : mfalab3.com
Status : Verified
Authentication : Federated
2. From ADFS server, run following Powershell commands.
Set-MsolADFSContext -Computer th-adfs2012
Set-MsolDomainAuthentication -Authentication Managed -DomainName mfalab3.com
Get-MsolDomain | fl name,status,auth*
(Note : th-adfs2012 : adfs server, mfalab3.com : test domain name)
3. Check federation status again,
PS C:\Users\administrator> Get-MsolDomain | fl name,status,auth*
Name : mfalab3.com
Status : Verified
Authentication : Managed
4. Login to O365 to check if it is not redirected to ADFS server
Secure RDWeb using Azure Multi-Factor Authentication
1. Change RDWeb authentication mode from "Forms" to "Windows"
Edit C:\Windows\Web\RDWeb\Pages\web.config
<authentication mode="Windows"/>
<!--
<authentication mode="Forms">
<forms loginUrl="default.aspx" name="TSWAAuthHttpOnlyCookie" protection="All" requireSSL="true" />
</authentication>
-->
.
.
.
<system.webServer>
<!--
<modules runAllManagedModulesForAllRequests="true">
<remove name="FormsAuthentication" />
<add name="RDWAFormsAuthenticationModule" type="Microsoft.TerminalServices.Publishing.Portal.FormAuthentication.TSDomainFormsAuthentication" />
</modules>
<security>
<authentication>
<windowsAuthentication enabled="false" />
<anonymousAuthentication enabled="true" />
</authentication>
</security>
-->
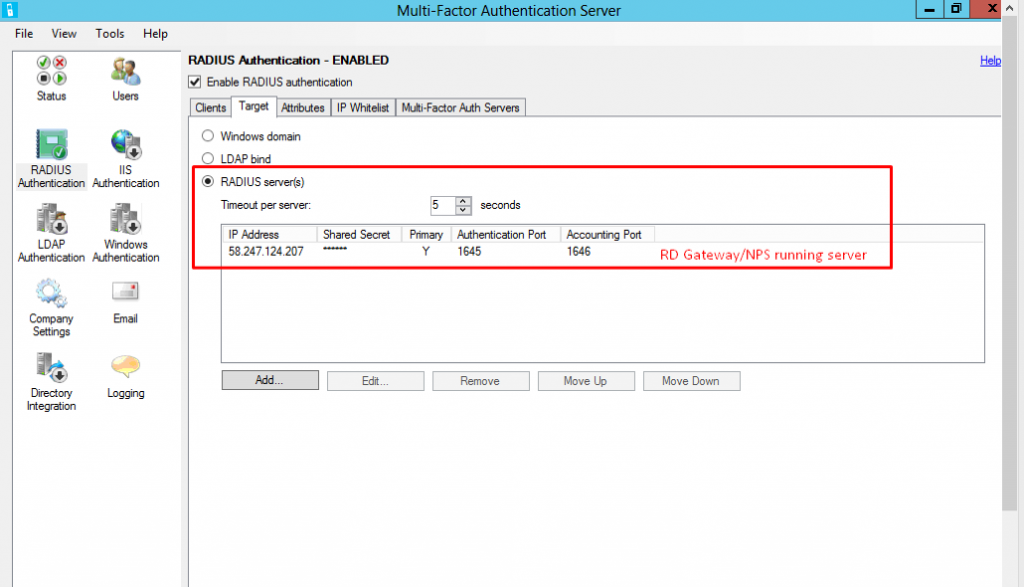
2. Add URL for RDWeb access in Azure MFA server
![]()
3. Browse RDWeb page on the client and enter credential
Popular posts from this blog
[Excel] 문서에 오류가 있는지 확인하는 방법 Excel 문서를 편집하는 도중에 "셀 서식이 너무 많습니다." 메시지가 나오면서 서식을 더 이상 추가할 수 없거나, 문서의 크기가 예상보다 너무 클 때 , 특정 이름이 이미 있다는 메시지가 나오면서 '이름 충돌' 메시지가 계속 나올 때 가 있을 것입니다. 문서에 오류가 있는지 확인하는 방법에 대해서 설명합니다. ※ 문서를 수정하기 전에 수정 과정에서 데이터가 손실될 가능성이 있으므로 백업 본을 하나 만들어 놓습니다. 현상 및 원인 "셀 서식이 너무 많습니다." Excel의 Workbook은 97-2003 버전의 경우 약 4,000개 2007 버전의 경우 약 64,000개 의 서로 다른 셀 서식 조합을 가질 수 있습니다. 셀 서식 조합이라는 것은 글꼴 서식(예- 글꼴 종류, 크기, 기울임, 굵은 글꼴, 밑줄 등)이나 괘선(괘선의 위치, 색상 등), 무늬나 음영, 표시 형식, 맞춤, 셀 보호 등 을 포함합니다. Excel 2007에서는 1,024개의 전역 글꼴 종류를 사용할 수 있고 통합 문서당 512개까지 사용할 수 있습니다. 따라서 셀 서식 조합의 개수 제한을 초과한 경우에는 "셀 서식이 너무 많습니다." 메시지가 발생하는 것입니다. 그러나 대부분의 경우, 사용자가 직접 넣은 서식으로 개수 제한을 초과하는 경우는 드뭅니다. 셀 서식이 개수 제한을 넘도록 자동으로 서식을 추가해 주는 Laroux나 Pldt 같은 매크로 바이러스 에 감염이 되었거나, 매크로 바이러스에 감염이 되었던 문서의 시트를 [시트 이동/복사]하여 가져온 경우 시트의 서식, 스타일이 옮겨와 문제가 될 수 있습니다. "셀 서식이 너무 많습니다." 메시지가 발생하지 않도록 하기 위한 예방법 글꼴(종류, 크기, 색, 굵기, 기울임, 밑줄), 셀 채우기 색, 행 높이, 열 너비, 테두리(선 종류, ...
Announcing the AdventureWorks OData Feed sample
Update – Removing Built-in Applications from Windows 8 In October last year I published a script that is designed to remove the built-in Windows 8 applications when creating a Windows 8 image. After a reading some of the comments in that blog post I decided to create a new version of the script that is simpler to use. The new script removes the need to know the full name for the app and the different names for each architecture. I am sure you will agree that this name - Microsoft.Bing – is much easier to manage than this - Microsoft.Bing_1.2.0.137_x86__8wekyb3d8bbwe. The script below takes a simple list of Apps and then removes the provisioned package and the package that is installed for the Administrator. To adjust the script for your requirements simply update the $AppList comma separated list to include the Apps you want to remove. $AppsList = "Microsoft.Bing" , "Microsoft.BingFinance" , "Microsoft.BingMaps" , "Microsoft.Bing...
How to control your World with Intune MDM, MAM (APP) and Graph API
VSS yedekleme testi nasıl yapılır Exchange üzerinde bulunan verilerin yedeklenmesi (backup) ve geri yüklenmesi (restore) baslibasina çok önemli bir konudur. Bir yedegin saglikli alinmasi kadar restore isleminin basarili bir biçimde yapilabilmesi de test edilmesi gereken önemli bir islem. Exchange destegi olan (aware) diye adlandirdigimiz yazilimlar exchange writer'lari kullanarak VSS teknolojisi ile yedek alirlar. Yedekleme esnasinda karsilasilan sorunlarin büyük bölümünün nedeni, yazilimlarin uyumsuzlugu ya da bu yazilimlardaki yanlis bir ayar olabilmektedir. Bunun tespiti için, yani yedek alma sirasinda sorunun VSS Writer'dan mi, disk sisteminden mi ve/veya yedekleme yazilimindan mi kaynaklandigini anlayabilmek için Betest aracini kullanabilirsiniz. BETEST, Windows SDK yada Volume Shadow Copy Service SDK 7.2 (sonraki versiyonlarda mevcut) içerisinde bulunan yardimci bir araçtir. Araci kolaylikla bulabilir ve kurabilirsiniz. Kurulum islemini exchange sunucunuz...


Comments
Post a Comment