PowerTip: Use PowerShell to Show Approved Verbs Group
PowerShell Workflow for Mere Mortals: Part 3
Summary: Microsoft Scripting Guy Ed Wilson continues his five-part series about Windows PowerShell Workflow.
Hey, Scripting Guy! So what's up with Windows PowerShell workflows and activities? I do not know what an activity is. Can you help me?
—CJ
Hello CJ,
Microsoft Scripting Guy, Ed Wilson, is here. Ah…this afternoon, I am sipping a cup of Darjeeling Earl Grey tea with a bit of cinnamon stick, and I added just a bit of lavender honey from a nearby lavender farm. I am accompanying my tea with a 90% cocoa bar with black currants and hazelnuts. The combination is absolutely stunning.
Note This is the third in a five-part series of blog posts about Windows PowerShell Workflow for "mere mortals." Before you read this post, please read:
For more information about workflow, see these Hey, Scripting Guy! Blog posts: Windows PowerShell Workflow.
Workflow activities
A Windows PowerShell Workflow is made up of a series of activities. In fact, the basic unit of work in a Windows PowerShell Workflow is called an activity. There are five types of Windows PowerShell Workflow activities that are available for use. The following table describes the types of activities.
Activity | Description |
CheckPoint-Workflow (alias = PSPersist) | Takes a checkpoint. Saves the state and data of a workflow in progress. If the workflow is interrupted or rerun, it can restart from any checkpoint. Use the Checkpoint-Workflow activity along with the PSPersist workflow common parameter and the PSPersistPreference variable to make your workflow robust and recoverable. |
ForEach -Parallel | Runs the statements in the script block once for each item in a collection. The items are processed in parallel. The statements in the script block run sequentially. |
Parallel | Allows all statements in the script block to run at the same time. The order of execution is undefined. |
Sequence | Creates a block of sequential statements within a parallel script block. The Sequence script block runs in parallel with other activities in the Parallel script block. However, the statements in the Sequence script block run in the order in which they appear. Sequence is valid only within a Parallel script block. |
Suspend-Workflow | Stops a workflow temporarily. To resume the workflow, use the Resume-Job cmdlet. |
Windows PowerShell cmdlets as activities
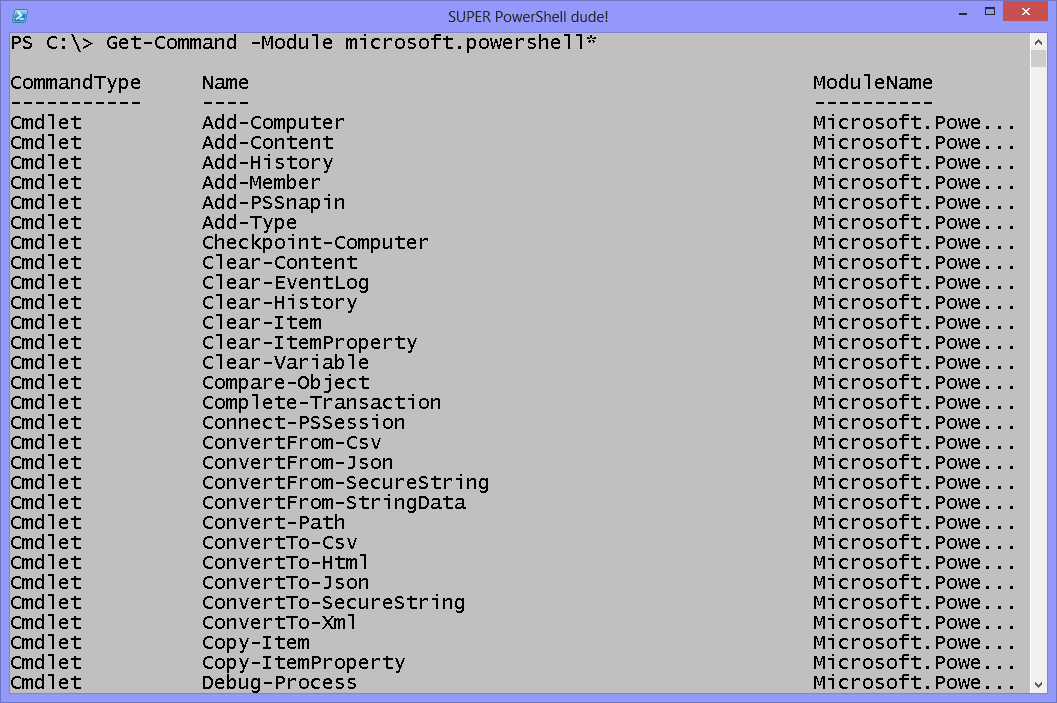
Windows PowerShell cmdlets from the core modules are automatically implemented as activities for use in a Windows PowerShell Workflow. These core modules, all begin with the name Microsoft.PowerShell. To find these cmdlets, I can use the Get-Command cmdlet as shown here:
Get-Command -Module microsoft.powershell*
The command and the associated output from the command are shown in the image that follows.
Disallowed core cmdlets
However, not all of the cmdlets from the Windows PowerShell core modules are permitted as automatic activities for Windows PowerShell Workflows. The reason for this is that some of the core cmdlets do not work well in workflows. A quick look at the disallowed list makes this abundantly clear. The following table lists the disallowed core cmdlets.
Add-History | Invoke-History |
Add-PSSnapin | New-Alias |
Clear-History | New-Variable |
Clear-Variable | Out-GridView |
Complete-Transaction | Remove-PSBreakpoint |
Debug-Process | Remove-PSSnapin |
Disable-PSBreakpoint | Remove-Variable |
Enable-PSBreakpoint | Set-Alias |
Enter-PSSession | Set-PSBreakpoint |
Exit-PSSession | Set-PSDebug |
Export-Alias | Set-StrictMode |
Export-Console | Set-TraceMode |
Get-Alias | Set-Variable |
Get-History | Start-Transaction |
Get-PSBreakpoint | Start-Transcript |
Get-PSCallStack | Stop-Transcript |
Get-PSSnapin | Trace-Command |
Get-Transaction | Undo-Transaction |
Get-Variable | Use-Transaction |
Import-Alias | Write-Host |
Non-Automatic cmdlet activities
If a cmdlet is not in the Windows PowerShell core modules, it does not mean that it is excluded. In fact, it probably is not excluded. Therefore, when a non-core Windows PowerShell cmdlet is used in a Windows PowerShell Workflow, Windows PowerShell will automatically run the cmdlet as an InlineScript activity.
An InlineScript activity permits me to run commands in a Windows PowerShell workflow, and to share data that would not be otherwise permitted.
In the InlineScript script block, I can call all Windows PowerShell commands and expressions and share state and data within the session. This includes imported modules and variable values. For example, the cmdlets listed in the previous table that are not permitted in a Windows PowerShell workflow, could be included in an InlineScript activity.
Parallel activities
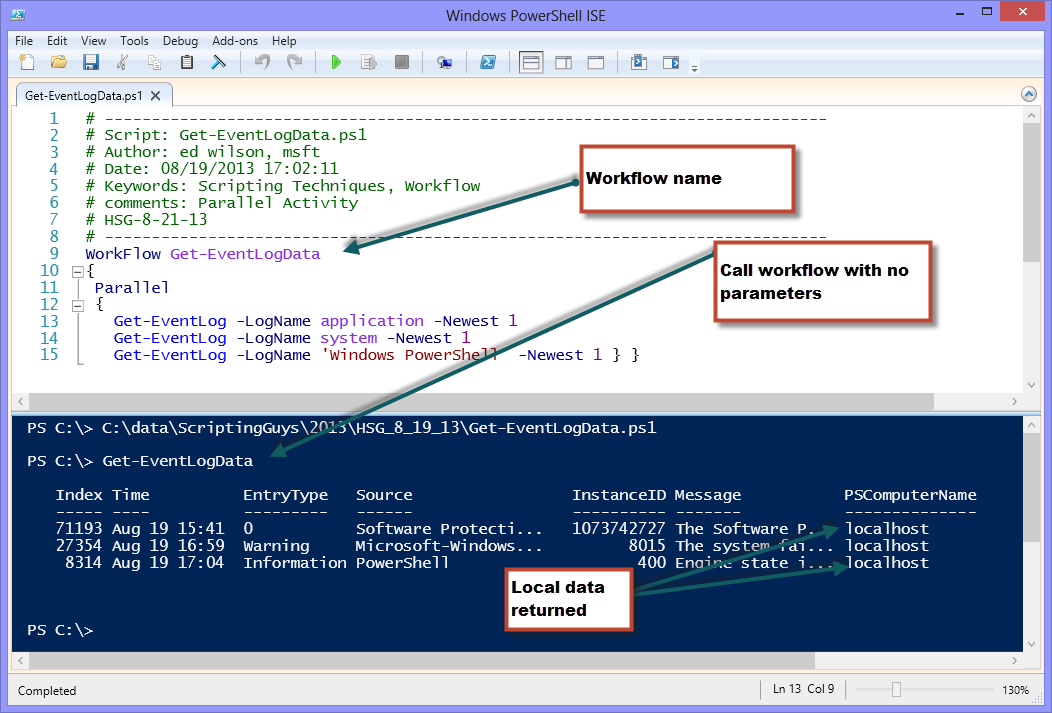
To create a Windows PowerShell Workflow that uses a parallel workflow activity, I use the Parallel keyword, and I supply a script block. The following workflow illustrates this technique:
WorkFlow Get-EventLogData
{
Parallel
{
Get-EventLog -LogName application -Newest 1
Get-EventLog -LogName system -Newest 1
Get-EventLog -LogName 'Windows PowerShell' -Newest 1 } }
When I run the script that contains the Get-EventLogData workflow, I go to the execution pane of the Windows PowerShell ISE to execute the workflow. What happens is that the three Get-EventLog cmdlet commands execute in parallel. This results in a powerful and quick way to grab event log data. If I call the workflow with no parameters, it runs on my local computer. This is shown here:
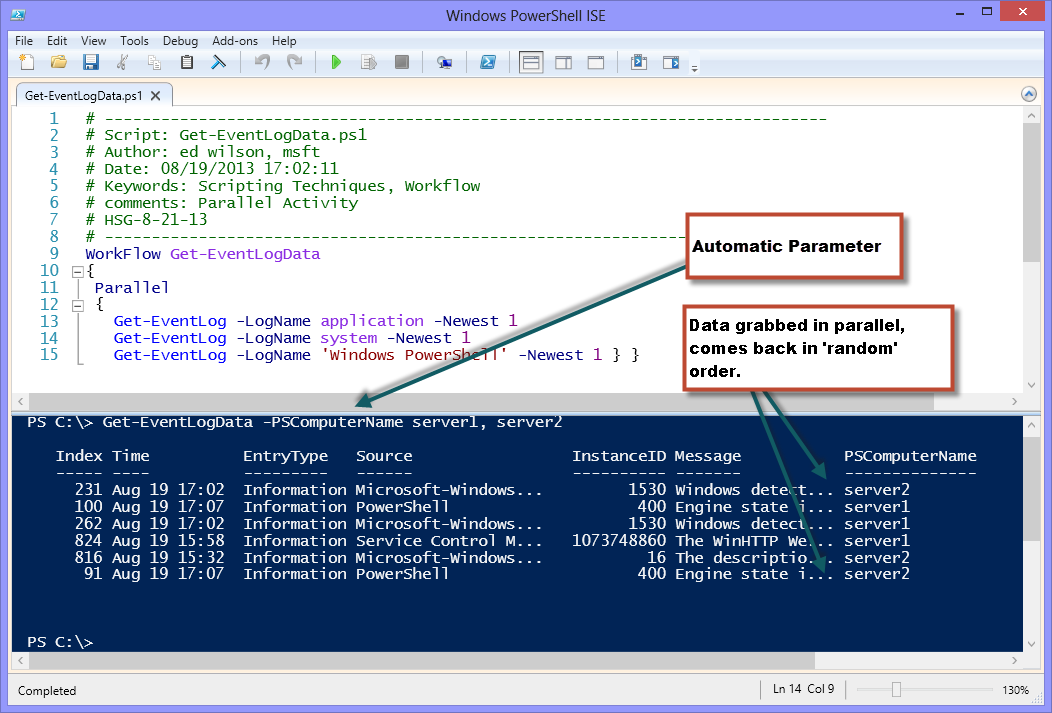
The cool thing is that with a Windows PowerShell Workflow, I automatically gain access to several automatic parameters. One of the automatic parameters is PSComputerName. Therefore, with no additional work (this workflow does not exist on Server 1 or Server2—it only exists on my workstation), I can use the automatic PSComputerName workflow parameter, and run the workflow on two remote servers. This is shown here:
Because I am not accessing the PSComputerName automatic parameter directly within my Windows PowerShell activity, I am actually using an automatic workflow parameter. For more information, see the following online Help: about_WorkflowCommonParameters.
There are also workflow activity-specific common parameters. For more information, see Using Activities in Script Workflows.
CJ, that is all there is to using Windows PowerShell Workflow activities. Windows PowerShell Workflow Week will continue tomorrow when I will talk about more Windows PowerShell Workflow activities.
I invite you to follow me on Twitter and Facebook. If you have any questions, send email to me at scripter@microsoft.com, or post your questions on the Official Scripting Guys Forum. See you tomorrow. Until then, peace.
Ed Wilson, Microsoft Scripting Guy
PowerShell Workflow for Mere Mortals: Part 4
Summary: Microsoft Scripting Guy, Ed Wilson, continues his five-part series about Windows PowerShell Workflow.
Hey, Scripting Guy! Yesterday you talked about Windows PowerShell Workflow activities. But you only demonstrated the Parallel activity. Is there something you can share with me about some of the other types of activities? In particular I am interested in checkpoints because I think they can help me.
—AP
Hello AP,
Microsoft Scripting Guy, Ed Wilson, is here. This morning, it is really foggy outside. To be honest, it seems to look more like fall than the end of summer. But then, I am not a real weather person—I don't even play one on TV. It is fairly humid and fairly cool—a nice morning for a cup of English Breakfast tea. I am not in the mood to experiment today, and so I am going with a standard recipe of mine: Three scoops of English Breakfast tea, a scoop of lemon grass, and a single crushed cinnamon stick. I let it steep for three minutes and 45 seconds, grab my tea pot, my Surface RT, and head outside to check email.
AP, you want to talk about checkpoints in a Windows PowerShell workflow today. No problem…
Note This is the fourth in a five-part series of blog posts about Windows PowerShell Workflow for "mere mortals." Before you read this post, please read:
- PowerShell Workflow for Mere Mortals: Part 1
- PowerShell Workflow for Mere Mortals: Part 2
- PowerShell Workflow for Mere Mortals: Part 3
For more information about workflow, see these Hey, Scripting Guy! Blog posts: Windows PowerShell Workflow.
Checkpoints Windows PowerShell workflow
If I have a Windows PowerShell Workflow, and I need to save the workflow state or data to a disk while the workflow runs, I can configure a checkpoint. In this way, if something interrupts the workflow, it does not need to restart completely. Instead, the workflow resumes from the point of the last checkpoint. Setting a checkpoint in a Windows PowerShell Workflow is sometimes referred to as "persistence" or "persisting a workflow." Because Windows PowerShell Workflows run on large distributed networks, or they control the execution of long running tasks, it is vital that the workflow can handle interruptions.
Understanding checkpoints
A checkpoint is a snapshot of the workflow's current state. This includes the current values of variables and generated output. A checkpoint persists this data to a disk. It is possible to configure multiple checkpoints in a workflow.
Windows PowerShell Workflow provides multiple methods to implement a checkpoint. Whichever method is used to generate the checkpoint, Windows PowerShell will use the data in the latest checkpoint for the workflow to recover and resume the workflow if it is interrupted. If a workflow runs as a job (such as by using the AsJob workflow common parameter), Windows PowerShell retains the workflow checkpoint until the job is deleted (for example, by using the Remove-Job cmdlet).
Placing checkpoints
I can place checkpoints anywhere in a Windows PowerShell Workflow. This includes before and after each command or activity. The counter-balance to this sort of a paranoid approach is that each checkpoint uses resources. Therefore, it interrupts processing the workflow—often with perceptible results. In addition, every time the workflow runs on a target computer, it "checkpoints" the workflow.
So where are the best places to place a checkpoint? I like to place a checkpoint after a portion of the workflow that is significant, such as something that takes a long time to run. Or it might be a section of the workflow that uses a great amount of resources. Or even something that relies on a resource that is not always available.
Adding checkpoints
There are several levels of checkpoints that I can add to a Windows PowerShell Workflow. For example, I can add a checkpoint at the workflow level or at the activity level. If I add a checkpoint at the workflow level, it will set a checkpoint at the beginning and at the end of the workflow.
Workflow checkpoints are free
The absolutely, positively easiest way to add a checkpoint to a Windows PowerShell Workflow is to use the –PSPersist common parameter when calling the workflow.
The following workflow obtains network adapter, disk, and volume information:
workflow Get-CompInfo
{
Get-NetAdapter
Get-Disk
Get-Volume
}
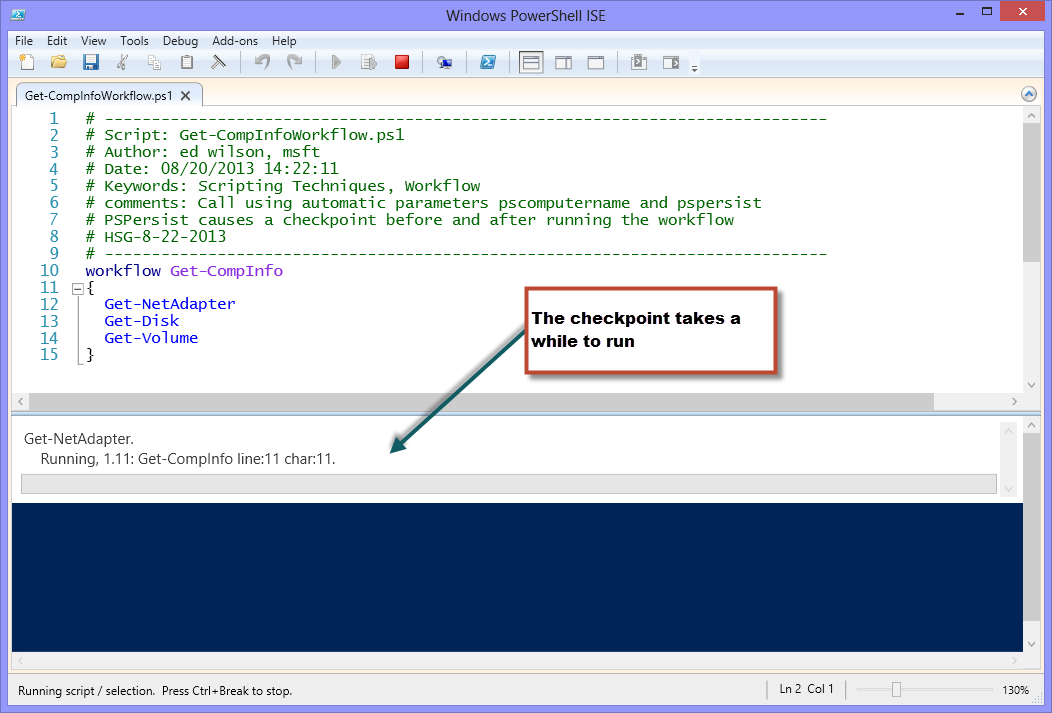
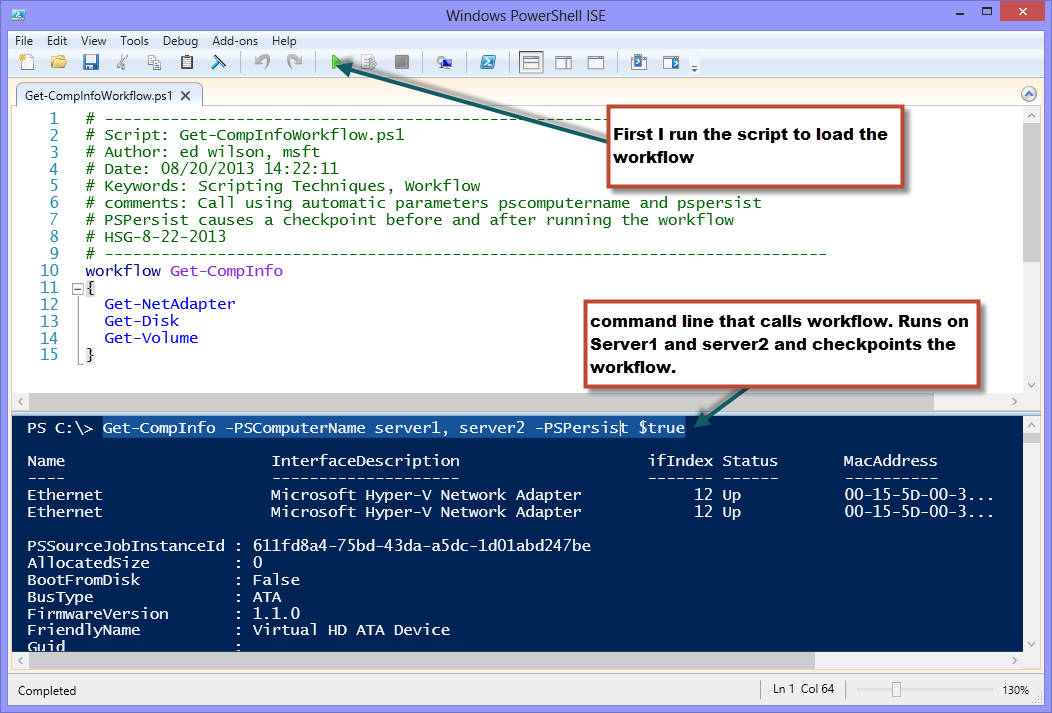
To cause the workflow to set a checkpoint, I call the workflow with the –PSPersist parameter, and I set it to $true as shown here:
Get-CompInfo -PSComputerName server1, server2 -PSPersist $true
When I run the workflow, a progress bar appears. It takes a few seconds due to the checkpoints. This progress bar is shown in the image that follows.
After the checkpoints, the workflow completes quickly and displays the gathered information. The following image shows the output and the command line that I used to call the workflow.
Checkpoint activity
If I use core Windows PowerShell cmdlets, they pick up an automatic –PSPersist parameter. I can then set a checkpoint for my workflow at the activity level. I use the –PSPersist parameter the same way that I do if I use it at the workflow level. To cause a checkpoint, I set the value to $true. To disable a checkpoint, I set it to $false.
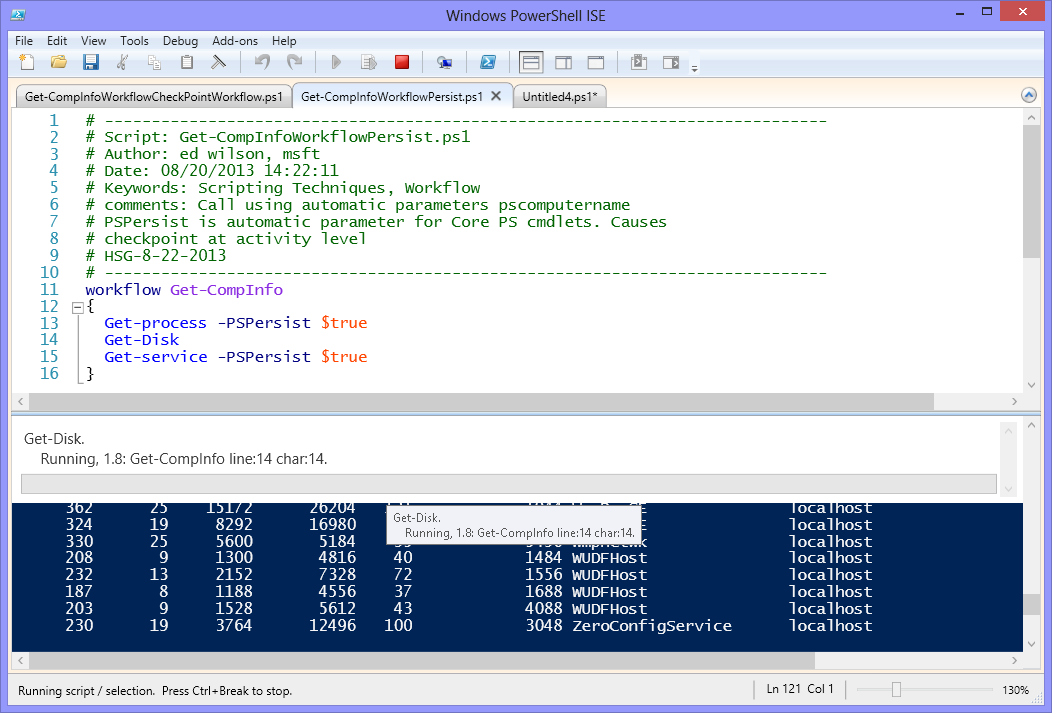
In the workflow that follows, I set a checkpoint to occur after the completion of the first and third activities.
workflow Get-CompInfo
{
Get-process -PSPersist $true
Get-Disk
Get-service -PSPersist $true
}
The workflow obtains process information, and then the workflow takes a checkpoint. Next, disk information and service information appear and the final checkpoint occurs. In the image that follows, the progress bar indicates a checkpoint in progress. But in the output pane, process information appears. This indicates that the Get-Process cmdlet ran prior to the checkpoint.
Using the CheckPoint-Workflow activity
The CheckPoint-WorkFlow activity causes a workflow to checkpoint immediately. I can place it in any location in the workflow. The big advantage of the Checkpoint-Workflow activity is that I can use it to checkpoint a workflow that does not use the core Windows PowerShell cmdlets as activities. This means that, for example, I can use a workflow that includes Get-NetAdapter, Get-Disk, and Get-Volume, and still be able to checkpoint the activity.
I need to use Checkpoint-Workflow because no –PSPersist parameter adds automatically to the non-core Windows PowerShell cmdlets. Here is my revised workflow:
workflow Get-CompInfo
{
Get-NetAdapter
Get-Disk
Get-Volume
Checkpoint-Workflow
}
AP, that is all there is to using checkpoints with Windows PowerShell workflow. Windows PowerShell Workflow Week will continue tomorrow when I will talk about more cool workflow stuff.
I invite you to follow me on Twitter and Facebook. If you have any questions, send email to me at scripter@microsoft.com, or post your questions on the Official Scripting Guys Forum. See you tomorrow. Until then, peace.
Ed Wilson, Microsoft Scripting Guy

Comments
Post a Comment