Skip to main content
Invitation aux Journées Portes Ouvertes de Microsoft Maroc
One step for man
One giant leap for mankind
The msExchInternalTLSCert attribute
Have you ever wondered where Exchange looks to find the certificate for inbound and outbound TLS for the SMTP service?
Well, it's actually documented in detail here and here. If you read the TechNet articles you can come to the conclusion that Enable-ExchangeCertificate for the SMTP service will stamp the msExchServerInternalTLSCert attribute on the transport server object in AD with the certificate thumbprint you specify in the command.
But what happens if you run Enable-ExchangeCertificate and choose to not overwrite the certificate for SMTP.

If you check the certificate list now, you'll notice two certificates, both are valid, and apparently both are assigned to SMTP. So which one will Exchange use for X-AnonymousTLS, because I didn't overwrite the current certificate.
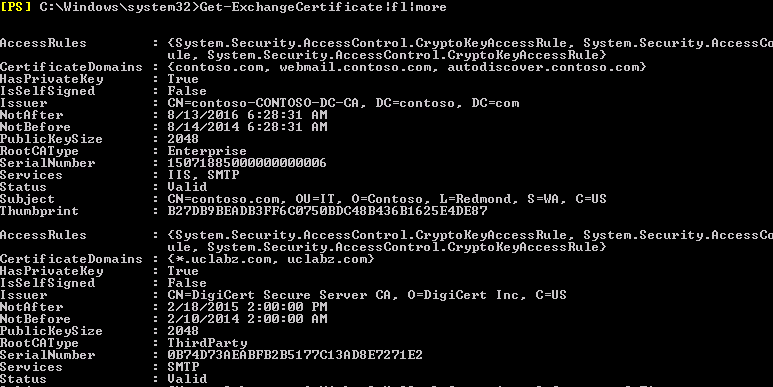
Luckily we know from the TechNet articles that Exchange queries AD to match the thumbprint in the msExchInternalTLSCert attribute during the certificate selection process for X-AnonymousTLS. So, how can I quickly check which one of the certificates is actually being used?
Import-Module activedirectory $transportServers = Get-TransportServer|select -ExpandProperty Name $forest = [System.DirectoryServices.ActiveDirectory.Domain]::GetComputerDomain().Forest.ToString(); $searchbase = "CN=Configuration,DC="+($forest).replace('.',',DC=') $results = @() foreach($transportServer in $transportServers) { $CertThumbPrint = Get-ADObject -Filter "ObjectClass -eq 'msExchExchangeServer' -and name -eq '$transportServer'" -properties * -SearchBase $searchbase -server $forest|%{[Security.Cryptography.X509Certificates.X509Certificate2]$_.msExchServerInternalTLSCert}|select -expandproperty thumbprint $obj = New-Object PSObject -Property @{"TransportServer"=$transportServer;"SMTPCertificate"=$CertThumbPrint} $results+=$obj } $results|select TransportServer,SMTPCertificate
Michael Hall
Service Engineer
Office 365
Why the correct load balancing persistence is so important in Exchange Server 2010?
I'm sure this has been covered by many other sources on the internet, but I thought I'd put down my thoughts on the matter as many people still don't understand why the correct load balancing configuration is important.
I've been involved in a number of Exchange Server 2010 deployments during my last couple of months and most of the deployments were upgrades on hosted platforms from Exchange Server 2007 to Exchange Server 2010.
What I noticed in these Exchange Server 2007 deployments were that load on Client Access Servers (CAS) were somewhat skew. And this makes sense, because the load balancing was configured for Source IP persistence.
What does this mean in a hosting environment?
Well, firstly all clients are connecting to the messaging platform over the Internet behind a NATed IP.
You could potentially have a tenant with a 1000 users behind a single IP. The hosting environment won't have any visibility to the internal IP's and thus only see the source IP being the external interface on the tenants firewall. If source IP persistence is configured on the load balancer it will basically send all traffic for that source IP to one CAS server (give or take a few connections).
Something like this:
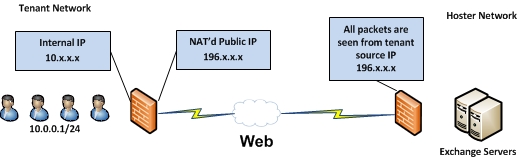
This concept is also the same for corporate enterprises running their own on-premise Exchange Server 2010 solution. The reason I'm saying it effects corporate deployments as well is that most mobile phones connect to the internet via NATed IP's behind the carrier firewall. So mobile phone ActiveSync connections from a specific carrier will be sent to one CAS box.
So how do we fix this? Configure the correct persistence.
First we check that the load balancer is on the Exchange qualification program for load balancers. The main reason for this is that we'll know if it was tested and reviewed by Microsoft and the partner for the type of load balancing we want to do. It's also a very good resource to find deployment guides on the specific load balancer.
When I deployed the Exchange Server 2010 solution we incorporated cookie based persistence on the load balancers for the customer. We did not configure SSL Offloading. To keep things simple we configured an SSL Bridge whereby the load balancer will decrypt the packets, read the cookies then re-encrypt the packets before sending it to the CAS boxes.
Implementing cookie based persistence can be tricky. but it can also be very easy, it really depends on the person responsible for the load balancer, which usually falls into the networking or security team. Personally, I put in a lot of effort to understand how the specific vendors' load balancer works. I find that this makes discussions with the network engineer easier. If the engineer understands the concepts on the Exchange side and the impact then it makes life very easy to implement the correct solution.
What protocols require persistence?
I've detailed the recommendations on the specific services below that will help you determine the correct persistence method for optimal load balancing.
Exchange Address Book service within the Intranet
- This service provides directory access for clients. Not using affinity results in a significantly higher level of communication between the client and the Client Access servers.
- Recommended persistence type: Source IP.
Outlook MAPI connections within the Intranet
- Outlook clients on the Intranet assume that all RPC connections are made to the same server. Outlook uses multiple sessions per user and assumes that all sessions connect to the same server.
- Recommended persistence type: Source IP.
Outlook Web App and Exchange Control Panel
- These services must have affinity to the same Client Access server.
- Recommended persistence type for Outlook Web App: OutlookSession cookie.
- Recommended persistence type for Exchange Control Panel: msExchEcpCanary cookie.
Exchange Web Services (Load balancer generated cookie or SSL Session ID)
- Microsoft does not support the use of Exchange Web Services without affinity.
- Recommended persistence type: Load balancer generated cookie or SSL Session ID.
Outlook Anywhere – (RPC over HTTPs)
- Recommended persistence type: User-agentcookie or OutlookSession (Outlook 2010 only) cookie.
Exchange ActiveSync – (HTTPs)
-
- Recommended persistence type: Authorization header cookie
Offline Address Book – HTTPs (Transactional connection)
-
- Recommended persistence type: SSL Session ID or Source IP
Autodiscover service – HTTPs ((Transactional connection)
-
- No affinity is required for Autodiscover.
Hopefully, this helps some administrators/implementer's understand the concept better. As I mentioned earlier, I personally do a lot of research during my planning and deployment phases to help ease configuration on firewalls, load balancers and such.
Some references that you will find very valuable:
- Great load balancing presentation by Andrew Ehrensing:
- Understanding load balancing in Exchange Server 2010:
Until next time…..happy load balancing :-)
Michael
Windows 8, Hyper-V, Vyatta Lab and Wireless adapter saga
I had some time recently to fine tune my lab environment on my laptop and thought I would share my experiences.
Microsoft was kind enough to provide me with a drive upgrade a couple of months back – a 250 GB Solid State Drive – Thank you Microsoft!!
I also took the liberty of purchasing an additional 128 GB Solid State to act as my OS drive.
So my setup is as follows:
- Lenovo W510 with 16GB RAM
- OS Drive: 128GB SSD
- Data Drive: 250GB SSD
I didn't want to utilize my precious SSD space for ISO images so I still have my 1TB SATA external HDD that contain my bulky ISO's that I use during my deployments.
My goal in my lab was very simple –
- Create a site resilient Exchange Server 2010 solution with a hardware load balancer.
- Configure a Hybrid deployment to Office 365.
- Use as little storage as possible.
First order of business was creating the virtual switches.
At this stage I didn't want to create a situation where my VM's might affect a customer production network where I might be working – and yes this has happened to me once before…many many moons ago…I won't go into detail but I started providing DHCP IP's to machines…hehehe, sounds funny now!
Anyway, the vSwitch configuration on Hyper-v is configured as follow:
External vSwitches:
- LAN pNic – vSwitch-LAN-Access
- WLAN pNic – vSwitch-WLAN-Access
- Planned Subnet: 192.168.41.0/24
Internal vSwitch:
- Internal only – vSwitch-Internal-Access
- Planned Subnets:
- 192.168.42.0/24
- 192.168.43.0/24
As seen above I planned on having two subnets internally within the Hyper-v environment and then my external home subnet for Internet access. I'll then configure routing (I'll cover this later) between these subnets to allow internet access and RDP from my home network.
Next step was to create my template VM.
- Deploy a VM called Template.
- Configure this VM with my base prerequisites – RDP, Hotfixes, whatever I wanted in the base.
- Sysprep this VM – OOBE with Generalize check box and Shutdown option.
This VM's vhd will be used as the parent disk for all my other VM's in the lab environment by using the Differencing disk feature.
Start deploying my VM's as follow:
Save the following as PowerShell script and run in PowerShell window (Run as Administrator and change paths where required) :
Import-module Hyper-v $LABVMs =@('DC01';'DC02';'EX01';'EX02';'EX03';'ADFS';'SQL';'LYNC') Foreach ($LABVM in $LABVMs) { New-VHD -ParentPath "C:\LAB\TEMPLATE\Template.vhd" -Differencing -Path "D:\LAB\$LABVM\$LABVM.vhd" New-VM -VHDPath "D:\LAB\$LABVM\$LABVM.vhd" -VMName $LABVM -MemoryStartupBytes 1024MB -SwitchName vSwitch-Internal-Access Start-VM -Name $LABVM }
While the above executes go and download Vyatta Virtual Router here: https://www.vyatta.com/download/trial_software/VyattaCore
The reason I'm using Vyatta is that it has a very small footprint – less than 800mb.
Vyatta will act as my router between the subnets so it will require three interfaces:
- vNIC1 – Associated to vSwitch-LAN-Access
- vNIC2 – Associated to vSwitch-Internal-Access
- vNIC3 – Associated to vSwitch-Internal-Access
IMPORTANT: There are currently some issues with Windows 8 Hyper-v and Wireless LAN adapters – specifically routing via Wireless LAN adapters. If you assign the Vyatta interface to your Wireless LAN adapter the routing will NOT work. On top of that if you use the Wireless adapter and assign a static route on your Windows 8 machine to other subnets you will encounter an OS crash – I've replicated this behaviour a couple of times. Use the physical LAN adapter or you'll be troubleshooting for hours. I've communicated this to the Hyper-v dev team as well – I'll update this blog if I get a fix for this issue.
So to continue….
Create the Vyatta VM with the ISO downloaded and login with vyatta/vyatta.
My config is very simple no weird NATs or anything like that – just plain routing. I assign IP's to my interfaces created.
#configure
#set interfaces ethernet eth0 address 192.168.41.254/24
#set interfaces ethernet eth2 address 192.168.42.254/24
#set interfaces ethernet eth3 address 192.168.43.254/24
#set system gateway-address 192.168.41.1
#set service ssh port 22
#save
#commit
As this is lab environment I didn't bother with any other config as I didn't require it.
Config looks like this:
interfaces {
ethernet eth0 {
address 192.168.41.254/24
duplex auto
hw-id 00:15:5d:29:04:3f
smp_affinity auto
speed auto
}
ethernet eth1 {
address 192.168.42.254/24
duplex auto
hw-id 00:15:5d:29:04:3e
smp_affinity auto
speed auto
}
ethernet eth2 {
address 192.168.43.254/24
duplex auto
hw-id 00:15:5d:29:04:40
smp_affinity auto
speed auto
}
loopback lo {
}
}
service {
ssh {
port 22
}
}
Next step was to add some static routes on my home router:
- Added a route to 192.168.42.0/24 using gateway IP 192.168.41.254
- Added a route to 192.168.43.0/24 using gateway IP 192.168.41.254
Next was configuring all my VM's with static IP's and using gateway IP of 192.168.42.254 or 192.168.43.254 depending on which subnet I want the VM in.
Test network – life is good:

And then you can create and configure your ADDS, Exchange Server 2010, SQL, Lync etc. as per usual. If you configure DHCP on your internal subnets it won't breach the physical network, but you still have access to those VM's via RDP from you physical network at home.
I can get about 12 VM's running on my Laptop with this parent/child configuration on the VHD's while the SSD drives are still idling along nicely and the laptop is still as responsive as always. My bottleneck at this stage is RAM.
Hope this helps anyone. I read alot of people struggling with Vyatta, but it's really that simple.
Until next time…..
Michael
15 Minutes pour comprendre le cloud computing
enfin l'informatique en nuage… en français dans le texte
Voici une vidéo très intéressante (17 minutes), permettant de comprendre ce qu'est le cloud computing.
![Get Microsoft Silverlight]()
Visionner cette vidéo au format WMV

Il est notamment intéressant de comprendre l'origine du Cloud Computing : les grands acteurs, comme Amazon, ont cherché à rentabiliser les datacenters bien souvent sous-utilisés… d'où l'idée de proposer ces machines sous-forme de service…
Cette vidéo explique également,les différents types de service :
- Infastructure as a Service (IaaS)
- Platform as a Service (PaaS)
- Software as a Service (SaaS)
et les responsabilités qui en découlent, ainsi que des scénarios d'utiisation, et la proposition de Microsoft pour ses clients : laisser le choix pour s'adapter aux spécificités de chaque entreprise.
Je vous recommande également la lecture de l'article de Stanislas Quastana : Cloud et Sécurité : Mythes et Réalités qui reprend une bonne introduction au cloud computing.
Pour ceux qui souhaitent avoir une idée de ce qu'est Windows Azure, une vidéo est disponible ici
Bien comprendre le stockage partagé dans un cluster de serveurs Hyper-V
Pour permettre les migrations à chaud de machines virtuelles, le cluster de serveurs s'appuie sur un stockage spécifique : le Clustered Shared Volume (CSV)
Je vous propose une vidéo qui permet de bien comprendre comment utiliser ce type de stockage et d'en découvrir les avantages, dans un contexte de haute disponibilité. Ce webcast va donc présenter :
- un rappel sur le clustering traditionnel (Failover clustering)
- les changements du modèle dit "Share nothing" utilisé dans les clusters
- les fonctionnalités intéressantes des Clustered Shared Volumes (CSV), notamment la tolérance aux pannes de réseau
Dans un deuxième temps, on passe à des cas pratiques :
- les exigences en matière d'infrastructure réseau (pour un stockage iSCSI), et disques
- les recommandations pour déployer plusieurs machines virtuelles sur un (ou plusieurs) CSV(s), en fonction des contraintes (IO, principalement)
- et divers recommandations / considérations concernant :
- les performances,
- les backups/restauration,
- les déploiements multi-sites.
La vidéo (un peu longue : 45 minutes) est disponible ici : https://www.microsoft.com/events/podcasts/default.aspx?pageId=x6330&source=Microsoft-Podcasts&WT.rss_ev=a
A vos serveurs et stockages !
Comment mettre en place un cluster de Serveurs Hyper-V et permettre les Live Migration
Depuis l'arrivée de Windows Server 2008 R2, il est possible de créer des clusters de serveurs Hyper-V. Les machines virtuelles qui sont sur ce type de cluster vont pouvoir être déplacées, d'un nœud à l'autre, sans interruption
Dans cette vidéo, on apprend comment mettre en place le cluster de serveurs Hyper-V. Cela commence par :
- la configuration du stockage (en utilisant un stockage iSCSI)
- la configuration du réseau : physique (les cartes des machines physiques) et et virtuel (configuration des switchs virtuels dans Hyper-V)
- Ajout des fonctions de clustering (et d'administration du cluster)
puis on réalise la création du cluster en lui-même.
Une fois le cluster configuré, on découvre comment ajouter des machines virtuelles (existantes) à ce cluster et comment on peut migrer (Live Migration) une machine virtuelle d'un nœud à l'autre.
L'ensemble de la vidéo est disponible ici : https://www.microsoft.com/events/podcasts/default.aspx?pageId=x6923&source=Microsoft-Podcasts&WT.rss_ev=a
A vos serveurs ! bon tests !
Découverte d'Internet Explorer 9 : l'accélération matérielle
Deuxième partie
Après avoir présenté la nouvelle interface d'Internet Explorer 9, voici la deuxième présentation : l'accélération matérielle.
![Get Microsoft Silverlight]()
Visionner cette vidéo au format WMV
Au menu des prochaines vidéos :
- Moteur Javascript
- Protection de la vie privée
- Les outils pour les développeurs
- Les mécanismes de sécurité
Découverte d'Internet Explorer 9 : le moteur Javascript
Troisième partie
Troisème vidéo de notre série dédiée à Internet Explorer 9 : Le moteur Javascript. Pour mémoire, les vidéos précédentes vous ont permis de découvrir la nouvelle interface, l'accélération matérielle.
![Get Microsoft Silverlight]()
Visionner cette vidéo au format WMV
Au menu des prochaines vidéos :
- Protection de la vie privée
- Les outils pour les développeurs
- Les mécanismes de sécurité
Découverte d'Internet Explorer 9 : les mécanisme de sécurité
Sixième et dernière partie
Gros enjeux sur Internet : la sécurité. Depuis plusieurs année Microsoft s'éfforce d'offrir aux internautes des navigateurs les protégeant au maximum. Voici donc les mécanismes de sécurité d'Internet Explorer 9.
Cette vidéo fait suite à la nouvelle interface, l'accélération matérielle, le moteur Javascript, la protection de la vie privée et les outils pour développeurs .
![Get Microsoft Silverlight]()
Visionner cette vidéo au format WMV
Cette vidéo conclue la série  .
.
Pour en savoir plus, vous pouvez tester par vous même sur https://ie.microsoft.com/testdrive
vous pouvez également étudier comment administrer, de manière centralisée les navigateurs déployés dans votre organisation : https://technet.microsoft.com/fr-fr/ie/gg609063
Découverte d'Internet Explorer 9 : les outils pour les développeurs
Cinquième partie
Internet ne serait rien sans les développeurs de sites web. Pour aider ces développeurs, Internet Explorer 9 embarque un certain nombre d'outils que nous vous invitons à découvrir.
Cette vidéo fait suite à la nouvelle interface, l'accélération matérielle, le moteur Javascript et la protection de la vie privée.
![Get Microsoft Silverlight]()
Visionner cette vidéo au format WMV
Au menu des prochaines vidéos :
- Les mécanismes de sécurité
Découverte d'Internet Explorer 9 : l'interface utilisateur
Première partie
Voici une série de vidéos pour vous aider à dévouvrir Internet Explorer 9.
Pour la première vidéo de la série, nous aborderons : l'interface Utilisateur et l'intégration avec Windows 7.
Pour votre information Rekrute.com a déjà mis en place des Jumplists pour faciliter l'utilisation de leur site.
Au menu des prochaines vidéos :
- Accélération matérielle
- Moteur Javascript
- Protection de la vie privée
- Les outils pour les développeurs
- Les mécanismes de sécurité
Découverte d'Internet Explorer 9 : Protection de la vie privée
Quatrième partie
Dans cette quatrième vidéo, vous allez découvrir les fonctionnalités mises en oeuvre dans Internet Explorer 9 pour protéger la vie privée de l'internaute.
Cette vidéo fait suite à la nouvelle interface, l'accélération matérielle et le moteur de Javascript
![Get Microsoft Silverlight]()
Visionner cette vidéo au format WMV
Au menu des prochaines vidéos :
- Les outils pour les développeurs
- Les mécanismes de sécurité
Découvrir SQLServer 2008 R2
Microsoft Press propose une introduction à SQLServer 2008 R2
 | Au menu, 10 chapitres couvrant : - l'administration (Améliorations, Administration Multi-Serveurs, Data-Tier Applications, Haute disponibilité et Virtualisation,Consolidation et Monitoring)
- et le développement d'applications décisionnelles (Data Warehouse permettant la montée en charge ainsi que les différents services de Reporting –Reporting services, PowerPivot, etc.)
Vous pouvez télécharger : La version PDF La version XPS |

Description du Service Pack 1 de System Center Virtual Machine Manager 2008 R2
à l'occasion de la sortie de la Release Candidate, Raynald nous propose de découvrir les nouveautés

Raynald Chaffaux, spécialiste de la virtualisation vous propose de découvrir les nouvelles fonctions prises en charge par le Service Pack 1 de SCVMM.
Raynald nous explique :
- la prise en charge de mémoire dynamique
- Les propriétés et contrôles pour RemoteFX (virtualisation de la carte graphique dans les scénariosVDI)
l'article est ici : https://rchaffaux.wordpress.com/2011/01/16/le-sp1-de-scvmm-2008-r2-disponible/
Bonne lecture !

Forum des enseignants innovants – Finale Mondiale – Jour 1
du 26 au 30 octobre, Cape Town – Afrique du Sud
Se déroule actuellement à Cape Town en Afrique du Sud, le Forum Mondial de l'éducation innovante. Il s'agit d'un événement qui regroupe plus de 600 personnes de 100 nationalités différentes.
Ce forum est initié par Microsoft dans le cadre du programme Partners in learning (Partenaires du Savoir) et regroupe les enseignants et écoles innovantes. L'objectif de cet événement, est de favoriser le partage d'expérience entre les différents participants mais également, leur transmettre de nouvelles méthodes pédagogiques.
Le Maroc est représenté par un enseignant Innovant, M. Essouafi ainsi que par les représentants du collège Kacem Amine (membre du Microsoft Pathfinder School Program) de Fès. Le ministère de l'Education Nationale est à la tête de cette délégation, et représenté par M. El Houcine Jarrad, chef de division au CNIPE.
VIEW SLIDE SHOW
DOWNLOAD ALL
L'événement a commencé le 26 octobre, et prendra fin le 30 Octobre.
Soutenons tous les représentants du Maroc !

Hyper-V : c'est quoi ? comment ça marche ?
5 minutes pour comprendre le fonctionnement de la virtualisation avec Windows Server 2008 R2
La virtualisation est sur toute les lèvres. L'offre de Microsoft est assez peu connue. Je vous propose de prendre 5 minutes pour visionner une vidéo très concise qui vous expliquera comment fonctionne les machines virtuelles sur Hyper-V :
Bien entendu, cette vidéo n'est qu'une introduction, et je propose à ceux d'entre vous qui souhaite essayer Hyper-V de prendre contact avec moi (damienro@microsoft.com) pour que nous préparions un workshop 
Internet Explorer 9 : navigateur pour l'entreprise ou pour la maison ?
les 2 mon général !
Récemment, dans une série de commentaires, certains employés de Google et de Mozilla Firefox ont reconnu que le développement de leurs navigateurs respectifs avait fait l'impasse sur certaines fonctions d'entreprise. Asa Dotzler (Mozilla Firefox) a ajouté que pour Mozilla : l'entreprise n'est pas intéressante pour Firefox, car cela coûte très cher de satisfaire les utilisateurs des entreprises… Gloups ! (le commentaire original est ici).
La vision de Microsoft diffère radicalement ! Cette vision est détaillée dans un article fort intéressant disponible ici. L'idée principale est que les utilisateurs ne doivent pas avoir à choisir entre un navigateur supportant les derniers standards technologiques (HTML5, CSS3, SVG, etc) et un navigateur sûr, administrable dans un environnement professionnel.
Certes les besoins peuvent être différent suivant l'utilisation : en entreprise, les administrateurs ont besoin de protéger le système d'information, de déployer régulièrement les mises à jour, voire dans certains cas d'avoir plus de contrôle sur ce que l'utilisateur peut faire (ou pas) avec son navigateur. Par exemple, il peut être utile, dans certains cas, de bloquer les téléchargements, ou limiter l'utilisation de scripts / composants afin de garantir la sécurité de l'entreprise.
Ce type de besoins a été pris en compte dans Internet Explorer : depuis plusieurs années, les administrateurs système peuvent utiliser un kit de déploiement : Internet Explorer Administration Kit (IEAK) qui peut les aider à créer leur propre version d'Internet Explorer, en vue d'un déploiement. De plus, grâce aux stratégies de groupe, il est possible de gérer un grand nombre de paramètres du navigateur (plus de 1300) de manière centralisée !
Aujourd'hui, il n'est donc plus nécessaire de choisir entre un navigateur moderne et un navigateur sécurisé, il n'est plus nécessaire non plus de choisir entre un navigateur personnel et un navigateur d'entreprise. Les utilisateurs peuvent et doivent exiger les 2 !
Introduction à la virtualisation avec Hyper-V
Depuis Windows Server 2008, un rôle optionnel, Hyper-V, permet de faire de windows une plateforme de virtualisation.
La virtualisation est à la mode, mais il n'est pas toujours facile de trouver des guides pour commencer à utiliser ces plateformes. Heureusement, Windows Server 2008 et Hyper-V sont très simples  . En plus, je vous propose une vidéo de 13 minutes qui présente les fondamentaux d'Hyper-V. Un bon point de départ, pour tous ceux qui veulent se lancer.
Dans cette vidéo (en anglais  ), on apprend :
- à installer le rôle Hyper-V sur un serveur installé en mode "Core".
- à utiliser Hyper-V Manager pour gérer les machines virtuelles.
Par gestion, on va bien évidemment découvrir comment :
- créer une machine virtuelle
- configurer les ressources matérielles attribuées à une machine virtuelle
- gérer les interconnexions réseau entre les machines virtuelles
- créer et gérer les Snapshots de machines virtuelles
La vidéo est ici : View the video
c'est une introduction, très simple, mais qui aide à comprendre comment transformer un serveur Windows Server 2008 en plateforme de virtualisation. La vidéo n'est pas parfaite, mais on peut quand même facilement suivre les démonstrations.
Bon courage à tous ceux qui veulent s'essayer à la virtualisation !
Prochainement, j'essayerai d'ajouter d'autres articles (ou guides) pour mettre en place un cluster de machines Hyper-V et ainsi permettre des migrations à chaud de machines virtuelles.
Damien Rossignol
Invitation aux Journées Portes Ouvertes de Microsoft Maroc
les 15 et 16 décembre 2010.

Popular posts from this blog
[Excel] 문서에 오류가 있는지 확인하는 방법 Excel 문서를 편집하는 도중에 "셀 서식이 너무 많습니다." 메시지가 나오면서 서식을 더 이상 추가할 수 없거나, 문서의 크기가 예상보다 너무 클 때 , 특정 이름이 이미 있다는 메시지가 나오면서 '이름 충돌' 메시지가 계속 나올 때 가 있을 것입니다. 문서에 오류가 있는지 확인하는 방법에 대해서 설명합니다. ※ 문서를 수정하기 전에 수정 과정에서 데이터가 손실될 가능성이 있으므로 백업 본을 하나 만들어 놓습니다. 현상 및 원인 "셀 서식이 너무 많습니다." Excel의 Workbook은 97-2003 버전의 경우 약 4,000개 2007 버전의 경우 약 64,000개 의 서로 다른 셀 서식 조합을 가질 수 있습니다. 셀 서식 조합이라는 것은 글꼴 서식(예- 글꼴 종류, 크기, 기울임, 굵은 글꼴, 밑줄 등)이나 괘선(괘선의 위치, 색상 등), 무늬나 음영, 표시 형식, 맞춤, 셀 보호 등 을 포함합니다. Excel 2007에서는 1,024개의 전역 글꼴 종류를 사용할 수 있고 통합 문서당 512개까지 사용할 수 있습니다. 따라서 셀 서식 조합의 개수 제한을 초과한 경우에는 "셀 서식이 너무 많습니다." 메시지가 발생하는 것입니다. 그러나 대부분의 경우, 사용자가 직접 넣은 서식으로 개수 제한을 초과하는 경우는 드뭅니다. 셀 서식이 개수 제한을 넘도록 자동으로 서식을 추가해 주는 Laroux나 Pldt 같은 매크로 바이러스 에 감염이 되었거나, 매크로 바이러스에 감염이 되었던 문서의 시트를 [시트 이동/복사]하여 가져온 경우 시트의 서식, 스타일이 옮겨와 문제가 될 수 있습니다. "셀 서식이 너무 많습니다." 메시지가 발생하지 않도록 하기 위한 예방법 글꼴(종류, 크기, 색, 굵기, 기울임, 밑줄), 셀 채우기 색, 행 높이, 열 너비, 테두리(선 종류, ...
How to control your World with Intune MDM, MAM (APP) and Graph API
VSS yedekleme testi nasıl yapılır Exchange üzerinde bulunan verilerin yedeklenmesi (backup) ve geri yüklenmesi (restore) baslibasina çok önemli bir konudur. Bir yedegin saglikli alinmasi kadar restore isleminin basarili bir biçimde yapilabilmesi de test edilmesi gereken önemli bir islem. Exchange destegi olan (aware) diye adlandirdigimiz yazilimlar exchange writer'lari kullanarak VSS teknolojisi ile yedek alirlar. Yedekleme esnasinda karsilasilan sorunlarin büyük bölümünün nedeni, yazilimlarin uyumsuzlugu ya da bu yazilimlardaki yanlis bir ayar olabilmektedir. Bunun tespiti için, yani yedek alma sirasinda sorunun VSS Writer'dan mi, disk sisteminden mi ve/veya yedekleme yazilimindan mi kaynaklandigini anlayabilmek için Betest aracini kullanabilirsiniz. BETEST, Windows SDK yada Volume Shadow Copy Service SDK 7.2 (sonraki versiyonlarda mevcut) içerisinde bulunan yardimci bir araçtir. Araci kolaylikla bulabilir ve kurabilirsiniz. Kurulum islemini exchange sunucunuz...
Announcing the AdventureWorks OData Feed sample
Update – Removing Built-in Applications from Windows 8 In October last year I published a script that is designed to remove the built-in Windows 8 applications when creating a Windows 8 image. After a reading some of the comments in that blog post I decided to create a new version of the script that is simpler to use. The new script removes the need to know the full name for the app and the different names for each architecture. I am sure you will agree that this name - Microsoft.Bing – is much easier to manage than this - Microsoft.Bing_1.2.0.137_x86__8wekyb3d8bbwe. The script below takes a simple list of Apps and then removes the provisioned package and the package that is installed for the Administrator. To adjust the script for your requirements simply update the $AppList comma separated list to include the Apps you want to remove. $AppsList = "Microsoft.Bing" , "Microsoft.BingFinance" , "Microsoft.BingMaps" , "Microsoft.Bing...


Comments
Post a Comment