Skip to main content
Enhancements to SQL Server Backup to Cloud in SQL Server 2012 SP1 CU4
SQL Server code-named "Denali" Native Client supporting ODBC 3.8
We're excited to announce that Denali SNAC CTP1 adds support for the ODBC 3.8 features of the Microsoft ODBC DM (Driver Manager) introduced in Windows 7 and Windows Server 2008 R2. Please refer to https://blogs.msdn.com/b/data/archive/2009/07/06/odbc-dm-3-80-in-windows-7-and-windows-server-2008-r2.aspx for a blog posting detailing the ODBC DM changes.
The ODBC 3.8 features supported in Denali SNAC are:
Streamed Output Parameters
Support retrieving output parameters in parts via SQLGetData when the output parameter was bound using SQLBindParameter. This is extremely valuable when working with large data objects, such as varbinary(max), varchar(max), and nvarchar(max), since allocating an extremely large buffer may not be possible.
ODBC C-Type Extensibility
Leveraging the functionality of C-type extensibility introduced in the ODBC 3.8 driver manager, Denali SNAC introduced SQL_C_SS_TIME2 and SQL_C_SS_TIMESTAMPOFFSET C-type structures. The introduction of these 2 new C-types provides application developers a rich programming experience when using SQL Server Time and DatetimeOffset data types. So, instead of binding these data types as SQL_C_BINARY and having to manually realize the byte sequence can cast to a struct, application developers can now directly bind these data types as the new C-types which automatically maps to the structs.
Asynchronous Connection Operation
Before ODBC 3.80, asynchronous mode was only supported on statement operations, such as SQLExecDirect and SQLGetData. Leveraging the ODBC 3.8 feature, Denali SNAC extends this support to connection operations, such as SQLDriverConnect and SQLEndTran. It also allows applications to cancel connection operations via SQLCancelHandle, just as with SQLCancel on statement operations.
Jimmy Wu
Microsoft SQL Server
SQL Server Connection Director will not be in the RTM version of the release
The SQL Server Connection Director is a feature in Visual Studio 2010 beta 2 and SQL Server 2008 R2 CTP. However, Microsoft has already decided that this feature will not be included in the final version of Visual Studio 2010 and SQL Server 2008 R2. Please do not use this feature in Visual Studio 2010 beta 2 or SQL Server 2008 R2 CTP.
SQL Server Connectivity has a new portal page!
The Microsoft SQL Server team is working on a portal page that brings together common resources and community links for all data access providers to Microsoft SQL Server. We'd like your feedback on how useful you will find it and what else you'd like to see included. Although, at this time we're concentrating on bringing together the most useful links, in the future we might include more content and your feedback will help us to determine which additional content and links are most useful. Our goal is to give you a single page you can bookmark in order to use as the starting point for your data access needs regardless of the technology you're using, and to make it easy to explore the different options available to access Microsoft SQL Server in the most efficient way.
Using the Site Feedback link in Additional Resources on the right hand side of the page, please send your feedback, before June 30th please, on the general usefulness of this page, what additional content you'd like to see included in the future and what additional links you'd find useful.
The new portal page can be found at https://msdn.microsoft.com/sqlserver/connectivity.
Thanks.
Jimmy Wu
SNAC PM
SQL Server Customer Survey (Fall 2010)
Greetings to the SQL Server community:
Last year in October 2009, we introduced the process of interacting on a regular basis with the developers and users in the form of surveys. During the last 12 months, we completed surveys that focused on the broad SQL Connectivity components, including ODBC, ADO.NET, JDBC and PHP. These surveys provide us with an ability to validate some of the requests we have got from developers, users and partners such as you as well as ideas that we have gathered internally as a part of our development process. You have seen our roadmap for SQL Server evolve based on the feedback that we have received.
We view your organization as a key stakeholder in the process that we have to identify areas for future investments. The feedback you provide is valuable and each response will be read and will be treated with utmost confidence.
The survey can be found in the link below and will be available until 25th October, 2010 5:00 PM PST.
https://www.zoomerang.com/Survey/WEB22BAW29Z8P2
Thank you,
Raghu Ram
Principal Group Program Manager
SQL Connectivity
SQL Server RDBMS Group
Microsoft Corporation
SQL Server Customer Survey (Fall 2010) final weekend
Thank-you all for your active participation in our Fall 2010 customer survey. Due to your overwhelming response, we have extended the survey until Nov. 2.
For quick access, the link to the survey is here https://www.zoomerang.com/Survey/WEB22BAW29Z8P2.
Regards,
Jimmy Wu
Microsoft SQL Server
SQL Server Native Client: Connection strings and OLE DB
(Anton Klimov, a developer on the SQL Server Native Client team, wrote the following article.)
Connection strings for an OLE DB provider is a concept that causes a lot of confusion. One problem is that OLE DB itself does not define connection string as a provider concept.
The documentation at Connection String Syntax (https://msdn.microsoft.com/en-us/library/ms722656(VS.85).aspx) says:
"A connection string is a string version of the initialization properties needed to connect to a data store and enables you to easily store connection information within your application or to pass it between applications. Without a connection string, you would be required to store or pass a complex array of structures to access data. When accessing OLE DB directly, using IDataInitialize (https://msdn.microsoft.com/en-us/library/ms714296%28VS.85%29.aspx), the connection string is passed as a parameter to create an OLE DB data source object."
"when accessing OLE DB directly" actually means that the application doesn't directly instantiate a corresponding provider object, but rather goes through the "service component", (otherwise known as "core services", layer (oledb32.dll) by doing something like:
hr = CoCreateInstance(
CLSID_MSDASC, // CLSID of "service component"
NULL, // pUnkOuter
CLSCTX_INPROC_SERVER,
IID_IDataInitialize,
(void**)&m_pIDataInitialize)
;
This way, you get additional services from oledb32 like session pooling, automatic transaction enlistment, cursor engine, and support for additional interfaces.
This also applies to ADO; so for an ADO programmer, a connection string is a similar concept but the way the provider looks at it is frequently misunderstood.
From the provider point of view there is no such thing as a connection string, instead the provider understands the initialization properties, which are hinted to in the above passage as "complex array of structures to access data". See also OLE DB Initialization Properties: Quick Reference (https://msdn.microsoft.com/en-us/library/ms723996(VS.85).aspx).
What makes the situation especially confusing is that one of the properties is similar to a connection string. These are the so called "Extended Properties" (DBPROP_INIT_PROVIDERSTRING).
https://msdn.microsoft.com/en-us/library/ms723996(VS.85).aspx for it says:
"A string containing provider-specific, extended connection information. Use of this property implies that the consumer knows how this string will be interpreted and used by the provider. Consumers should use this property only for provider-specific connection information that cannot be explicitly described through the property mechanism."
However, in practice, lack of understanding leads consumers to use a combination of keywords both corresponding to the generic OLE DB properties and to provider specific keywords making sense only in the context of the provider string.
For example the site listing lots of examples of connection strings has the following for SQL Server Native Client 10.0 OLE DB Provider (https://www.connectionstrings.com/sql-server-2008):
Provider=SQLNCLI10; Server=myServerAddress; Database=myDataBase; Trusted_Connection=yes; MarsConn=yes; |
Equivalent key-value pair: "MultipleActiveResultSets=true" equals "MARS_Connection=yes" |
Here "Provider" keyword is used by oledb32 to find a CLSID of the provider to instantiate. "Server", "Database", "Trusted_Connection" and "MarsConn" are not the names of the OLE DB initialization properties (which would be "Data Source", "Integrated Security", and "Mars Connection"). Moreover, MarsConn=yes will have no effect, see explanation below.
MultipleActiveResultSets is a keyword for ADO.NET , and MARS_Connection is for ODBC.
oledb32 process a connection string as follows: it tries to find the keywords corresponding to the generic OLE DB initialization keywords (corresponding to DBPROPSET_DBINIT), and it also queries a provider by using IDBProperties::GetPropertyInfo (https://msdn.microsoft.com/en-us/library/ms718175(VS.85).aspx) to see which initialization properties provider supports (for SQL Server Native Client it is DBPROPSET_SQLSERVERDBINIT). For matched keywords, the corresponding properties will be set, everything else goes into "Extended Properties".
Consider the following example in VBScript:
set connection = CreateObject("ADODB.Connection")
connection.ConnectionString = "provider=sqlncli10;data source=akl6; integrated security=sspi;initial catalog=tempdb"
connection.Open
WScript.Echo connection.ConnectionString
Here is the result of the execution:
Provider=SQLNCLI10.1;Integrated Security=sspi;Initial Catalog=tempdb;Data Source=akl6;Use Procedure for Prepare=1;Auto Translate=True;Packet Size=4096;Workstation ID=AKL5;Use Encryption for Data=False;Tag with column collation when possible=False;MARS Connection=False;DataTypeCompatibility=0;Trust Server Certificate=False
If we try the following connection string
"provider=sqlncli10;server=akl6;database=tempdb;Trusted_Connection=yes;MarsConn=yes"
we will get:
Provider=SQLNCLI10.1;Extended Properties="server=akl6;database=tempdb;Trusted_Connection=yes;MarsConn=yes";Use Procedure for Prepare=1;Auto
Translate=True;Packet Size=4096;Workstation ID=AKL5;Use Encryption for Data=False;Tag with column collation when possible=False;MARS Connect
ion=False;DataTypeCompatibility=0;Trust Server Certificate=False
As you can see all the keywords that we specified are bundled into "Extended Properties" since they are not recognized as property names. What is worse is that now we apparently have two keywords corresponding to MARS Connectivity and one is "yes", whether the other is "False".
Which one wins? It turns out that the generic value wins. So the setting "MarsConn=yes" as a part of OLE DB connection string has no effect. It would work only if the provider was initialized directly and provider specific property was not used, but "Extended Properties" was used.
If you have the following:
"Server=server1; Data Source=server2;"
The data Source will win.
Generic Initialization properties (DBPROPSET_DBINIT)
The following list shows property IDs and their associated description/keywords:
Property ID | Description / keyword |
DBPROP_AUTH_INTEGRATED | Integrated Security |
DBPROP_AUTH_PASSWORD | Password |
DBPROP_AUTH_PERSIST_SENSITIVE_AUTHINFO | Persist Security Info |
DBPROP_AUTH_USERID | User ID |
DBPROP_INIT_ASYNCH | Asynchronous Processing |
DBPROP_INIT_CATALOG | Initial Catalog |
DBPROP_INIT_DATASOURCE | Data Source |
DBPROP_INIT_HWND | Window Handle |
DBPROP_INIT_LCID | Locale Identifier |
DBPROP_INIT_PROPMT | Prompt |
DBPROP_INIT_PROVIDERSTRING | Extended Properties |
DBPROP_INIT_TIMEOUT | Connect Timeout |
DBPROP_INIT_GENERALTIMEOUT | General Timeout |
If default value is specified the property cannot be overridden with an "extended property" when used in an OLE DB connection string.
Provider Specific Properties (DBPROPSET_SQLSERVERDBINIT)
The following list shows the associated property IDs, default values (if any) and description/keywords for provider specific properties.
SSPROP_INIT_CURRENTLANGUAGE
(no default value)
Current Language
SSPROP_INIT_NETWORKADDRESS
(no default value)
Network Address
SSPROP_INIT_NETWORKLIBRARY
(no default value)
Network Library
SSPROP_INIT_USEPROCFORPREP
1
Use Procedure for Prepare
SSPROP_INIT_AUTOTRANSLATE
VARIANT_TRUE
Auto Translate
SSPROP_INIT_PACKETSIZE
4096
Packet Size
SSPROP_INIT_APPNAME
(no default value)
Application Name
SSPROP_INIT_WSID
(no default value)
Workstation ID
SSPROP_INIT_FILENAME
(no default value)
Initial File Name
SSPROP_INIT_ENCRYPT
VARIANT_FALSE
Use Encryption for Data
SSPROP_AUTH_REPL_SERVER_NAME
(no default value)
Replication server name connect option
SSPROP_INIT_TAGCOLUMNCOLLATION
VARIANT_FALSE
Tag with column collation when possible
SSPROP_INIT_MARSCONNECTION
VARIANT_FALSE
MARS Connection
SSPROP_INIT_FAILOVERPARTNER
(no default value)
Failover Partner
SSPROP_AUTH_OLD_PASSWORD
(no default value)
Old Password
SSPROP_INIT_DATATYPECOMPATIBILITY
0
DataTypeCompatibility
SSPROP_INIT_TRUST_SERVER_CERTIFICATE
VARIANT_FALSE
Trust Server Certificate
SSPROP_INIT_SERVERSPN
(no default value)
Server SPN
SSPROP_INIT_FAILOVERPARTNERSPN
(no default value)
Failover Partner SPN
Note that the corresponding properties are not going to be set, and as mentioned above, some of the settings might be ignored.
The following list shows keywords recognized in the provider string and its (approximate) corresponding property.
"Server"
DBPROP_INIT_DATASOURCE
"UID"
DBPROP_AUTH_USERID
"PWD"
DBPROP_AUTH_PASSWORD
"APP"
SSPROP_INIT_APPNAME
"WSID"
DBPROP_INIT_CATALOG
"Database"
DBPROP_INIT_CATALOG
"Language"
SSPROP_INIT_CURRENTLANGUAGE
"Network" or "Net" or "Network Library"
SSPROP_INIT_NETWORKLIBRARY
"Address" or "Addr"
SSPROP_INIT_NETWORKADDRESS
"Trusted_Connection"
DBPROP_AUTH_INTEGRATED
"UseProcForPrepare"
SSPROP_INIT_USEPROCFORPREP
"LCID"
Not used
"Prompt"
DBPROP_INIT_PROPMT
"PersistSensitive"
DBPROP_AUTH_PERSIST_SENSITIVE_AUTHINFO
"AutoTranslate" or "Auto Translate"
SSPROP_INIT_AUTOTRANSLATE
"Timeout"
DBPROP_INIT_TIMEOUT
"PacketSize"
SSPROP_INIT_PACKETSIZE
"HWND"
DBPROP_INIT_HWND
"AttachDBFileName"
SSPROP_INIT_FILENAME
"Encrypt"
SSPROP_INIT_ENCRYPT
"MarsConn"
SSPROP_INIT_MARSCONNECTION
"FailoverPartner"
SSPROP_INIT_FAILOVERPARTNER
"DataTypeCompatibility"
SSPROP_INIT_DATATYPECOMPATIBILITY
"TrustServerCertificate"
SSPROP_INIT_TRUST_SERVER_CERTIFICATE
"ServerSPN"
SSPROP_INIT_SERVERSPN
"FailoverPartnerSPN"
SSPROP_INIT_FAILOVERPARTNERSPN
Linked server configuration note:
In the "Linked Server Properties -- New Linked Server" dialog box" (SQL Server Management Studio go to Server Objects -> Linked Servers -> New Linked Server), the Provider string" really corresponds to "Extended Properties".
Some users try putting their generic OLE DB Connection string, which leads to the server discarding all or the part of the settings and it could end up connecting to the local machine instead of the machine that the user thinks is specified. For instance if "Failover Partner" is specified in that dialog and it contains a space, the setting will have no effect since in the provider string no space is expected.
SQL Server Native Client wants to hear your opinion
Dear SQL Server developers and users:
It is this time of the year when we in the SQL Server Native Client product team take a step back, review the priorities and goals for the long term and identify areas that will benefit from investments.
We view YOU and your organization as a key stakeholder in this process and would like to gather your inputs in this survey, which should take no more than 5 - 10 minutes. The feedback you provide is very valuable and be rest assured that each and every response will be read and will provide the background for some of the key decisions that we will make that will benefit our SQL Server database application developer community.
This survey will be open for your submissions until January 31, 2010 and can be found here.
SQL Server Native Client Team
Troubleshooting SQL Azure applications with SQL Server Native Client
In the Feb. 2010 blog post, "Using SQL Server Client APIs with SQL Azure Version 1.0", Steve Hale provided details regarding similarities and differences to watch out for when developing an application with SQL Azure. In this post, the focus is on tips of resolving issues once the application encounters an error condition. Please note that the exact error messages may differ slightly, but this should provide a good starting point.
Now, let's jump right into it. Starting with the initial setup of the database table:
Msg 40054, Level 16, State 1, Server server19, Line 1
Tables without a clustered index are not supported in this version of SQL Server. Please create a clustered index and try again.
As the error message stated, you'll need to create a cluster index on the table. The following sample demonstrates how you can create the cluster index:
Create table employees(EmployeeID int, EmployeeName varchar(30))
Create clustered index empIndex on employees(EmployeeID)
Please note that in order to insert data into a SQL Azure database table, you will need to have a cluster index anyways, so it is definitely in your interest to create the cluster index from the start.
Now that your database table is created, time to connect to the database. During connection, if you encounter:
Msg 40531, Level 11, State 1, Server servername.mscds.com, Line 1
Server name cannot be determined. It must appear as the first segment of the server's dns name (servername.mscds.com). Some libraries do not send the server name, in which case the server name must be included as part of the user name (username@servername). In addition, if both formats are used, the server names must match.
Verify that the "servername" is specified as part of the user name in the format the error message stated (uid = username@servername).
Another error you may encounter is:
HResult 0x35, Level 16, State 1
Named Pipes Provider: Could not open a connection to SQL Server [53].
Microsoft SQL Native Client : An error has occurred while establishing a connection to the server. When connecting to SQL Server 2005, this failure may be caused by the fact that under the default settings SQL Server does not allow remote connections.
Microsoft SQL Native Client : Login timeout expired.
In this scenario, there can be a couple of different configuration issues. Double check the following:
- Verify the local firewall is not blocking outbound network traffic on TCP 1433.
- Verify the Forefront Threat Management Gateway (TMG) or Internet Security Acceleration (ISA) Firewall client, or equivalent is installed, if the company firewall blocks non-authenticated traffic.
- Verify using the SQL Azure portal that the client IP address is in the set of SQL Azure allowed IP ranges.
Now that you can establish a connection to your SQL Azure database, the following are a few things to watch out for in your application:
- Do not execute any "USE <database>" statements. Always connect directly to the database the application requires.
- Use at most 2 part names in your query statements. Even though 3 part names are supported, the database portion of the 3 part name must be the name of the current database. Linked servers (4 part names) are not supported in SQL Azure.
- Do not call SQLSetConnectAttr() to set SQL_ATTR_CURRENT_CATALOG or SQL_ATTR_ENLIST_IN_DTC
- Do not call SQLSetConnectOption() to set SQL_CURRENT_CATALOG
If you do use any of these above syntax in your application, you will most likely encounter one of the following error messages:
SQLState=HY024: Message = "[Microsoft][SQL Server Native Client 10.0]Database is invalid or cannot be accessed"
SQLState=25S12: Message=[Microsoft][SQL Server Native Client 10.0]The partner transaction manager has disabled its support for remote/network transactions.
There are many similarities between programming for SQL Server and for SQL Azure. But, there are also a few things to watch out for. Hopefully these troubleshooting tips help you to recognize the differences quickly and resolve the problems.
Steve Hale and Jimmy Wu
Microsoft SQL Server
Using SQL Server Client APIs with SQL Azure Version 1.0
This post describes some of the issues that the application developer should be aware of when writing ODBC, ADO.NET SQLClient, BCP, and PHP code that connects to SQL Azure. There is no intention here to replace the SQL Azure documentation available on MSDN (https://msdn.microsoft.com/en-us/library/ee336279.aspx). Rather, the intent here is to provide a quick discussion of the primary issues impacting applications ported to or written for SQL Azure vs. SQL Server. Developers should reference the MSDN documentation for more detailed description of SQL Azure functionality.
Using supported SQL Server client APIs (ODBC, BCP, ADO.NET SQLClient, PHP) with SQL Azure is relatively easy, however, SQL Azure, while very similar, is not SQL Server. Because of this there are some pitfalls that need to be avoided to have the best experience when writing an application that connects to SQL Azure.
Supported components
The first thing to ensure is that you are using a supported component to connect to SQL Azure.
· Microsoft SQL Server Native Client 10.0 ODBC Driver or newer. The SQL Server 2008 R2 version of the SQL Server Native Client ODBC Driver is preferred due to some minor updates to work better with SQL Azure. This is a free download.
· SQL Server 2008 BCP.EXE or newer. The caution here is that the queryout option is not fully supported for SQL Server 2008 RTM. Queryout is fully supported in the SQL Server 2008 R2 release via the addition of the "-d" database parameter.
· ADO.NET 3.5 SqlClient or newer.
Any other components are not currently supported for connecting to SQL Azure. In particular it should be noted that OLEDB connections are not currently supported from any OLEDB provider, even SQL Server 2008 Native Client OLEDB provider. ODBC connections using the on-the-box ODBC driver "SQL Server" are not currently supported.
Also, using the OLEDB Provider for ODBC Drivers (MSDASQL) cannot be supported with SQL Azure because the only ODBC driver supported for SQL Azure is the SQL Server 2008 Native Client ODBC driver or newer, and SQL Server Native Client is not supported with MSDASQL (https://msdn.microsoft.com/en-us/library/ms131035.aspx).
Connecting
Before attempting a connection, make sure you have a valid server name, user ID, and password for SQL Azure. On the SQL Azure portal, set the firewall rules to allow your client IP address to connect to SQL Azure. Additionally, in some corporate environments, you might need to install Microsoft Firewall Client for ISA Server or Forefront TMG client on the client machines or connections will not succeed. And in those environments, using IIS might require the default IIS settings for Application Pool Identity to be changed. Here is how that setting is changed:
Open IIS Manager in Admin Tools, select Application Pools, Pick the pool, Advanced Setting and under Process Model change Identity from BuiltInAccount\ApplicationPoolIdentity to Custom account domain account. Restart IIS.
SQL Azure supports only TCP/IP connections using port 1433, which is the default for most SQL Server APIs and so this generally does not need any special handling by the application developer. But it is good to be aware of this in case you are expecting other protocol choices to work, such as named pipes or using other ports. Additionally, most client APIs do not send the server name when connecting, thus the server name should be included as part of the user ID. Currently the only exception to this is .NET 4.0 which does send the server name. ODBC, BCP, PHP, and .NET 3.5 all require the server name to be sent as part of the user ID. This may change in a future release. Connection strings are all similar for each API stack and require the server name, user ID, password, and optionally the database. Trusted connections (also known as Integrated Security or Windows Authentication) are not supported.
SQLCmd example:
sqlcmd -S o8uyxb64fe.ctp.database.windows.net -U <MyUserID>@o8uyxb64fe -P <MyPassword>
Note the required server name (in yellow) included as part of the user ID.
Creating and Connecting to a Database
In the above example the database was not specified. In that case the default database "master" is used. You must connect to the master database to create databases or drop databases.
Since the "USE database" command is not supported, you must disconnect after creating a database and reconnect directly to the user database. In this example we connect directly to the Northwind database.
sqlcmd -S o8uyxb64fe.ctp.database.windows.net -U <MyUserID>@o8uyxb64fe -P <MyPassword> -d Northwind
It should be noted that the set of databases viewable by the user is different in a user database versus master database. In master, you can see all of your databases for your server, but in a user database only the current user database and master.
Creating tables
Table creation is restricted to user databases; you cannot create tables in the master database. Table creation is substantially the same as on SQL Server, with the exception that certain data types are not supported, for example CLR User Defined Types, Filestream, and row guid types.
Also, it should be mentioned that SQL Azure requires a clustered index or primary key (which uses a clustered index by default) before data can be inserted into a table. For this reason, a clustered index or primary key must always be created for any table intended to contain data.
Example:
Create table employees(EmployeeID int primary key, EmployeeName varchar(30))
Or
Create table employees(EmployeeID int, EmployeeName varchar(30))
Create clustered index empIndex on employees(EmployeeID)
Unsupported features
Unsupported features are features that SQL Server supports and are not deprecated but SQL Azure does not support. Applications that require this functionality cannot work against SQL Azure unless they can be rewritten in such a manner that the unsupported features are not required. The main unsupported features that impact applications are:
· "USE database" is not supported
· 3-part names are not supported unless the database being referenced is the current database.
· Creating or dropping a database when not in the master database
· Creating or dropping a user when not in the master database.
· Table creation in the master database.
· Insertion of data into a table without a clustered index.
· Trusted connections
· CLR UDTs
· XML schema collections
· Distributed transactions (local transactions are supported)
· AttachDB
· Certain stored procedures, for example sp_who and undocumented stored procedures used to support OLEDB schema rowsets.
Deprecated functionality
Some features are deprecated in SQL Server and should not be used in new application development. In most cases SQL Azure does not support deprecated SQL Server features. Some examples of these are:
· System tables such as syslanguages. Use the new system views instead. See https://msdn.microsoft.com/en-us/library/ms187997.aspx for a mapping to the new system views.
· Numbered stored procedures
· "select into" syntax
· "COMPUTE BY" clause
· Two-part drop index statements
See https://msdn.microsoft.com/en-us/library/ee336281.aspx for more detailed Transact-SQL support.
Connection behavior
SQL Azure connections will behave somewhat differently than SQL Server connections. They can be dropped for a number of reasons:
· Excessive resource usage
· Long-running queries
· Long-running single transactions
· Idle connections
· Failover due to server failures
For this reason it's best to avoid caching connections for later use. A better strategy is to open the connection when needed, use it, and then close it. Additionally, it is recommended that applications provide retry/reconnect logic to recover from dropped connections.
Latency
Latency may be a concern when using SQL Azure unless the SQL Azure server is located near the application ("code near" scenario), such as with Windows Azure and a co-located SQL Azure. Making many round trips to the server can introduce noticeable delay in an application that previously performed adequately when running against a SQL Server on the intranet. Ensure the application connects to the nearest SQL Azure server and that round trips are minimized.
SUMMARY
ü Use only supported client components to connect
ü Connect using TCP/IP and port 1433
ü Use SQL Authentication only, not Trusted Connections/Integrated Authentication/Windows Authentication.
ü Specify the server name in the user ID.
ü Ensure the firewall rules in the SQL Azure portal permit your IP address.
ü Install Microsoft Firewall Client for ISA Server if needed.
ü Change the IIS Application Pool Identity if needed.
ü Connect to the master database to create or drop databases
ü Create a user database for your application since tables cannot be created in master
ü Disconnect and reconnect to change databases
ü Create a clustered index or primary key on a table before inserting data.
ü Remove any unsupported or deprecated features from the application.
ü Avoid caching connections. Open the connection, use it, and then close it.
ü Avoid making numerous round trips to the server.
ü Implement retry logic to recover from dropped connections.
Steve Hale (Microsoft) authored this article.
We are moving!
This blog is in the process of being migrated to one of the new consolidated SQL Server and Azure SQL Database blogs on the Microsoft TechCommunity website. Once the migration is complete, we will post the new URL along with instructions for how to navigate the new blog and update your RSS feeds. Until then, feel free to keep reading here, but keep in mind that any comments that are added may not make it over to the new blog. You will be able to re-post them there once we are live. Stay tuned and see you on the new site soon!
We have moved!
Thanks for visiting! This blog has now been migrated to:
https://techcommunity.microsoft.com/t5/SQL-Server/bg-p/SQLServer/label-name/SQLServerDrivers
Your Voice is Important
Greetings to the SQL Server community:
Back around October 2009, we introduced the process of interacting on a regular basis with the developers and users in the form of surveys. Today, we are happy to introduce the ability for you to suggest and vote on feature scenarios through UserVoice. Our UserVoice site https://mssqlconn.uservoice.com enables you to vote for the feature most important to you and if you do not see the feature you need most, you can enter your own feature idea. This provide us with the ability to validate some of the requests we have got from developers, users and partners such as you as well as ideas that we have gathered internally as a part of our development process.
We view your organization as a key stakeholder in the process that we have to identify areas for future investments. The feedback you provide is valuable and each response will be read and will be treated with utmost confidence.
Regards,
Microsoft SQL Server
Debugging slow response times in SQL Server 2008
Introduction
The other day I came across a nice article written by Mario Broodbakker called "SQL Server Wait Events: Taking the Guesswork out of Performance Profiling" (see references) on how to troubleshoot slow response times in SQL Server 2000 and 2005 using the YAPP Method. According to the author, one of the biggest challenges to apply this method in SQL Server is that fact that the wait statistics are collected and exposed at the server level (server wide):
... "This is simply not enough, unless you have the luxury of testing your application and SQL statements on an isolated server" ..." But, of course, it's often hard or impossible to isolate and replicate production problems on an isolated test server." ...
I decided to write this because in SQL Server 2008 the wait statistics are available at virtually any level, and (at the time of writing) I couldn't find any articles on the new sqlos.wait_info and sqlos.wait_info_external extended events.
YAPP Method
The YAPP Method: "Yet Another Performance Profiling Method" is based on a paper written by Anjo Kolk (see references). The basic idea of the method can be expressed with the following formula:
(1) Response time = service time + wait time
This method for performance troubleshooting has been around for some time and it is a fairly standard practice when debugging slow response times.
You can get the response time and the service time of a query by looking at sys.dm_exec_sessions, columns total_elapsed_time and cpu_time. Alternatively, you can use SQL trace or the more lightweight extended events in SQL Server 2008. Knowing response time and service time and applying formula (1) , gives you wait time. So, we know how much we waited. However, in order to get the individual wait types we need the new extended events.
Per session wait statistics in SQL Server 2008
In SQL Server 2008 you can get wait statistics for a given session or statement by leveraging the new extended events. Optionally, you can limit the collection to a small set of wait types or collect only waits exceeding certain duration. If your event session is written carefully, you can use this technique on production systems with very little or no performance impact. In fact, SQL Server 2008 ships with a built-in event session, which is collecting wait statistics, and is running by default out of the box.
Here is how to create an event session to collect wait types for session 51. The events will go to the specified trace file:
create event session session_waits on server
add event sqlos.wait_info
(WHERE sqlserver.session_id=51 and duration>0)
, add event sqlos.wait_info_external
(WHERE sqlserver.session_id=51 and duration>0)
add target package0.asynchronous_file_target
(SET filename=N'c:\wait_stats.xel', metadatafile=N'c:\wait_stats.xem');
Here is how to start the event session, run your workload, and then stop the event session:
alter event session session_waits on server state = start;
exec sp_workload;
alter event session session_waits on server state = stop;
Here is how to read the trace file:
select * from from sys.fn_xe_file_target_read_file
('c:\wait_stats*.xel', 'c:\wait_stats*.xem', null, null)
The result is a list of wait events, representing individual waits, having wait type and duration column. In order to make better sense out of this we need to group the events by wait type and calculate the total duration per wait type. The following code can do this:
create view dbo.read_xe_file as
select object_name as event, CONVERT(xml, event_data) as data
from sys.fn_xe_file_target_read_file
('c:\wait_stats*.xel', 'c:\wait_stats*.xem', null, null)
go
create view dbo.xe_file_table as
select
event
, data.value('(/event/data/text)[1]','nvarchar(50)') as 'wait_type'
, data.value('(/event/data/value)[3]','int') as 'duration'
, data.value('(/event/data/value)[6]','int') as 'signal_duration'
from dbo.read_xe_file
go
select
wait_type
, sum(duration) as 'total_duration'
, sum(signal_duration) as 'total_signal_duration'
from dbo.xe_file_table
group by wait_type
order by sum(duration) desc
go
Example
Hopefully this example will demonstrate the power of sqlos.wait_info and sqlos.wait_info_external events. I did some measurements by executing the following workload from two connections:
create proc #sp_workload
as
begin
SET nocount ON
CREATE TABLE #t1000k (c2 char(1020));
BEGIN TRANSACTION
DECLARE @rows INT = 50000;
DECLARE @row INT = 0;
DECLARE @count INT = 0;
WHILE @row < @rows
BEGIN
INSERT INTO #t1000k (c2) VALUES (REPLICATE('a',1000));
SELECT @row = @row + 1
IF @count > 10
BEGIN
COMMIT
BEGIN TRANSACTION
SELECT @count=0
END
SELECT @count=@count+1
END
COMMIT
END
go
While running the workload I had IOMeter (see references) so that I can add some disk pressure.
Results for session 51: Apparently, most of the time was spent waiting for space in the log buffer to store log records - wait type LOGBUFFER. For complete list of all wait types with their descriptions search for sys.dm_os_wait_stats in MSDN or Books Online (see references).
| Response time | Service time | Wait time |
| 32619 | 1828 | 30791 |
| | |
| wait_type | total_duration | total_signal_duration |
| LOGBUFFER | 9662 | 66 |
| PREEMPTIVE_OS_FILEOPS | 6442 | 276 |
| PREEMPTIVE_OS_FLUSHFILEBUFFERS | 3833 | 150 |
| PREEMPTIVE_OS_WRITEFILEGATHER | 3015 | 66 |
| SOS_SCHEDULER_YIELD | 2481 | 2480 |
| WRITE_COMPLETION | 1971 | 0 |
| IO_COMPLETION | 1183 | 0 |
| PAGEIOLATCH_UP | 551 | 0 |
| WRITELOG | 417 | 0 |
| PAGELATCH_UP | 30 | 27 |
| PAGELATCH_SH | 10 | 10 |
| PREEMPTIVE_XE_CALLBACKEXECUTE | 4 | 200 |
Results for session 52: The result for this session is very similar. We can tell that most of the time was spent waiting. After accumulating the durations from all waits we get 30726, which is pretty close to the total wait time calculated using sys.dm_exec_sessions (31484).
| Response time | Service time | Wait time |
| 33890 | 2406 | 31484 |
| | |
| wait_type | total_duration | total_signal_duration |
| LATCH_EX | 16555 | 32 |
| LOGBUFFER | 10796 | 28 |
| SOS_SCHEDULER_YIELD | 2739 | 2729 |
| WRITELOG | 605 | 0 |
| PAGELATCH_UP | 26 | 25 |
| PAGELATCH_SH | 5 | 5 |
For the sake of completeness I also collected server-wide wait statistics, which are also available in previous version of SQL Server. The server-wide statistics clearly shows that we have IO bottleneck however you don't know exactly which session or query was affected and by how much:
| wait_type | wait_time_ms | signal_wait_time_ms |
| LOGBUFFER | 21666 | 127 |
| WRITELOG | 17118 | 4 |
| LATCH_EX | 16561 | 34 |
| PAGEIOLATCH_UP | 7891 | 0 |
| SOS_SCHEDULER_YIELD | 7058 | 7038 |
| PREEMPTIVE_OS_FILEOPS | 6443 | 0 |
| WRITE_COMPLETION | 5896 | 4 |
| SLEEP_BPOOL_FLUSH | 3916 | 278 |
| PREEMPTIVE_OS_FLUSHFILEBUFFERS | 3833 | 0 |
| PREEMPTIVE_OS_WRITEFILEGATHER | 3016 | 0 |
| IO_COMPLETION | 1680 | 0 |
| PREEMPTIVE_OS_REPORTEVENT | 141 | 0 |
| PAGELATCH_UP | 139 | 128 |
| PREEMPTIVE_OS_PIPEOPS | 128 | 0 |
| PREEMPTIVE_XE_TARGETINIT | 85 | 0 |
| XE_BUFFERMGR_ALLPROCESSED_EVENT | 70 | 0 |
| PAGELATCH_SH | 23 | 23 |
| PREEMPTIVE_OS_QUERYREGISTRY | 16 | 0 |
| PREEMPTIVE_XE_CALLBACKEXECUTE | 8 | 0 |
| PAGELATCH_EX | 7 | 7 |
| PREEMPTIVE_XE_SESSIONCOMMIT | 5 | 0 |
| LATCH_SH | 1 | 0 |
| PREEMPTIVE_OS_GETDISKFREESPACE | 1 | 0 |
Complete test code
Here is the complete source code of the test:
use tempdb
go
--
-- Enable xp_cmdshell to delete trace files
--
exec sp_configure 'show advanced options', 1
reconfigure
exec sp_configure 'xp_cmdshell', 1
reconfigure
go
BEGIN TRY
drop proc #sp_workload
END TRY BEGIN CATCH END CATCH
go
create proc #sp_workload
as
begin
SET nocount ON
CREATE TABLE #t1000k (c2 char(1020));
BEGIN TRANSACTION
DECLARE @rows INT = 50000;
DECLARE @row INT = 0;
DECLARE @count INT = 0;
WHILE @row < @rows
BEGIN
INSERT INTO #t1000k (c2) VALUES (REPLICATE('a',1000));
SELECT @row = @row + 1
IF @count > 10
BEGIN
COMMIT
BEGIN TRANSACTION
SELECT @count=0
END
SELECT @count=@count+1
END
COMMIT
END
go
BEGIN TRY
drop event session session_waits on server
END TRY BEGIN CATCH END CATCH
go
exec xp_cmdshell 'del c:\wait_stats*.xel', no_output;
exec xp_cmdshell 'del c:\wait_stats*.xem', no_output;
go
declare @cmd nvarchar(max);
set @cmd = N'create event session session_waits on server ' +
N'add event sqlos.wait_info (WHERE sqlserver.session_id=' + convert(nvarchar(10), @@spid) + N' and duration>0) ' +
N', add event sqlos.wait_info_external (WHERE sqlserver.session_id=' + convert(nvarchar(10), @@spid) + N' and duration>0) ' +
N'add target package0.asynchronous_file_target (SET filename=N''c:\wait_stats.xel'', metadatafile=N''c:\wait_stats.xem'')';
exec(@cmd);
go
BEGIN TRY
drop table #snapshot
END TRY BEGIN CATCH END CATCH
go
select total_elapsed_time, cpu_time into #snapshot from sys.dm_exec_sessions where session_id=@@SPID;
go
alter event session session_waits on server state = start;
exec #sp_workload;
alter event session session_waits on server state = stop;
go
select
(es.total_elapsed_time - ss.total_elapsed_time) as 'Response time',
(es.cpu_time - ss.cpu_time) as 'Service time',
((es.total_elapsed_time - ss.total_elapsed_time) - (es.cpu_time - ss.cpu_time)) as 'Wait time'
from sys.dm_exec_sessions es, #snapshot ss where session_id=@@SPID;
go
drop event session session_waits on server
go
BEGIN TRY
drop view dbo.read_xe_file
END TRY BEGIN CATCH END CATCH
go
create view dbo.read_xe_file as
select object_name as event, CONVERT(xml, event_data) as data
from sys.fn_xe_file_target_read_file('c:\wait_stats*.xel', 'c:\wait_stats*.xem', null, null)
go
BEGIN TRY
drop view dbo.xe_file_table
END TRY BEGIN CATCH END CATCH
go
create view dbo.xe_file_table as
select
event
, data.value('(/event/data/text)[1]','nvarchar(50)') as 'wait_type'
, data.value('(/event/data/value)[3]','int') as 'duration'
, data.value('(/event/data/value)[6]','int') as 'signal_duration'
from dbo.read_xe_file
go
select
wait_type
, sum(duration) as 'total_duration'
, sum(signal_duration) as 'total_signal_duration'
from dbo.xe_file_table
group by wait_type
order by sum(duration) desc
go
--
-- CLEANUP
--
exec xp_cmdshell 'del c:\wait_stats*.xel', no_output;
exec xp_cmdshell 'del c:\wait_stats*.xem', no_output;
drop view dbo.xe_file_table;
drop view dbo.read_xe_file;
drop proc #sp_workload;
References
Sys.dm_os_wait_stats
The following MSDN article shows all wait types with their description: https://msdn.microsoft.com/en-us/library/ms179984.aspx
IOMeter
IOMeter is an IO stress and measurement tool developed by Intel. It is now an Open Source tool, and freely downloadable from:
https://www.iometer.org
A very nice article by Mario Broodbakker on how to troubleshoot slow response times in SQL Server 2000 and SQL Server 2005:
https://www.simple-talk.com/sql/performance/sql-server-wait-events-taking-the-guesswork-out-of-performance-profiling/
Here also has a very good presentation on the subject and describes a lot of SQL Server 2005 wait events here:
https://www.microsoft.com/technet/prodtechnol/sql/2005/tsprfprb.mspx
How to configure Soft-NUMA on a system with > 32 processors?
I recently answered this customer question and was looking forward to post the solution here. So here you go!
There is already a lot of information about how Soft NUMA works and how to configure Soft NUMA on your system. So without delving into the basics, I am jumping right ahead to the topic.
Soft Affinity Setting
SQL Server 2000 and above supports the affinity option for greater than 32 processors (33 to 64) only on 64-bit operating system.
If you are running SQL Server 2000 or above on a system with greater than 32 processors, then you can use sp_configure 'affinity mask' (32 bit mask) option for the first 32 CPUs and sp_configure 'affinity64 mask' (32 bit mask) option for the CPUs 33 to 64.
Ex: Consider a machine with 33 CPUs. Setting the 'affinity mask' to 0x0000ffff and 'affinity64 mask' to 0x1 hard affinitizes CPU 1 to 16 and CPU 33 to ONLINE.
sp_configure 'show advanced options', 1; RECONFIGURE; GO sp_configure 'affinity mask', 65535; RECONFIGURE; GO sp_configure 'affinity64 mask', 1; RECONFIGURE; GO |
Registry Settings
To map Soft NUMA nodes to greater than 32 CPUs, use a QWORD registry value to represent CPUs 1 to 64. Use the Registry Editor program (regedit.exe) to add the following registry keys to map soft-NUMA to CPUs as follows.
Ex: Mapping Soft NUMA nodes to CPUs as follows:
Node 0: CPUs 1 to 16
Node 1: CPUs 17 to 32
Node 2: CPUs 33 and 34
SQL Server 2005 | Type | Value name | Value data |
HKEY_LOCAL_MACHINE\SOFTWARE\Microsoft\Microsoft SQL Server\90\NodeConfiguration\Node0 | QWORD | CPUMask | 0x 0000 0000 0000 ffff |
HKEY_LOCAL_MACHINE\SOFTWARE\Microsoft\Microsoft SQL Server\90\NodeConfiguration\Node1 | QWORD | CPUMask | 0x0000 0000 ffff 0000 |
HKEY_LOCAL_MACHINE\SOFTWARE\Microsoft\Microsoft SQL Server\90\NodeConfiguration\Node2 | QWORD | CPUMask | 0x0000 0002 0000 0000 |
SQL Server 2008 | Type | Value name | Value data |
HKEY_LOCAL_MACHINE\SOFTWARE\Microsoft\Microsoft SQL Server\100\NodeConfiguration\Node0 | QWORD | CPUMask | 0x 0000 0000 0000 ffff |
HKEY_LOCAL_MACHINE\SOFTWARE\Microsoft\Microsoft SQL Server\100\NodeConfiguration\Node1 | QWORD | CPUMask | 0x0000 0000 ffff 0000 |
HKEY_LOCAL_MACHINE\SOFTWARE\Microsoft\Microsoft SQL Server\100\NodeConfiguration\Node2 | QWORD | CPUMask | 0x0000 0003 0000 0000 |
Rest of the details about using Soft NUMA and mapping the registry key remains the same.
If the registry is having faulty settings like overlapping NUMA node masks to CPU mapping or Soft NUMA mapping crossing hardware NUMA, then SQL Server ignores the Soft NUMA configuration.
Good news is that the new version of SQL Server (after SQL Server 2008) will be supporting greater than 64 logical processors and will be using a more convenient way for setting affinity!
-Harshitha Amit
SQLOS Test Team
Part 1: Anatomy of SQL Server 2008 Resource Governor CPU Demo
First, a quick introduction. My name is Boris Baryshnikov and I'm a program manager in SQL Server Database Engine group. As of today, Resource Governor is the most recent large project I worked on. Not surprisingly, I will talk about the Resource Governor here.
While Resource Governor spans multiple components of SQL Server Engine, it seems logical to discuss the feature in this blog as the resource management in general is so close to the scope of SQLOS.
Without further delay, let's get to point. As we have recently released a public CTP (Community Technology Preview) of SQL Server 2008 (aka SQL Server 2008 November CTP), which has Resource Governor functionality, and a number of presentations with Resource Governor demo on various conferences, I started getting a lot of questions about the demo itself which made me write this post.
We created this demo when Resource Governor was only a prototype to illustrate the concept, but probably its simplicity made it so attractive that it was included in a number of talks and demos by different people all over the world.
Background
If you are looking for general concepts about Resource Governor, check out the Books Online which comes as a separate download or read it directly on MSDN Library.
The Demo in a Nutshell
In the demo we will create two workload groups which share a common resource pool and one workload group which has its own dedicated resource pool. Each group gets a CPU intensive workload. Using the Resource Governor you will be able to affect CPU distribution between these competing workloads. The effects of the resource management are observed using performance counters specific to Resource Governor.
Step 1: Initial Demo Setup
On a newly installed server (i.e. no prior Resource Governor configuration) you may need to run these setup steps. I normally doing my demo on a dual core laptop and for the sake of simplicity I'm using a single CPU for SQL Server. To do so, I adjust CPU affinity mask as follows:
-- first enable advanced options in sp_configure
sp_configure 'show advanced', 1
GO
RECONFIGURE
GO
-- use only 1 CPU on demo machine
sp_configure 'affinity mask', 1
GO
RECONFIGURE
GO
Using 1 CPU for SQL Server on a dual proc machine has an interesting side-effect: we normalize "CPU usage %" counter to number of CPUs on the box and thus, the values will hover around 50% as maximum and not 100% as you might expect. I will illustrate this below.
Of course you can use both CPUs but this complicates the demo. This is a subject for whole another post - what happens when you have multiple CPUs.
In addition to that for demo purposes I will set min/max server memory to a fixed value, since it will improve predictability of the demo on the laptop.
-- 512 Mb is suitable for laptop demo
sp_configure 'min server', 512
GO
sp_configure 'max server', 512
GO
RECONFIGURE
GO
Step 2: Workload groups and Resource Pools
Now we will be setting up the following hierarchy of workload groups and resource pools:

Each corresponding workload group contains queries of the corresponding class or department (i.e. Marketing, Adhoc, and VP). Note that, Marketing and Adhoc queries share the same resource pool, while workload group VP has its own similarly named pool. The reason of such separation will become clear as we see how we adjust Resource Governor controls.
You will start building the above configuration in a bottom up manner (i.e. starting from pools and going up)
To do so, we execute the following T-SQL:
-- create user pools
-- note that we are using all default parameters
CREATE RESOURCE POOL PoolMarketingAdhoc
CREATE RESOURCE POOL PoolVP
-- create user groups
-- also note that all groups created with default parameters
-- only pointing to the corresponding pools (and not 'default')
CREATE WORKLOAD GROUP GroupMarketing
USING PoolMarketingAdhoc
CREATE WORKLOAD GROUP GroupAdhoc
USING PoolMarketingAdhoc
CREATE WORKLOAD GROUP GroupVP
USING PoolVP
GO
Step 3: Classification
Now, what you have just done is created hierarchy of the groups and pools, however, how does the server know about which query goes where? This is where classification comes in. The above picture becomes:

There is a couple of things:
- To do the classification you will need to create a user-defined function that will be executed for every new connection and it will place these new connections in the corresponding workload groups.
- How will we separate different connections? For demo purposes we will use 3 separate login names which we will check and use inside of the function
To implement the above 2 steps we will run the following:
-- classifier function should be created in master database
-- switch to master unless you are there already
USE master
GO
-- create logins to separate users into different groups
-- note that we disabled strong password checking for demo purposes
-- but this is against any best practice
CREATE LOGIN UserMarketing WITH PASSWORD = 'UserMarketingPwd', CHECK_POLICY = OFF
CREATE LOGIN UserAdhoc WITH PASSWORD = 'UserAdhocPwd', CHECK_POLICY = OFF
CREATE LOGIN UserVP WITH PASSWORD = 'UserVPPwd', CHECK_POLICY = OFF
GO
-- now create the classifier function
IF OBJECT_ID('DBO.CLASSIFIER_V1','FN') IS NOT NULL
DROP FUNCTION DBO.CLASSIFIER_V1
GO
-- note that this is just a regular function
CREATE FUNCTION CLASSIFIER_V1 ()
RETURNS SYSNAME WITH SCHEMABINDING
BEGIN
DECLARE @val varchar(32)
SET @val = 'default';
if 'UserVP' = SUSER_SNAME()
SET @val = 'GroupVP';
else if 'UserMarketing' = SUSER_SNAME()
SET @val = 'GroupMarketing';
else if 'UserAdhoc' = SUSER_SNAME()
SET @val = 'GroupAdhoc';
return @val;
END
GO
Step 4: Are we there yet?
After all this work, can we start workloads and see what happens? The answer, as you have guessed by the question is - no. What's left? Again, a couple of steps:
- We need to tell Resource Governor to use the function that we just created
- Make all the changes effective
First step is done by
-- make function known to the Resource Governor
ALTER RESOURCE GOVERNOR
WITH (CLASSIFIER_FUNCTION = dbo.CLASSIFIER_V1)
GO
For the second step, let's compare output of catalog views with in-memory information (note difference in names of catalog views and dynamic management views (DMVs) which are prefixed with dm_:
-- metadata information
SELECT * FROM sys.resource_governor_workload_groups
SELECT * FROM sys.resource_governor_resource_pools
SELECT * FROM sys.resource_governor_configuration
-- in-memory information
SELECT * FROM sys.dm_resource_governor_workload_groups
SELECT * FROM sys.dm_resource_governor_resource_pools
SELECT * FROM sys.dm_resource_governor_configuration
Now transfer changes from metadata to memory by running the following statement. Also, do not confuse it with already existing RECONFIGURE command:
-- make the changes effective
ALTER RESOURCE GOVERNOR RECONFIGURE
GO
And rerun the above query on metadata and DMVs and you should see that new groups, pools and classifier function ID are present in corresponding DMVs.
Step 5: Running the workloads
The easiest way to simulate a CPU intensive workload is to run the following in a loop:
set nocount on
declare @i int
declare @s varchar(100)
set @i = 100000000
while @i > 0
begin
select @s = @@version;
set @i = @i - 1;
end
Also, instead of running this query from the Management Studio, consider saving it in a file and running from a command prompt by using a script similar to the below. Note that we are using 3 different user names to connect to the server.
echo "Press any key to start Marketing workload"
pausestart sqlcmd -S <your_server_name> -U UserMarketing -P UserMarketingPwd -i "CPU intensive loop.sql"
echo "Press any key to start VP workload"
pause
start sqlcmd -S <your_server_name> -U UserVP -P UserVPPwd -i "CPU intensive loop.sql"
echo "Press any key to start Adhoc workload"
pause
start sqlcmd -S <your_server_name>" -U UserAdhoc -P UserAdhocPwd -i "CPU intensive loop.sql"
To observe the effects of the load, add the following performance counters in the perfmon:
- We will monitor CPU usage per group in the 1st instance of perfmon; add "SQLServer:Workload Group Stats object", "CPU usage %" counter for "GroupMarketing", "GroupAdhoc" and "GroupVP" instances
- We will monitor CPU usage per pool 2nd instance of perfmon, add "SQLServer:Resource Pool Stats object", "CPU usage %" counter for "PoolMarketingAdhoc" and "GroupVP" instances
Before you start the next workload, observe the counters for pools and groups for a number of seconds, you should see approximately the following:
For groups (click on the image to open in a new window):

For pools:

Few things to note:
- Remember I set affinity mask to 1? This is why the maximum on the figures is only 50% (it is for a single CPU while usage is normalized to all CPUs on the machine, 2 in my case)
- At point A, I started Marketing workload, CPU usage went to the maximum on the CPU for a single workload, 50% in this case
- At point B, I started VP workload, which, as you remember, belongs to a separate resource pool and it made Marketing group share half of the CPU with VP group. The same is true for the pools (because we have 1 to 1 match of active requests in groups to pools at this point)
- At point C, I started Adhoc workload, which has its own group but shares the pool with Marketing workload. What happened here on the groups is that all 3 of them are now sharing the CPU getting approximately 1/3 of it or roughly 17%. On the pool side, however, we can see that MarketingAdhoc pool which shows aggregate resource usage by all groups inside of it, has 2/3 or the CPU while PoolVP has only 1/3. This behavior is exactly what you get on SQL Server 2005. Resources are distributed as they are being requested and whoever needs more CPU simply gets it. This was one of the goals: to make behavior as close as possible to SQL Server 2005 when you do not use the Resource Governor or adjust any parameters of it. Note, however, by creating the groups and pools you are already slightly altering the behavior of SQL Server 2008, but more on this in the next few posts.
Step 6: Management Actions
Now we came to the point where we want to apply action to change the above picture. Specifically, we want our VP workload to proceed faster and thus, limit CPU usage by Marketing and Adhoc workloads to 50% of the CPU.
To do this, we alter the PoolMarketingAdhoc using the following syntax (remember, we created the pool using all default parameters):
-- adjust PoolMarketingAdhoc to not consume more than 50% of CPU
ALTER RESOURCE POOL PoolMarketingAdhoc
WITH (MAX_CPU_PERCENT = 50)
Remember to make changes effective:
-- make the changes effective
ALTER RESOURCE GOVERNOR RECONFIGURE
Now, let's look at the counters:
For groups:

For pools:

What you will see is what happened at point D: Pool usage by PoolMarketingAdhoc went back to half of the CPU while PoolVP took the remaining part of it. Note that, on group side GroupVP usage went up to use half of the CPU (it has a single workload) while groups Marketing and Adhoc divide another half equally (12.5% each).
Further step is to alter IMPORTANCE parameters of the Marketing and Adhoc groups. IMPORTANCE affects CPU distribution when two groups share the same pool. Value of importance has a numeric meaning for CPU bandwidth distribution. Ratio of Low:Medium:High IMPORTANCE is equal to 1:3:9.
To illustrate this, let's run the following:
-- alter importance of adhoc group
ALTER WORKLOAD GROUP GroupAdhoc
WITH (IMPORTANCE = Low)
-- alter importance of marketing group
ALTER WORKLOAD GROUP GroupMarketing
WITH (IMPORTANCE = High)
-- make the changes effective
ALTER RESOURCE GOVERNOR RECONFIGURE
When changes become effective corresponds to the point E on the above graphs. Note that distribution between pools does not change, amount of CPU available to GroupVP also does not change (there are no other groups in this pool), but GroupMarketing takes about 10 times of the bandwidth available to GroupAdhoc (remember the ratio of Low:High = 1:9, but together they stay within PoolMarketingAdhoc limits.
That's enough for the first post. In the upcoming post I will try to go over the cases when the demo does not seem to work or shows "unusual" behavior and possible explanations of it.
Part 2: Resource Governor CPU Demo on multiple CPUs
In some cases CPU demo described in the previous post may behave not as expected.
One such case is doing the demo on multiple CPUs. Even though it appears as Resource Governor is "not working", it is "by design". Let's take a look at what happens in this case.
What is our promise about CPU bandwidth distribution?
When you specify percentage on the pool we will ensure average CPU bandwidth distribution on per scheduler basis for CPU bound workloads. Note, emphasis: average, per scheduler, CPU bound. What does this mean?
For example, you have a 2 CPU machine, and SQL Server runs on both of the CPUs. If you haven't set affinity mask as was indicated in the Setup step of the previous post,
select scheduler_id, cpu_id, status, is_online from sys.dm_os_schedulers
will get you something like:
scheduler_id cpu_id status is_online
------------ ----------- ------------------------------------------------------------ ---------
0 0 VISIBLE ONLINE 1
1 1 VISIBLE ONLINE 1
257 0 HIDDEN ONLINE 1
255 0 VISIBLE ONLINE (DAC) 1
Important item to note here is that we have 2 online schedulers to service normal user requests (scheduler_id < 255). You can compare it with the case when affinity mask is set to 1. You will still have 2 schedulers (with scheduler_id < 255), but one of them will be offline.
Now, for simplicity, let's configure 2 groups and 2 pools as follows:
CREATE RESOURCE POOL pSlow
WITH (MAX_CPU_PERCENT = 30)
CREATE RESOURCE POOL pFast
WITH (MAX_CPU_PERCENT = 70)
CREATE WORKLOAD GROUP gSlow
USING pSlow
CREATE WORKLOAD GROUP gFast
USING pFast
GO
And corresponding classifier function as
CREATE FUNCTION f1()
RETURNS SYSNAME WITH SCHEMABINDING
BEGIN
DECLARE @val sysname
if 'UserSlow' = SUSER_SNAME()
SET @val = 'gSlow';
else if 'UserFast' = SUSER_SNAME()
SET @val = 'gFast';
return @val;
END
GO
Create logins, assign function and make changes effective
CREATE LOGIN UserFast WITH PASSWORD = 'UserFastPwd', CHECK_POLICY = OFF
CREATE LOGIN UserSlow WITH PASSWORD = 'UserSlowPwd', CHECK_POLICY = OFF
GO
ALTER RESOURCE GOVERNOR WITH (CLASSIFIER_FUNCTION = dbo.f1)
GO
ALTER RESOURCE GOVERNOR RECONFIGURE
Add group counters for CPU Usage % and run 1 CPU intensive query UserSlow, then 1 with UserFast. You will observe a picture similar to this:
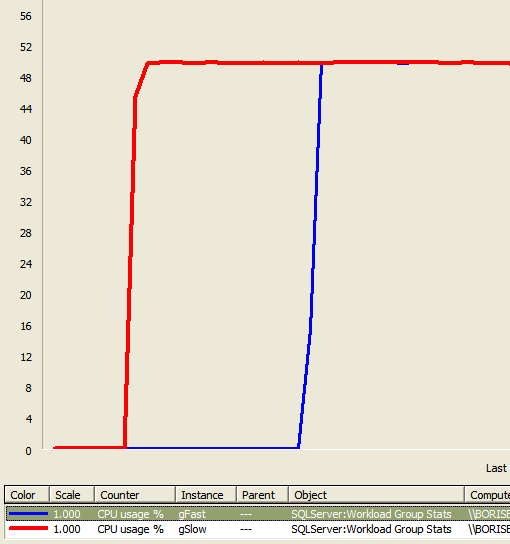
But how can explain that the resource governor does not obey 70:30 distribution we specified for the resource pools? The answer is quite simple: the queries landed on different schedulers (= different CPUs) and thus, there is nothing to share between them and each of them is taking a full CPU. How can you verify that?
First of all, verify the classification
-- verify the classification
select
sess.session_id, sess.group_id, CONVERT(NCHAR(20), grps.name) as group_name
from
sys.dm_exec_sessions as sess join
sys.dm_resource_governor_workload_groups as grps on sess.group_id = grps.group_id
where
session_id > 50
GO
Where you will see something like
session_id group_id group_name
---------- ----------- --------------------
52 2 default
51 265 gSlow
54 266 gFast
Everything is normal here. Now, let's take a look at how currently executing requests landed on schedulers:
select
r.session_id,
CONVERT(NCHAR(20), wg.name) as group_name,
t.scheduler_id,
r.status
from sys.dm_exec_requests r
join sys.dm_os_tasks t on r.task_address = t.task_address
join sys.dm_resource_governor_workload_groups wg on r.group_id = wg.group_id
where
r.session_id > 50
GO
Which will get
session_id group_name scheduler_id status
---------- -------------------- ------------ ------------------------------
54 gFast 0 runnable
52 default 0 running
51 gSlow 1 running
What you can see here is that gFast and gSlow is working on different schedulers, thus confirming our earlier statement. Thus Red and Blue line corresponds to utilization of 1 full CPU or 50%, since it is normalized to number of CPUs available on the box.
Is this a problem with Resource Governor in general? Certainly not if you have more executing requests than you have CPUs or if queries are running in parallel. But you should keep this in mind if you are trying to give 90% of CPU bandwidth to a single query running serially compared to a parallel query or number of serial queries in another group/pool.
A simple way of thinking about this is: is my workload capable of taking as much CPU as I told it to? Remember, when you set MAX_CPU_PERCENT on the pool, you allowing workloads belonging to the pool to take this much bandwidth on each scheduler. In case of the demo, you are working with a single query workload which produces this initially unexpected result.
SQLOS Team blog updates
Please note that to save the need to check two different sites, future SQLOS team blog posts will be appearing on the MSDN site here: SQLOS Team Blog.
Thanks, Guy.
Backup and Restore to Cloud Simplified in SQL Server 2012 SP1 CU2
SQL Server 2012 SP1 Cumulative Update 2 includes new functionality that simplifies the backup and restore capability of an on-premises SQL Server database to Windows Azure. You can now directly create a backup to Windows Azure Storage using SQL Server Native Backup functionality. Read the information below to get a brief introduction to the new functionality and follow the links for more in-depth information.
To download the update, go to the SQL Release Services Blog or to Download SQL Server 2012 SP1 CU2.
Overview:
In addition to disk and tape you can now use SQL Server native backup functionality to back up your SQL Server Database to the Windows Azure Blob storage service. In this release, backup to Windows Azure Blob storage is supported using T-SQL and
SMO. SQL Server Databases on an on premises instance of SQL Server or in a hosted environment such as an instance of SQL Server running in Windows Azure VMs can take advantage of this
functionality.
Benefits:
- Flexible, reliable, and limitless off-site storage for improved disaster recovery: Storing your backups on Windows Azure Blob service can be a convenient, flexible and easy to access off-site option. Creating off-site storage for your SQL Server backups can be as easy as modifying your existing scripts/jobs. Off-site storage should typically be far enough from the production database location to prevent a single disaster that might impact both the off-site and production database locations. You can also restore the backup to a SQL Server Instance running in a Windows Azure
Virtual Machine for disaster recovery of your on-premises database. By choosing to geo-replicate the Blob storage you have an extra layer of protection in the event of a disaster that could affect the whole region. In addition, backups are available from anywhere and at any time and can easily be accessed for restores. - Backup Archive: The Windows Azure Blob Storage service offers a better alternative to the often used tape option to archive backups. Tape storage might require physical transportation to an off-site facility and measures to protect the media. Storing your backups in Windows Azure Blob Storage provides an instant, highly available and durable archiving option.
- No overhead of hardware management: There is no overhead of hardware management with Windows Azure storage service. Windows Azure services manage the hardware and provides geo-replication for redundancy and protection against hardware failures.
- Currently for instances of SQL Server running in a Windows Azure Virtual Machine, backing up to Windows Azure Blob storage services can be done by creating attached disks. However, there is a limit to the number of disks you can attach to a Windows Azure Virtual Machine. This limit is 16 disks for an extra-large instance and fewer for smaller instances. By enabling a direct backup to Windows Azure Blob Storage, you can bypass the 16 disk limit.
- In addition, the backup file which now is stored in the Windows Azure Blob storage service is directly available to either an on-premises SQL Server or another SQL Server running in a Windows Azure Virtual Machine, without the need for database attach/detach or downloading and attaching the VHD.
- Cost Benefits: Pay only for the service that is used. Can be cost-effective as an off-site and backup archive option.
The Windows Azure pricing calculator can help estimate your costs.
Storage: Charges are based on the space used and are calculated on a graduated scale and the level of redundancy. For more details, and up-to-date information, see the Data Management section of the Pricing Details article.
Data Transfers: Inbound data transfers to Windows Azure are free. Outbound transfers are charged for the bandwidth use and calculated based on a graduated region-specific scale. For more details, see the Data Transfers section of the Pricing Details article.
How it works:
Backup to Windows Azure Storage is engineered to behave much like a backup device (Disk/Tape). Using the Microsoft Virtual Backup Device Interface (VDI), Windows Azure Blob storage is coded like a "virtual backup device", and the URL format used to access the Blob storage is treated as a device. The main reason for supporting Azure storage as a destination device is to provide a consistent and seamless backup and restore experience, similar to what we have today with disk and tape. When the Backup or restore process is invoked, and the Windows Azure Blob storage is specified using the URL "device type", the engine invokes a VDI client process that is part of this feature. The backup data is sent to the VDI client process, which sends the backup data to Windows Azure Blob storage.
As previously mentioned, the URL is much like a backup device used today, but it is not a physical device, so there are some limitations. For a full list of the supported options, see SQL Server Backup and Restore with Windows Azure Blob Storage Service.
How to use it
To write a backup to Windows Azure Blob storage you must first create a Windows Azure Storage account, create a SQL Server Credential to store storage account authentication information. By using Transact-SQL or SMO you can issue backup and restore commands.
The following Transact-SQL examples illustrate creating a credential, doing a full database backup and restoring the database from the full database backup. For a complete walkthrough of creating a storage account and performing a simple restore, see Tutorial: Getting Started with SQL Server Backup and Restore to Windows Azure Blob Storage Service.
Create a Credential
The following example creates a credential that stores the Windows Azure Storage authentication information.
IF NOT EXISTS
(SELECT * FROM sys.credentials WHERE credential_identity = 'mycredential')
CREATE CREDENTIAL mycredential
WITH IDENTITY = 'mystorageaccount'
,SECRET = '<storage access key>' ;
Backing up a complete database
The following example backs up the AdventureWorks2012 database to the Windows Azure Blob storage service.
BACKUP DATABASE AdventureWorks2012
TO URL = 'https://mystorageaccount.blob.core.windows.net/mycontainer/AdventureWorks2012.bak'
WITH CREDENTIAL = 'mycredential'
,STATS = 5;
Restoring a database
To restore a full database backup, use the following steps.
RESTORE DATABASE AdventureWorks2012 FROM URL =
'https://mystorageaccount.blob.core.windows.net/mycontainer/AdventureWorks2012.bak'
WITH CREDENTIAL = 'mycredential', STATS = 5
- - Note that options like STATS, COMPRESS, FORMAT etc.. can be used or omitted as for any T-SQL BACKUP command.
Resources:
Concepts/Script Examples
Best Practices /Troubleshooting
Getting Started Tutorial
Please send your feedback on the feature and or
documentation to karaman @ Microsoft.com or guybo @ microsoft.com.
- Karthika Raman
Enhancements to SQL Server Backup to Cloud in SQL Server 2012 SP1 CU4
Cumulative Update 4 for SQL Server 2012 Service Pack 1 includes enhancements to improve the SQL Server Backup and Restore to Cloud user experience. The enhancements include performance improvements, cleaning up invalid blobs when backups fail or are interrupted, and PowerShell support.
To request this update, see this knowledgebase article.
Performance improvements include faster return of restore metadata operations. The affected operations include:
- RESTORE HEADERONLY
- RESTORE FILELISTONLY
- RESTORE LABELONLY
Cleaning up invalid blobs after an interrupted or failed backup:
If backup operation fails, it may result in an incomplete or invalid blob.SQL Server Backup to URL process attempts to cleanup cleaning blobs that result from a failed backup. However, if the backup fails due to prolonged or sustained network connectivity failure, backup to URL process may not be able gain access to the blob and the blob may remain orphaned. In such cases, you have to manually release the lease and delete the blob. This topic has the details on how.
PowerShell Support:
This cumulative update also includes PowerShell support for the backup to cloud feature with changes to existing cmdlets and 4 new cmdlets. Following is a brief overview of the changes and sample syntax.
For more information and code examples, see the following topics:
Use PowerShell to Backup Multiple Databases to Windows Azure Blob Storage Service
SQL Server Backup and Restore to Windows Azure Blob Storage Service
Existing cmdlet changes:
The Backup-SqLDatabase, and Restore-SqlDatabase cmdlets have new parameters to support creating a SQL Server backup to or restore from a Windows Azure Storage Container. The following are the new parameters:
BackupContainer:
Using this parameter you can specify the URL of the container as the location for your backup files and let the Backup to URL process generate the file names. Alternatively you can use the BackupFile parameter to specify both the location and the name of the file. You can also use this parameter to set locations for a folder on a disk backup device. This parameter can be useful when backing up multiple databases in a given instance.
SqlCredential:
This parameter allows you to specify the SQL Credential name of object that stores the Windows Azure Storage authentication information.
Sample Syntax:
- This command backs up all databases on the server instance 'Computer\Instance' to the Windows Azure Blob storage container using the BackupContainer parameter.
Get-ChildItem SQLSERVER:\SQL\Computer\Instance\Databases | Backup-SqlDatabase –BackupContainer "https://storageaccountname.blob.core.windows.net/containername" -SqlCredential "SQLCredentialName"
- This command creates a full backup of the database 'MyDB'. It uses the BackupFile parameter to specify the location (URL) and the backup file name. The SqlCredential parameter is used to specify the name of the SQL Server credential.
Backup-SqlDatabase –ServerInstance "Computer\Instance" –Database –"MyDB" -BackupFile "https://storageaccountname.blob.core.windows.net/containername/MyDB.bak" -SqlCredential "SQLCredentialName"
- This command restores the full database 'MyDB' from the file on the Windows Azure Blob storage service to a SQL Server instance.
Restore-SqlDatabase -ServerInstance Computer\Instance -Database MyDB -BackupFile "https://mystorageaccountname.blob.core.windows.net/container/MyDB.bak" -SqlCredential "mySqlCredential"
New cmdlets:
New-SQLCredential
The New-SqlCredential cmdlet creates a new SQL Server Credential object. The SQL Server credential is required when backing up to or restoring from the Windows Azure storage service, and is used to store the Windows Azure storage account name and access key information.
Sample Syntax:
- This command creates SQL Credential "mysqlcredential" on the current instance of SQL Server.
New-SqlCredential – name "mysqlcredential" –Identity "storageAccount" –secret "storageAccessKey"
Set-SqlCredential
You can set the Identity and password properties for a SQL Credential object using this cmdlet. This cmdlet supports the two following modes of operation:
By specifying the path or location of the credential including the credential name using the –path parameter.
By passing a Smo.Credential object to the object using the –InputObject.
Sample Syntax:
- This command sets the identity of MySqlCredential to 'mystorageaccount'.
Set-SqlCredential -Path "SQLSERVER:\SQL\Computer\Instance\Credentials\MySqlCredential" –Identity "mystorageaccount"
- This command retrieves the credential object from the Get-Credential cmdlet and then pipes it to the Set-Sql Credential cmdlet to set the identity of mySqLCrendential to 'mystorageaccount'.
$cred = Get-SqlCredential -Name MySqlCredential
$cred | Set-SqlCredential –Identity "mystorageaccount"
Get-SqlCredential
The Get-SqlCredential returns the SQL credential object. This cmdlet supports the following modes of operation:
By specifying the name of the SQL credential and the path of the instance.
By specifying the name of the SQL Credential and the server object.
Sample Syntax:
- This command returns the credential object.
Get-SqlCredential –Name "mycredential"
Remove-SqlCredential
The Remove-SqlCredential cmdlet deletes a SQL Server credential object. This cmdlet supports the following two modes of operation:
By specifying the path or location of the credential and the credential name using the –path parameter.
By passing a Smo.Credential object to the object using the –InputObject parameter.
Sample Syntax:
- The command retrieves the credential object from the Get-Credential cmdlet and then pipes it to the Remove-Sql Credential cmdlet to delete the SQL Credential 'MySqlCredential'.
$cred = Get-SqlCredential -Name "MySqlCredential"
$cred | Remove-SqlCredential
This blog post is about the changes that were made in the Cumulative Update 4 for SQL Server 2012 SP1 release and assumes some amount of familiarity with SQL Server native backup to cloud functionality released in SQL Server 2012 SP1 CU2. For information on SQL Server Backup and Restore to Cloud, see the following articles:
SQL Server Backup and Restore to Cloud Simplified
Getting Started Tutorial
Popular posts from this blog
[Excel] 문서에 오류가 있는지 확인하는 방법 Excel 문서를 편집하는 도중에 "셀 서식이 너무 많습니다." 메시지가 나오면서 서식을 더 이상 추가할 수 없거나, 문서의 크기가 예상보다 너무 클 때 , 특정 이름이 이미 있다는 메시지가 나오면서 '이름 충돌' 메시지가 계속 나올 때 가 있을 것입니다. 문서에 오류가 있는지 확인하는 방법에 대해서 설명합니다. ※ 문서를 수정하기 전에 수정 과정에서 데이터가 손실될 가능성이 있으므로 백업 본을 하나 만들어 놓습니다. 현상 및 원인 "셀 서식이 너무 많습니다." Excel의 Workbook은 97-2003 버전의 경우 약 4,000개 2007 버전의 경우 약 64,000개 의 서로 다른 셀 서식 조합을 가질 수 있습니다. 셀 서식 조합이라는 것은 글꼴 서식(예- 글꼴 종류, 크기, 기울임, 굵은 글꼴, 밑줄 등)이나 괘선(괘선의 위치, 색상 등), 무늬나 음영, 표시 형식, 맞춤, 셀 보호 등 을 포함합니다. Excel 2007에서는 1,024개의 전역 글꼴 종류를 사용할 수 있고 통합 문서당 512개까지 사용할 수 있습니다. 따라서 셀 서식 조합의 개수 제한을 초과한 경우에는 "셀 서식이 너무 많습니다." 메시지가 발생하는 것입니다. 그러나 대부분의 경우, 사용자가 직접 넣은 서식으로 개수 제한을 초과하는 경우는 드뭅니다. 셀 서식이 개수 제한을 넘도록 자동으로 서식을 추가해 주는 Laroux나 Pldt 같은 매크로 바이러스 에 감염이 되었거나, 매크로 바이러스에 감염이 되었던 문서의 시트를 [시트 이동/복사]하여 가져온 경우 시트의 서식, 스타일이 옮겨와 문제가 될 수 있습니다. "셀 서식이 너무 많습니다." 메시지가 발생하지 않도록 하기 위한 예방법 글꼴(종류, 크기, 색, 굵기, 기울임, 밑줄), 셀 채우기 색, 행 높이, 열 너비, 테두리(선 종류, ...
Announcing the AdventureWorks OData Feed sample
Update – Removing Built-in Applications from Windows 8 In October last year I published a script that is designed to remove the built-in Windows 8 applications when creating a Windows 8 image. After a reading some of the comments in that blog post I decided to create a new version of the script that is simpler to use. The new script removes the need to know the full name for the app and the different names for each architecture. I am sure you will agree that this name - Microsoft.Bing – is much easier to manage than this - Microsoft.Bing_1.2.0.137_x86__8wekyb3d8bbwe. The script below takes a simple list of Apps and then removes the provisioned package and the package that is installed for the Administrator. To adjust the script for your requirements simply update the $AppList comma separated list to include the Apps you want to remove. $AppsList = "Microsoft.Bing" , "Microsoft.BingFinance" , "Microsoft.BingMaps" , "Microsoft.Bing...
How to control your World with Intune MDM, MAM (APP) and Graph API
VSS yedekleme testi nasıl yapılır Exchange üzerinde bulunan verilerin yedeklenmesi (backup) ve geri yüklenmesi (restore) baslibasina çok önemli bir konudur. Bir yedegin saglikli alinmasi kadar restore isleminin basarili bir biçimde yapilabilmesi de test edilmesi gereken önemli bir islem. Exchange destegi olan (aware) diye adlandirdigimiz yazilimlar exchange writer'lari kullanarak VSS teknolojisi ile yedek alirlar. Yedekleme esnasinda karsilasilan sorunlarin büyük bölümünün nedeni, yazilimlarin uyumsuzlugu ya da bu yazilimlardaki yanlis bir ayar olabilmektedir. Bunun tespiti için, yani yedek alma sirasinda sorunun VSS Writer'dan mi, disk sisteminden mi ve/veya yedekleme yazilimindan mi kaynaklandigini anlayabilmek için Betest aracini kullanabilirsiniz. BETEST, Windows SDK yada Volume Shadow Copy Service SDK 7.2 (sonraki versiyonlarda mevcut) içerisinde bulunan yardimci bir araçtir. Araci kolaylikla bulabilir ve kurabilirsiniz. Kurulum islemini exchange sunucunuz...


Comments
Post a Comment