Skip to main content
Command option update
AD RMS to AD RMS to Azure Information Protection Part 1
The Scenario:
So, you have read my previous blog posts about AD RMS side-by-side migration and Enterprise Migration from AD RMS to AIP using SCCM but unfortunately both of those articles assume best case scenario for the original AD RMS cluster. Sadly, that is not always the way things work. In the real world, the AD RMS instance may have been initially installed on Windows Server 2003 using RMS 1.0 and was subsequently upgraded to 2008 R2 keeping all of the settings pretty much the same. This usually means using http only and having no CNAMEs for AD RMS or SQL. This makes my happy articles on upgrading to newer versions of AD RMS or to AIP a lot less straightforward. Let's fix that.
The Setup:
Luckily, most of the concepts for migration are the same as what I documented in the previous two articles, so I am going to happily plagerize reuse the content in those articles to make something new. This article should be a bit more useful for poor AD RMS admins that find themselves inheriting systems that have been around for far longer than the best practices guidelines have been. For this process, we will assume the near worst case (I know things can be more complicated with HSMs and 3rd party stuff) of an AD RMS 2008 (R2) cluster using http only for the pipelines and SCP. To get from this situation to AIP, you will have to do a 2-step upgrade. First, you will need to migrate to a new AD RMS cluster that has https pipelines. Along with this you will need to import the TPD from the old cluster into the new and set up licensing redirection for all clients. This is where the SCCM scripts from my AD RMS to AIP article come in handy. We will modify those to point to the new cluster and let SCCM compliance settings work it's magic to get us past the first stage. Once you are on a shiny new AD RMS 2012 R2 or 2016 cluster, you can follow the other article to do the second stage. So without further ado:
For this demo, we will assume an original AD RMS cluster with the following settings:
Windows Server 2008 R2 with AD RMS role installed (we will also assume the use of a Windows Internal Database but that is irrelevant to this migration)
Host A record of RMS01.contoso.com
SCP registered in Active Directory of https://rms01.contoso.com/\_wmcs/certification
The Solution:
The Old Cluster:
The very first thing you will want to do is export your TPD from the original cluster. It is wise to take a backup of the database as well since we will be shutting down the cluster eventually, but the TPD is the main thing that you need.
If you know how to export a TPD, do that. Otherwise, follow along with the content below and I will show you how!
Log into the existing AD RMS server ad a member of the AD RMS Enterprise Admins local group (not related to the AD Enterprise Admins group) and click on the Start Menu > Administrative Tools > Active Directory Rights Management Services. 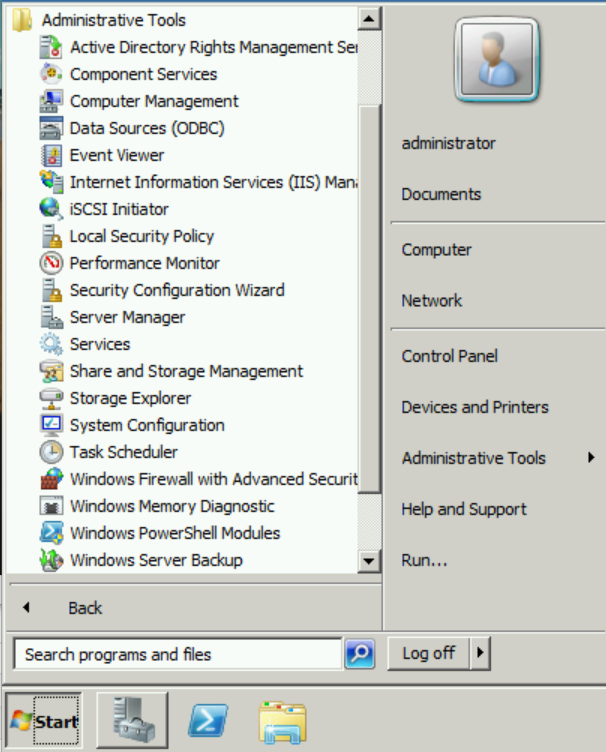
In the AD RMS console, expand <server>, Trust Policies, Trusted Publishing Domains and in the Actions pane, click Export Trusted Publishing Domain... 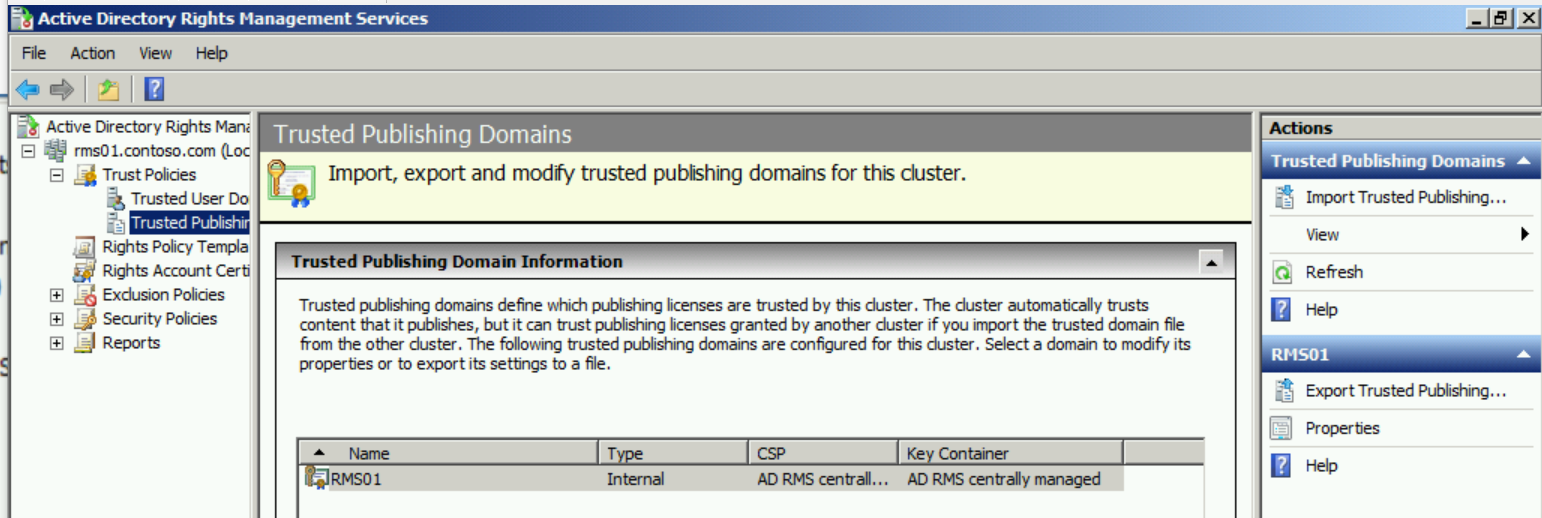
Save the TPD in a location that the RMS Service Account has access to Write (eg. C:\Windows\Temp) and give it a strong password 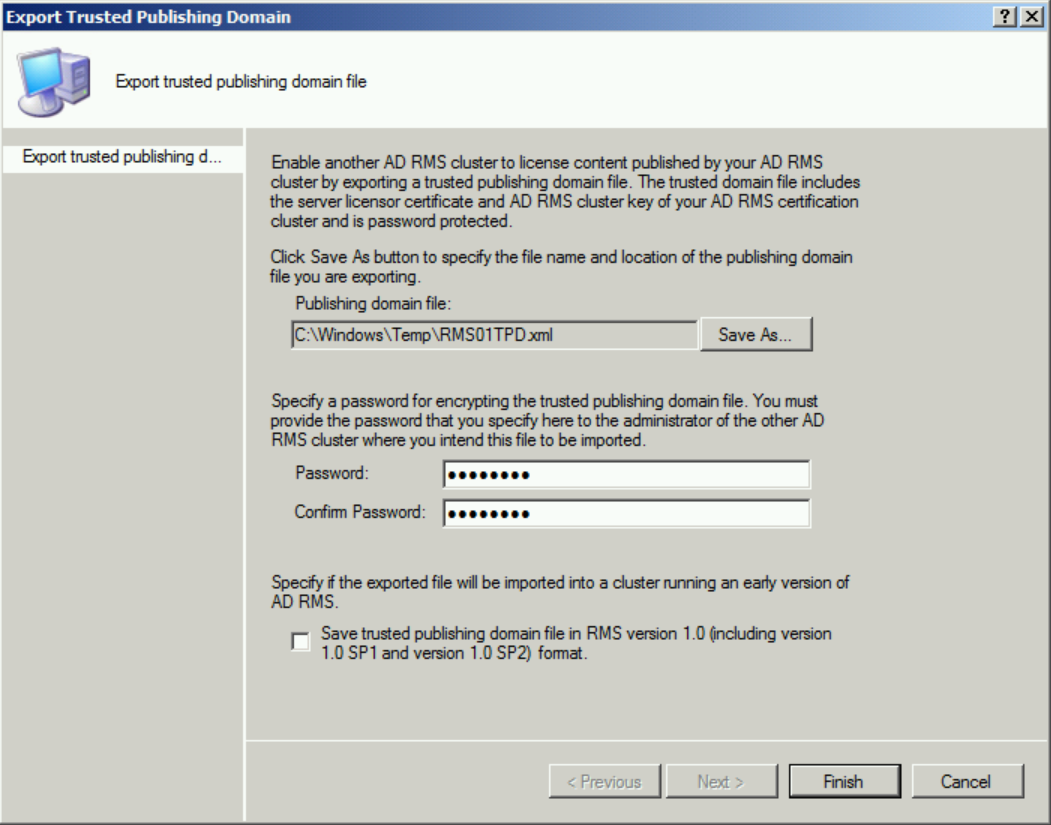
And that is the last thing you will do with your old RMS cluster until you are ready to shut it off. ;-)
The New Cluster:
So, the new AD RMS cluster is technically temporary because you are just using it to transition to the cloud. However, I highly recommend setting the cluster up as if it will be in production for a year or two just in case. I have seen AD RMS to AIP migrations take multiple years in some cases due to processes, moratorium periods, and unforeseen setbacks, so setting it up based on production best practices is just a good idea. Hopefully everything will go smoothly, but just in case.....here is the link to the best practices for setting up an AD RMS cluster.
https://aka.ms/ADRMSBestPractices
So, since the new cluster will be set up via best practices, we need to create 2 CNAME or A records in DNS pointing to the new host (I am only using 1 node for the cluster, but in production these records would point to a load balancer which forwards the traffic to the nodes).
If you already know how to create these records, do that, or follow along below for a nauseatingly detailed walkthrough. :-)
Log into a DNS server and in Server Manager click Tools > DNS 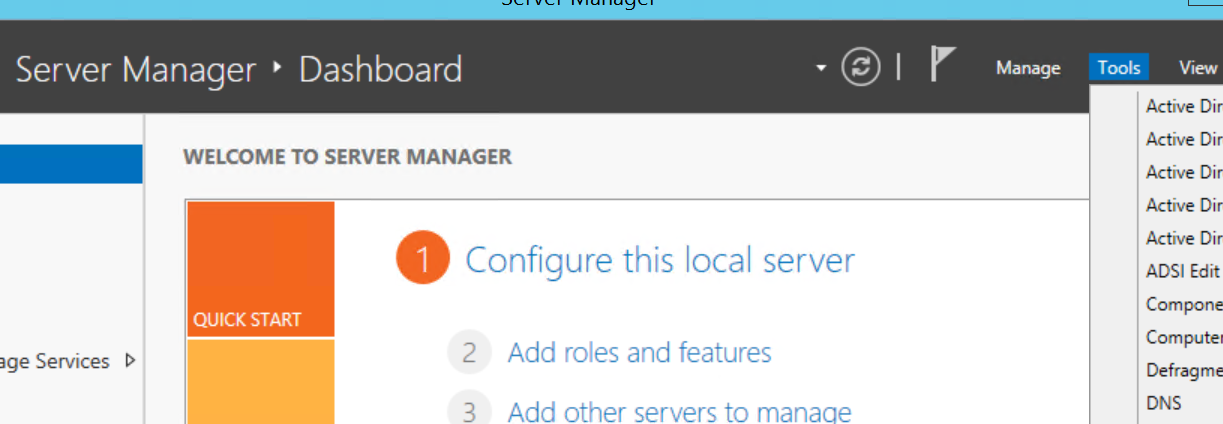
In the DNS console, expand <server>, Forward Lookup Zones, yourdomain.tld and right-click in the zone to create a New Host (A or AAAA)... or New Alias (CNAME)... 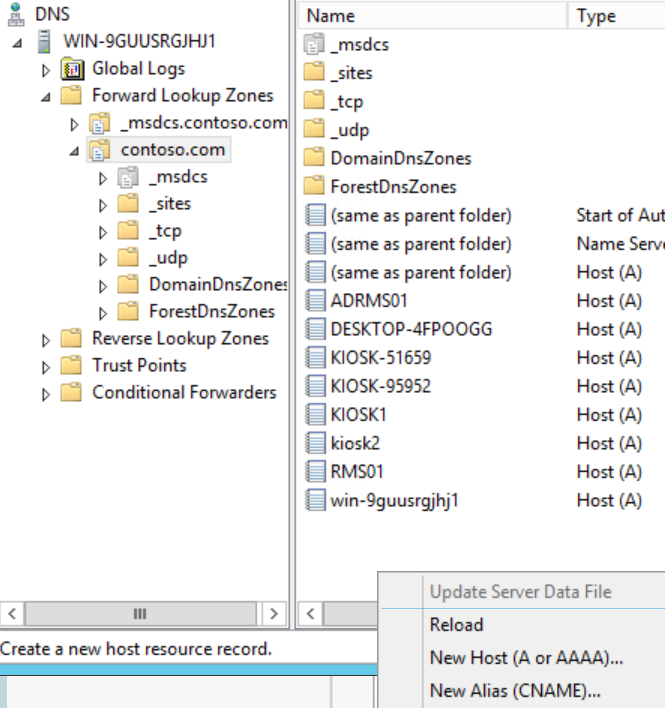
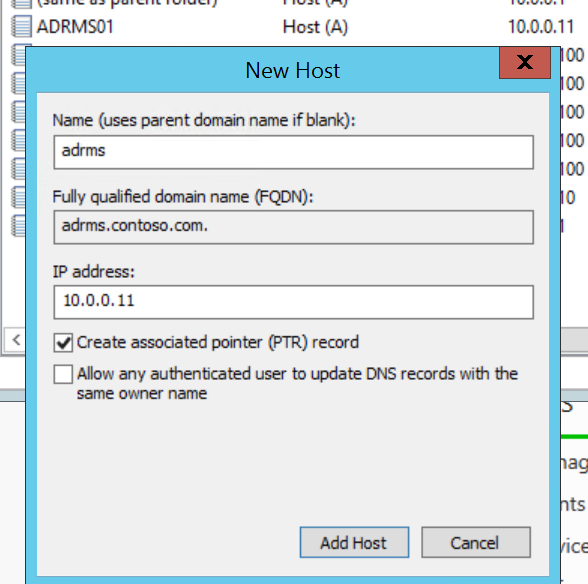
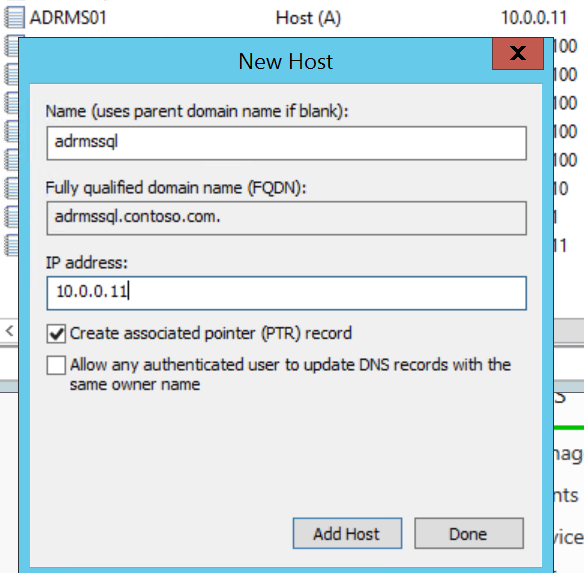
For my demo environment, I am creating New Host (A) records for adrms and adrmssql pointing to the ADRMS01 system that will be my AD RMS server and has SQL Server 2014 installed.
Now that we have that out of the way, we can log into the new AD RMS server and knock out the installation.
Bypassing the SCP
Log into the new AD RMS server and open Regedit. We need to set the GICURL registry key so installation will allow us to install a new root cluster despite the SCP present in AD.
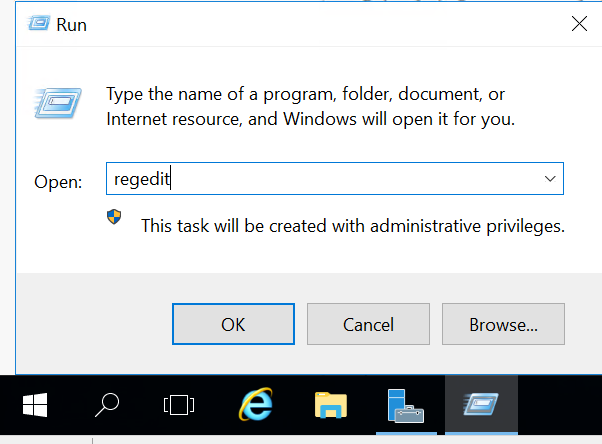
Navigate to HKEY_LOCAL_MACHINE\SOFTWARE\Microsoft\DRMS (It likely will not exist, so create a new key under Microsoft named DRMS)
In the DRMS key, create a new String Value named (you guessed it) GICURL
Do not enter a value 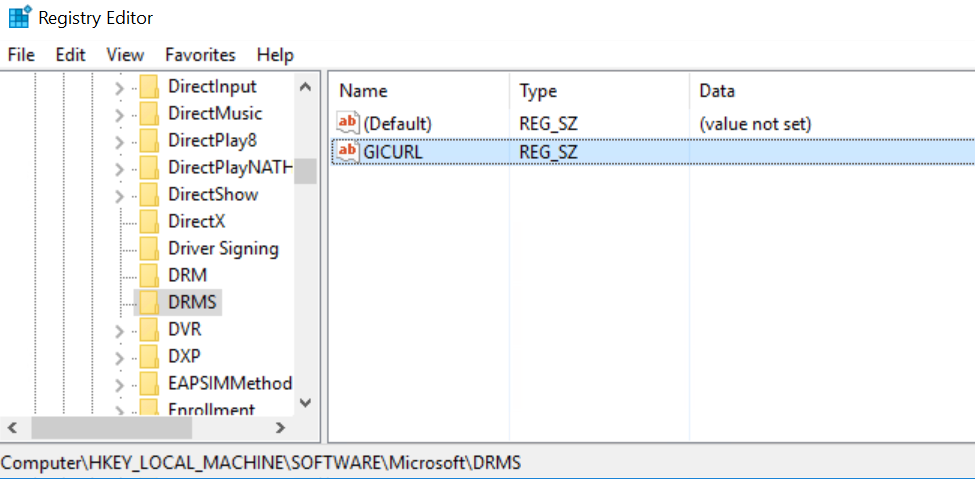
Close Regedit
Installing AD RMS
Again, if you know how to install AD RMS, you may do so now on the new server. Just remember not to register the SCP at the end since there already is one and it will cause your install to fail. If you really like screenshots (I do!), follow along below to see dozens of them that will walk you through a full AD RMS 2016 install.
On the new AD RMS server, launch Server Manager and click Manage > Add Roles and Features 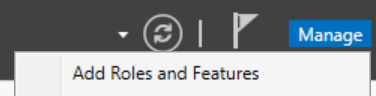
Click next 3 times to get to the Server Roles page and click on Active Directory Rights Management Services. When the Additional Features dialog pops up, click Add Features 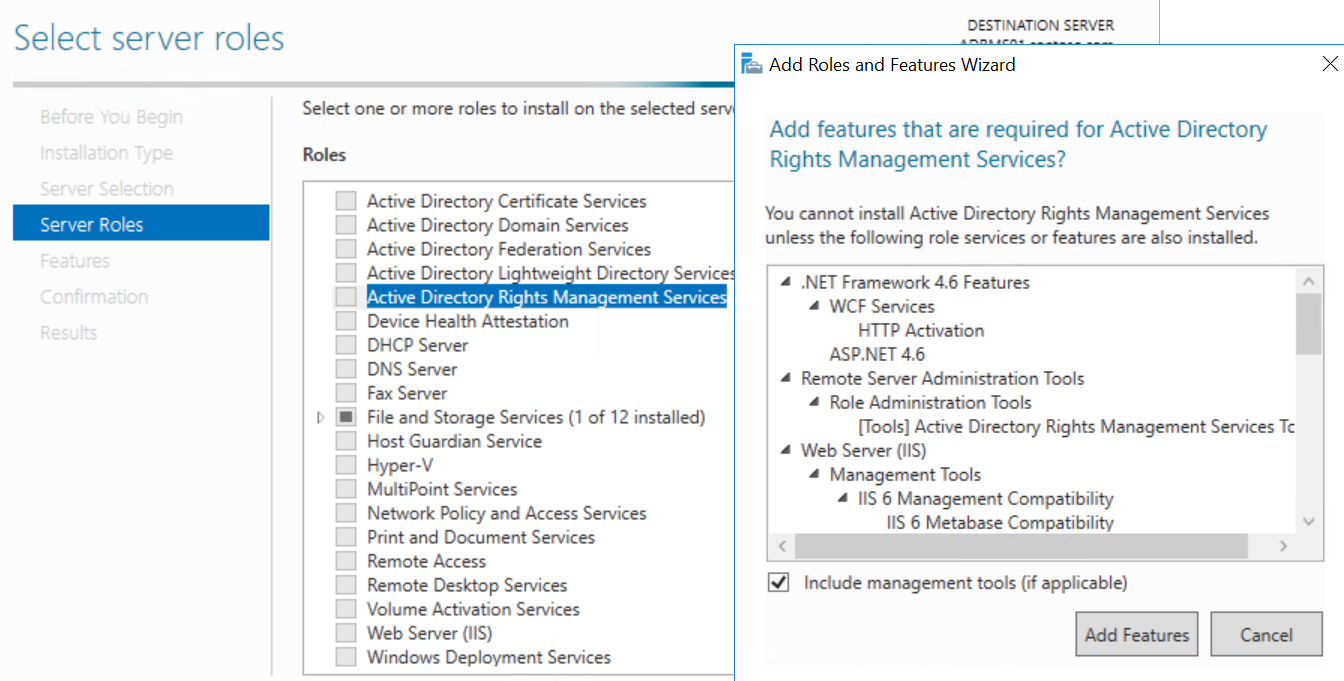
Click Next until you get to the Confirmation page, then click Install 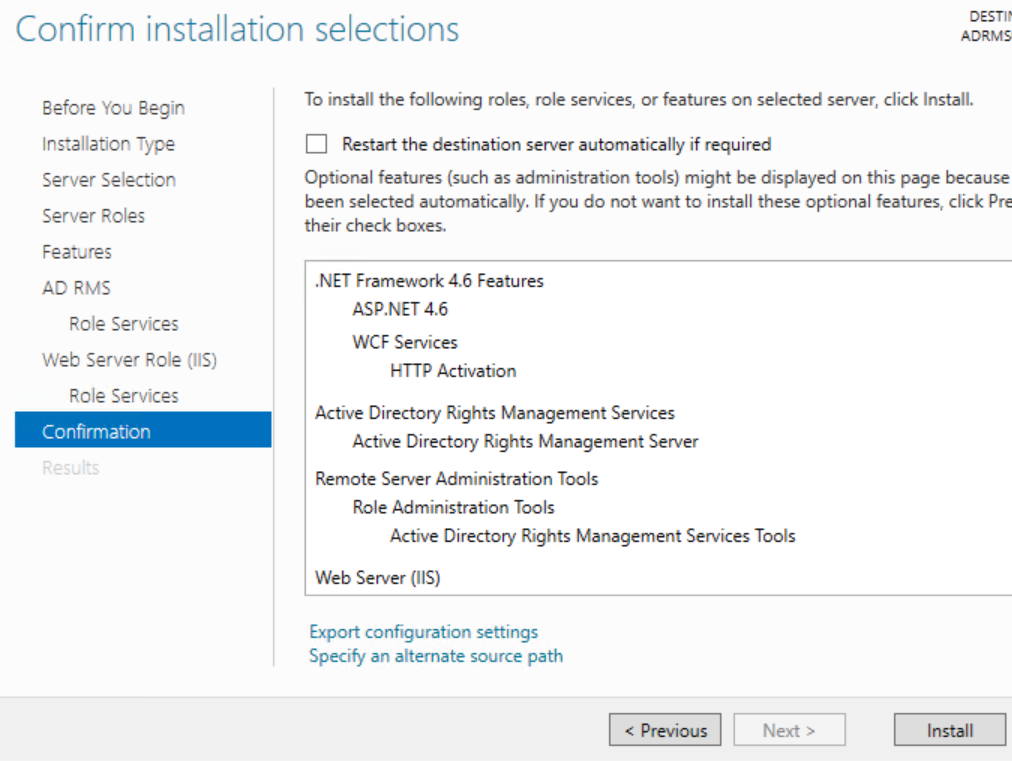
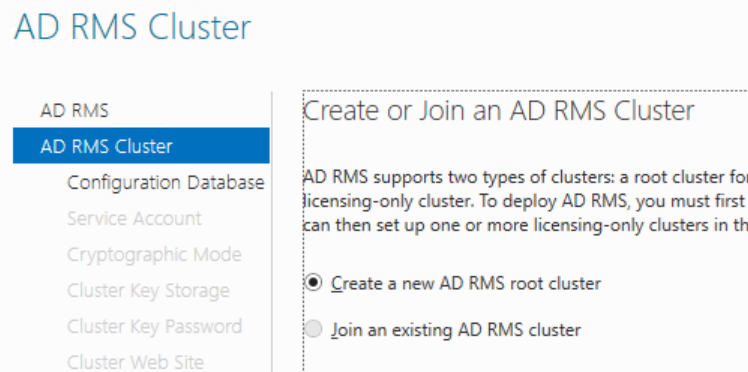
After the installation completes, click the blue link to Perform additional configuration 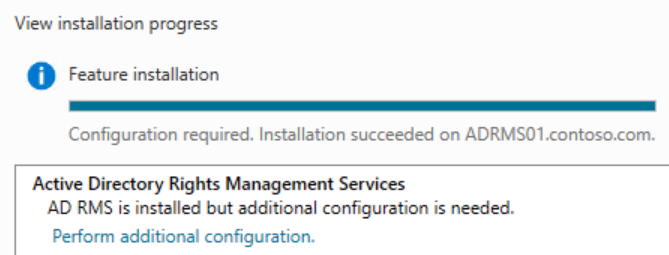
Click Next on the intro page and verify that Create a new AD RMS root cluster is selected on the AD RMS Cluster page. (If this is greyed out, make sure the GICURL registry key is set correctly)
On the Configuration Database page, type the name of the A record or CNAME you created for the SQL database and click List 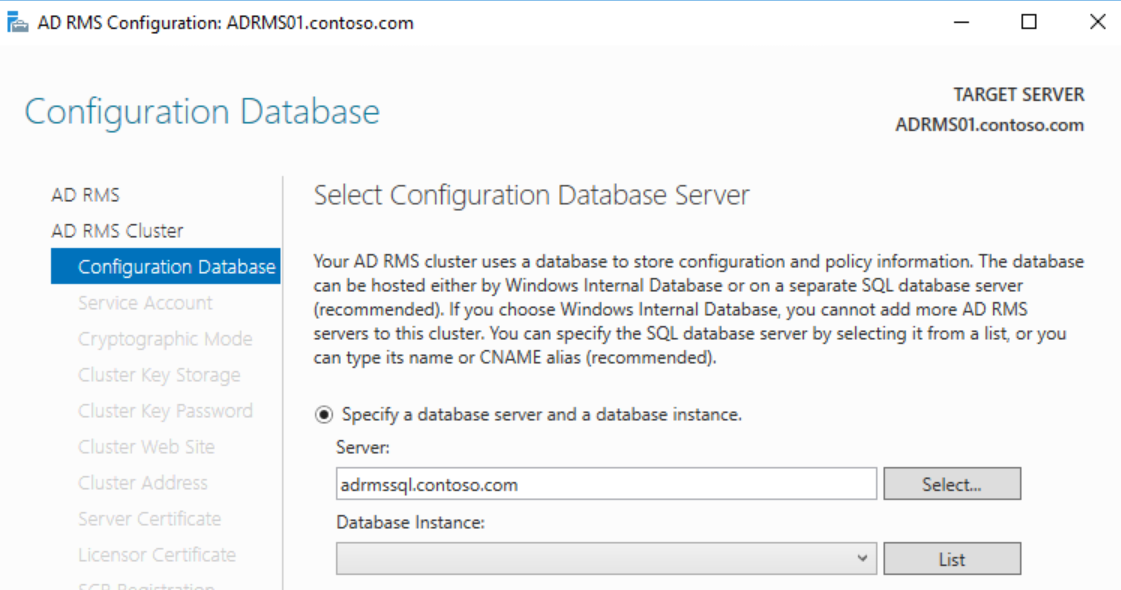
In the drop-down, select the database instance or DefaultInstance and click Next 
On the Service Account page, enter the service account credentials and click Next 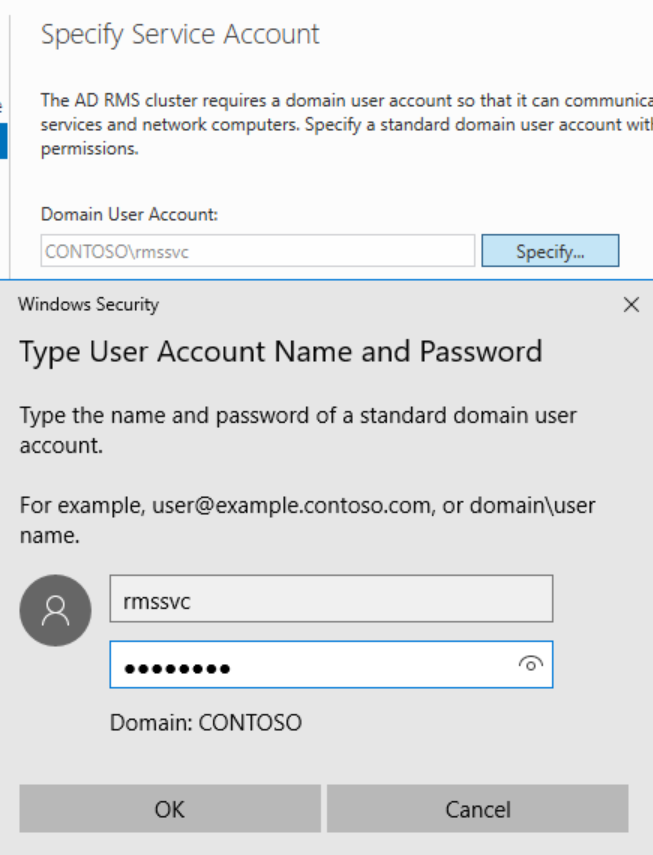
Choose a Cryptographic Mode (leave default unless you have legacy operating systems) and click Next 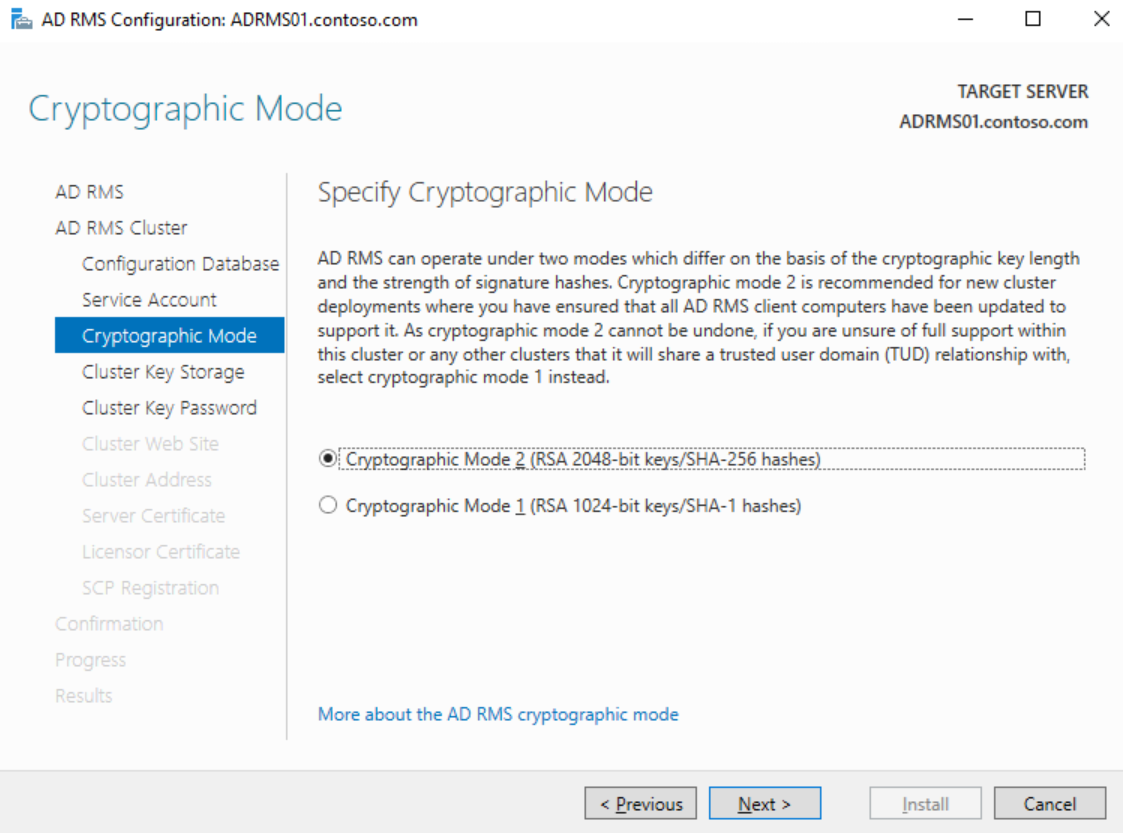
Click Next on the Cluster Key Storage page and click Next 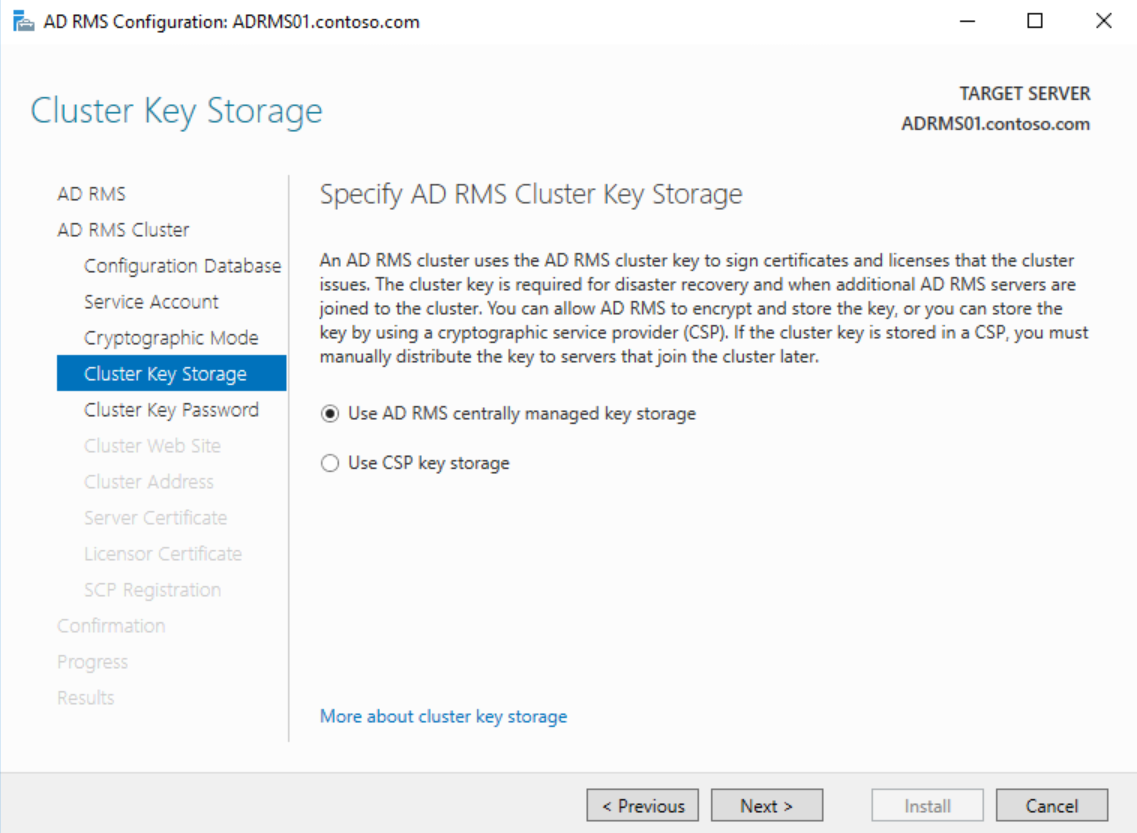
Enter a secure password on the Cluster Key Password page and click Next 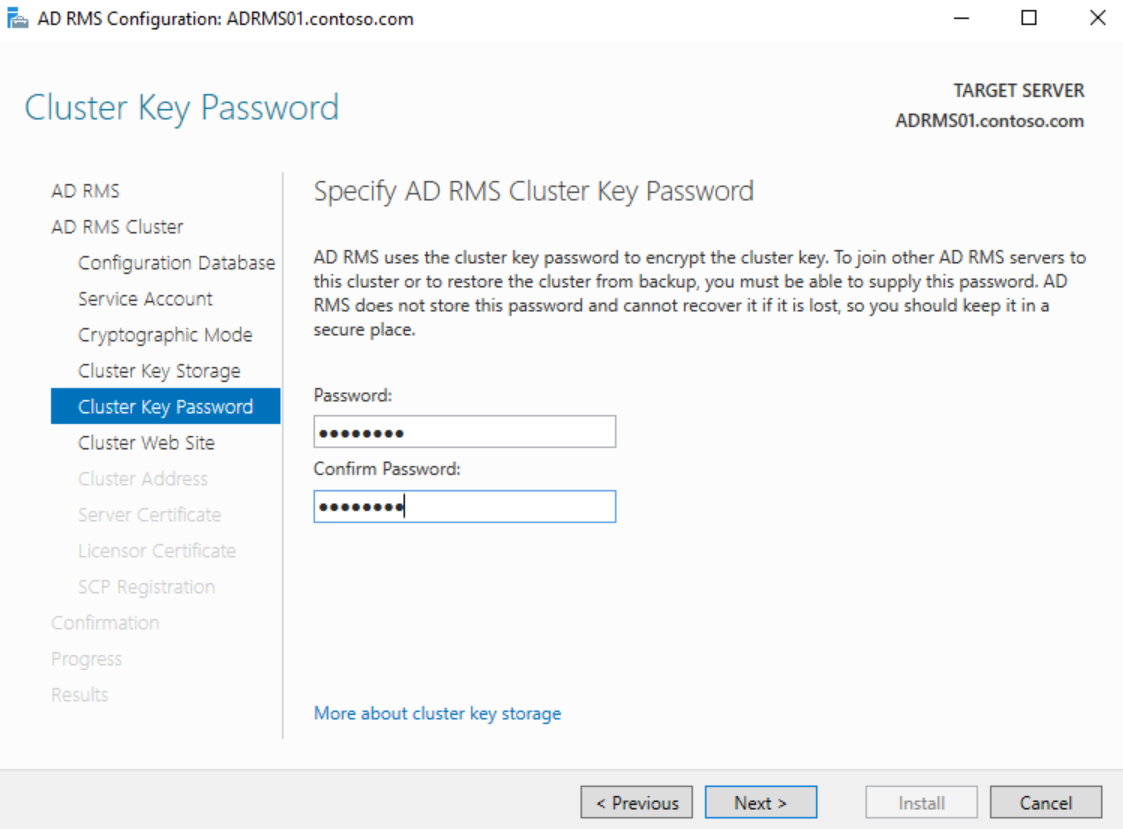
Choose the AD RMS website and click Next 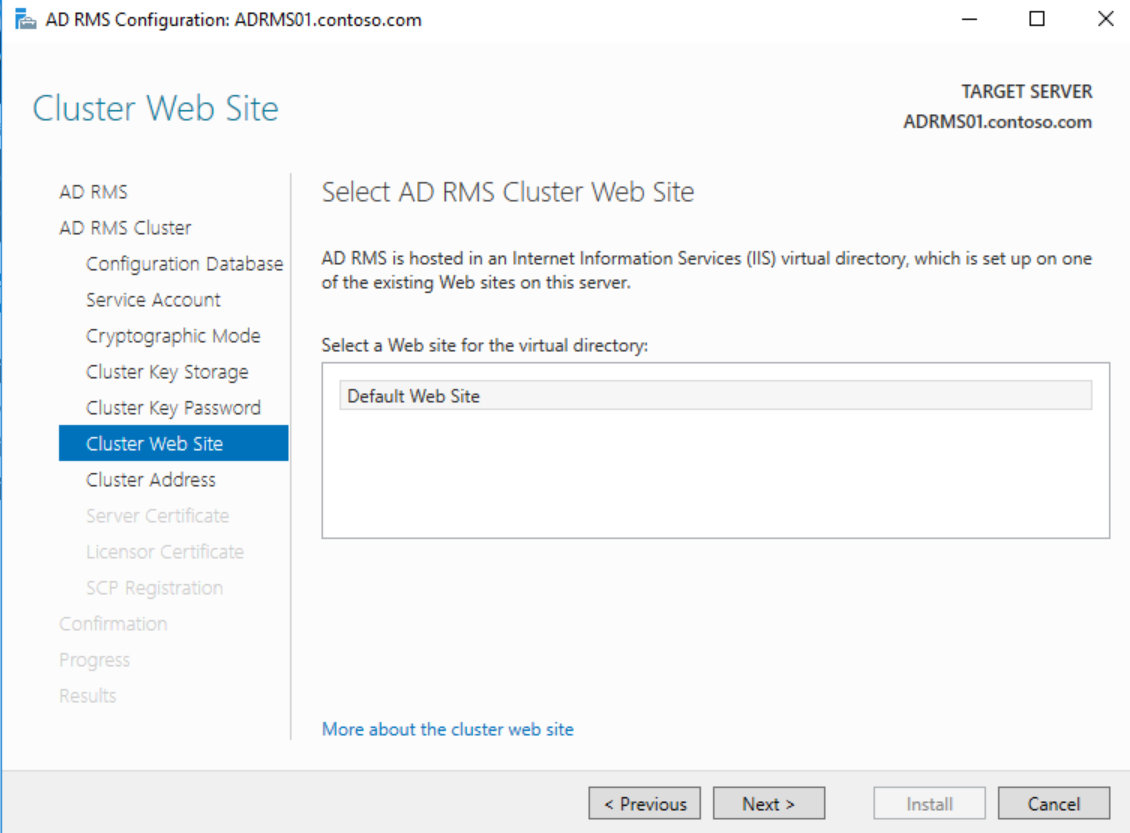
On the Cluster Address page, enter the FQDN of the A record or CNAME for the cluster and ensure that SSL is selected, then click Next 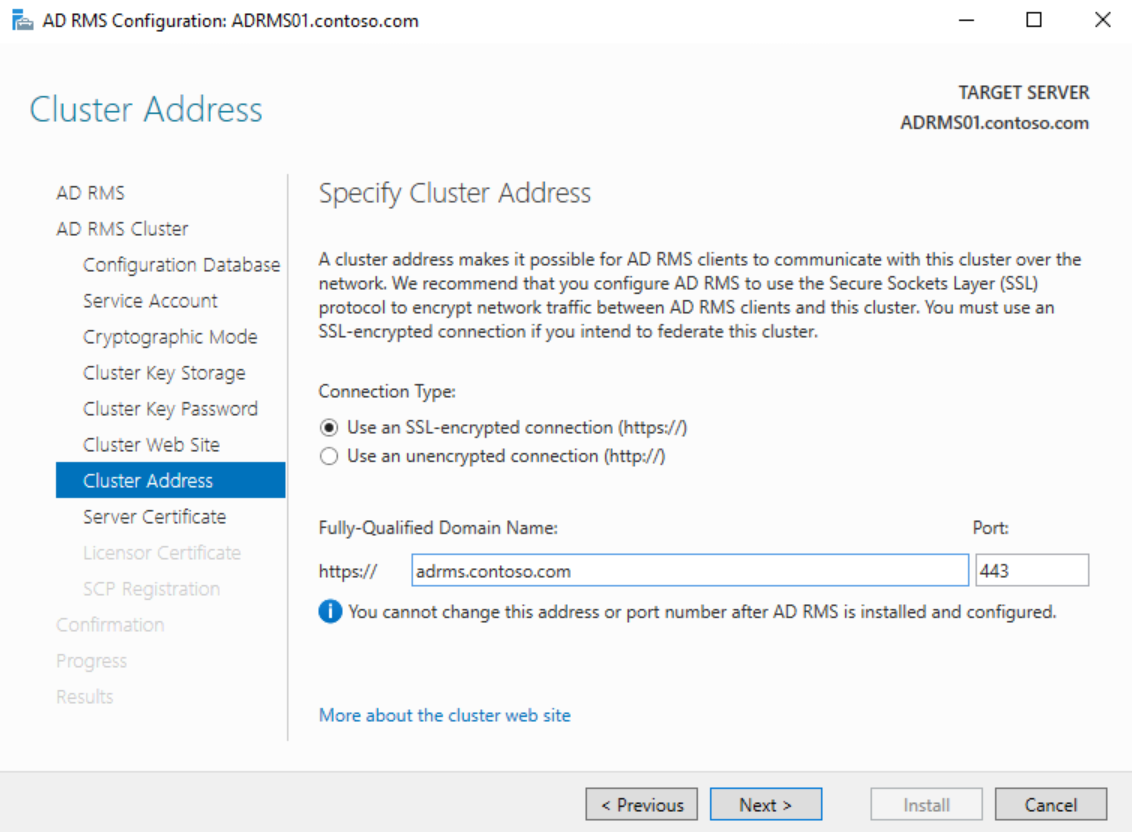
If you have a certificate for the cluster FQDN installed on the server choose it on the Server Certificate page or select Choose a certificate for SSL encryption later and click Next 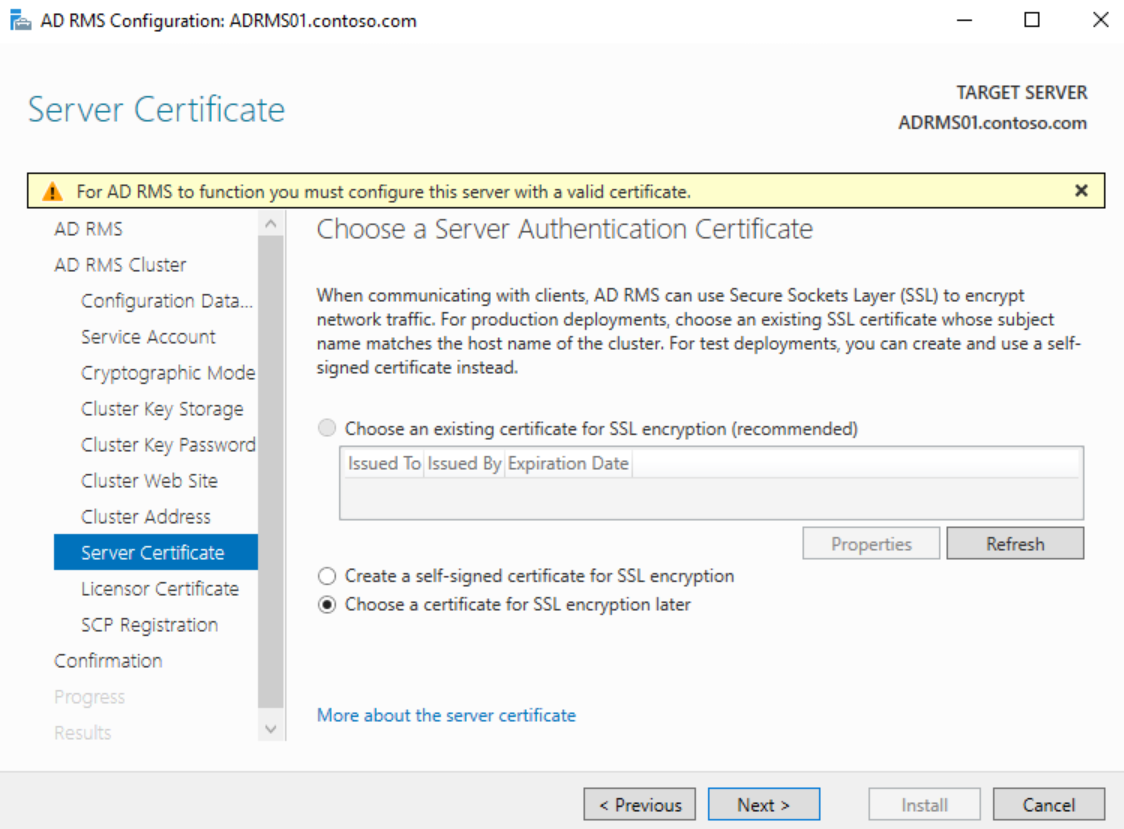
Choose a meaningful name for the SLC on the Licensor Certificate page and click Next 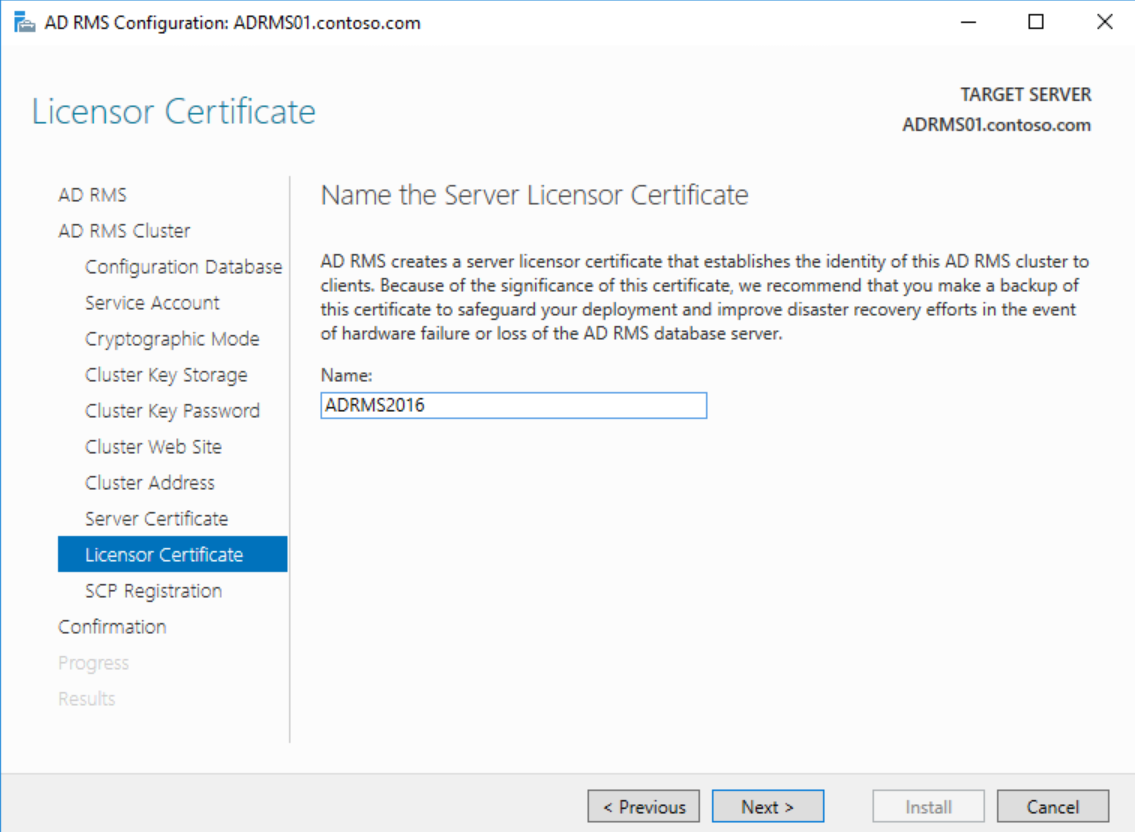
On the SCP Registration page, choose to Register the SCP later and click Next 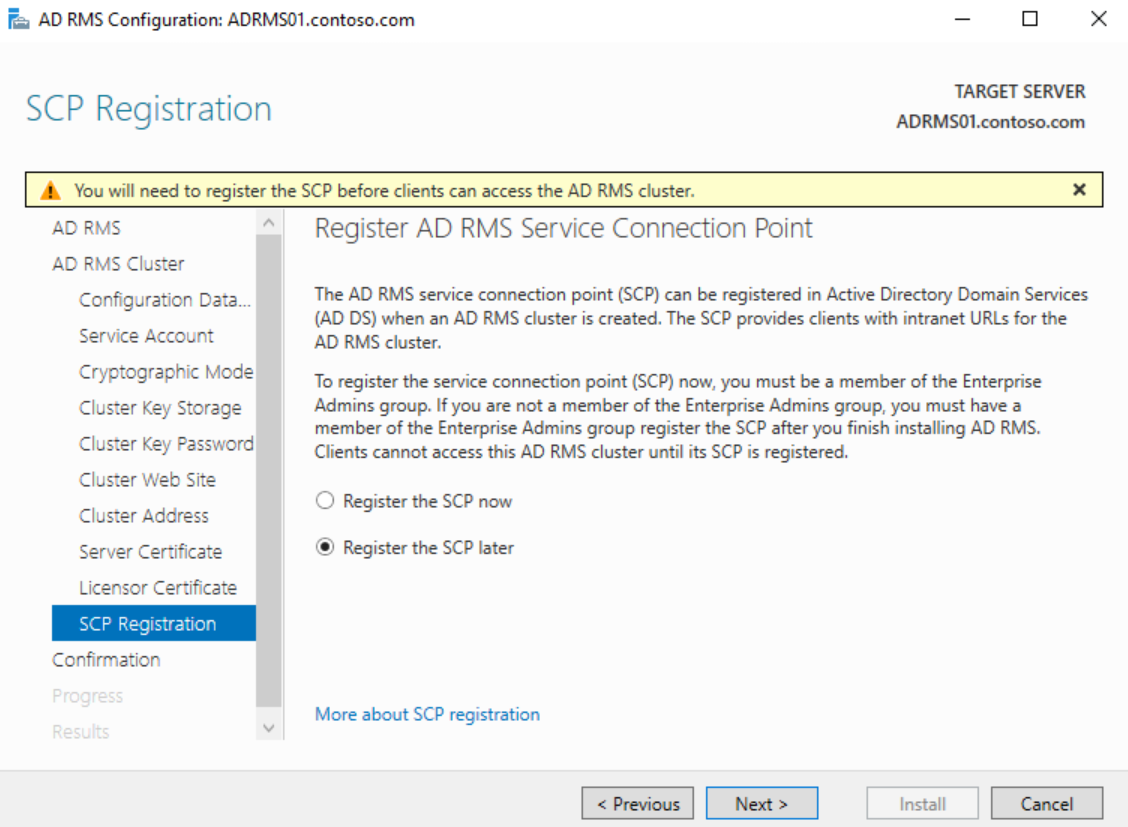
Verify all of the settings on the Confirmation page and click Install 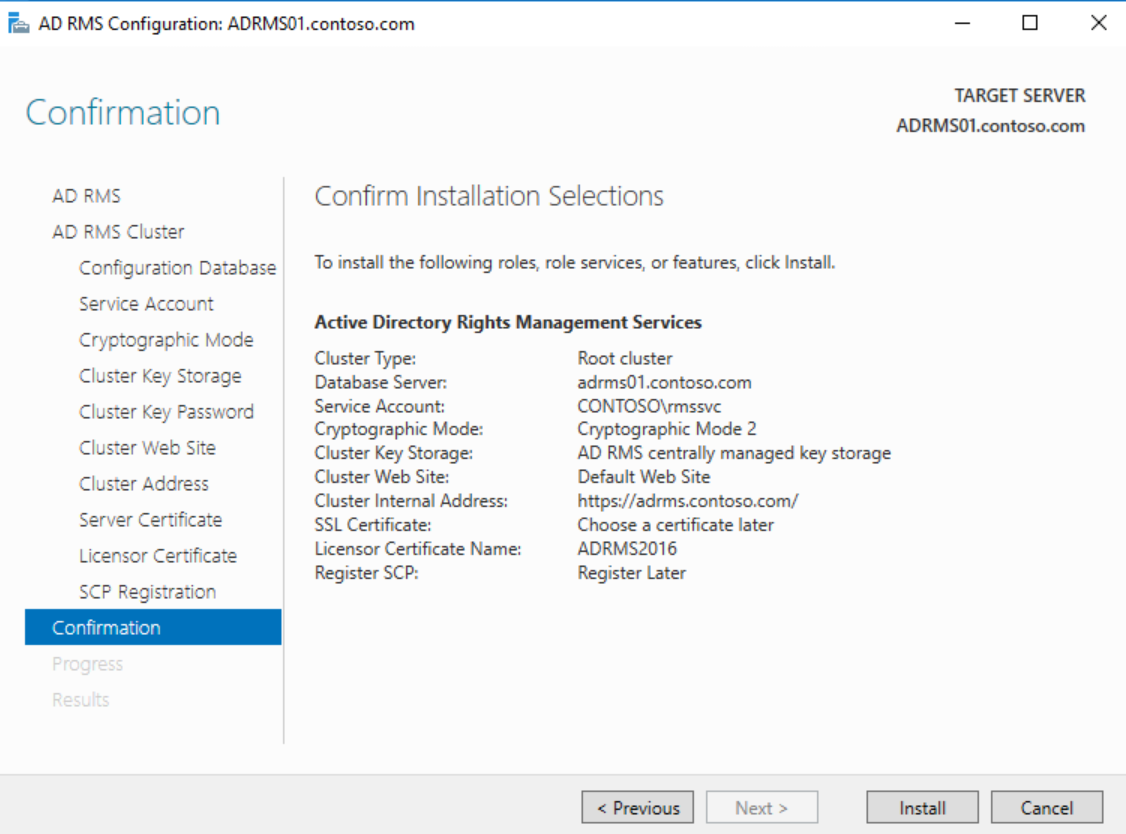
After installation completes, you must log off and back on to add your account to the AD RMS Enterprise Admins local group membership. You will not be able to launch the console until you do this and you will see 401 Unauthorized errors.
If you did not configure a certificate during the install, obtain a certificate from your Certificate Authority for the FQDN of the AD RMS cluster name and install it on the server. Next launch Server Manager and click on Tools > Internet Information Services (IIS) Manager 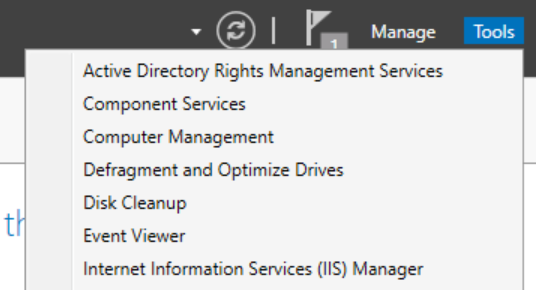
Expand <server>, Sites, and click on the AD RMS website 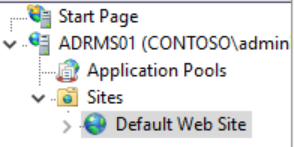
In the Actions pane on the right, under Edit Site, click Bindings 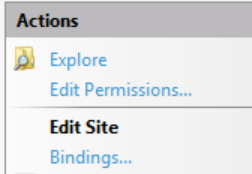
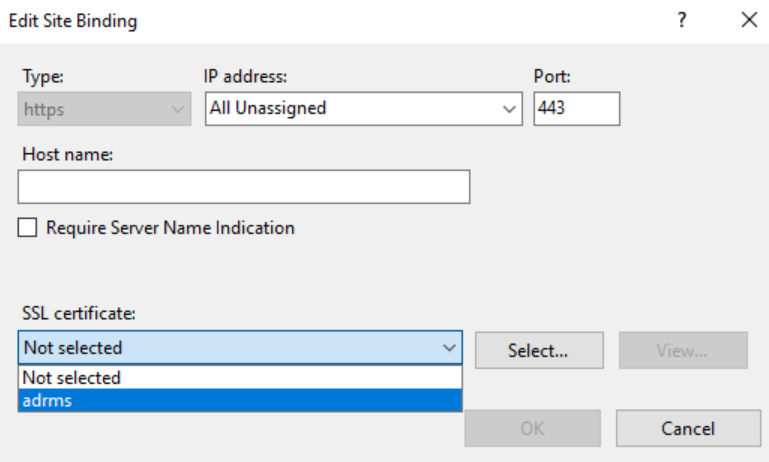
Click on https and click Edit... 
In the Edit Site Binding dialog, choose the installed AD RMS certificate and click OK and Close to bind the certificate
To finalize the certificate binding, Launch an Administrative Command Prompt and type IISReset and hit Enter 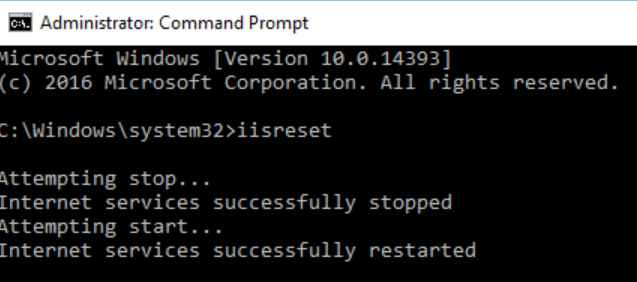
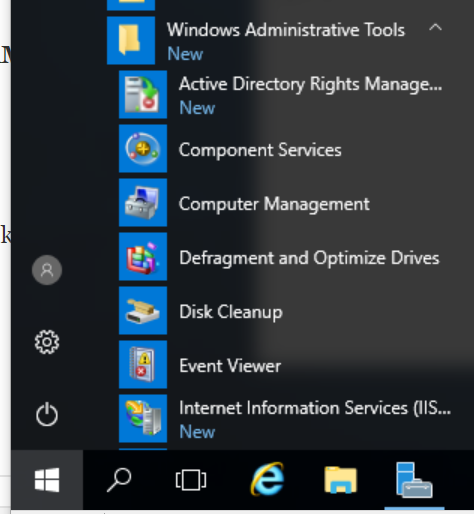
After you have completed this, click on the Start Menu > Windows Administrative Tools > Active Directory Rights Management Services to launch the AD RMS Console.
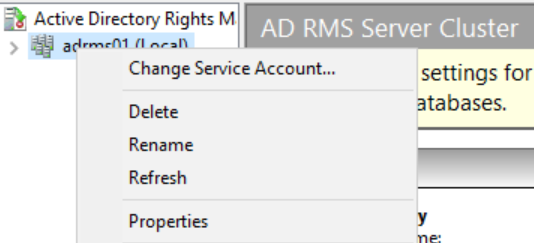
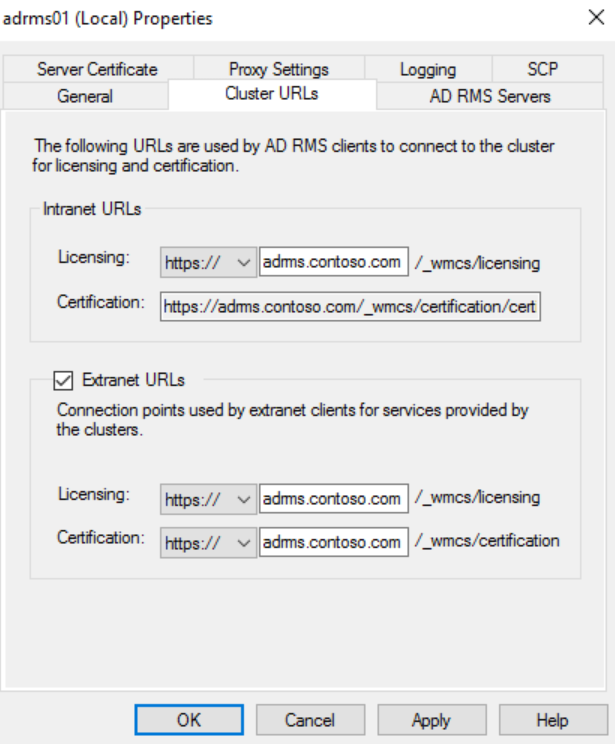
Once logged into the console, right-click on the server name and click Properties.
Click on the Cluster URLs tab and copy the cluster FQDN from the licensing URL.
Check the box next to Extranet URLs and paste the copied value into both boxes.
Change the protocol from http to https for both pipelines. The completed tab should look similar to the screenshot below.
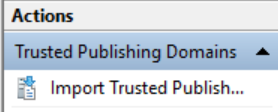
Close the properties dialog and expand <servername>, Trust Policies, and click on Trusted Publishing Domains.
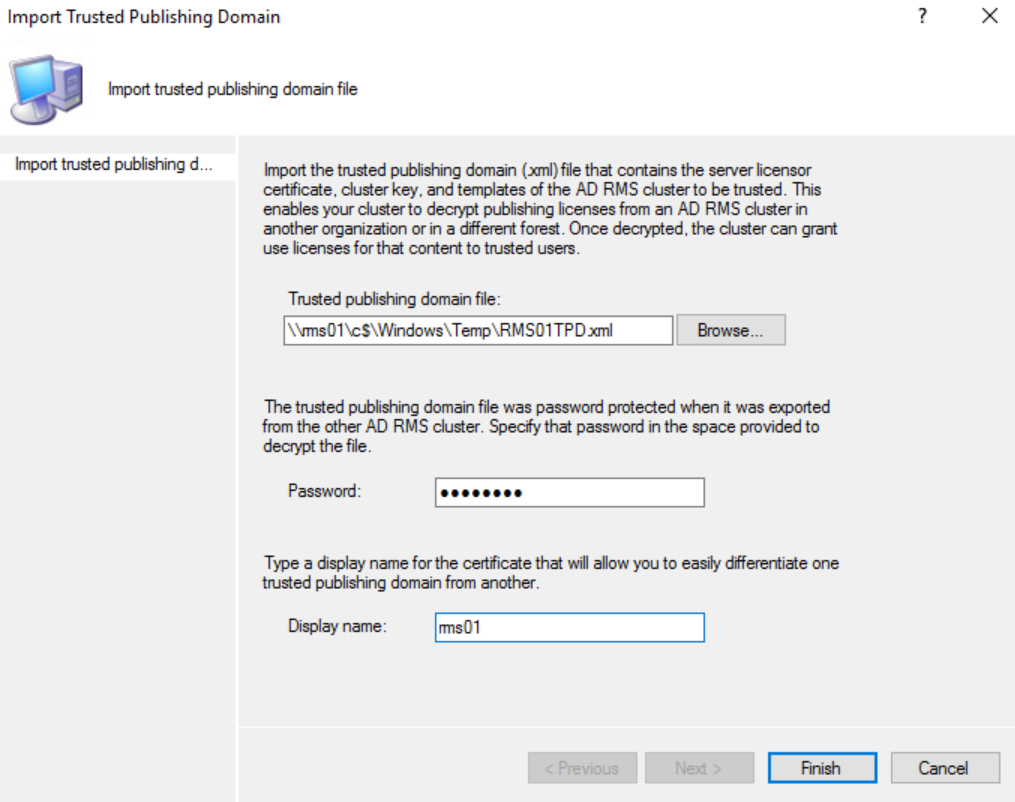
In the Trusted Publishing Domains section, under the Actions pane, click on Import Trusted Publishing Domain.
In the Import Trusted Publishing Domain dialog, browse to the exported TPD and enter the password and a name for the old server TPD and click Finish.
The Install is now complete and you have a fully functional AD RMS cluster that can open content protected with the old cluster. You still need to put in redirection keys for the clients, but that is where SCCM Compliance Settings comes in. This is also where my copy and paste kicks into high gear! In the upcoming blog post I will modify my scripts to allow SCCM Compliance Settings to redirect clients to the new AD RMS server rather than Azure Information Protection. Stay tuned and I will remove this text once it is up.
AD RMS to Azure Information Protection: Enterprise Client Migration using SCCM Compliance Settings
The Scenario:
Your management has just renewed their Microsoft Enterprise Agreement and bought a shiny new Office 365 E3 (or E5/EM+S/etc) and have been told wonderful things about how Azure Information Protection can enable them to securely collaborate with partners in the cloud. They want this implemented yesterday (of course) so they can start sending protected messages to all their fellow CxOs that have recently made the move to Azure as well. OK, no problem. So you follow the documented migration steps and find that migrating the server portion is going to be a piece of cake. Then you notice what is needed for the client migration. The documentation for the client migration requires a few scripts on each client, and one of the scripts must be run with administrative rights to allow modification of HKLM registry entries. This presents a problem. In keeping with Microsoft's posture on Securing Privileged Access, you have removed users from the local administrators group on their assets. Additionally, you do not want to expose privileged credentials to every endpoint. So how can you manage the client side of this migration?
The Solution:
I recently ran into this scenario at a customer site when assisting with a migration from AD RMS to Azure Information Protection. Trying to figure out the best way to do this without compromising security and with the least possible impact on end users proved to be very challenging indeed. Luckily, I stumbled across something that works.
System Center Configuration Manager to the rescue! I found the answer in SCCM Compliance Settings. When researching this issue, I came across an article by one of my teammates, Russ Rimmerman, about using SCCM Compliance Settings to work with PKI certificates. I wanted to make sure that it would be possible to do both the elevated portions and user level portions of the script provided in the migration article so I ended up reaching out to another senior SCCM resource on my team, Ray Rosen. With his help, I designed the SCCM compliance settings using four PowerShell scripts to handle the detection and remediation for both the system and user portions of the migration. I am going to walk through this process below for your benefit.
Prerequisites:
System Center Configuration Manager 2012 or above
All clients must have properly communicating SCCM client agents
For Office 2010, the RMS Sharing Application and Azure Information Protection Client should be installed (the Beta Azure IP Client can be used inplace of both)
For Office 2013+, the Azure IP Client should be installed
Client Migration using SCCM Compliance Settings:
As I mentioned earlier, this will be done using PowerShell scripts executed using SCCM Compliance settings. For SCCM, you have two options for running PowerShell scripts on clients. The first option is to sign the script with a trusted certificate. While this is the best option, it is not always possible. Thus, the second option is to set the PowerShell execution policy to "Bypass". In this example, I won't be signing the PowerShell scripts, so I will go into Administration->Client Settings and select the Client Settings that are being applied to the collection I want to migrate. This may be the default client settings or custom client settings depending on where you want to deploy the scripts. Go into the "Computer Agent" section of the client settings, and set the PowerShell execution policy to "Bypass". This allows unsigned PowerShell scripts to execute when run by the Computer Agent.

***UPDATE***
I have added scripts to the package below that include the premigration settings added to the batch scripts at docs.microsoft.com. These premigration scripts can be used to roll out Azure IP in a phased manner. These scripts are used in the same fashion as described below but in a separate Compliance Settings package targeting users that are not yet migrated to AIP.
***
For the next section, you will need the PowerShell scripts I created for discovery and remediation. I have posted these at https://aka.ms/AzureIPSCCMScripts. Download the zip file and extract the for PowerShell scripts.
***IMPORTANT***
Open each of the PowerShell scripts and modify them to add your AD RMS Server Name/FQDN and Azure IP GUID. Read through each of the scripts so you understand what each of them does. I have tried to document them as much as possible so they will be easy to follow. Once you have added the appropriate data in each file, save them and we will use them below.
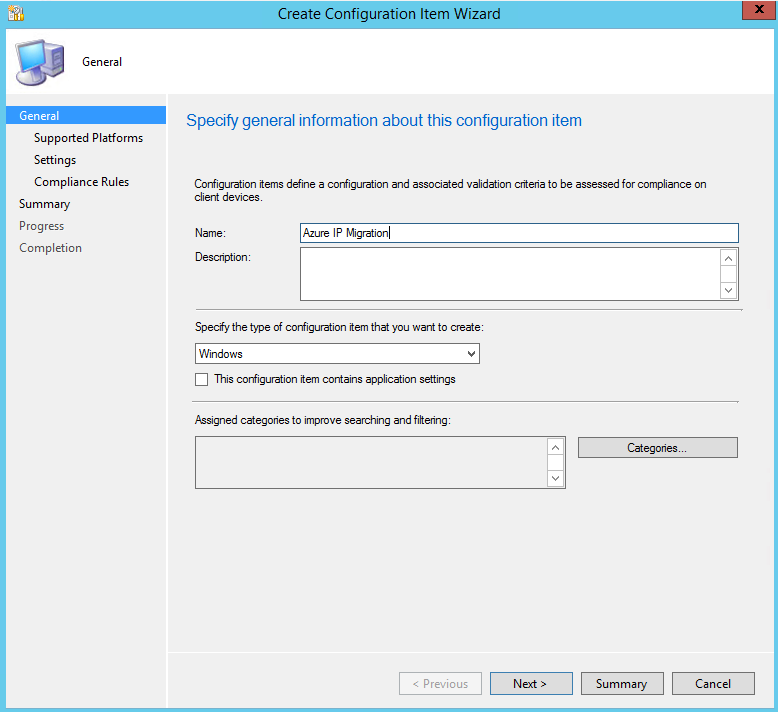
Now, go to Assets and Compliance->Compliance Settings->Configuration Items and click "Create Configuration Item". The Create CI Wizard will appear. Give it a meaningful name, select any categories if desired, and click "Next".
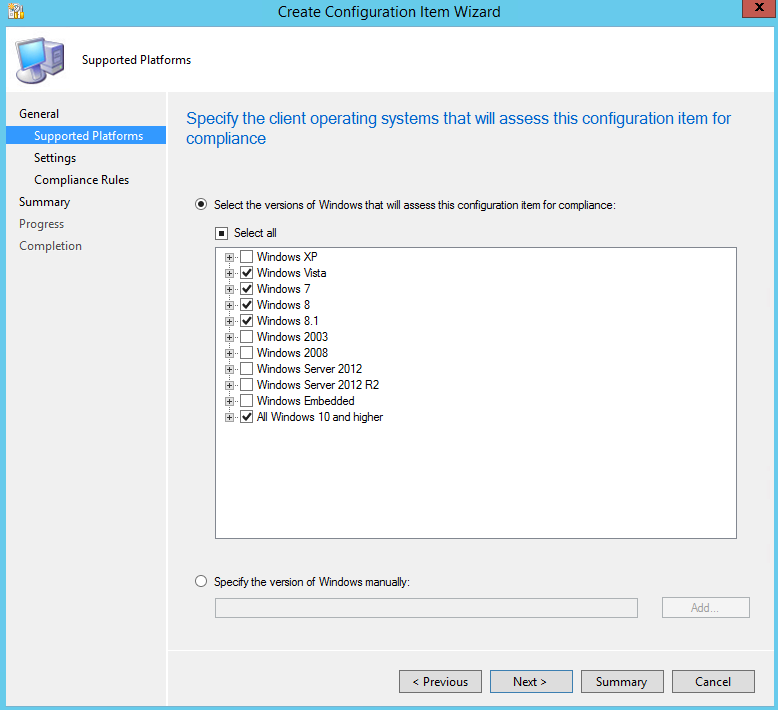
On the Supported Platforms page, select any supported client operating systems you require and click "Next".
On the Settings Page, click New...
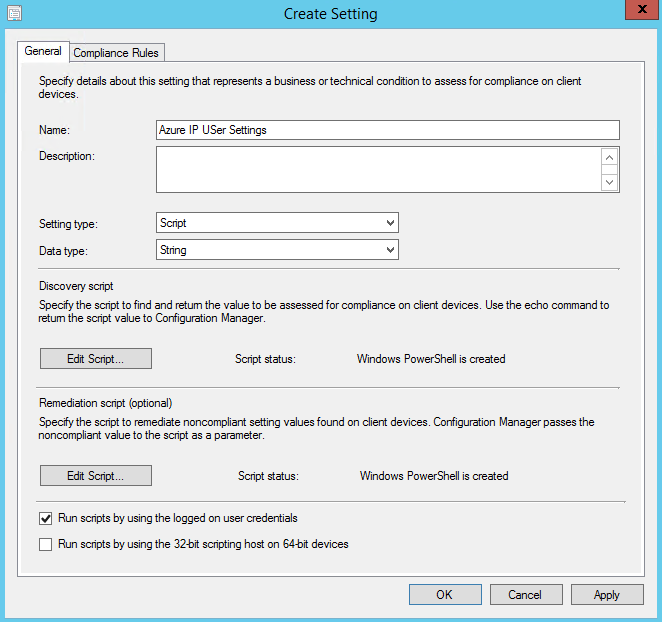
This will launch the Create Settings dialog box. Name the setting something meaningful like "Azure IP User Settings". Add a description if you like and set the Setting type to Script. Set the Data type to String. Under Discovery Script, click the Add Script... button. In the Edit Discovery Script dialog, click Open... and select the UserDiscovery.ps1 script you modified earlier. The script will populate in the Script pane and you should be able to scroll down and verify that your AD RMS Server and Azure IP GUID are populated. Ensure that the Script language says Windows PowerShell and click OK to close the dialog. Repeat this process for the Remediation script only this time browsing to UserRemeditation.ps1. After both scripts have been loaded, check the box to "Run scripts by using the logged on user credentials". Your General tab should look similar to the image below.
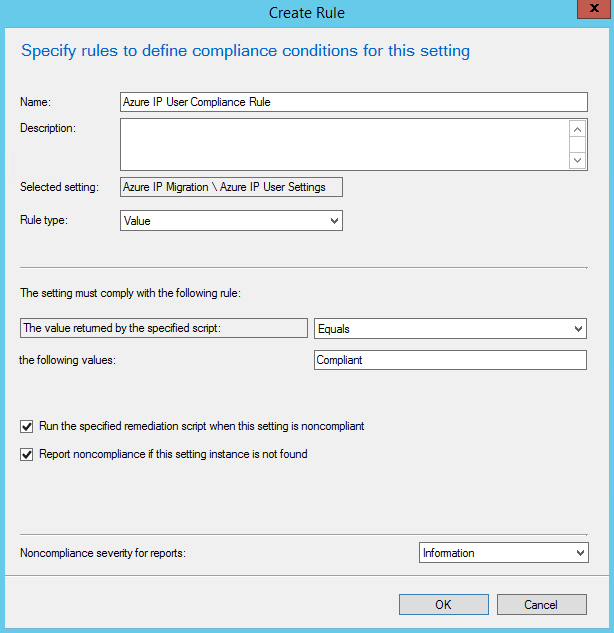
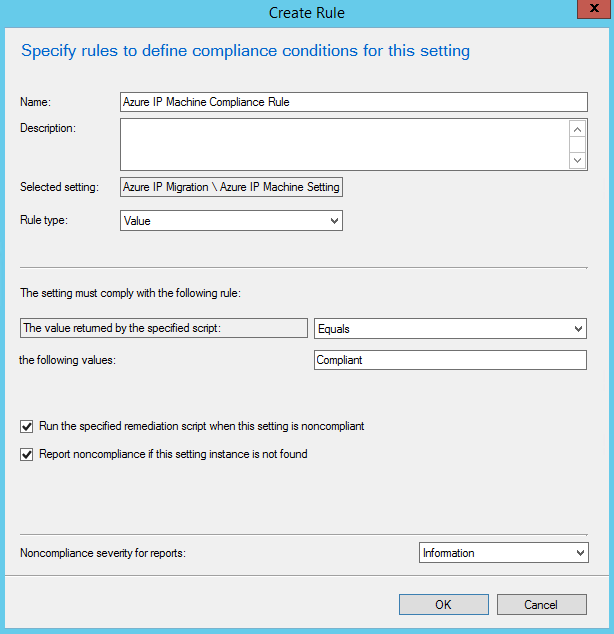
Next, click on the Compliance Rules tab and click on the New... button. In the Create Rule dialog, name the rule something descriptive like "Azure IP User Compliance Rule". In "the following values:" textbox, enter "Compliant" (without quotes). Check the box next to "Run the specified remediation script when this setting is noncompliant" and optionally "Report noncompliance if this setting instance is not found". You can also set the severity for reporting if you chose to enable that. Your rule should look similar to the image below. Click OK to create the rule.
Click OK to finish the User Settings. Click the New... button again and go through a similar process to create the Azure IP Machine Settings. The only difference other than the scripts you will choose is that you will not check the checkbox next to "Run scripts by using the logged on user credentials". Your settings and compliance rule should look similar to the images below. Click OK to create the rule. 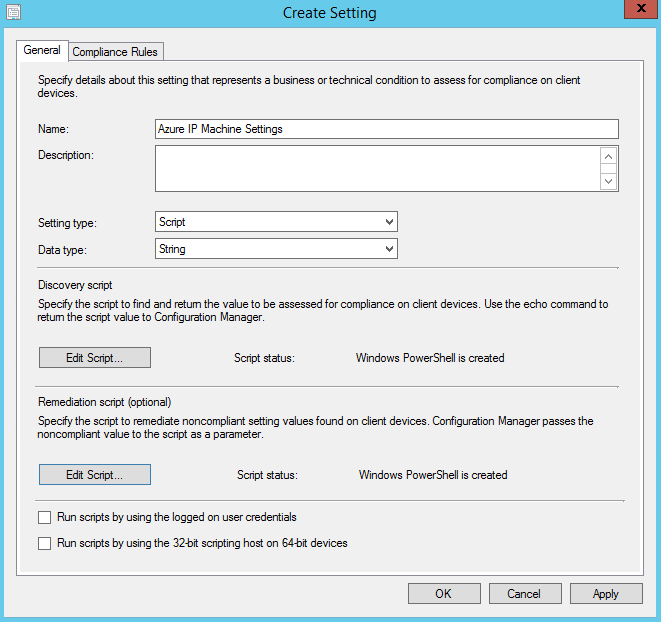
Finally, click OK to complete the Machine Settings. Click Next and you should see the Compliance Rules you have created. Click next to see the Summary, then Next and Close to complete creation of the Configuration Item.
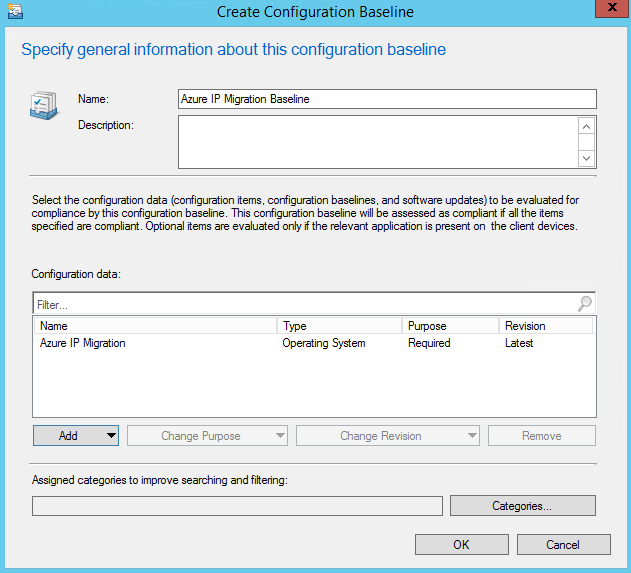
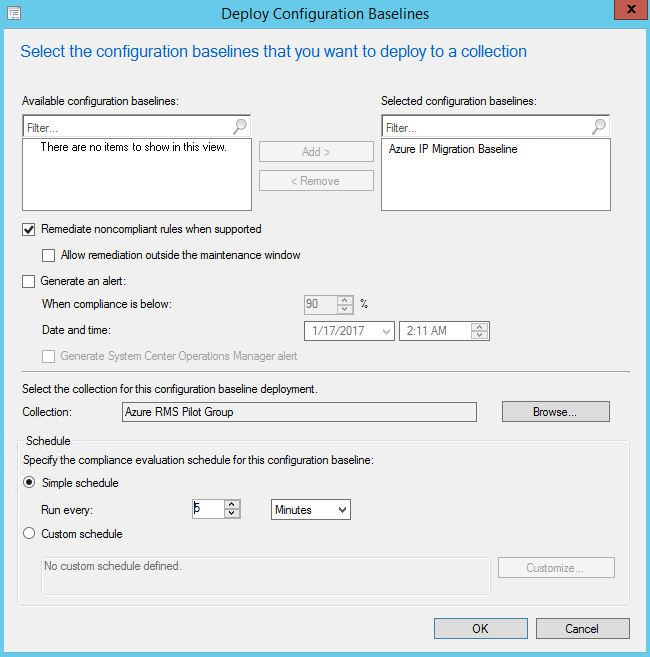
Now, go to Assets and Compliance->Compliance Settings->Configuration Baselines and click "Create Configuration Baseline". Give the baseline a descriptive name like "Azure IP Migration Baseline", and under Configuration data click Add->Configuration Items. Select the configuration item you just created and click Add then OK. Your dialog should look like the one below.
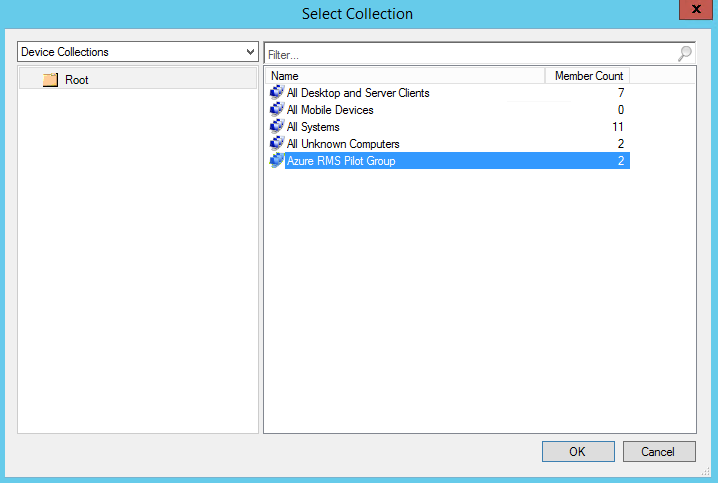
Click OK to complete the creation of your baseline. The last thing to do now is to deploy the baseline to your clients. I recommend doing this with a test or pilot group and then rolling out to a larger audience after you have confidence that it is working in your environment. You can do this by clicking the Deploy button. This launches the Deploy Configuration Baselines dialog box. If you had your baseline selected, then it will already show up under Selected configuration baselines in the dialog. Check the box next to "Remediate noncompliant rules when supported" then click the Browse... button to select your collection. The selection dialog defaults to User Collections, but I created a Device Collection for my pilot group and you can select that from the drop-down. Choose your collection then set a schedule for compliance evaluation. During testing it is good to keep this low, but make sure to raise it back up to a reasonable value when deploying to your full environment. Below are some images from my deployment.
Click OK and your SCCM Compliance Settings should migrate your collection to Azure Information Protection.
Additional Information:
If you are running Office 2010, the RMS Sharing Application or Beta Azure Information Protection Client will be necessary for the clients to connect to Azure Information Protection. I mentioned it earlier, but I wanted to make sure that it is fresh in your mind as it is a requirement for your migration. Office 2013+ will work without the Azure IP client, but I highly advise installing the Azure Information Protection Client on all systems as classification is a great user experience and should be the end goal for any migration to Azure Information Protection. Please let me know if you find any errors in my documentation or scripts but I have tested them so hopefully you will not run into any issues.
Kevin McKinnerney
PREMIER FIELD ENGINEER – PLATFORMS/SECURITY
AD RMS: Upgrade Migration with a Named SQL Instance
The Scenario:
You read my previous article but it does not cover how to do an upgrade migration if you are moving to a new named instance in SQL. Although it is very similar to the Version 2, there are some important call-outs if you want to have a pain free upgrade experience. I have tested these in my lab using AD RMS on Windows Server 2012 R2 and a new named instance of SQL Server 2012 SP3 called ADRMS running on a static port of 1414.
Upgrading AD RMS (Version 3):
- If a CNAME does not yet exist for SQL, create a new CNAME in DNS to use for the AD RMS SQL server
- Restore the AD RMS databases to the new SQL server named instance
- Open SQL Server Managment Studio on the new SQL server and connect to the new named instance
- Expand Security
- Right-click on Logins and select New Login...
- Click Search...
- Change the Locations... to Entire Directory
- Enter the name of your AD RMS Service Account and click Check Names then OK
- Click OK to complete adding the service account
- Expand Databases
- Expand the Configruation Database (Should be similar to DRMS_Config_adrms_contoso_com_443)
- Expand Tables
- Right-click on dbo.DRMS_ClusterPolicies and select Edit Top 200 Rows
- Modify the PolicyData corresponding to the following entries in the PolicyName column removing the existing SQL Server and adding the CNAME created for the new SQL server plus "\<InstanceName>" (In my case it would be SQL.CONTOSO.COM\ADRMS)
- LoggingDatabaseServer
- CertificationUserKeyStorageConnectionString
- DirectoryServicesCacheDatabase
- Close Sql Server Management Studio
- Open SQL Server Configuration Manager (this is only if you are setting a static port for the named instance)
- Expand SQL Server Network Configuration
- Click on Protocols for <InstanceName>
- Ensure TCP has a status of Enabled
- Right-click on TCP and select Properties
- Select the IP Addresses tab
- Scroll down to the IPAll section, enter your port number, then click Apply and OK.
- Click on SQL Server Services
- Verify that the SQL Server Browser Service is running and is set to a Start Mode of Automatic
- Right-click on SQL Server (<InstanceName>), and select Restart
- Open a command prompt on the SQL server and run Netstat -ano > %Temp%\netstat.txt
- Type Start %Temp%\netstat.txt and verify that you see an entry like "TCP 0.0.0.0:1414 0.0.0.0:0 LISTENING <PID>"
- Verify that the Windows Firewall and any firewalls between the SQL Server and the new AD RMS server allow your new port over TCP and the SQL Server Browser Service (1434) over UDP
- On the new AD RMS server, import the SSL Certificate to the Local Computer>Personal store
- Open an administrative Notepad.exe and browse to C:\Windows\System32\drivers\etc and open the hosts file
- Create an entry in the hosts file redirecting the CNAME for AD RMS to the local server (Actual IP, not loopback)
- Create an entry in the hosts file redirecting the CNAME for the SQL server to the new SQL server (Actual IP, not loopback)
e.g.
adrms.contoso.com 10.0.0.25
sqladrms.contoso.com 10.0.0.26
- Install the AD RMS Role on the new 2012 R2 server
- After installation completes, select the link to Perform additional configuration
- The server will detect the SCP in Active Directory and default to Join an existing AD RMS cluster. There is a warning that it cannot contact the root cluster. This is because the SCP is being redirected to this server via the hosts file. Leave this as is and click next.
- On the Select Configuration Database page, enter the CNAME you specified in the hosts file for the new SQL server (FQDN)
- Click List on the second line and select the DefaultInstance from the drop-down
- Drop down the Configuration Database Name selection box and select your configuration database
- Enter the private key password corresponding to the old database
- Enter credentials for the original AD RMS service account
- Select Default Website
- On the Choose a Server Authentication Certificate page, select the imported SSL certificate and click Next
- Click Install to begin the installation
- After configuration completes, you will need to log off and back on to administer AD RMS
- If you are using primarily Kerberos based authentication, you may need to follow the instructions at https://technet.microsoft.com/en-us/library/dd759186(v=ws.11).aspx to modify your application pool and set Service Principal Names.
- Modify the hosts file on several clients to point to the new AD RMS server
- Test consuming existing content and protecting new content against the new server
- After you are satisfied that the 2012 R2 AD RMS server is doing what you want it to do, you can add any additional nodes to the 2012 R2 AD RMS cluster you now have
- Open SQL Server Managment Studio on the new SQL server and navigate to the configuration Database
- Expand Tables
- Right-click on dbo.DRMS_ClusterServers and select Edit Top 200 Rows
- Remove any old servers from the table by deleting each row
- Finally, switch over the CNAMEs in DNS and all your clients will start talking to the new servers
- When you are comfortable with the new environment, you can gracefully shut down and reallocate the old resources.
Wrapping Up:
As you can see, there is a reason I didn't dive into all of that in the first article. There are a lot of little things that you have to touch when moving to a new SQL Server Named Instance and static port. Please let me know if you notice anything I have missed. Like I said above, I tested this in my lab environment several times so it should work without any issues, but I know production environments can sometimes be more challenging.
Kevin McKinnerney
PREMIER FIELD ENGINEER – PLATFORMS/SECURITY
AD RMS: Side-by-Side Migration from AD RMS on 2008 R2 to 2012 R2
The Scenario:
You are an AD RMS administrator running your AD RMS infrastructure on Windows Server 2008 R2. You have finally been given the go ahead to upgrade to Windows Server 2012 R2 or 2016 for all your AD RMS farms, but you want to be able to do it with little to no user impact and have full fallback capabilities. Additionally, the SQL administrators have informed you that they will be decommissioning the SQL server housing your AD RMS databases so you have to figure out how to migrate the databases to a new location.
You think about the best way to go about this and find yourself browsing the TechNet documentation at https://technet.microsoft.com/library/cc754277.aspx. This is the RMS to AD RMS Migration and Upgrade Guide, but also covers what is necessary for an upgrade from AD RMS 2008 R2 to 2012 R2. The only problem is that this would require you to add a 2012 R2 server to the cluster which would upgrade the database and immediately render the other AD RMS servers in the cluster useless. For many companies this is not an issue, but if you have a heavy user load or simply want to be able to test first or fallback to the old infrastructure there is a better way.
The (unofficial) Solution:
I have worked with many companies to do side-by-side migrations and they have gone off without a hitch. That being said, it is easiest when you have an environment with the following items in place.
- AD RMS using HTTPS for all endpoints
- CNAME record in DNS for the AD RMS cluster URL
- CNAME record in DNS for the SQL server (Many companies do not have this though, so I will cover how to work around that)
- Know your current private key password (or reset it before backing up the databases)
- Not using an HSM or third-party extensions to AD RMS
You will need a few prerequisite items as well.
- Previously mentioned AD RMS cluster private key password
- Full backup of all AD RMS databases
- New SQL server or instance to restore databases to (I am assuming the default instance in this guide. See my next article for details on named instances/static ports)
- Export of SSL Certificate with Private Key for the cluster URL
- New Windows Server 2012 R2 server to install your first AD RMS cluster node
If you are still with me, then you are in for a treat. With those items in place, you have a very easy road for migration to AD RMS on Windows Server 2012 R2. This migration scenario is very similar to the standard upgrade, but you are duplicating the databases and then joining the new 2012 R2 (or 2016 if you are really fancy) AD RMS server to the cluster pointing at the new SQL server. The new node will believe that it is joining the existing cluster and will be able to license existing and new content. Follow the steps below in your environment to perform the side-by-side migration. Version 1 assumes CNAMEs for both AD RMS and SQL. Version 2 details how to set up a CNAME for the new SQL server and the necessary database modifications.
Upgrading AD RMS (Version 1):
- Restore the AD RMS databases to the new SQL server
- On the new AD RMS server, import the SSL Certificate to the Local Computer>Personal store
- Open an administrative Notepad.exe and browse to C:\Windows\System32\drivers\etc and open the hosts file
- Create an entry in the hosts file redirecting the CNAME for AD RMS to the local server (Actual IP, not loopback)
- Create an entry in the hosts file redirecting the CNAME for the SQL server to the new SQL server (Actual IP, not loopback)
e.g.
adrms.contoso.com 10.0.0.25
sqladrms.contoso.com 10.0.0.26
- Install the AD RMS Role on the new 2012 R2 server
- After installation completes, select the link to Perform additional configuration
- The server will detect the SCP in Active Directory and default to Join an existing AD RMS cluster. There is a warning that it cannot contact the root cluster. This is because the SCP is being redirected to this server via the hosts file. Leave this as is and click next.
- On the Select Configuration Database page, enter the CNAME you specified in the hosts file for the new SQL server (FQDN)
- Click List on the second line and select the DefaultInstance from the drop-down
- Drop down the Configuration Database Name selection box and select your configuration database
- Enter the private key password corresponding to the old database
- Enter credentials for the original AD RMS service account
- Select Default Website
- On the Choose a Server Authentication Certificate page, select the imported SSL certificate and click Next
- Click Install to begin the installation
- After configuration completes, you will need to log off and back on to administer AD RMS
- If you are using primarily Kerberos based authentication, you may need to follow the instructions at https://technet.microsoft.com/en-us/library/dd759186(v=ws.11).aspx to modify your application pool and set Service Principal Names.
- Modify the hosts file on several clients to point to the new AD RMS server
- Test consuming existing content and protecting new content against the new server
- After you are satisfied that the 2012 R2 AD RMS server is doing what you want it to do, you can add any additional nodes to the 2012 R2 AD RMS cluster you now have
- Open SQL Server Managment Studio on the new SQL server and navigate to the configuration Database (Should be similar to DRMS_Config_adrms_contoso_com_443)
- Expand Tables
- Right-click on dbo.DRMS_ClusterServers
- Remove any old servers from the table by deleting each row
- Finally, switch over the CNAMEs in DNS and all your clients will start talking to the new servers
- When you are comfortable with the new environment, you can gracefully shut down and reallocate the old resources.
Upgrading AD RMS (Version 2):
- Create a new CNAME in DNS to use for the AD RMS SQL server
- Restore the AD RMS databases to the new SQL server
- Open SQL Server Managment Studio on the new SQL server and navigate to the configuration Database (Should be similar to DRMS_Config_adrms_contoso_com_443)
- Expand Tables
- Right-click on dbo.DRMS_ClusterPolicies and select Edit Top 200 Rows
- Modify the PolicyData corresponding to the following entries in the PolicyName column to match the CNAME created for the new SQL server
- LoggingDatabaseServer
- CertificationUserKeyStorageConnectionString
- DirectoryServicesCacheDatabase
- Close Sql Server Management Studio
- On the new AD RMS server, import the SSL Certificate to the Local Computer>Personal store
- Open an administrative Notepad.exe and browse to C:\Windows\System32\drivers\etc and open the hosts file
- Create an entry in the hosts file redirecting the CNAME for AD RMS to the local server (Actual IP, not loopback)
- Create an entry in the hosts file redirecting the CNAME for the SQL server to the new SQL server (Actual IP, not loopback)
e.g.
adrms.contoso.com 10.0.0.25
sqladrms.contoso.com 10.0.0.26
- Install the AD RMS Role on the new 2012 R2 server
- After installation completes, select the link to Perform additional configuration
- The server will detect the SCP in Active Directory and default to Join an existing AD RMS cluster. There is a warning that it cannot contact the root cluster. This is because the SCP is being redirected to this server via the hosts file. Leave this as is and click next.
- On the Select Configuration Database page, enter the CNAME you specified in the hosts file for the new SQL server (FQDN)
- Click List on the second line and select the DefaultInstance from the drop-down
- Drop down the Configuration Database Name selection box and select your configuration database
- Enter the private key password corresponding to the old database
- Enter credentials for the original AD RMS service account
- Select Default Website
- On the Choose a Server Authentication Certificate page, select the imported SSL certificate and click Next
- Click Install to begin the installation
- After configuration completes, you will need to log off and back on to administer AD RMS
- If you are using primarily Kerberos based authentication, you may need to follow the instructions at https://technet.microsoft.com/en-us/library/dd759186(v=ws.11).aspx to modify your application pool and set Service Principal Names.
- Modify the hosts file on several clients to point to the new AD RMS server
- Test consuming existing content and protecting new content against the new server
- After you are satisfied that the 2012 R2 AD RMS server is doing what you want it to do, you can add any additional nodes to the 2012 R2 AD RMS cluster you now have
- Open SQL Server Managment Studio on the new SQL server and navigate to the configuration Database (Should be similar to DRMS_Config_adrms_contoso_com_443)
- Expand Tables
- Right-click on dbo.DRMS_ClusterServers and select Edit Top 200 Rows
- Remove any old servers from the table by deleting each row
- Finally, switch over the CNAMEs in DNS and all your clients will start talking to the new servers
- When you are comfortable with the new environment, you can gracefully shut down and reallocate the old resources.
Wrapping Up:
OK, so maybe that wasn't super easy, but it is effective and allows for a seamless migration from an older version of AD RMS to a newer version. I know people do this all the time because I have assisted with dozens of migrations exactly like this. I am fairly certain that I did not leave anything out, but if you find something I missed please leave me a comment and I will correct it as quickly as possible.
Update:
I have written a followup article detailing how to do this if you are moving to a Named Instance for SQL and using a static port.
https://blogs.technet.microsoft.com/kemckinn/2017/01/13/ad-rms-upgrade-migration-with-a-named-sql-instance/
Kevin McKinnerney
PREMIER FIELD ENGINEER – PLATFORMS/SECURITY
AIP Scanner++ (Discovering all the sensitive data)
The Situation:
So, you know that you have terabytes of unstructured data on your file shares and document libraries but you are uncertain how much of it is actually sensitive and needs to be protected. In the past, discovering sensitive data was time consuming and potentially costly using 3rd party solutions or a massive amount of manpower to accomplish (but realistically, it probably has never been done). Luckily, Microsoft introduced the AIP Scanner to help with bulk encryption of data, but we actually went one step further and have provided a way for you to discover all of the different types of data that you have scattered throughout your network.
The Solution:
The AIP Scanner now has a feature that will allow for the discovery of sensitive data by scanning against all of the information types defined in O365 and any custom types you create. And the discovery portion can be done with only AIP P1/EMS E3 licenses. The new parameter is associated with the Set-AIPScannerConfiguration and is called -DiscoverInformationTypes. When this property is set to All, the scanner uses any custom conditions that you have specified for labels in the Azure Information Protection policy, and the list of information types that are available to specify for labels in the Azure Information Protection policy. When you use this option, labels do not need to be configured for any conditions. Keep in mind that this setting only does discovery. If you would like to classify and protect the identified items, you will need to configure automatic conditions on your labels to classify/protect the documents based on information type (AIP P2/EMS E5) or use PowerShell to classify and protect the entire repository (AIP P1/EMS E3).
The command below will allow you to scan your repositories against all information types
PS C:\> Set-AIPScannerConfiguration -Enforce Off -Schedule OneTime -Type Full -DiscoverInformationTypes All
After running the scan, you can review the logs by opening the Azure Information Protection event log or you can view the detailed logs at C:\users\<Scanner Service Account Profile>\appdata\local\Microsoft\MSIP\Scanner\Reports. There you will find the summary txt and detailed csv files.
If you need assistance installing the AIP Scanner, please see my previous blog at https://blogs.technet.microsoft.com/kemckinn/2018/03/23/easy-configuration-of-the-azure-information-protection-scanner/
Let me know if you have any questions. Thanks!
Kevin
AIP Scanner Express (Fully Functional in 10 minutes!)
The Scenario:
You have been trying to install the AIP Scanner and have found that despite all the fancy screenshots and witty remarks I have throughout all of my posts, it takes a long time to configure the Azure AD App Registrations and often fails the first time around. Well, those days are past us now. I spent way too many hours developing a scripted method that allows for the automation of the creation of the Azure AD App Registrations and even a cloud account if you are not fond of syncing your service accounts to Azure. I figured, if it was even painful for me to deploy the scanner...I needed to find a way to make it easier. So the new solution will allow you to fully deploy the scanner in less than 10 minutes (I have done it in 4 actually), but that is assuming that you already have the AIP Client and Azure AD PowerShell Cmdlets installed, and a SQL Server ready, so there may be a little more time involved (but not too much). The greatest part is that by using the PS Cmdlets for the Azure AD App Registrations, it removes the possibility of making a mistake when configuring them (something I must say I have done quite a few times). :-)
The Solution:
As per my previous post, please check out the stunning conclusion to this blog post on our official AIP blog at https://techcommunity.microsoft.com/t5/Azure-Information-Protection/Azure-Information-Protection-Scanner-Express-Installation/ba-p/265424 and bookmark https://aka.ms/AIPBlog for future exciting content from yours truly (I will of course keep writing my fun scenarios here, but the solutions will all be over in the grown-up blog).
Thanks!
Kevin
Creating Labels for Azure Information Protection
The Scenario:
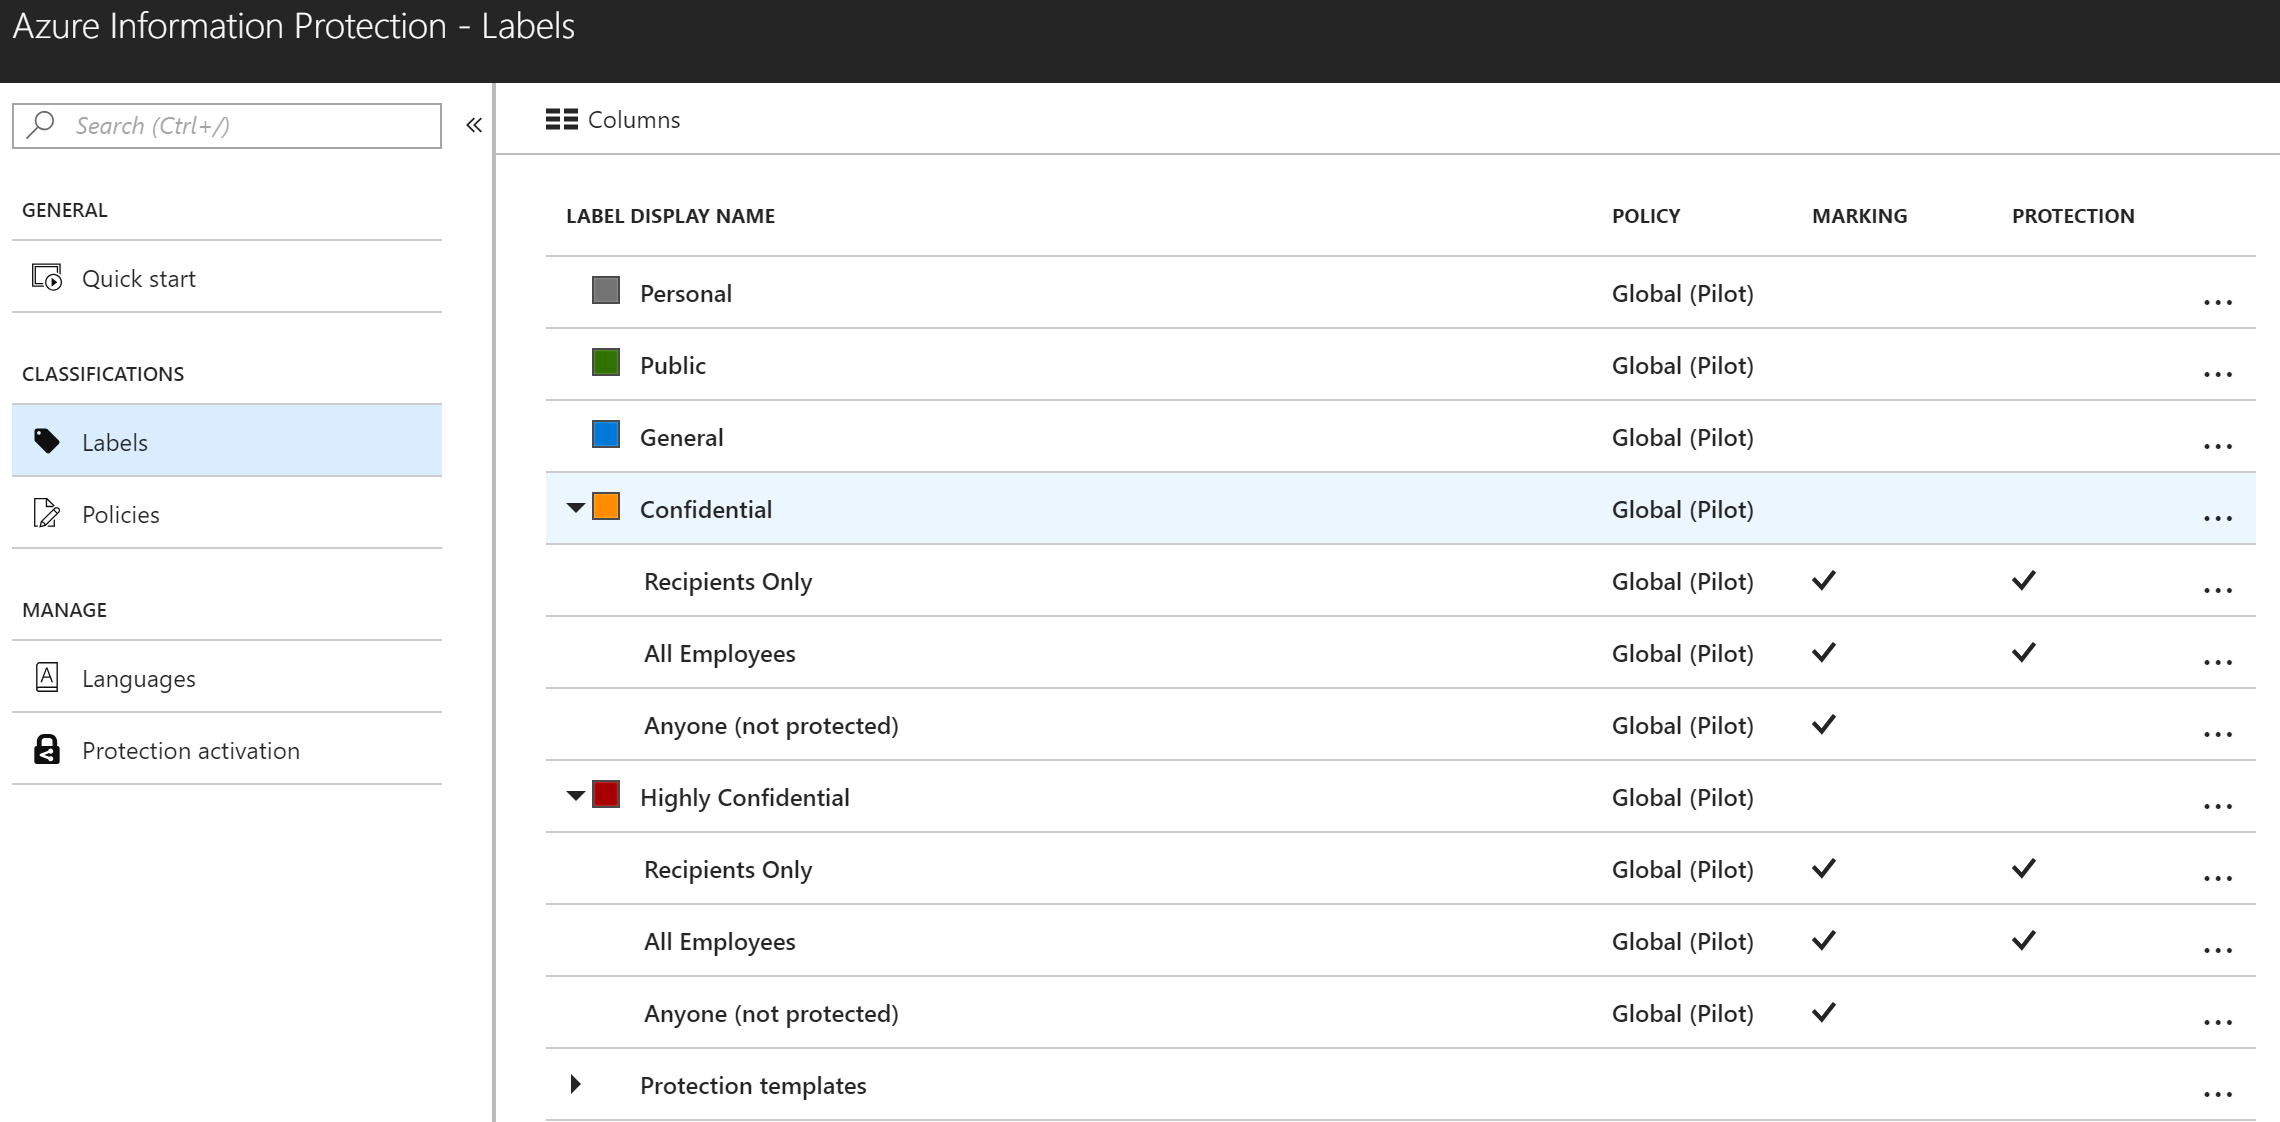
You are starting to implement Azure Information Protection and you need to create Labels and Sub-Labels so your users can see the new fancy buttons in their Office applications. Often there are default labels to work from, but sometimes those labels have been removed or you simply want to create your own labels and are not sure what all the options in the portal do. Fear not! I will show you how to create labels and explain all the functionality of those labels along the way. As an added bonus, I have provided some labels templates at the end that may be useful in defining your structure. These are of course just a recommendation and you can use them or not as you see fit. Also, since I like to make sure you have the best information possible, the official documentation for creating labels can be found at /en-us/azure/information-protection/deploy-use/configure-policy-new-label and as always is authoritative over anything I might say here. ;-)
The Solution
Here I am going to assume that you already know how to log into the Azure Portal and get to the AIP blade. So, navigate to the AIP blade and I will help you create labels that look like the set below.
To create a new label, click on the + Add a new label link below Protection templates
This will bring up the Label blade as shown below.
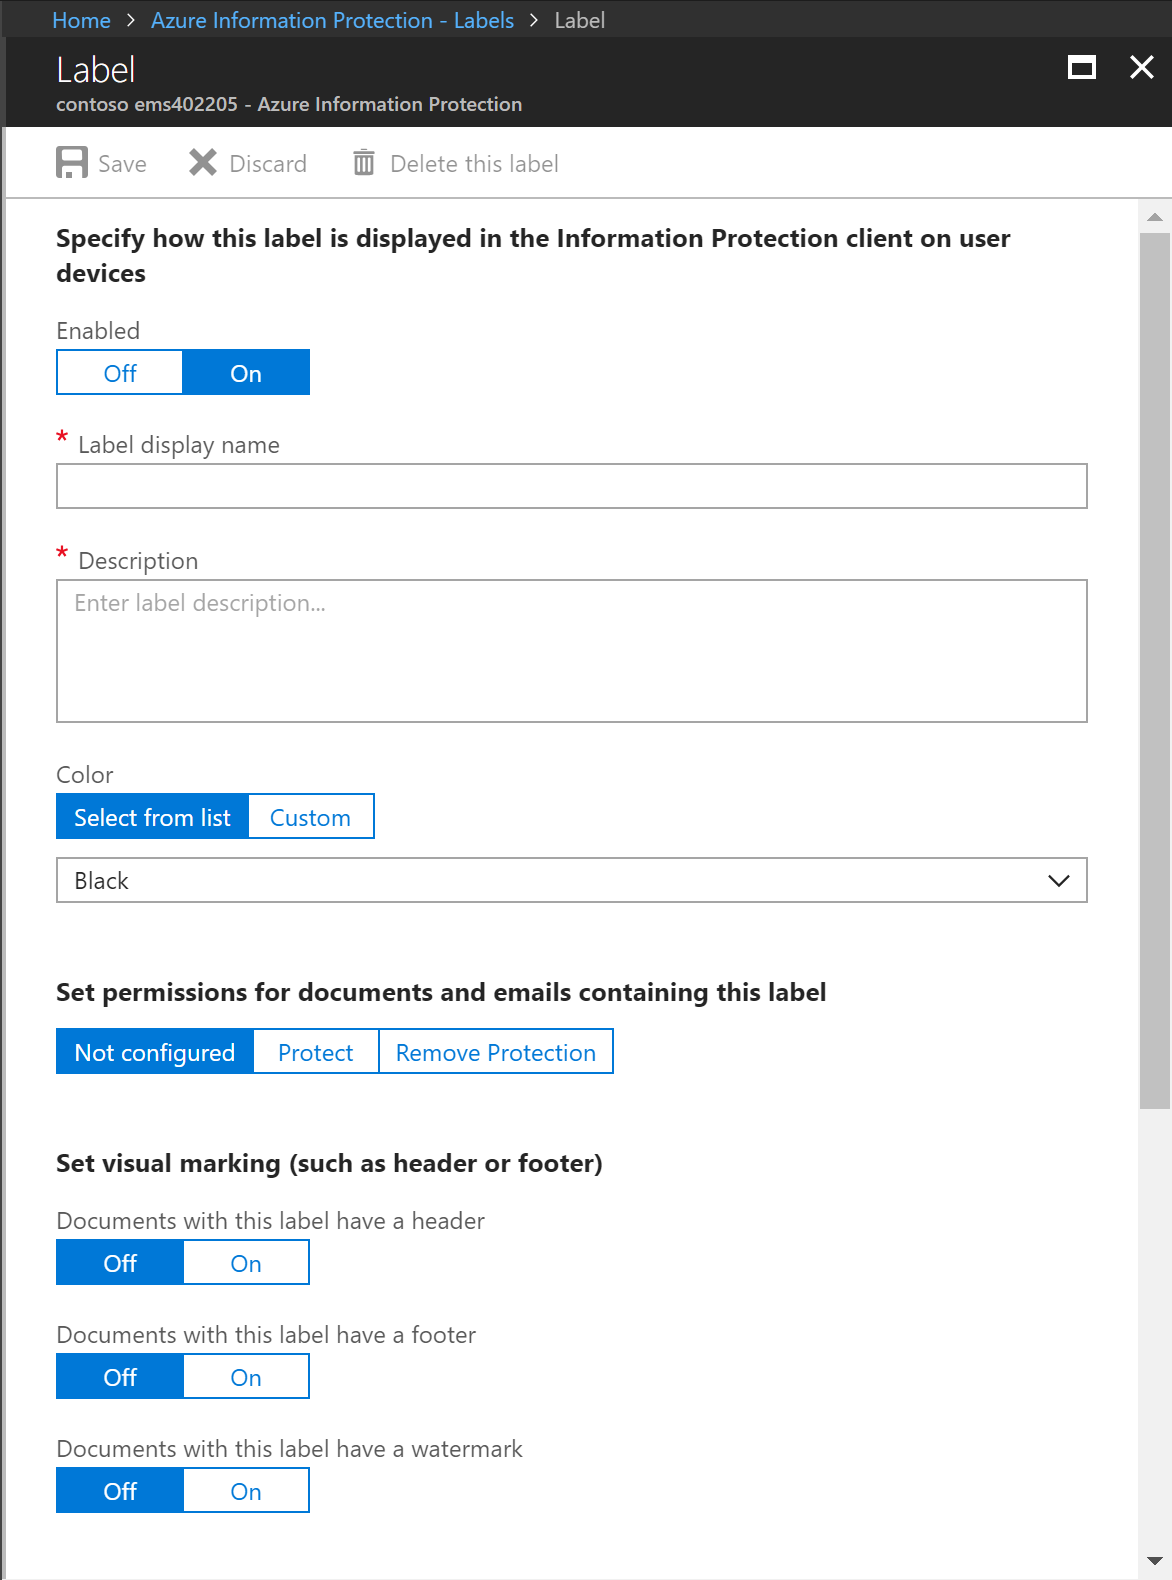
Let's step through each of the options on this new label interface.
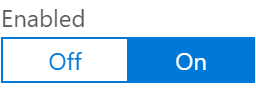
Enabled
This is a simple Off/On selection that defaults to On.
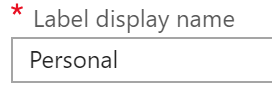
Label display name
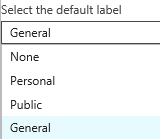
This is the text that will display on the button in the Office AIP client interface and in the sensitivity bar of protected documents. As an example, we can use the first default label of Personal.
Description
This is the description of the purpose and usage instructions for a label. This should be concise enough to fit in a popup description while being descriptive enough to help your users know if the label should be applied to the content. The description for Personal is below (I will list all of the default labels and their descriptions later in this post).
Non-Business data which does not belong to <enter your company here>. Data is not encrypted and cannot be tracked or revoked. Do not use Non-Business to classify any personal data which is collected by or belongs to <enter your company here>. Such content should be marked as either Confidential or Highly Confidential.

Color
This is the color that will display next to the label in the sensitivity bar in Office. You can Select from a list of standard colors in the drop-down or select Custom and specify the color using the hex triplet code for RGB.
Example: Gray or #737373

Set permissions for documents and email containing this label
The options here are Not configured, Protect, or Remove Protection.
Not configured is exactly what is sounds like and is what is used for the Personal, Public, and General labels.

Protect gives additional options for encrypting content using a Microsoft managed key, Azure (cloud key), BYOK, or HYOK.
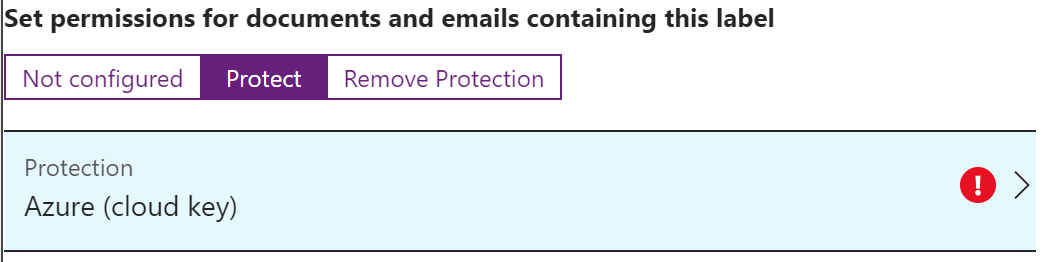
After selecting Protect, you will also need to configure the additional options by clicking on the Protection type (in this case Azure (cloud key). Protection is typically used for Confidential and Highly Confidential sub-labels. The Protect blade looks similar to the image below.
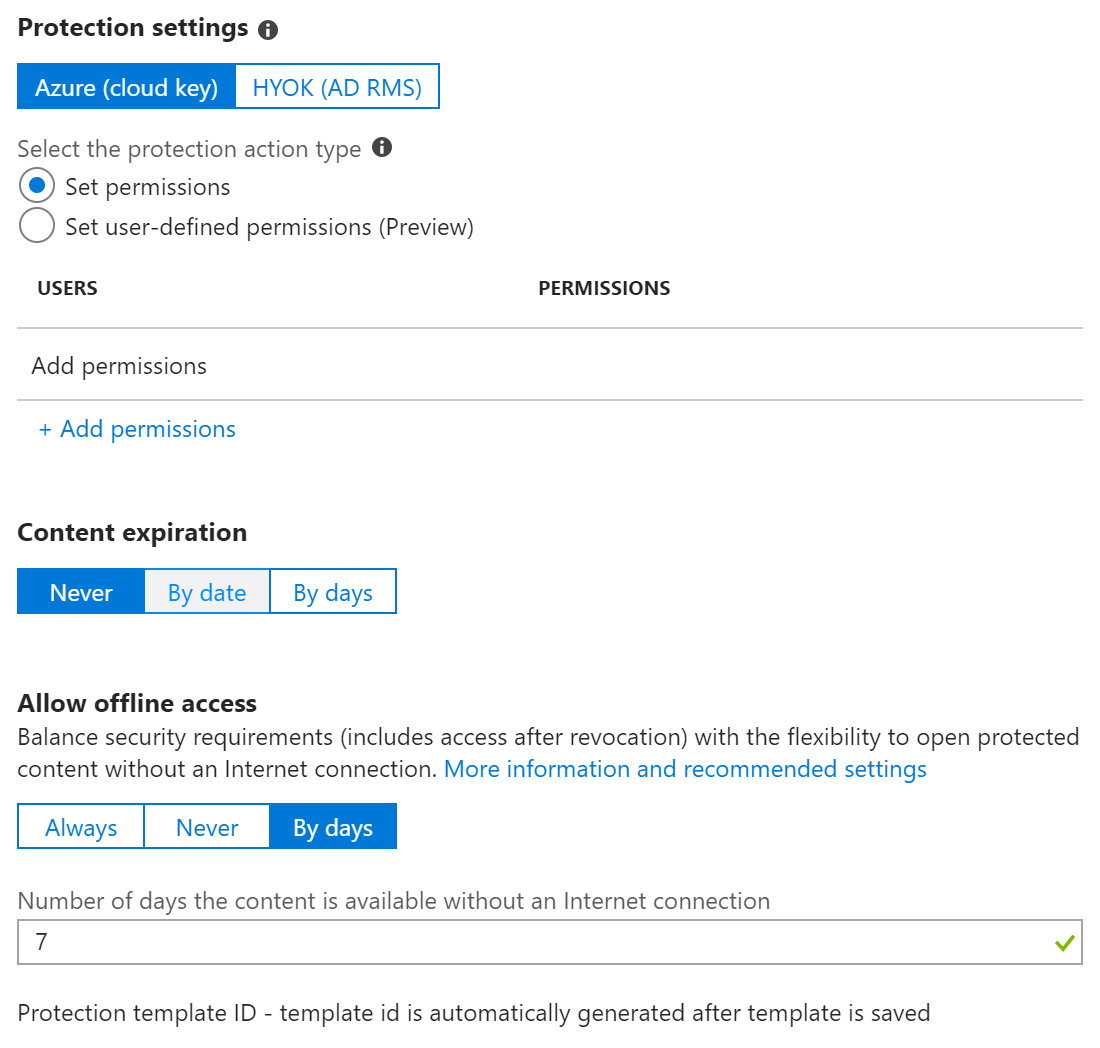
The first option in the Protection settings is Azure (cloud key) or HYOK (AD RMS) protection.
In Azure (cloud key) protection, you first have to
Select the protection action type
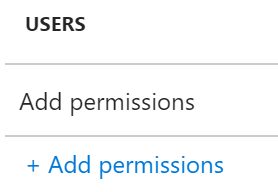
This defines if you will use standard permissions for users, groups, or domains (Set permissions), or use the Do Not Forward or Custom Settings dialogs in Office (Set user-defined permissions (Preview)).
If using Set permissions, click the + Add permissions link below users to select user rights.
This brings up the Add permissions blade
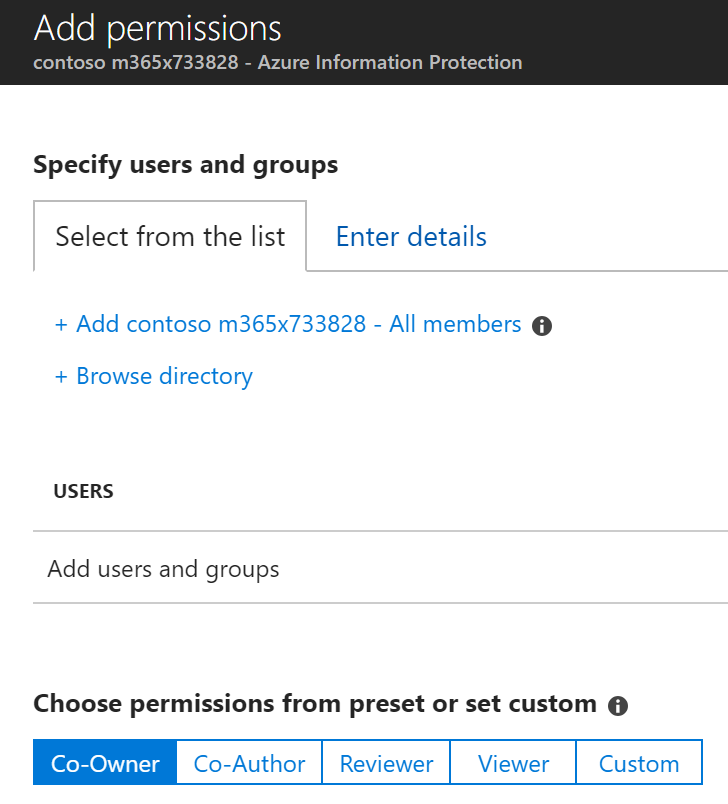
To add all users synced to your O365 tenant, simply click the + Add <your company> - All members link and choose a permission preset or custom permissions. Alternatively, you can browse the directory for any mail enabled groups or users to add rights to.
Note: You will only be able to add one type of permissions at a time so if you want different levels of permissions for different groups you will need to save and return to add the different levels of access.
One additional option you have in this interface is to add additional external users or domains on the Enter details tab.

Note: If entering a domain, include only the domain name and no additional characters like *@
The permissions you can choose from under Choose permissions from preset or set custom are shown below.
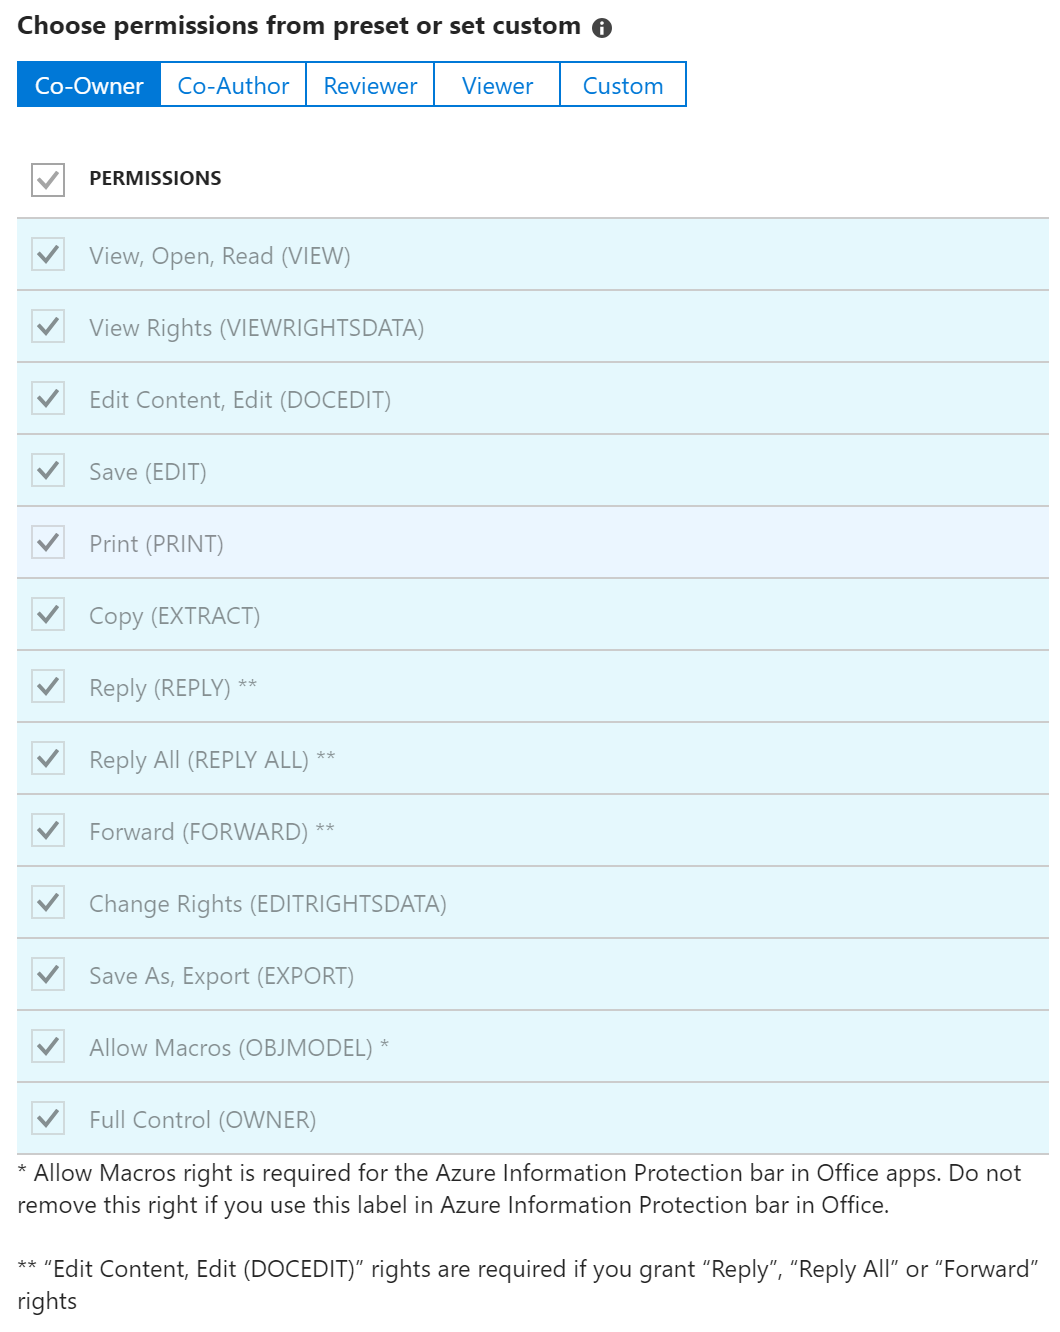
You can click through the presets to see what is available or use Custom to assign specific permissions from this list.
After adding users/groups/domains and selecting the appropriate level of permissions, click OK to return to the Protection settings interface.
If you choose Set user-defined permissions (Preview) you will see the interface below.
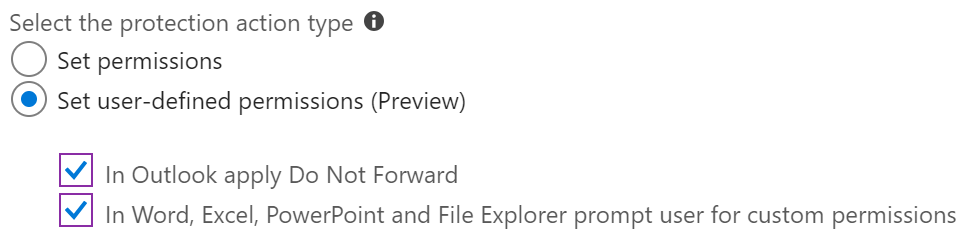
If you deselect either of these options, the label will not display in the programs noted. This is often used to create Recipient Only labels that will apply the Do Not Forward permission, but the label would look out of place in Word, Excel, PowerPoint and File Explorer. Similarly, a label like Custom Permissions would look out of place in Outlook but fine in the other Office applications.
The other options in the Protections settings interface are Content expiration and Allow offline access.
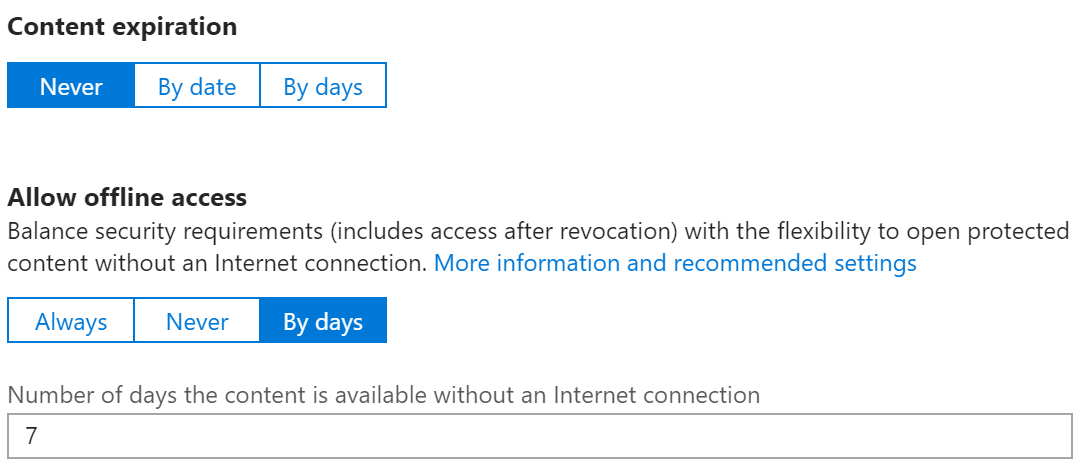
Content expiration
This option allows you to expire content on a specific date or after a specific number of days. This could be useful for contracts that are not valid after a specific date or offers that are only valid for a set number of days from creation.
Allow offline access
This option defines the length of time that a Use license is valid without reauthenticating to AIP. The default for this is 7 days which allows a user to be offline for a full week without needing to authenticate to the cloud. After that amount of time they will need to reach out to AIP to get a new use license. Leaving this default for Confidential information and perhaps using a lower number of days for Highly Confidential is a good decision as it allows you to revoke access to content dynamically by removing a user from the authorized groups defined in the AIP label.
Note: Use caution with setting this option to Never as it could have detrimental impact on usability and could cause users that travel regularly to be unable to work on Airplanes or other locations with limited internet access. 
Finally, Remove Protection allows you to use a label to remove any existing protection applied to a document. This is useful for bulk decryption templates.
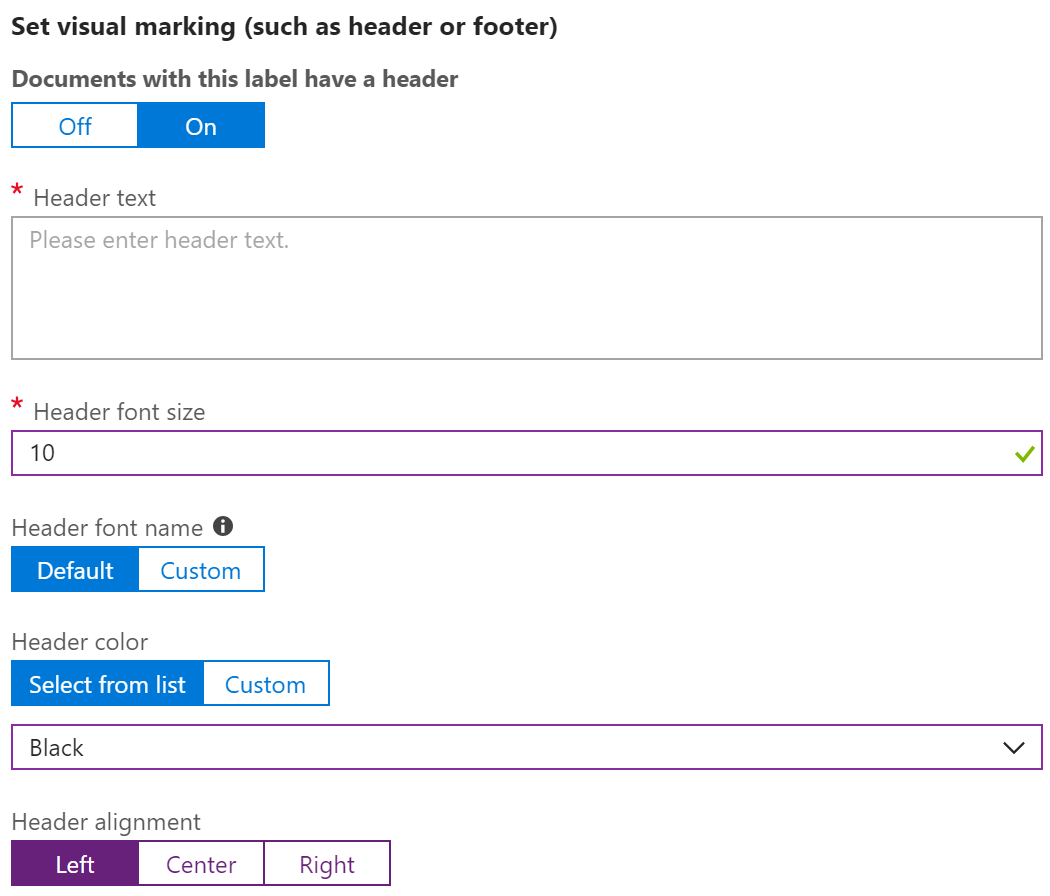
Set visual marking (such as header or footer)
This option allows you to add header/footer text to your labeled documents. This is typically reserved for Confidential/Highly Confidential documents but can be configured for any label.
Documents with this label have a header/footer/watermark
This can be set to Off or On with the default being Off. If this is set to Off, the additional options below are hidden.
Header/Footer/Watermark text
This is the text that will be added to the header/footer/watermark of the document or email
Header/Footer/Watermark font size
This is the font size for the header/footer/watermark
Header/Footer/Watermark font name
The default header/footer/watermark font is Calibri. A custom font must be typed in manually and if the font is not present on the system opening the document the system will use a random font.
Header/Footer/Watermark Color
This works like the color option for the label (Select from list or use Custom RGB hex triplet)
Header/Footer alignment
Choose from Left, Center, or Right alignment with Left being default
Caution : Headers and Footers defined in labels will overwrite any existing headers or footers in documents or emails.
Watermark layout
Choose Horizontal or Diagonal with Diagonal being the default
Configure conditions for automatically applying this label
This option can be used to automatically apply or recommend this label based on defined criteria. This is an AIP Premium P2 feature (EMS E5) and goes beyond the scope of this post.
Default Label Contents and Template
The information below can be used to create the default templates that Microsoft provides with new AIP tenants. There is also a blank template that you can use for planning your own labels and adding to your documentation.
Personal
Label Name:
Personal
Note: Many companies use Non-Business rather than Personal for this label name
Sub-Label:
No
Description:
Non-Business data which does not belong to <enter your company here>. Data is not encrypted and cannot be tracked or revoked. Do not use Non-Business to classify any personal data which is collected by or belongs to <enter your company here>. Such content should be marked as either Confidential or Highly Confidential.
Label color:
Gray
AIP Protection:
Not configured
Document Headers:
No
Header Text:
N/A
Font size:
N/A
Color:
N/A
Alignment:
N/A
Document Footers:
No
Footer Text:
N/A
Font size:
N/A
Color:
N/A
Alignment:
N/A
Document Watermark:
No
Watermark Text:
None
Size:
N/A
Color:
N/A
Layout:
N/A
Conditions set:
None
Public
Label Name:
Public
Sub-Label:
No
Description:
Business data specifically prepared and approved for public consumption. Data is NOT encrypted and cannot be tracked or revoked.
Label color:
Green
AIP Protection:
Not configured
Document Headers:
No
Header Text:
N/A
Font size:
N/A
Color:
N/A
Alignment:
N/A
Document Footers:
No
Footer Text:
N/A
Font size:
N/A
Color:
N/A
Alignment:
N/A
Document Watermark:
No
Watermark Text:
None
Size:
N/A
Color:
N/A
Layout:
N/A
Conditions set:
None
General
Label Name:
General
Sub-Label:
No
Description:
Business data which is NOT intended for public consumption. However, this can be shared with internal employees, business guests and external partners as required. Data is not encrypted and cannot be tracked or revoked.
Label color:
Blue
AIP Protection:
Not configured
Document Headers:
No
Header Text:
N/A
Font size:
N/A
Color:
N/A
Alignment:
N/A
Document Footers:
No
Footer Text:
N/A
Font size:
N/A
Color:
N/A
Alignment:
N/A
Document Watermark:
No
Watermark Text:
None
Size:
N/A
Color:
N/A
Layout:
N/A
Conditions set:
None
Confidential
Label Name:
Confidential
Sub-Label:
No
Description:
Sensitive business data that could cause damage to the business if shared with unauthorized people. Data is encrypted. Data owners can track and revoke content.
Label color:
Orange
AIP Protection:
Not configured
Document Headers:
No
Header Text:
N/A
Font size:
N/A
Color:
N/A
Alignment:
N/A
Document Footers:
No
Footer Text:
N/A
Font size:
N/A
Color:
N/A
Alignment:
N/A
Document Watermark:
No
Watermark Text:
None
Size:
N/A
Color:
N/A
Layout:
N/A
Conditions set:
None
Confidential \ Recipients Only
Label Name:
Confidential \ Recipients Only
Sub-Label:
Yes, of Confidential
Description:
Confidential data that is encrypted and that can be viewed by the recipients only.
AIP Protection:
Protect, User defined permissions, In Outlook apply Do Not Forward
Document Headers:
No
Header Text:
N/A
Font size:
N/A
Color:
N/A
Alignment:
N/A
Document Footers:
Yes
Footer Text:
Classified as Confidential \ Recipients Only
Font size:
10
Color:
Black
Alignment:
Left
Document Watermark:
No
Watermark Text:
None
Size:
N/A
Color:
N/A
Layout:
N/A
Conditions set:
None
Confidential \ All Employees
Label Name:
Confidential \ All Employees
Sub-Label:
Yes, of Confidential
Description:
Confidential data which is classified and protected. <Company name> employees may edit, reply, forward and print. Data owners can track and revoke content.
AIP Protection:
Protect, Set permissions, Add all members of tenant with Co-Owner rights
Document Headers:
No
Header Text:
N/A
Font size:
N/A
Color:
N/A
Alignment:
N/A
Document Footers:
Yes
Footer Text:
Classified as Confidential \ All Employees
Font size:
10
Color:
Black
Alignment:
Left
Document Watermark:
No
Watermark Text:
None
Size:
N/A
Color:
N/A
Layout:
N/A
Conditions set:
None
Highly Confidential
Label Name:
Highly Confidential
Sub-Label:
No
Description:
Very Sensitive business data that would certainly cause damage to the business if over-shared. Data is encrypted. Data owners can track and revoke content.
Label color:
Red
AIP Protection:
Not configured
Document Headers:
No
Header Text:
N/A
Font size:
N/A
Color:
N/A
Alignment:
N/A
Document Footers:
No
Footer Text:
N/A
Font size:
N/A
Color:
N/A
Alignment:
N/A
Document Watermark:
No
Watermark Text:
None
Size:
N/A
Color:
N/A
Layout:
N/A
Conditions set:
None
Highly Confidential \ Recipients Only
Label Name:
Highly Confidential \ Recipients Only
Sub-Label:
Yes, of Highly Confidential
Description:
Highly Confidential data that is encrypted and that can be viewed by the recipients only.
AIP Protection:
Protect, User defined permissions, In Outlook apply Do Not Forward
Document Headers:
No
Header Text:
N/A
Font size:
N/A
Color:
N/A
Alignment:
N/A
Document Footers:
Yes
Footer Text:
Classified as Highly Confidential \ Recipients Only
Font size:
10
Color:
Black
Alignment:
Left
Document Watermark:
No
Watermark Text:
None
Size:
N/A
Color:
N/A
Layout:
N/A
Conditions set:
None
Highly Confidential \ All Employees
Label Name:
Highly Confidential \ All Employees
Sub-Label:
Yes, of Highly Confidential
Description:
Highly Confidential data which is classified and protected. <Company name> employees may edit, reply, forward and print. Data owners can track and revoke content.
AIP Protection:
Protect, Set permissions, Add all members of tenant with Co-Owner rights
Document Headers:
No
Header Text:
N/A
Font size:
N/A
Color:
N/A
Alignment:
N/A
Document Footers:
Yes
Footer Text:
Classified as Highly Confidential \ All Employees
Font size:
10
Color:
Black
Alignment:
Left
Document Watermark:
No
Watermark Text:
None
Size:
N/A
Color:
N/A
Layout:
N/A
Conditions set:
None
Template
Label Name:
LabelName
Sub-Label:
No
Description:
Description of Label Usage
Label color:
Color or N/A for sub-labels
AIP Protection:
Protection Properties
Document Headers:
No
Header Text:
N/A
Font size:
10
Color:
Black
Alignment:
Left
Document Footers:
No
Footer Text:
N/A
Font size:
10
Color:
Black
Alignment:
Left
Document Watermark:
No
Watermark Text:
None
Size:
N/A
Color:
N/A
Layout:
Diagonal
Conditions set:
None
Easy Configuration of the Azure Information Protection Scanner
NOTE: This content has been moved to https://aka.ms/AIPBlog and will be maintained/updated at that location moving forward. It is recommended that you use that location for AIP Scanner installs.
The Scenario:
The EU General Data Protection Regulation (GDPR) took effect on May 25, 2018 and marks a significant change to the regulatory landscape of data privacy. The aim of the GDPR is to protect all EU citizens from privacy and data breaches in an increasingly data-driven world. Organizations in breach of GDPR can be fined up to 4% of annual global turnover or €20 Million (whichever is greater). Needless to say, this has motivated organizations worldwide to better classify and protect sensitive personal data to protect against breach. One of the ways to accomplish this is to protect everything sensitive using Azure Information Protection.
Azure Information Protection allows data workers to classify and optionally protect documents as they are created. There are also options for automatically classifying/protecting emails as they are sent through your Exchange server or Exchange Online, and SharePoint Online can be protected using Microsoft Cloud App Security AIP integration. These options go a long way to protect newly created data and data migrated to the cloud, but what about the terabytes of data sitting on File Shares and On-Premises SharePoint 2013/2016 servers? That is where the AIP Scanner comes in.
The Solution:
The Azure Information Protection Scanner is the solution for classifying and protecting documents stored on File Shares and On-Premises SharePoint servers. The overview below is from the official documentation at /en-us/information-protection/deploy-use/deploy-aip-scanner. This blog post is meant to assist customers with deploying the AIP Scanner, but if there is ever a conflict, the official documentation is authoritative.

The AIP Scanner runs as a service on Windows Server and lets you discover, classify, and protect files on the following data stores:
- Local folders on the Windows Server computer that runs the scanner.
- UNC paths for network shares that use the Common Internet File System (CIFS) protocol.
- Sites and libraries for SharePoint Server 2016 and SharePoint Server 2013.
The scanner can inspect any files that Windows can index, by using iFilters that are installed on the computer. Then, to determine if the files need labeling, the scanner uses the Office 365 built-in data loss prevention (DLP) sensitivity information types and pattern detection, or Office 365 regex patterns. Because the scanner uses the Azure Information Protection client, it can classify and protect the same file types.
You can run the scanner in discovery mode only, where you use the reports to check what would happen if the files were labeled. Or, you can run the scanner to automatically apply the labels.
Note that the scanner does not discover and label in real time. It systematically crawls through files on data stores that you specify, and you can configure this cycle to run once, or repeatedly.
Prerequisites:
To install the AIP Scanner in a production environment, the following items are needed:
- A Windows Server 2012 R2 or 2016 Server to run the service
- Minimum 4 CPU and 4GB RAM physical or virtual
- Internet connectivity necessary for Azure Information Protection
- A SQL Server 2012+ local or remote instance (Any version from Express or better is supported)
- Sysadmin role needed to install scanner service (user running Install-AIPScanner, not the service account)
- If using SQL Server Express, the SQL Instance name is ServerName\SQLExpress
- Service account created in On Premises AD and synchronized with Azure AD (I will call this account AIPScanner in this document)
- Service requires Log on locally right and Log on as a service right (the second will be given during scanner service install)
- Service account requires Read permissions to each repository for discovery and Read/Write permissions for classification/protection
- AzInfoProtection.exe available on the Microsoft Download Center (The scanner bits are included with the AIP Client)
- Labels configured for Automatic Classification/Protection
Installation:
Here is where the Easy part from the title gets started. Installation of the AIP Scanner service is incredibly simple and straight-forward.
- Log onto the server where you will install the AIP Scanner service using an account that is a local administrator of the server and has permission to write to the SQL Server master database.
- Run AzInfoProtection.exe on the server and step through the client install (this also drops the AIP Scanner bits)
- Next, Right-click on the Windows
 button in the lower left-hand corner and click on Command Prompt (Admin)
- Type PowerShell and hit Enter

- At the PowerShell prompt, type the following command and press Enter:
Install-AIPScanner - When prompted, provide the credentials for the scanner service account (YourDomain\AIPScanner) and password
- When prompted for SqlServerInstance, enter the name of your SQL Server and press Enter
You should see a success message like the one below
- Right-click on the Windows button in the lower left-hand corner and click on Run
- In the Run dialog, type services.msc and click OK
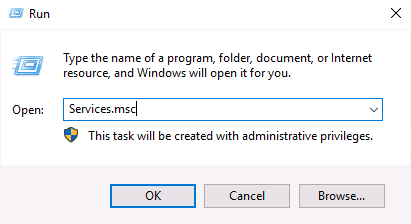
- In the Services console, double-click on the Azure Information Protection Scanner service
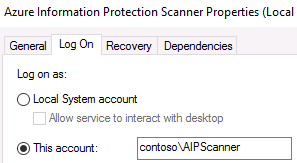
- On the Log On tab of the Azure Information Protection Scanner Service Properties, verify that Log on as: is set to the YourDomain\AIPScanner service account
See, told you it was easy to install. Luckily, configuring the service is only slightly more challenging. :-)
Scanner Configuration:
OK, this next part is not super simple but it isn't terrible either as long as you don't miss anything. Luckily, you can follow my steps to make it as easy as possible.
Authentication Token:
- On the server where you installed the scanner, create a new text document on the desktop and name it Set-AIPAuthentication.txt
- In this document, paste the line of PowerShell code below and save
Set-AIPAuthentication -webAppId <ID of the "Web app / API" application> -webAppKey <key value generated in the "Web app / API" application> -nativeAppId <ID of the "Native" application >
- Open Internet Explorer and browse to https://portal.azure.com
- At the Sign in to Microsoft Azure page, enter the your tenant admin credentials
- In the Microsoft Azure portal, click on Azure Active Directory in the left-hand pane

- Under Manage, click on App registrations
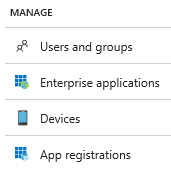
- In the App registrations blade, click the + New application registration button

- In the Create blade, use the values in the table below to create the registration
| Name | AIPOnBehalfOf |
| Application type | Web app / API |
| Sign-on URL | https://localhost |
 - Click the Create button to complete the app registration
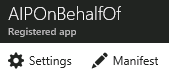
- In the AIPOnBehalfOf blade, hover the mouse over the Application ID and click on the Click to copy icon when it appears

- Minimize (DO NOT CLOSE) Internet Explorer and other windows to show the desktop
- On the desktop, return to Set-AIPAuthentication.txt and replace <ID of the "Web app / API" application> with the copied Application ID value
and Save

WARNING: Ensure there is only a single space after the Application ID before -webAppKey - Return to the browser and click on the Settings button
- In the Settings blade, under API ACCESS, click on Keys

- In the Keys blade, add a new key by typing AIPClient in the Key description field and your choice of duration (1 year, 2 years, or never expires)

- Select Save and copy the Value that is displayed
WARNING: Do not dismiss this screen until you have saved the value as you cannot retrieve it later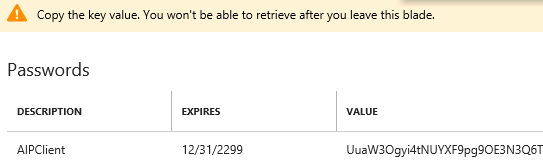
- Go back to the txt document and replace <key value generated in the "Web app / API" application> with the copied key valueand Save

WARNING: Ensure there is only a single space after the Application Key before -nativeAppId - In the Microsoft Azure portal, click on Azure Active Directory in the left-hand pane
- Under Manage, click on App registrations
- In the App registrations blade, click the + New application registration button
- In the Create blade, use the values in the table below to create the registration
| Name | AIPClient |
| Application type | Native Application |
| Sign-on URL | https://localhost |
 - Click the Create button to complete the app registration
- In the AIPClient blade, hover the mouse over the Application ID and click on the Click to copy icon when it appears
- Replace <ID of the "Native" application > in the Set-AIPAuthentication.txt document with the copied Application ID value
and Save

- Return to the browser and in the AIPClient blade, click on Settings
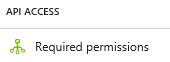
- In the Settings blade, under API ACCESS, select Required permissions
- On the Required permissions blade, click Add, and then click Select an API
NOTE: It may take a few moments for each of these blades to load - In the search box, type AIPO and click on AIPOnBehalfOf, and then click the Select button
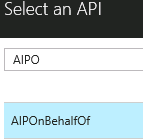
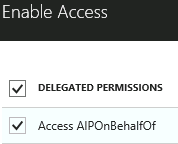
- On the Enable Access blade, check the box next to AIPOnBehalfOf, click the Select button

- Click Done

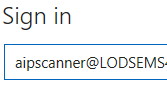
- Return to the PowerShell window and paste the completed command from Set-AIPAuthentication.txt and press Enter
- When prompted, enter the user AIPScanner@yourdomain.onmicrosoft.com and the password
NOTE: Replace tenantname with the your tenant
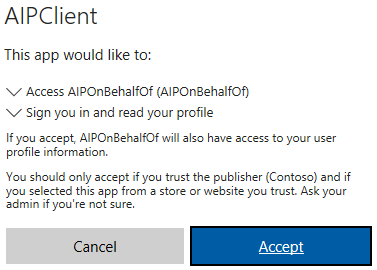
- You should see a prompt like the one below. Click Accept
- You will see the message below in the PowerShell window once complete

About Policies:
Now that the scanner is happy and fully authenticated, we should discuss what you want to do with the AIP Scanner. We know that you want to use it to scan file shares and SharePoint sites, but some discussion needs to be had about how the scanner locates data and what the scanner will do once it finds it. This may be a no brainer to some so feel free to skip this and move on to the next section if you like.
AIP Policies are made up of Labels and Sub-labels that allow you to classify and optionally protect data. You can assign conditions to labels using the standard Office 365 DLP templates and have those conditions be recommended or automatic. For the AIP Scanner to classify documents, you must set these conditions to be Automatic. This allows the AIP Scanner to protect content without the need for user input. This is a content based approach and labels are assigned to content based on the conditions defined in each label. If you want all of the documents in your repositories to be classified, then you can use the default label setting in the portal and the AIP Scanner will assign that label to any content that does not meet any other automatic criteria. This is done in the Global policy blade, under the Configure settings to display and apply on Information Protection end users section.
For more in-depth information about configuring policies, you can see the official documentation at /en-us/information-protection/deploy-use/configure-policy-classification
Configuring Repositories:
Finally, it is time to put the AIP Scanner to work scanning repositories. These can be on-premises SharePoint 2013 or 2016 document libraries or lists and any accessible CIFS based share. Keep in mind that in order to do discovery, classification, and protection, the scanner service pulls the documents to the server, so having the scanner server located in the same LAN as your repositories is recommended. You can deploy as many servers as you like in your domain, so putting one at each major site is probably a good idea.
To add a file share repository, open a PowerShell window and run the command below
Add-AIPScannerRepository -Path \\fileserver\documents
To add a SharePoint 2013/2016 document library run the command below
Add-AIPScannerRepository -Path https://sharepoint/documents
To verify that the repositories that are configured, run the command below
Get-AIPScannerRepository

Run the command below to run an initial discovery cycle
Set-AIPScannerConfiguration -Schedule OneTime
NOTE: Although the scanner will discover documents to protect, it will not protect them as the default configuration for the scanner is Discover only mode
Start the AIP Scanner service using the command below
Start-Service AIPScanner
Right-click on the Windows button in the lower left-hand corner and click on Event Viewer

Expand Application and Services Logs and click on Azure Information Protection

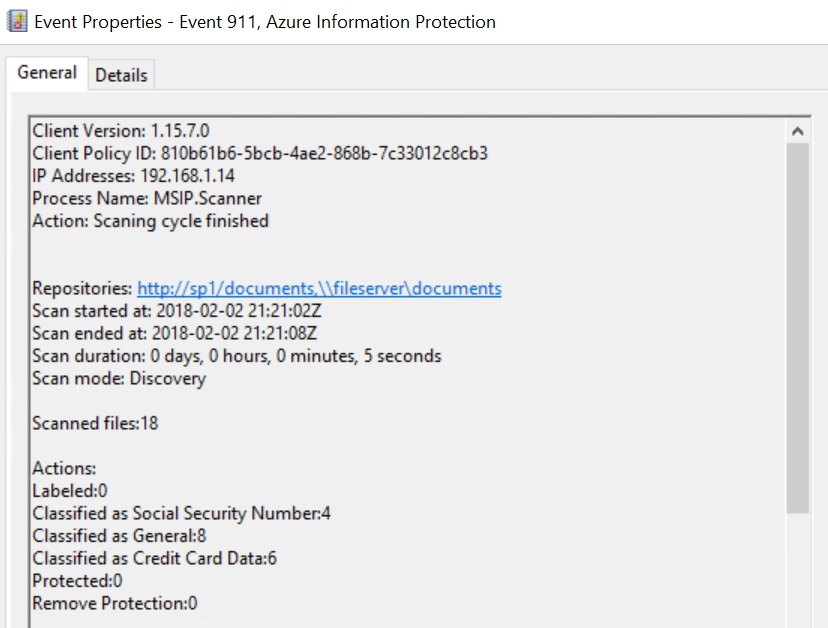
You will see an event like the one below when the scanner completes the cycle
NOTE: You may also browse to %localappdata%\Microsoft\MSIP\Scanner\Reports and review the summary txt and detailed csv files available there
At the PowerShell prompt type the command below to enforce protection and have the scanner run once
Set-AIPScannerConfiguration -Enforce On -Schedule OneTime -Type Full
NOTE: After testing, you would use the same command with the -Schedule Continuous command to have the AIP Scanner run continuously
NOTE: The -Type Full switch forces the scanner to review every document.
Start the AIP Scanner service using the PowerShell command below
Start-Service AIPScanner
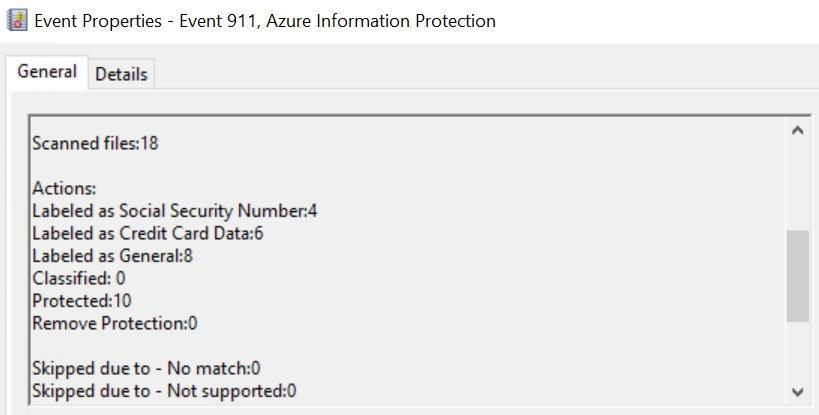
In the Event Log, you will now see an event that looks like the one below
And that's all there is to setting up the AIP Scanner! There are many more options to consider about how to classify files and what repositories you want to configure, but I would say that it is fairly simple to set up a basic scanner server that can be used to protect a large amount of data easily. I highly recommend reading the official documentation on deploying the scanner as there are some less common caveats that I have left out and they cover performance tips and other nice additional information.
I hope this was helpful. Please rate the article if it was helpful and let me know in the comments below if I missed anything or if anything is not clear. Check out the rest of my content at https://aka.ms/Kevin
Kevin
Encrypting Emails from Anywhere!
***If you would like to help shape the future of OME, please fill out the survey at https://aka.ms/OMESurvey***
The Situation:
So, you recently purchased Microsoft 365 E3/E5 (or EMS E3/E5) and have started rolling out your pilot of Azure Information Protection. Everything is going great until one of your executives approaches you and wants to know how to protect emails from their phone/tablet while they are relaxing on the beach. You could always just hand them a shiny new Surface Pro with Office 365 Pro Plus, but they mentioned that sometimes they send emails while they are in the water (hey, I do that too!) and Surface Pro's aren't super tiny and waterproof (yet). So, you need a different solution that will quickly enable said executive to classify and protect their emails right from their portable device.
The Solution:
The solution to this conundrum comes in the form of the new Office 365 Encrypt functionality and Exchange Online Mail Flow Rules (the feature formerly known as Exchange Transport Rules or ETRs). By using a mail flow rule, you can allow your executives (and everyone else) to automatically encrypt emails and supported attachments by simply adding a keyword like #Encrypt to the bottom of their message. I will walk you through this process in the rest of this post.
The Mail Flow Rule
We will now set up a super simple mail flow rule to accomplish this task. Follow the steps below to set up your mail flow rule.
- Log into https://outlook.office365.com/ecp/ as either a Office 365 Global Admin or Exchange Admin
- On the left side, click mail flow

- This will default to the rules pane
- In the rules pane, click the
 and click Create a new rule...
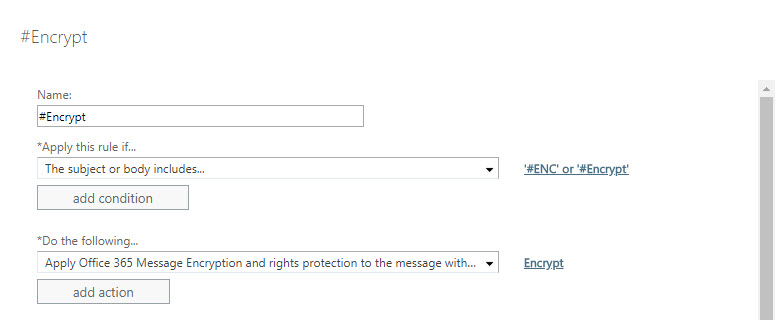
- In the new rule pane, name the rule #Encrypt and click the More options... link
- After clicking More options..., select the drop-down under *Apply this rule if... and hover over The subject or body... and select subject or body includes any of these words
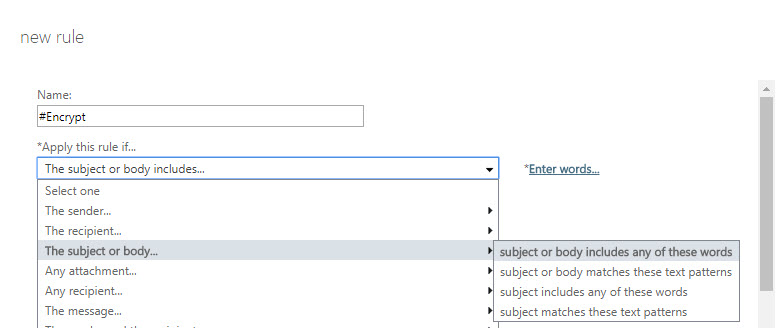
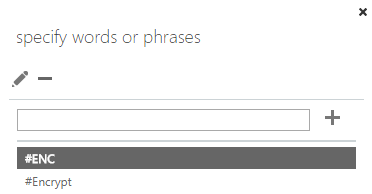
- In the specify words or phrases dialog, add #Encrypt (and optionally #ENC) and press then OK once finished
- Click the drop-down below the *Do the following... and hover over Modify the message security... and click Apply Office 365 Message Encryption and rights protection
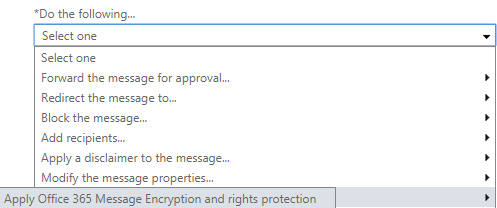
- In the select RMS template dialog, click the drop-down below RMS template: and select Encrypt and click OK

- The completed rule should look like the image below. Click Save to finish creating the mail flow rule.
That's it! Now that you have completed these steps, you have a keyword (#Encrypt) that you can use for mobile devices and any other clients that do not currently support the Encrypt Only protection template natively. Hopefully this is helpful to get you set up to use the new Encrypt functionality. Let me know in the comments if there is anything you didn't understand.
Thanks!
Kevin
***Author's Note***
I know that the original version of this post included the set up of a unified classification label that can be used across any Office version. It was brought to my attention that this was confusing so I have broken that information out into it's very own blog post! Please see my new blog post at https://blogs.technet.microsoft.com/kemckinn/2018/07/19/using-encrypt-only-even-on-older-office-versions for that information (currently in development).
Full AIP Scanner Configuration (AIP Premium P1 Edition)
The Scenario:
You recently signed an Enterprise Agreement that includes AIP Premium P1 as one of the features (EMS E3/Microsoft 365 E3) and have been told that the AIP Scanner can be used to discover and protect your sensitive data. You want to know what this story looks like for you and how to fully install, configure, and best utilize the AIP Scanner based on just the capabilities that are included in the AIP Premium P1 license. Luckily, I have created multiple blog posts that show you what is possible in that regard.
https://blogs.technet.microsoft.com/kemckinn/2018/03/23/easy-configuration-of-the-azure-information-protection-scanner/
https://blogs.technet.microsoft.com/kemckinn/2018/05/11/more-fun-with-the-aip-scanner-ems-e3-aip-p1-capabilities/ https://blogs.technet.microsoft.com/kemckinn/2018/06/18/aip-scanner-discovering-all-the-sensitive-data/
Unfortunately, due to new capabilities of the AIP Scanner and trying to appeal to the largest audience, I have lost a bit of cohesion when trying to tell the specific story of what can be done at various license levels. But have no fear! I will shamelessly rip off bring together all of these blogs to give you a full story of what can be done at each of the license levels so you can focus on what you can do right now. I will focus this article on the Installation, Configuration, and Utilization of the AIP Scanner for functions available to the AIP Premium P1 license and will spare some of the exposition in the original articles for the sake of efficiency. So feel free to check those articles out if you want to hear more of my witty remarks read more detail about the product.
The Solution:
Installation:
Prerequisites:
To install the AIP Scanner in a production environment, the following items are needed:
- A Windows Server 2012 R2 or 2016 Server to run the service
- Minimum 4 CPU and 4GB RAM physical or virtual
- Internet connectivity necessary for Azure Information Protection
- A SQL Server 2012+ local or remote instance (Any version from Express or better is supported)
- Sysadmin role needed to install scanner service (user running Install-AIPScanner, not the service account)
- If using SQL Server Express, the SQL Instance name is ServerName\SQLExpress
- If you cannot be granted the Sysadmin role or your organization policies require databases to be created and configured manually, see Deploying the scanner with alternative configurations
- Service account created in On Premises AD and synchronized with Azure AD (I will call this account AIPScanner in this document)
- Service requires Log on locally right and Log on as a service right (the second will be given during scanner service install)
- Service account requires Read permissions to each repository for discovery and Read/Writepermissions for classification/protection
- AzInfoProtection.exe available on the Microsoft Download Center (The scanner bits are included with the AIP Client)
Binary/Service Installation:
Installation of the AIP Scanner service is incredibly simple and straightforward (once you have done it a few dozen times or if you follow this blog).
- Log onto the server where you will install the AIP Scanner service using an account that is a local administrator of the server and has permission to write to the SQL Server master database.
- Run AzInfoProtection.exeon the server and step through the client install (this also drops the AIP Scanner bits)
- Next, Right-click on the Windows button in the lower left-hand corner and click on Command Prompt (Admin)
- Type PowerShelland hit Enter
- At the PowerShell prompt, type the following command and press Enter:
Install-AIPScanner - When prompted, provide the credentials for the scanner service account (YourDomain\<AIPScanner Service Account>) and password
- When prompted for SqlServerInstance, enter the name of your SQL Server and press Enter
You should see a success message like the one below
NOTE: If you get any errors at this point, verify network connectivity and resolve any permissions issues with the SQL Database before proceeding! - Right-click on the Windows button in the lower left-hand corner and click on Run
- In the Run dialog, type services.msc and click OK
- In the Services console, double-click on the Azure Information Protection Scanner service
- On the Log On tab of the Azure Information Protection Scanner Service Properties, verify that Log on as: is set to the YourDomain\AIPScanner service account
See, told you it was easy to install. Luckily, configuring the service is only slightly more challenging. 🙂
Scanner Configuration:
OK, this next part is not super simple but it isn't terrible either as long as you don't miss anything. Luckily, you can follow my steps to make it as easy as possible.
Authentication Token:
- On the server where you installed the scanner, create a new text document on the desktop and name it something like Set-AIPAuthentication.txt
- In this document, paste the line of PowerShell code below and save
Set-AIPAuthentication -webAppId <ID of the "Web app / API" application> -webAppKey <key value generated in the "Web app / API" application> -nativeAppId <ID of the "Native" application>
- Open Internet Explorer and browse to https://portal.azure.com
- At the Sign in to Microsoft Azure page, enter the your tenant global admin credentials
- In the Microsoft Azure portal, click on Azure Active Directory in the left-hand pane
- Under Manage, click on App registrations
- In the App registrationsblade, click the + New application registration button
- In the Create blade, use the values in the table below to create the registration
| Name | AIPOnBehalfOf |
| Application type | Web app / API |
| Sign-on URL | https://localhost |
 - Click the Create button to complete the app registration
- In the AIPOnBehalfOf blade, hover the mouse over the Application ID and click on the Click to copyicon when it appears
- Minimize (DO NOT CLOSE) Internet Explorer and other windows to show the desktop
- On the desktop, return to Set-AIPAuthentication.txt and replace <ID of the "Web app / API" application> with the copied Application ID value
and Save
WARNING: Ensure there is only a single space after the Application ID before -webAppKey - Return to the browser and click on the Settingsbutton
- In the Settings blade, under API ACCESS, click on Keys
- In the Keys blade, add a new key by typing AIPClientin the Key description field and your choice of duration (1 year, 2 years, or never expires)
- Select Saveand copy the Value that is displayed
WARNING: Do not dismiss this screen until you have saved the value as you cannot retrieve it later - Go back to the txt document and replace <key value generated in the "Web app / API" application> with the copied key valueand Save
WARNING: Ensure there is only a single space after the Application Key before -nativeAppId - In the Microsoft Azure portal, click on Azure Active Directory in the left-hand pane
- Under Manage, click on App registrations
- In the App registrationsblade, click the + New application registration button
- In the Create blade, use the values in the table below to create the registration
| Name | AIPClient |
| Application type | Native Application |
| Sign-on URL | https://localhost |
 - Click the Create button to complete the app registration
- In the AIPClient blade, hover the mouse over the Application ID and click on the Click to copyicon when it appears
- Replace <ID of the "Native" application > in the Set-AIPAuthentication.txt document with the copied Application ID value
and Save
- Return to the browser and in the AIPClient blade, click on Settings
- In the Settings blade, under API ACCESS, select Required permissions
- On the Required permissions blade, click Add, and then click Select an API
NOTE: It may take a few moments for each of these blades to load - In the search box, type AIPO and click on AIPOnBehalfOf, and then click the Selectbutton
- On the Enable Access blade, check the box next to AIPOnBehalfOf, click the Select button
- Click Done
- In the Required permissions blade, click Grant permissions
- In the popup window, click Yes
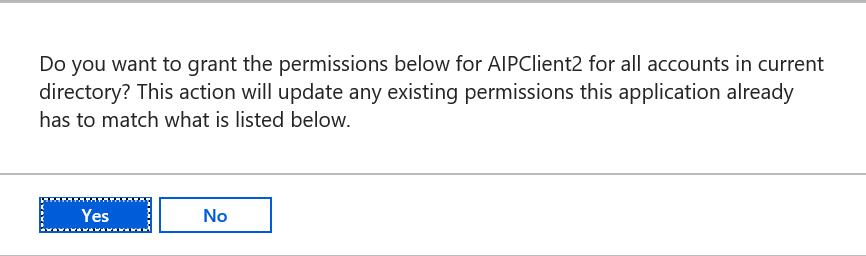
- Click on the Start menu and type PowerShell, right-click on the PowerShell program, and click Run as a different user.

- In the Run as different user dialog, insert the Scanner Service credentials
- In the Scanner Service context PowerShell window, paste the completed command from Set-AIPAuthentication.txt and press Enter
- When prompted, enter the user AIPScanner@yourdomain.com and the password
NOTE: Replace yourdomain with the your tenant
- You will see the message below in the PowerShell window once complete
Configuring Repositories:
Finally, it is time to put the AIP Scanner to work scanning repositories. These can be on-premises SharePoint 2013 or 2016 document libraries or lists and any accessible CIFS based share. Keep in mind that in order to do discovery, classification, and protection, the scanner service pulls the documents to the server, so having the scanner server located in the same LAN as your repositories is recommended. You can deploy as many servers as you like in your domain, so putting one at each major site is probably a good idea (Microsoft currently uses around 40 Scanner instances worldwide for internal repositories).
- To add a file share repository, open a PowerShell window and run the command below
Add-AIPScannerRepository -Path \\fileserver\documents - To add a SharePoint 2013/2016 document library run the command below
Add-AIPScannerRepository -Path https://sharepoint/documents - To verify that the repositories that are configured, run the command below
Get-AIPScannerRepository
Sensitive Data Discovery:
One of the most useful features of the AIP Scanner for the AIP Premium P1 license level is the discovery of sensitive data across all of your configured repositories. You can do this by adding a parameter to Set-AIPScannerConfiguration called -DiscoverInformationTypes. When this property is set to All, the scanner uses any custom conditions that you have specified for labels in the Azure Information Protection policy, and the list of information types that are availableto specify for conditions on labels in the Azure Information Protection policy. When you use this option, labels do not need to be configured for any conditions.
The command below will allow you to scan your repositories against all information types
PS C:\> Set-AIPScannerConfiguration -Enforce Off -Schedule OneTime -Type Full -DiscoverInformationTypes All
After running the scan, you can review the logs by opening the Azure Information Protection event log or you can view the detailed logs at C:\users\<Scanner Service Account Profile>\appdata\local\Microsoft\MSIP\Scanner\Reports. There you will find the summary txt and detailed csv files.
Bulk Protection:
Now that you have a list of all of your sensitive files, you can use AIP PowerShell to Classify and Protect the files. You can either script this using the information you have obtained from the scanner, or you can relocate the files to a central location where you can bulk protect the entire location. If you choose to do the latter, you can use the PowerShell commands below to accomplish this.
PS C:\> Install-Module Aadrm
PS C:\> Import-Module Aadrm
PS C:\> Set-AIPFileLabel -Path \\Finance\Projects\ -LabelId d9f23ae3-4321-4321-4321-f515f824c57b -JustificationMessage '
The previous label no longer applies' -Owner "admin@contoso.com" -PreserveFileDetails
And that is it! Now you can start using the AIP Scanner and PowerShell to classify and protect entire file shares and on prem SharePoint libraries with only an AIP Premium P1 license!
Please leave comments below and rate to let me know if you enjoy my posts.
The rest of my content can be found at https://aka.ms/Kevin
Thanks!
Kevin
Full AIP Scanner Configuration (AIP Premium P2 Edition)
The Scenario:
You recently signed an Enterprise Agreement that includes AIP Premium P2 as one of the features (EMS E5/Microsoft 365 E5) and have been told that the AIP Scanner can be used to discover and protect your sensitive data. You want to know what this story looks like for you and how to fully install, configure, and best utilize the AIP Scanner. Luckily, I have created multiple blog posts that show you what is possible in that regard.
https://blogs.technet.microsoft.com/kemckinn/2018/03/23/easy-configuration-of-the-azure-information-protection-scanner/
https://blogs.technet.microsoft.com/kemckinn/2018/05/11/more-fun-with-the-aip-scanner-ems-e3-aip-p1-capabilities/ https://blogs.technet.microsoft.com/kemckinn/2018/06/18/aip-scanner-discovering-all-the-sensitive-data/
Unfortunately, due to new capabilities of the AIP Scanner and trying to appeal to the largest audience, I have lost a bit of cohesion when trying to tell the specific story of what can be done at various license levels. But have no fear! I will shamelessly rip off bring together all of these blogs to give you a full story of what can be done at each of the license levels so you can focus on what you can do right now. I will focus this article on the Installation, Configuration, and Utilization of the AIP Scanner for functions available to the AIP Premium P2 license and will spare some of the exposition in the original articles for the sake of efficiency. So feel free to check those articles out if you want to hear more of my witty remarks read more detail about the product.
The Solution:
I have been told that I need to be a bit more adultish with my blog posts going forward, so please check out the stunning conclusion to this blog post on our official AIP blog at https://techcommunity.microsoft.com/t5/Azure-Information-Protection/Installation-Configuration-and-Usage-of-the-Azure-Information/ba-p/221792 and bookmark https://aka.ms/AIPBlog for future exciting content from yours truly (I will of course keep writing my fun scenarios here, but the solutions will all be over in the grown-up blog).
Thanks!
Kevin
More Fun with the AIP Scanner (EMS E3/AIP P1 Capabilities)
The Scenario:
So you recently read my post about configuring the Azure Information Protection Scanner and love the capabilities, but alas, you only have EMS E3/AIP P1 licensing so you can't use the AIP Scanner since Automatic Labeling is an EMS E5/AIP P2 feature, right? Well, almost. It has recently been brought to my attention that there is one Automatic label that is available to EMS E3/AIP P1, and that is the Default Label. A default label is used to make it easier to start classifying all of your data and is typically set to a non-protected (unencrypted) label such as General so as not to upset standard business processes.
However, the designers of the AIP Scanner are AWESOME and decided that you could assign a different default label for each AIP Repository! This means that if you want to use your Confidential (or HR Only, Legal Only....) label as the default label for a specific repository, you can do just that! So, you can stand up an AIP Scanner instance and use it to apply a label to an entire folder on a file share or specific on prem SharePoint document list/library and everything unlabeled in that folder/library will be classified and, if specified, protected with that default label.
The Solution:
So...how do we make this amazing functionality happen?? Simple! First, make sure you have the AIP Scanner fully deployed up to the point where you are ready to add repositories (see my previous blog if you need help here) and then use the PowerShell command below to add your repository (using fake values for the repository and label details, change the red items).
PS C:\> Add-AIPScannerRepository -Path \\NAS\HR -SetDefaultLabel On -DefaultLabelId f018e9e7-0cfc-4c69-b27a-ac3cb7df43cc -DefaultOwner "admin@contoso.com"
Note that we are also assigning a default owner that will have full control of the documents. This command is actually stolen from fully documented at /en-us/powershell/module/azureinformationprotection/add-aipscannerrepository and as always, if that page is updated it is authoritative over any content here.
One caveat to this feature is that a default label, by design, will only label items that have never been classified before. The AIP scanner -OverrideLabel switch is only used to override labels if they match automatic conditions (E5/P2 feature). So if you are using default labels throughout your organization, those files will be skipped by the scan.
If you are using default labels, you can still have this same functionality but you would need to script the use of the Set-AIPFileLabel cmdlet on the repository to be able to provide justification for the changing of the labels and set up a scheduled task to run the commands on a regular basis. While this is not elegant, it does provide similar functionality with only the E3/P1 license. A sample of that command is shown below.
PS C:\> Set-AIPFileLabel -Path \\Finance\Projects\ -LabelId d9f23ae3-4321-4321-4321-f515f824c57b -JustificationMessage 'The previous label no longer applies' -Owner "admin@contoso.com" -PreserveFileDetails
And that is it! Now you can start using the AIP Scanner (or PowerShell) to classify and protect entire file shares and on prem SharePoint libraries with only an EMS E3/AIP P1 license!
***UPDATE***
But wait, there's more! I recently documented additional discovery features that can be done with an E3/P1 license at https://blogs.technet.microsoft.com/kemckinn/2018/06/18/aip-scanner-discovering-all-the-sensitive-data/. This gives even more flexibility with finding your sensitive data so that you can move it to a secure repository (or protect it where it is if you decide to move to E5/P2 for auto-classification capabilities).
Please leave comments below and rate to let me know if you enjoy my posts.
The rest of my content can be found at https://aka.ms/Kevin
Thanks!
Kevin
Protecting Data That (Shouldn't Be but) Is Leaving Your Network in the Clear
The Scenario:
You have just received a message from Microsoft that Azure Information Protection and Office 365 Message Encryption has been enabled in your tenant. So what, right? Well, I will tell you why this is an amazing thing! Every year millions of dollars are lost due to identity theft and companies are held liable for mistakes their employees make that result in the disclosure of customer data. One of the ways these disclosures often happen is through email.
The Solution:
Office 365 Message Encryption has been updated so that users can now send encrypted emails to anyone regardless of the service the recipient uses. This opens up new possibilities for securing data in transit that were previously very challenging without adversely affecting the user experience. The amazing thing is that this can now be triggered based on the content of an email or attached file. In this post, I will walk you through setting up one of these rules so you can start protecting your data in transit. I will also show you some examples of what the user experience looks like for a social email recipient.
The Mail Flow Rule
So, here we will set up a mail flow rule to trigger on credit card numbers that are sent in the body of an email or attachment. This is a simple use case for this that you can use to extrapolate additional items you can trigger on from sensitive PII data to Mergers and Acquisitions information that should not be going out in the clear.
- Log into https://outlook.office365.com/ecp/ as either a Office 365 Global Admin or Exchange Admin
- On the left side, click mail flow
- This will default to the rules pane
- In the rules pane, click the and click Apply Office 365 Message Encryption and rights protection to messages...

- In the new rule pane, name the rule Credit Card Data and select the drop-down under *Apply this rule if... and hover over This message... and click contains any of these types of sensitive information
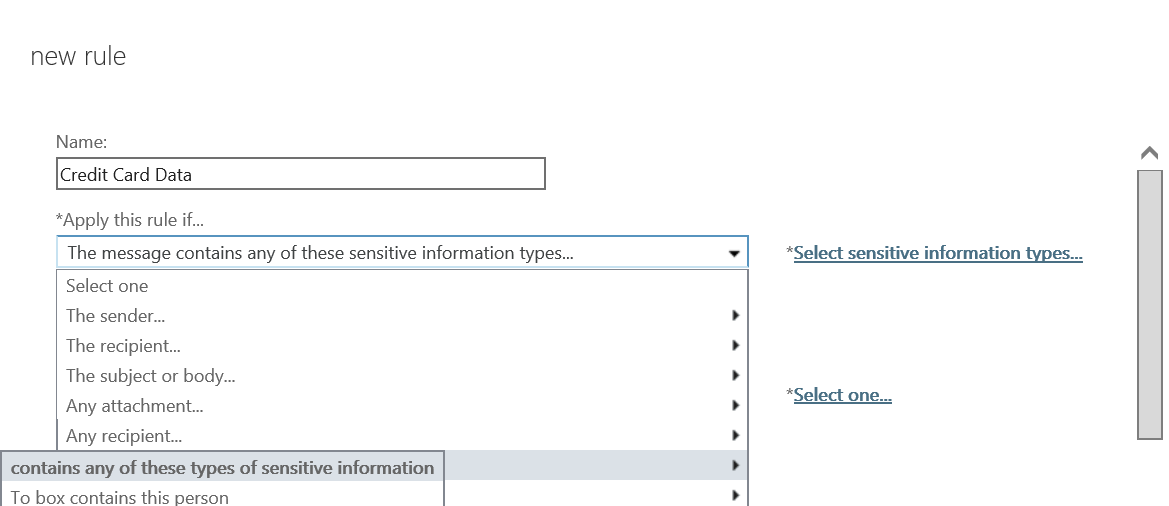
- In the Contains any of these sensitive information types dialog, click on the , scroll down and select Credit Card Number. Click the Add -> button, and click OK.
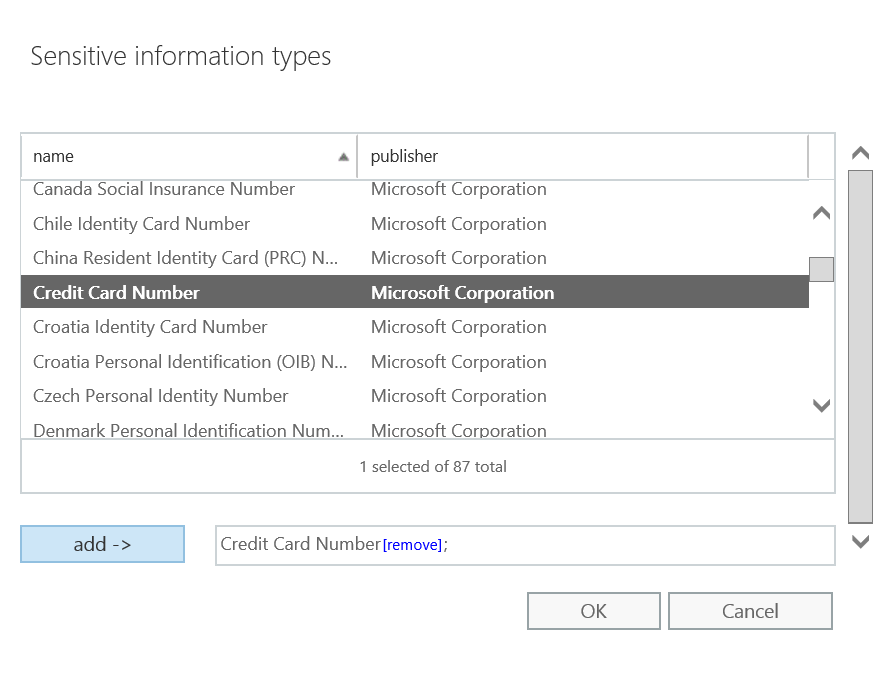
NOTE: You can add multiple types of sensitive information types to a single rule through this dialog. - In the Contains any of these sensitive information types dialog, you can now set additional settings related to each sensitive data type. We will leave it at the defaults and click OK.
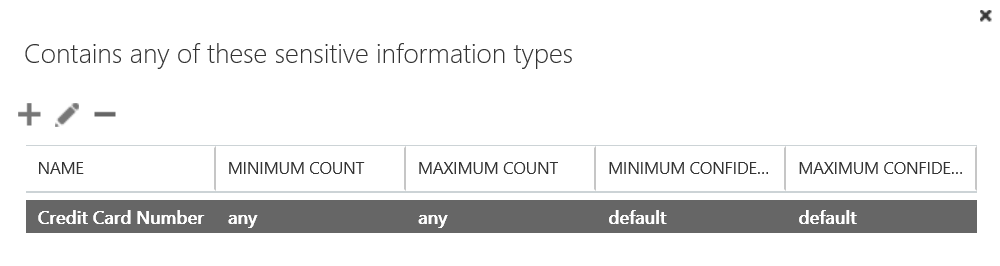
- Under *Do the following..., next to Apply Office 365 Message Encryption and rights protection to the message with..., click *Select one...

- In the select RMS template dialog, click the drop-down below RMS template: and select Encrypt and click OK
- The completed rule should look like the image below. Click Save to finish creating the first mail flow rule.
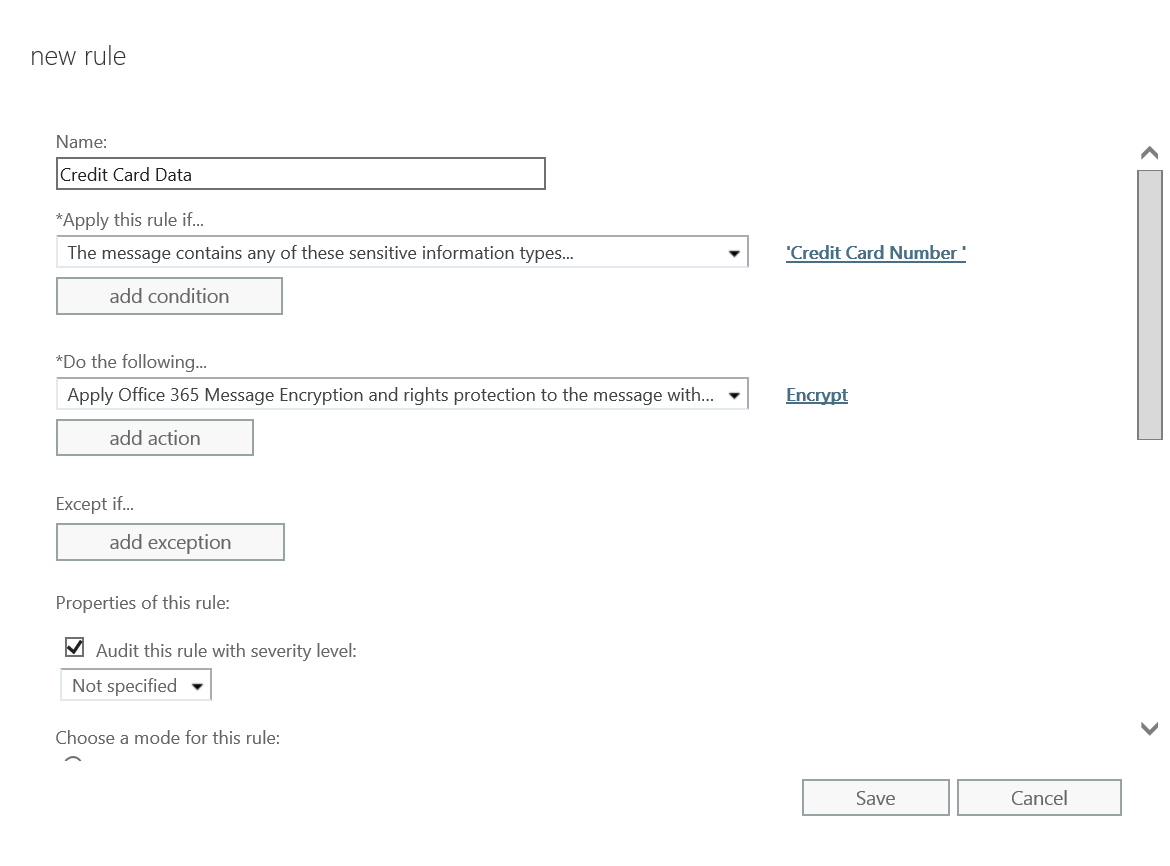
The User Experience
Now that we have the rule created, we can test the user experience. Please note that mail flow rules may take up to 15 minutes to be fully functional after creation, so now's a good time to go get some coffee or a soda. ;-) The steps below will show a user sending a clear text email with a Credit Card and a Gmail user recipient.
This needs to be a real Credit Card Number as EXO uses an algorithm to verify. I got mine from https://www.paypalobjects.com/en_GB/vhelp/paypalmanager_help/credit_card_numbers.htm
- This first image shows a credit card number being sent to a Gmail user with no protection.
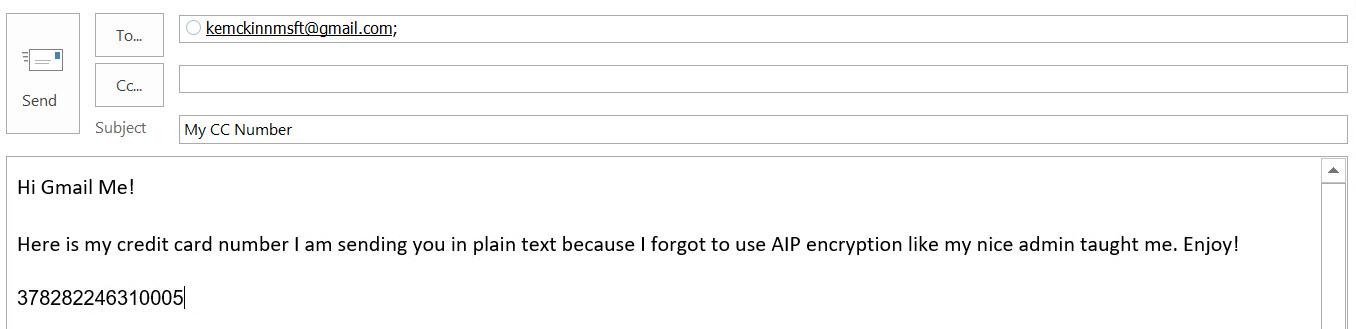
- In the Gmail mailbox you can see that the message came in and the wrapper data is all that can be seen of the content.

- The standard OME wrapper format is shown below. As you can see in this image, the text, branding icon and color can be customized. Details on that are available at https://aka.ms/OMEBranding.
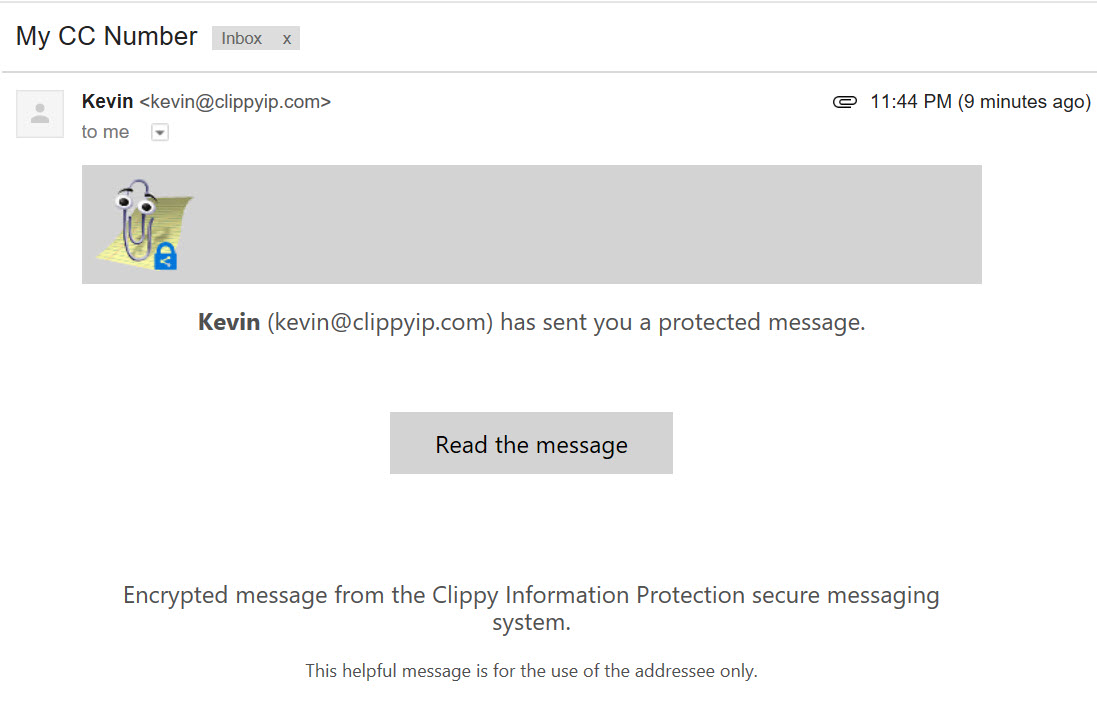
- After clicking Read the message, the user is sent to an authentication portal based on the social email service. In this case it is Google, but Outlook.com, Yahoo, and several others also have dedicated authentication. For other email providers that may not have their own authentication platform (who still has their Prodigy email?), they will be given the common option of a one-time passcode.
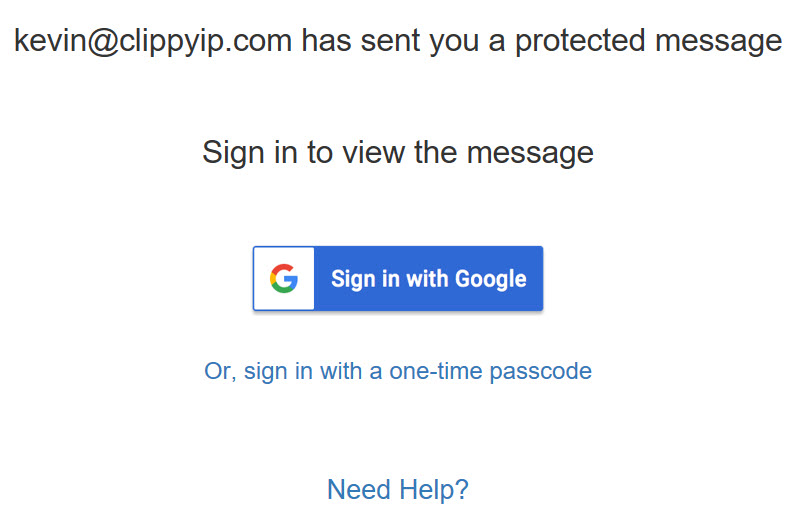
- In this case I authenticated with Google and it took me directly to the message in the OME Portal.
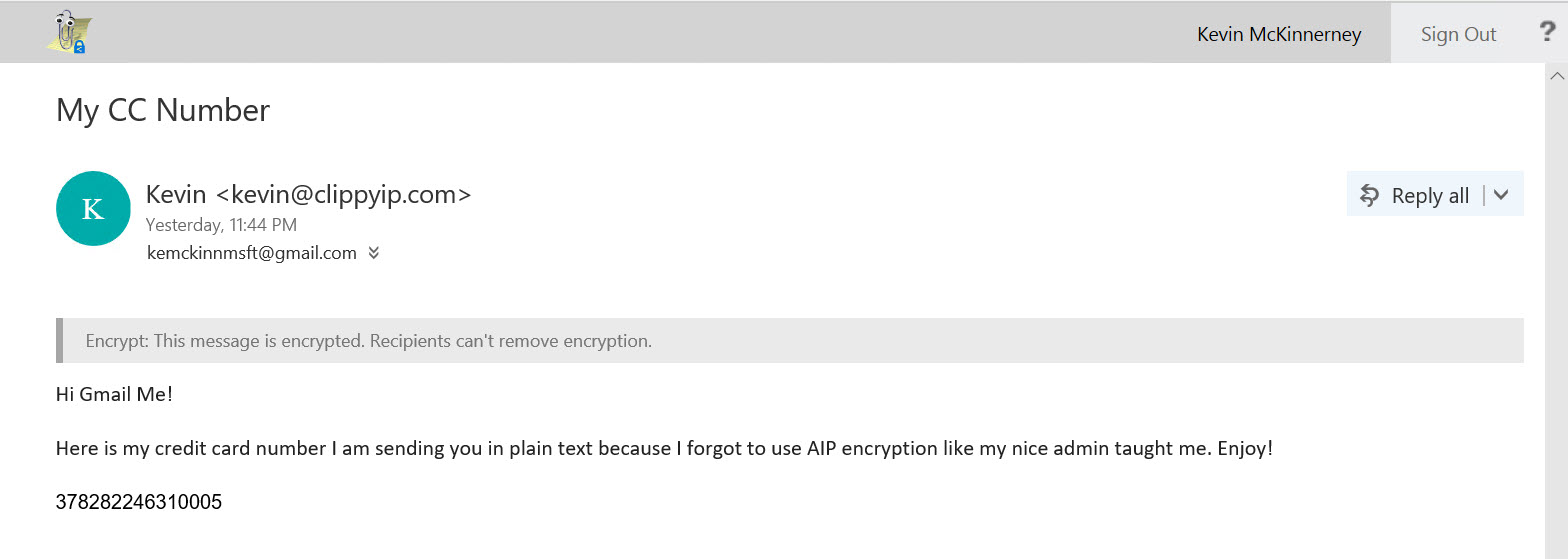
- If the user clicks sign in with a one-time passcode, they will be forwarded to the page below
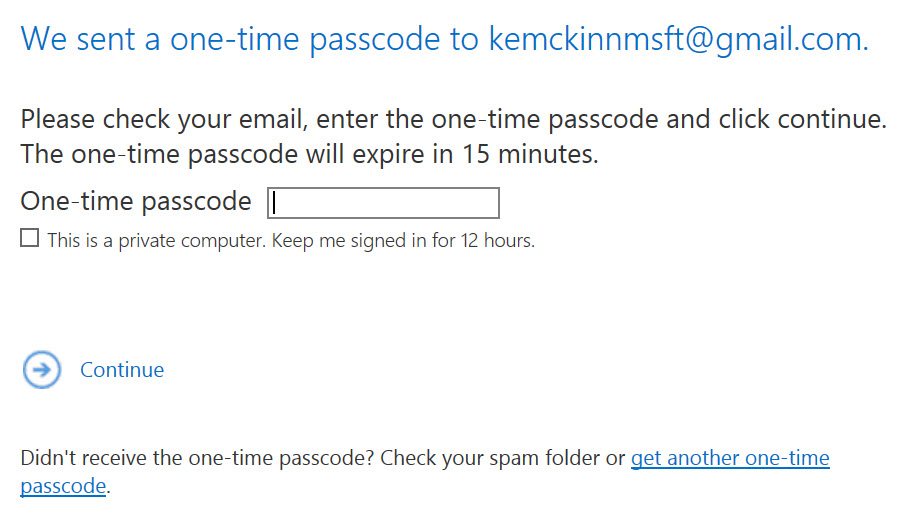
- The one-time passcode will be sent to the same email and they can use this to authenticate to the OME Portal.
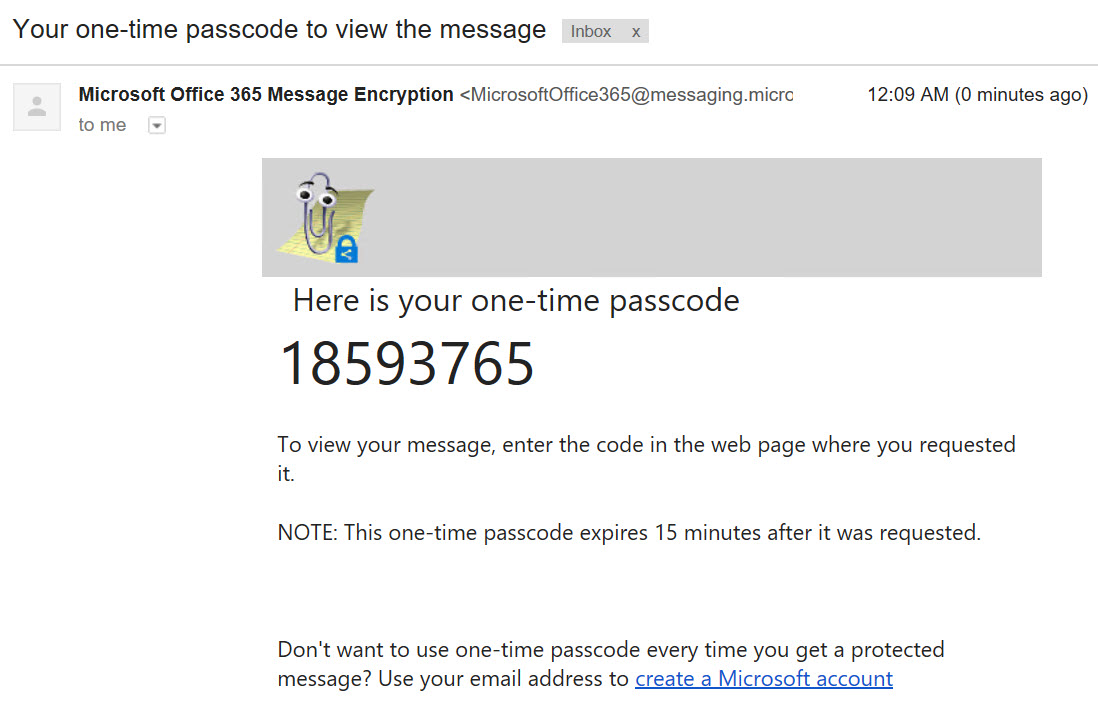
And there you have it. You can use a EXO mail flow rule to catch sensitive data leaving your network and encrypt it in transit. As I have shown in the images above, the user experience is fluid and pleasant and is accessible to anyone.
NOTE: Official documentation for configuring these type of rules and additional use cases are available at /en-us/azure/information-protection/deploy-use/configure-exo-rules
Thanks,
Kevin
More fun content at https://aka.ms/Kevin
Sending Protected Attachments to Social Identities
The Scenario:
So you have started using the fancy new Encrypt functionality to send protected emails to users on Outlook.com, Gmail, Yahoo, and other social identity providers and you start getting some complaints. It seems that users on older versions of Office (not Office 365 monthly channel) are having problems opening attachments that were sent with protected emails. So, we can just ask them to update to the latest version of Office 365 ProPlus and get on the monthly update channel, right?? Yeah...we would have a bad time if we went that route. Luckily, the Office team heard these cries and came to the rescue.
The Solution:
In a recent technical blog post, the Office team introduced a new feature for decrypting attachments on download for users that are not on Office 365. This awesome new feature helps to reduce the friction for social identity recipients of emails with attachments. In this post, I am going to shamelessly plagiarize elaborate on the steps to accomplish this task. It is not hard, but having the steps laid out on a single page does have it's merits. :-)
First, we have to connect to Exchange Online PowerShell. For those that have a dedicated prompt for this, feel free to skip these steps and go straight to the Set-IRMConfiguration command below.
- Click on the start menu and type PowerShell, then right-click on Windows PowerShell and select Run as administrator
- In the admin PowerShell window run the command Set-ExecutionPolicy RemoteSigned and type y and enter if prompted.
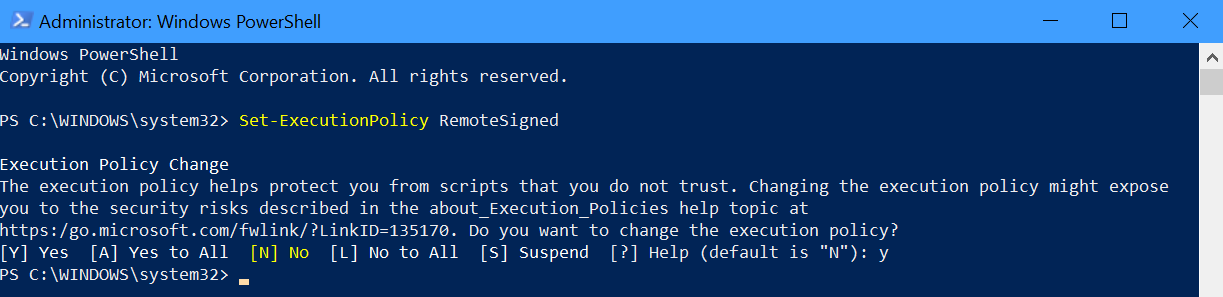
- Next, type $UserCredential = Get-Credential and provide the username of your exchange or global admin
- Next, run $Session = New-PSSession -ConfigurationName Microsoft.Exchange -ConnectionUri https://outlook.office365.com/powershell-liveid/ -Credential $UserCredential -Authentication Basic -AllowRedirection to create the session. If you have any errors, you may have one of the more picky tenants (Germany, 21Vianet, Proxy configurations) then you should see https://aka.ms/EXOPowerShell for additional details.
- Finally, run Import-PSSession $Session -DisableNameChecking to complete the connection to EXO PowerShell.
- Now that you are connected, you can run Set-IRMConfiguration -DecryptAttachmentFromPortal $true to enable the feature I described earlier.
That's all it takes. Now, when a recipient that is not an Office 365 user get a protected email with an attachment, that attachment will be decrypted upon download of the document. They will still be able to preview it in the OME interface, but when it is downloaded the protection will be removed so they can open it without an issue in any supported version of office. Now, if the user IS an Office 365 user, the attachment will maintain it's encrypted status upon download.
Removing the encryption of an attachment may seem at first glance like a bad idea, but keep in mind that through the email wrapper, the attachment is fully encrypted from sender to recipient and the user must authenticate before they will ever see the attachment. This is a similar experience to third party systems, but for Office 365 users you get the added value of having supported attachments be encrypted as well.
Thanks,
Kevin
More fun content at https://aka.ms/Kevin
Super Secret Unfinished Blog Posts!!!
Hi All,
This is a quick note for my loyal blog followers. I regularly have new ideas for blog posts that often sit in my drafts for far too long. Because of this, I have decided to start staging my blogs on Github so you can see the future goodies I am working on for you. I am still in the process of consolidating from my various draft locations, but going forward, all of my new blog ideas will start on Github. Once I have rewritten and formatted them a few dozen times, they will eventually graduate to this and the AIPBlog, but I thought it would be nice to let you have a look at the content that will come out in the future. Keep in mind that the content of these blogs will often not be polished and occasionally be inaccurate (like most of my blogs really, but worse) so take care in using the content for any production purposes. As always, I welcome feedback even when I am in the development stage, so please let me know if you see something that could be better.
https://github.com/kemckinnmsft/AIPBlogDrafts
Thanks,
Kevin
The Enterprise Admin (unpleasant) Way to Add an AD RMS Service Connection Point
The Situation:
You need to install a new AD RMS cluster in your environment because you got a nastygram from an auditor about not having your document libraries protected. However, you have secured your environment against modern threats which means that your Enterprise Admin cannot log into one of those dirty Tier 1 servers (good job!). Unfortunately, there isn't a quick and easy way to register the SCP any more unless you are an EA logged into an AD RMS server. There was a toolkit once upon a time (RMS 1.0 SP2 Administration Toolkit, I believe) that had a nifty tool that let you register the SCP from a command line, but alas, that toolkit has gone the way of the dinosaur and cannot be found unless you delve into deep dark places on the web that no respectable Admin should be going. One would think that this is an easy thing to create a PowerShell module for, but I am not going to start venting here. Anyway, I had to manually create an SCP the other day so I thought I would do a quick and dirty writeup on how it can be done. (Perhaps sometime in the future a nifty PowerShell module will make this post obsolete...hint, hint, PG).
The Solution:
So...if there isn't a tool to do the job, we do it manually. It really isn't that hard, but you would be amazed at the lack of useful information about this that exists out there. Anyway, follow the steps below to create a nice SCP that (almost) looks exactly like the one AD RMS would create itself.
Log into a Domain Controller or Privileged Admin Workstation and launch ADSI Edit.
In ADSI Edit, right-click on ADSI Edit and click Connect to... 
In the Connection Settings dialog, click the drop-down menu under Select a well known Naming Context, select Configuration, and click OK.
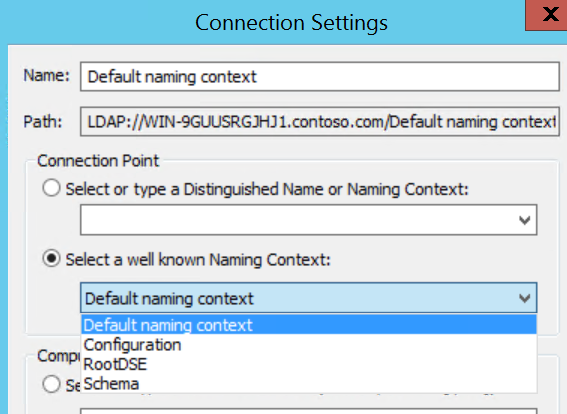
Double-click on Configuration and CN=Configuration...
Right-click on CN=Services and select New > Object... 
In the Create Object dialog, select container and click Next. 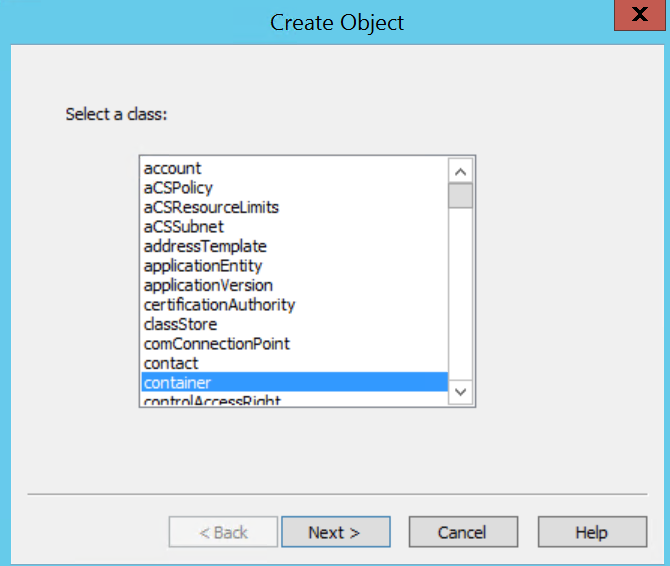
On the next page, in the Value field, type RightsManagementServices and click Next. 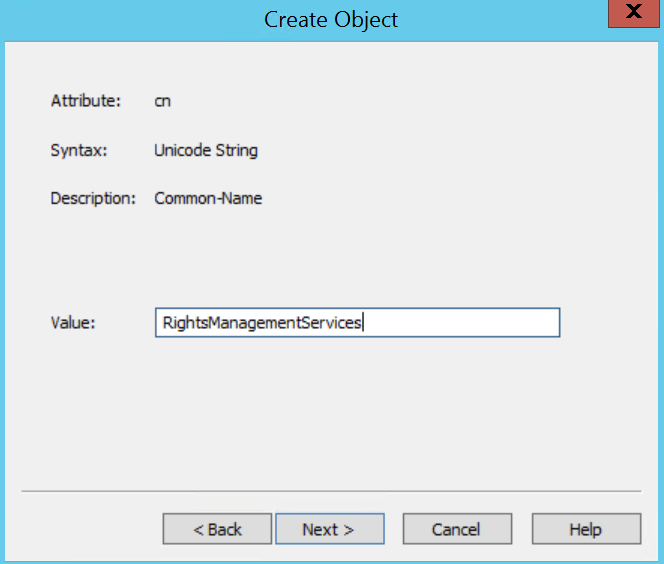
Click Finish on the last page to create the CN=RightsManagementServices container.

Right-click on the new CN=RightsManagementServices container and select New > Object... 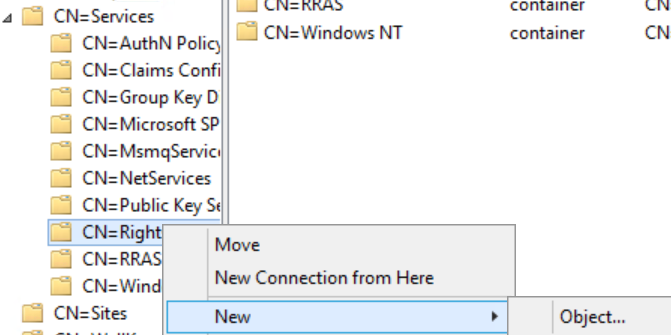
In the Create Object dialog, select serviceConnectionPoint and click Next. 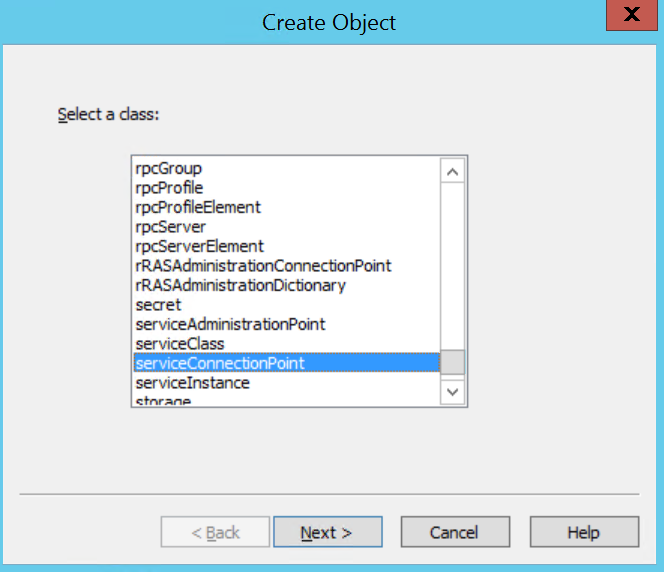
On the next page, in the Value field, type SCP and click Next. 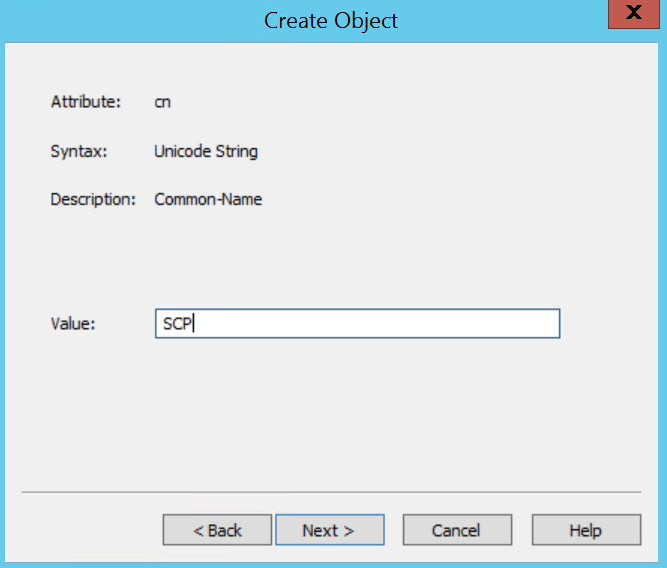
On the last page, click More Attributes. 
In the Attributes dialog, click the drop-down menu next to Select a property to view and select serviceBindingInformation.
Under Attribute Values, in the field next to Edit Attribute, type the SCP URL https://fqdn/_wmcs/certification (eg. https://adrms.contoso.com/\_wmcs/certification)
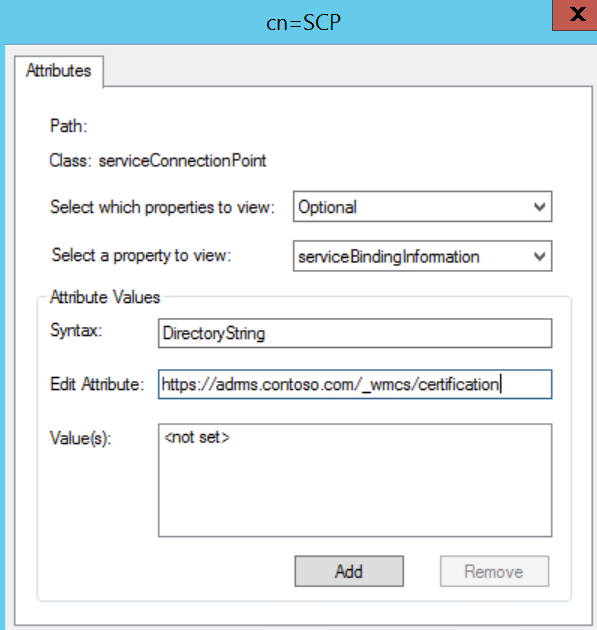
Click the Add button to set the Value 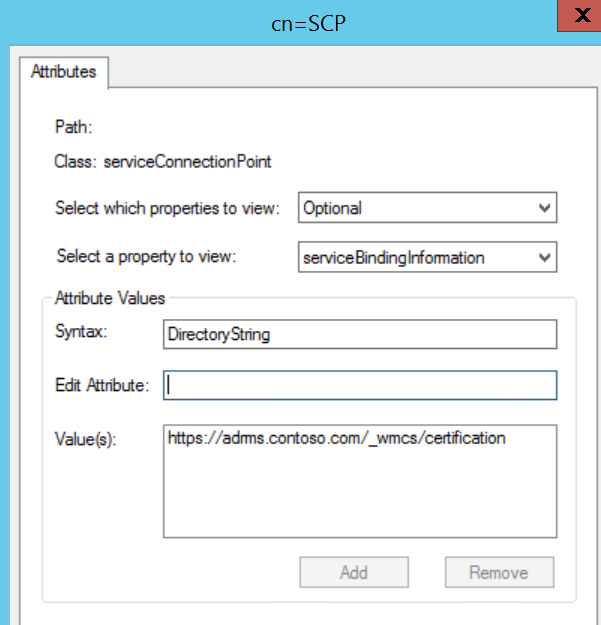
Click the drop-down menu next to Select a property to view and select keywords.
Under Attribute Values, in the field next to Edit Attribute, type MSRMRootCluster and click Add.
Under Attribute Values, in the field next to Edit Attribute, type 1.0 and click Add.
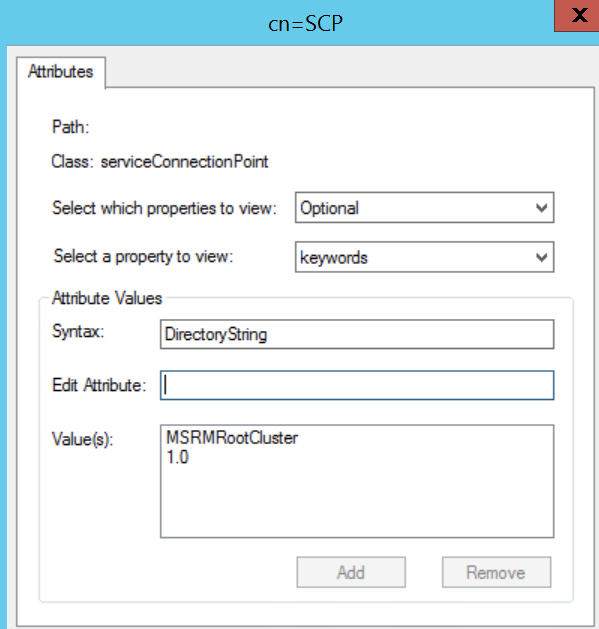
Click OK to close the Attributes dialog and click Finish to complete creation of the SCP.
Super simple right??? OK, yeah, that is not the most pleasant experience but it will allow your Enterprise Admins to create the SCP on a secure system and make your AD RMS cluster stop whining about not having an SCP. If anyone knows of an easier way to do this or automate the creation I would love to add it here! Rating and comments are very welcome! Thanks!
Kevin
Check out https://aka.ms/Kevin for more of my content!
The Saga of Hold Your Own Key (AIP Classification with AD RMS Protection)
The Situation:
Azure Information Protection (AIP) is a powerful technology for Classifying and Protecting sensitive data which was designed around the cloud based Azure RMS service for protection. This is great for new users of Microsoft Information Protection technologies as there is less investment in on premises servers that must be maintained and secured. However, for current AD RMS users that cannot use a cloud-based key for regulatory or technical reasons, this left them without the Classification capabilities provided by AIP and the collaboration features provided when using a cloud key. Luckily, the amazing AIP product group has come up with a solution that provides customers with a method to allow AIP labels to use AD RMS for protection. This solution was dubbed Hold Your Own Key (HYOK). Although there are limitations to HYOK (less external collaboration options, limited application support, continued on-premises server maintenance), it has opened up the possibility of using AIP classification for customers that must maintain on premises keys for some of their data.
Per the official documentation, Hold Your Own Key protection is designed for documents and emails that require the encryption key to be isolated from the cloud. HYOK protection doesn't provide the same benefits that you get when you use cloud-based key protection, and it often comes at the cost of "data opacity". This phrase means that only on-premises applications and services will be able to open HYOK-protected data; cloud-based services and applications cannot reason over HYOK-protected data.
Even for the organizations that use HYOK protection, it is typically suitable for a small number of documents that need to be protected. As guidance, use it only for documents and when they match all the following criteria:
- The content has the highest classification in your organization ("Top Secret") and access is restricted to just a few people
- The content is not shared outside the organization
- The content is only consumed on the internal network
Because HYOK protection is an administrator configuration option for a label, user workflows remain the same, irrespective of whether the protection uses a cloud-based key or HYOK.
Scoped policies are a good way to ensure that only the users who need to apply HYOK protection see labels that are configured for HYOK protection.
The Solution:
Implementing HYOK is fairly straightforward but can be complicated in situations where there are multiple forests involved. I recommend reviewing the prerequisite requirements listed at /en-us/azure/information-protection/deploy-use/configure-adrms-restrictions if you have multiple forests where you share AD RMS protected data. The rest of this post assumes that you have a single forest AD RMS implementation and walks through the configuration of AIP labels for HYOK. Additionally, HYOK requires an AIP P2 license (included with EMS E5) for all users that will be able to protect documents using an HYOK label (another reason you may want to limit these policies to a smaller subset of scoped users).
The core assumption of HYOK is that you have an AD RMS farm on premises with configured rights management policy templates that you have been using, or that you will configure those prior to creating your HYOK labels in the AIP portal. I will assume that you are using AIP cloud key or Bring Your Own Key based protection for a majority of your AIP labels, so we will only set up one HYOK label to demonstrate the process necessary to use the solution. For creation of standard AIP labels, you can see my previous post at https://blogs.technet.microsoft.com/kemckinn/2018/05/17/creating-labels-for-azure-information-protection/.
Creating the "Top Secret" Label and Scoped Policy
To create an HYOK protected label, first create the AIP label per the instructions at /en-us/azure/information-protection/deploy-use/configure-policy-new-label or the blog post I referenced above. For my demo tenant, I have created a sub-label of Highly Confidential called "Top Secret".
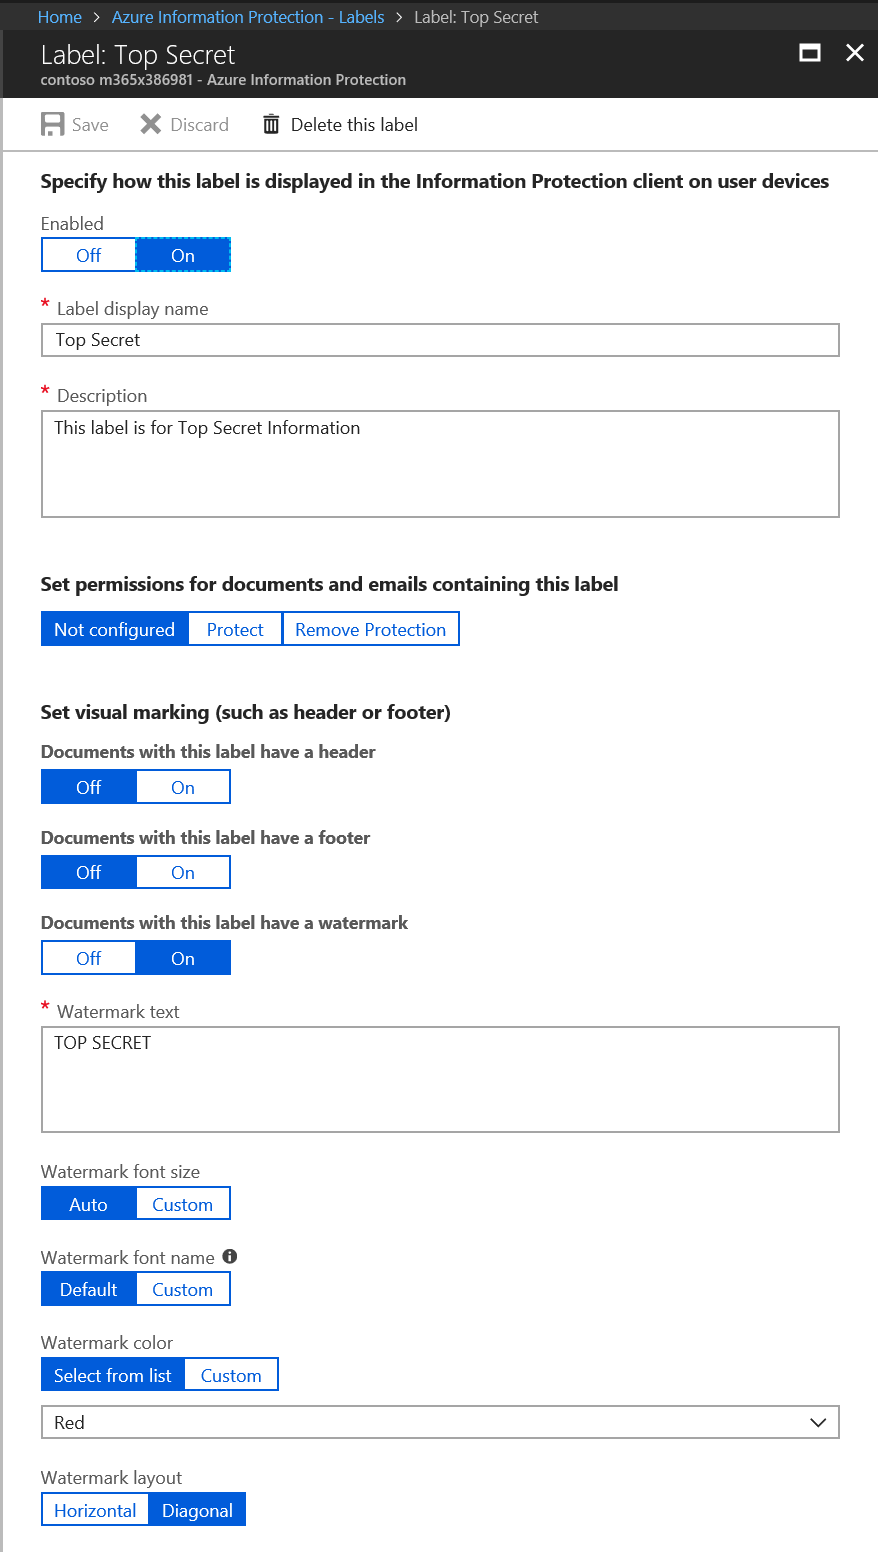
Next, I created a scoped policy named Top Secret and scoped it to the Top Secret group. Instructions for creating a scoped policy can be found at /en-us/azure/information-protection/deploy-use/configure-policy-scope.
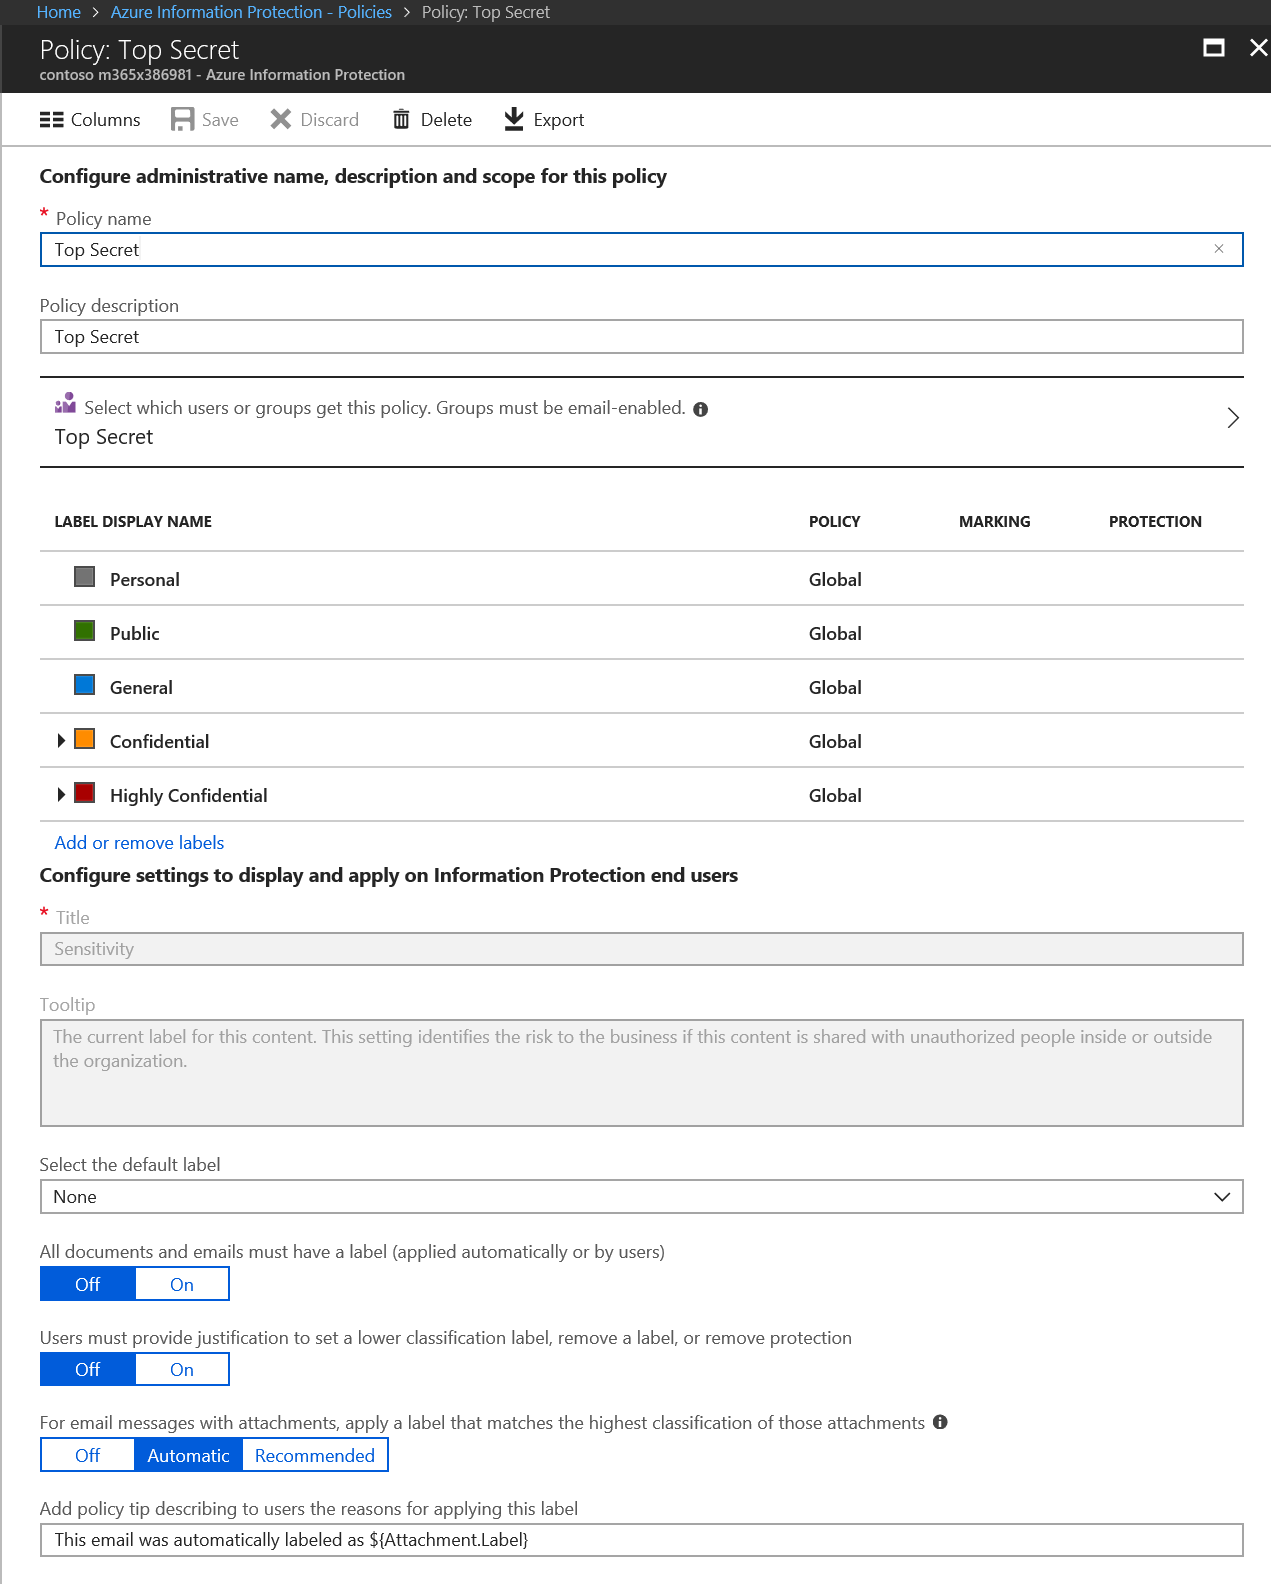
After creating the scoped policy, I click on the Add or remove labels link and selected the Top Secret label to add to the policy.
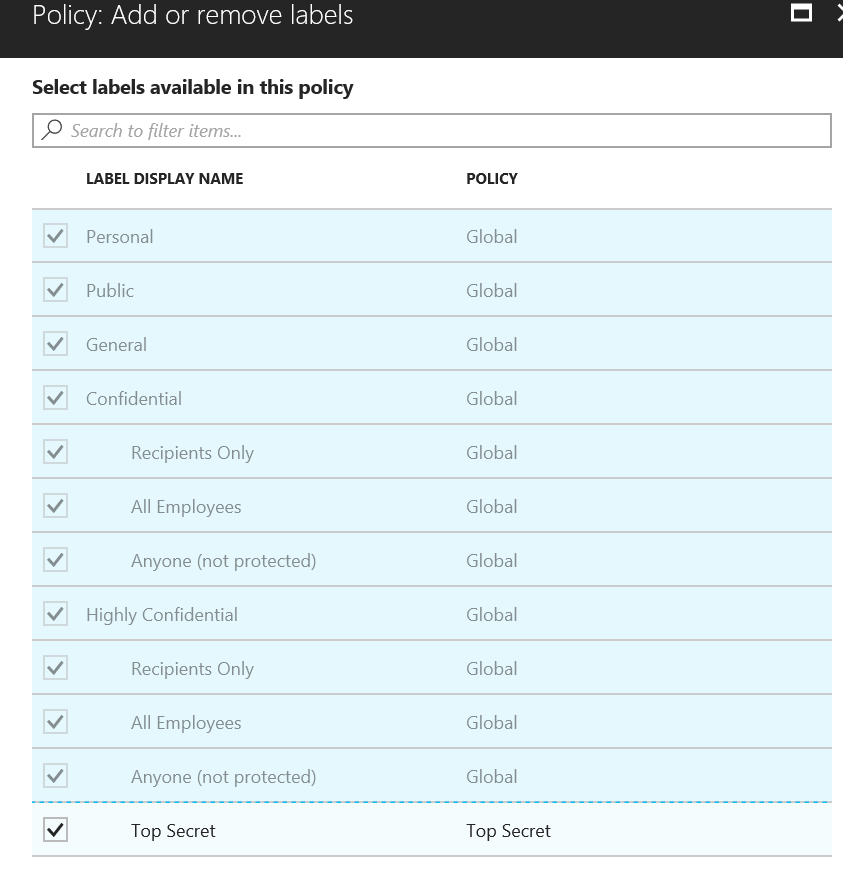
The following image shows what my Highly Confidential label looks like after assigning the TS label to the scoped policy.
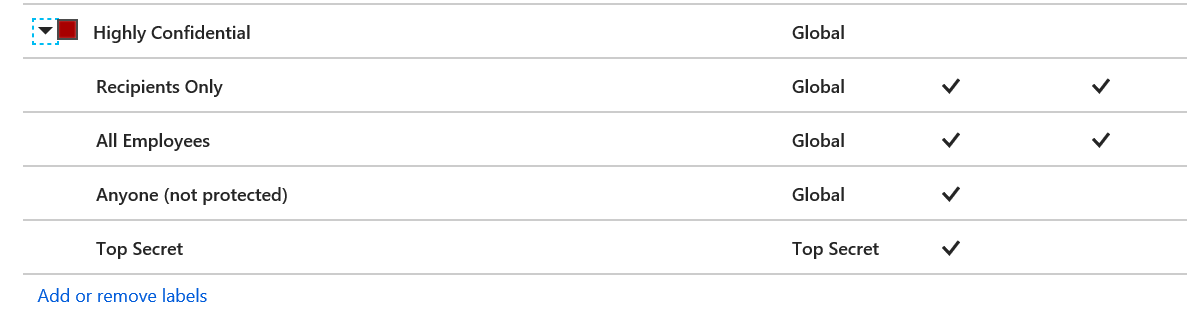
Gathering Data from the AD RMS Server
Next, we will go to the AD RMS server and gather the required Policy GUID and licensing URL that we will use for the HYOK label we created above.
Log onto one of the AD RMS servers in your farm and open the AD RMS Admin Console. In the AD RMS console, expand the node and select Rights Policy Templates.
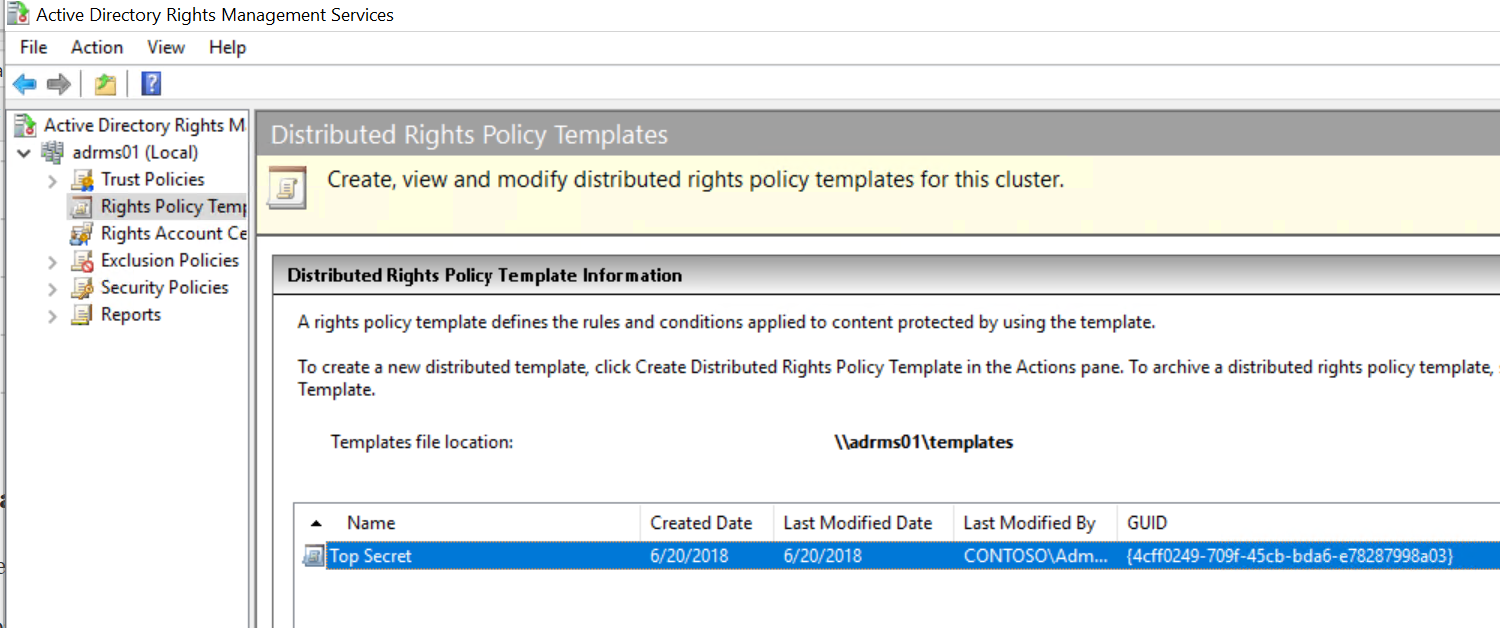
Note the Template file location and the GUID associated with the Top Secret RMS Policy Template. Next, browse to the share or folder where the templates are located.
Right-click on the template and open it in Notepad.

In Notepad, you can select the GUID associated with the label you will use for HYOK. Copy this to a new document.
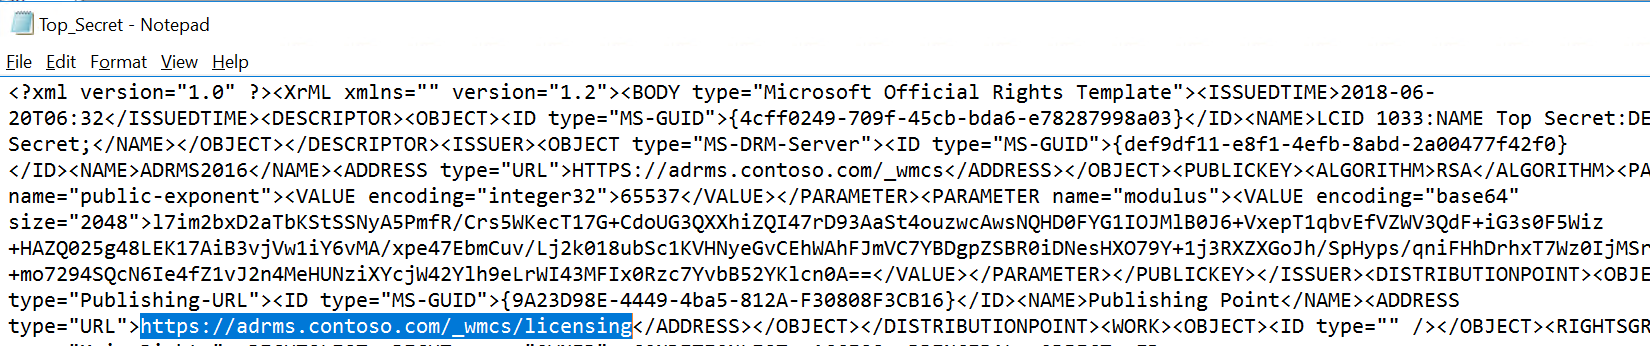
Next, copy the licensing URL from the same template into your new document. These are the two items needed for an HYOK label.
Adding Protection to the HYOK Label
For the last step in configuring HYOK, return to the Top Secret label we created earlier and click on Protect > Azure (cloud key).
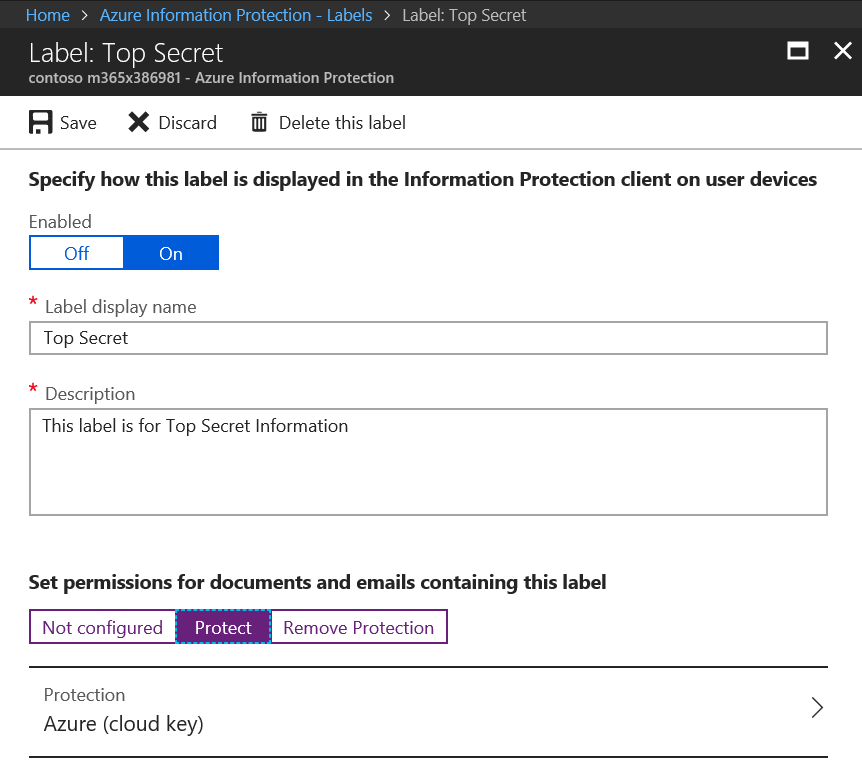
In the Protection blade, under Protection settings, click on HYOK (AD RMS) and enter the copied Rights Policy Template GUID and Licensing URL gathered in the previous section.
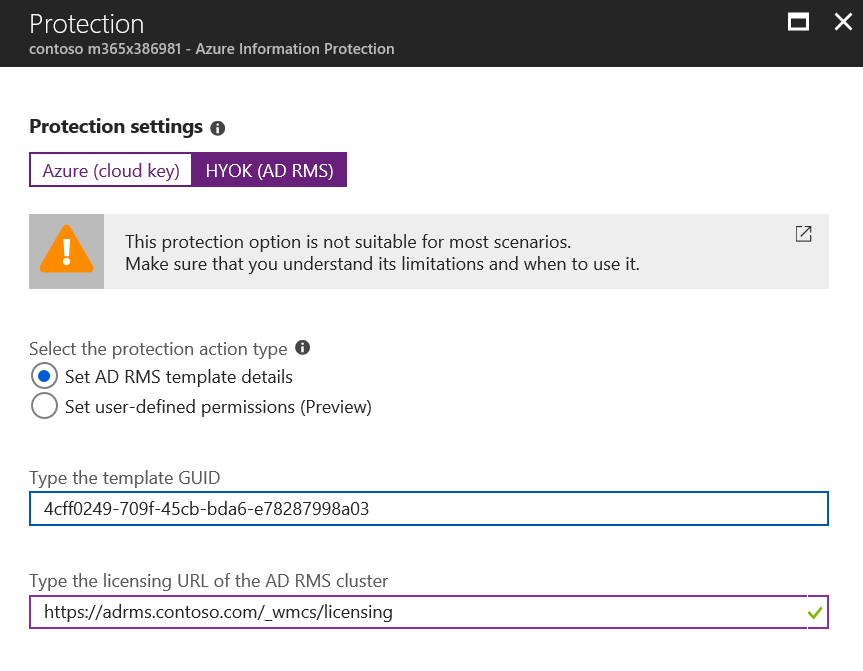
Press OK and the Label should look similar to the image below.
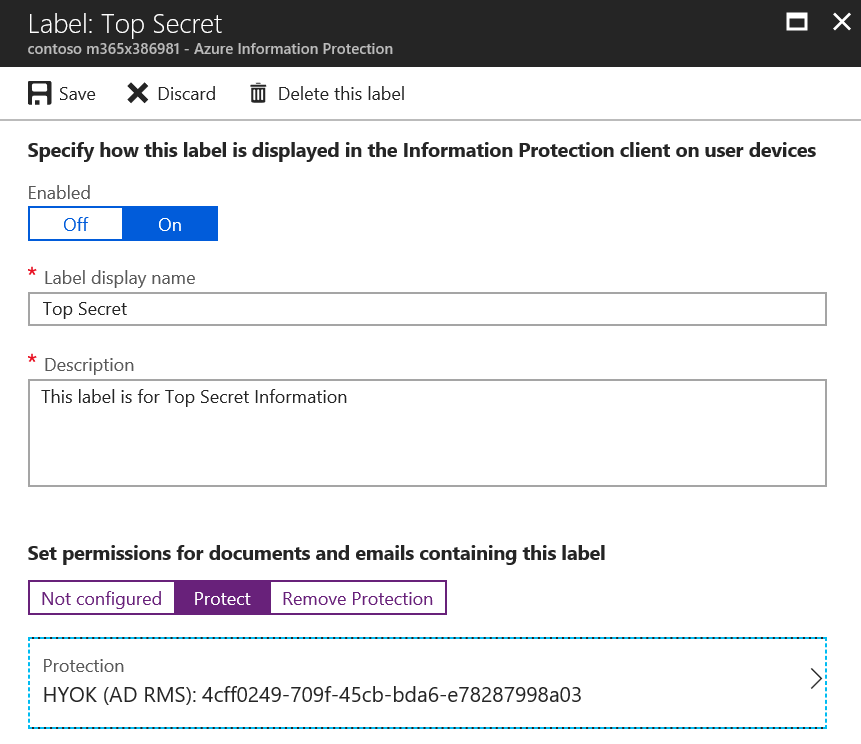
Save the label and you have successfully configured a label for Hold Your Own Key. Repeat as needed, but remember that HYOK is designed to be used sparingly for specific data like the Top Secret label, but you should use Bring Your Own Key or Cloud Key for other labels to allow for advanced collaboration capabilities. If you do not do this, any content that needs to be shared externally, consumed via cloud services, or otherwise used in a way that is not compatible with the protections implemented by HYOK will end up being send as unprotected content. It is far better to have content protected with a cloud key for collaboration than simply sending items externally in clear text.
Additionally, it would be wise to train your users on the restrictions on your HYOK labels. If, for instance, you grant specific trusted users Full Control rights on the HYOK template, you can teach your other users that if they need to share something externally they can ask one of these trusted users to reclassify the content with a label that uses a cloud key (e.g. Partner Confidential) prior to sharing. This is the best of both worlds and will ensure encryption for the largest subset of your sensitive data.
Please let me know if I missed anything, and if you find this content useful, please rate it so I know. Thanks!
Kevin
Using Encrypt Only (Even on Older Office Versions!)
The Scenario:
You have completed migrating all your mailboxes to Exchange Online and you have started deploying Azure Information Protection to your environment. Although you are quickly migrating all of your Office clients to Office 365 ProPlus (you are, right?), you are managing a large environment and still have a mix of Office versions and editions (2010, 2013, 2016 Semi-annual Channel, etc...). You have learned about our fancy new Encrypt Only functionality that allows you to send Encrypted messages to anyone throughout the world and you are eager to have your users start protecting all their sensitive data. Alas, you have discovered that only users on the Office365 ProPlus 2016 monthly update channel can see the new Encrypt function! Luckily, by following a few simple steps, you can give this functionality to all your users with a consistent users experience across all Office versions and editions.
The Solution:
Using a combination of the Azure Information Protection toolbar and an Exchange Online mail flow rule, you can provide this amazing functionality to all of your users. To do this, we will create an unprotected label in the AIP Portal and a few mail flow rules in the EXO control panel.
The Label
For the uniform office experience, you must create a custom AIP label. The way that I typically recommend customers to set up their label is as a sub-label of a Confidential and/or Highly Confidential top level label. In the portal, it would look like the image below.

If you need assistance creating a label, you can see my previous post on the subject at https://blogs.technet.microsoft.com/kemckinn/2018/05/17/creating-labels-for-azure-information-protection/. However, as TL;DR, I will walk you through the simple steps of setting up this sub-label.
- Log into https://portal.azure.com as an O365 Global Admin or Security Admin with rights to the AIP Portal
- In the search bar at the top of the portal, type Inform and click on Azure Information Protection
- In the AIP Portal, you should see the list of labels similar to the image above. If you do not, under Classifications on the left, select Labels
- Assuming you have a top level label similar to Confidential, click the ... on the right and click Add a sub-label
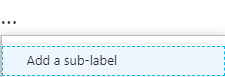
- In the new Sub-label, give it the name Encrypt and the description This message is encrypted. Recipients can't remove encryption. and Save. We are using this specific name and description because it mirrors the native Encrypt protection verbiage. Do not add any protection to this label (we will do that with the mail flow rule).
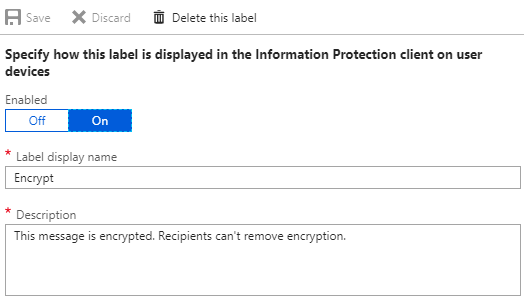
- You should now have an unprotected sub-label that looks similar to the image at the beginning.
The Mail Flow Rules
- In the AIP Portal, click on the Encrypt label and scroll to the bottom where the label ID is shown

- Copy this Label ID into a new notepad document and add the words MSIP_Label_ and _Enabled=True around the Label ID. In my case, I have MSIP_Label_18acc54a-e84e-4add-9fe5-36781d02b550_Enabled=True.

- Next, log into https://outlook.office365.com/ecp/ as either a Office 365 Global Admin or Exchange Admin
- On the left side, click mail flow
- This will default to the rules pane
- In the rules pane, click the and click Create a new rule...
- In the new rule pane, name the rule Encrypt and click the More options... link
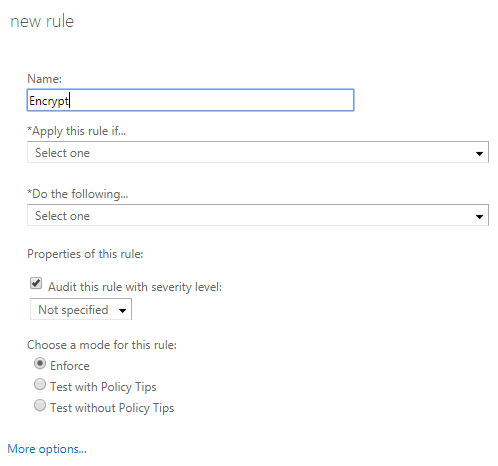
- After clicking More options..., select the drop-down under *Apply this rule if... and hover over A message header... and click includes any of these words
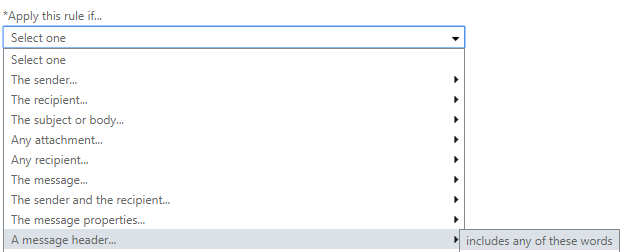
- Click on the *Enter text... link and type msip_labels in the specify header name box and click OK
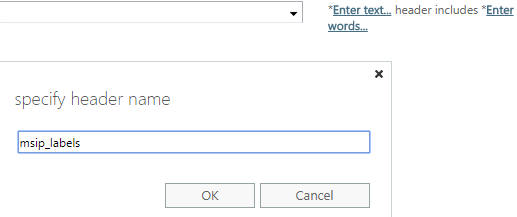
- Next, click on the Enter words... link and copy/paste the label information you have stored in the notepad document and click the then click OK
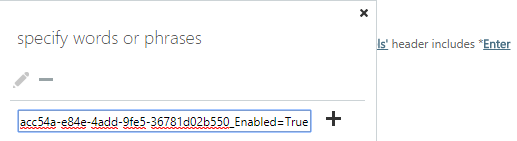
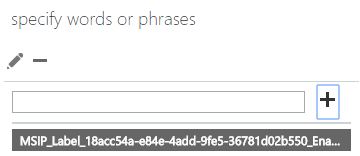
- Click the drop-down below the *Do the following... and hover over Modify the message security... and click Apply Office 365 Message Encryption and rights protection
- In the select RMS template dialog, click the drop-down below RMS template: and select Encrypt and click OK
- The completed rule should look like the image below. Click Save to finish creating the first mail flow rule.
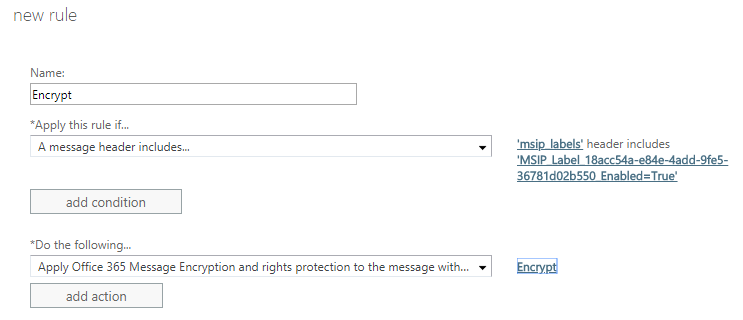
- Now, back in the rules panel, highlight the Encrypt rule and click the
 button.
- In the new rule panel, change the name to Encrypt (attachments)
- Select the drop-down under *Apply this rule if... and hover over Any attachment... and click on has these properties, including any of these words.
- In the select attachment properties dialog, click the to add a new property/value pair.
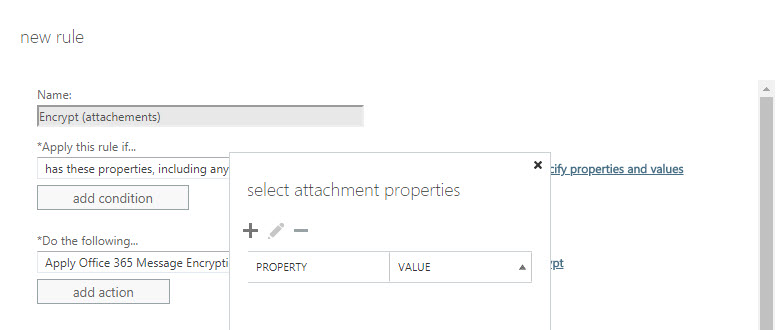
- This should bring up a new window where you can specify a custom attachment property (this only worked properly in IE for me but YMMV). For the Property, enter the same metadata string from the first rule up to Enabled. For the Value, enter True. For me this Property value was MSIP_Label_18acc54a-e84e-4add-9fe5-36781d02b550_Enabled.
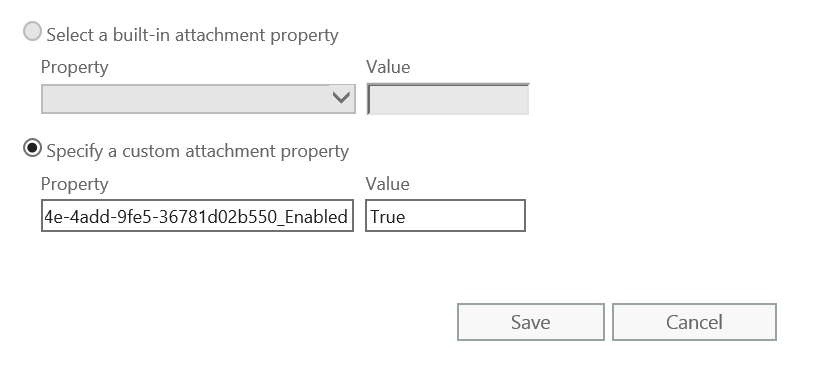
- Click Save and your select attachment properties dialog should look similar to the image below
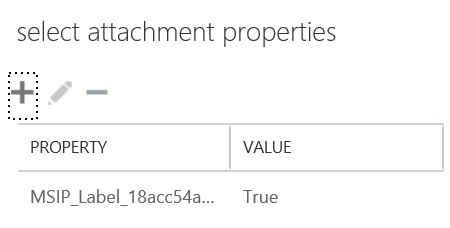
- Click OK to close the dialog and your completed rule should look like the image below
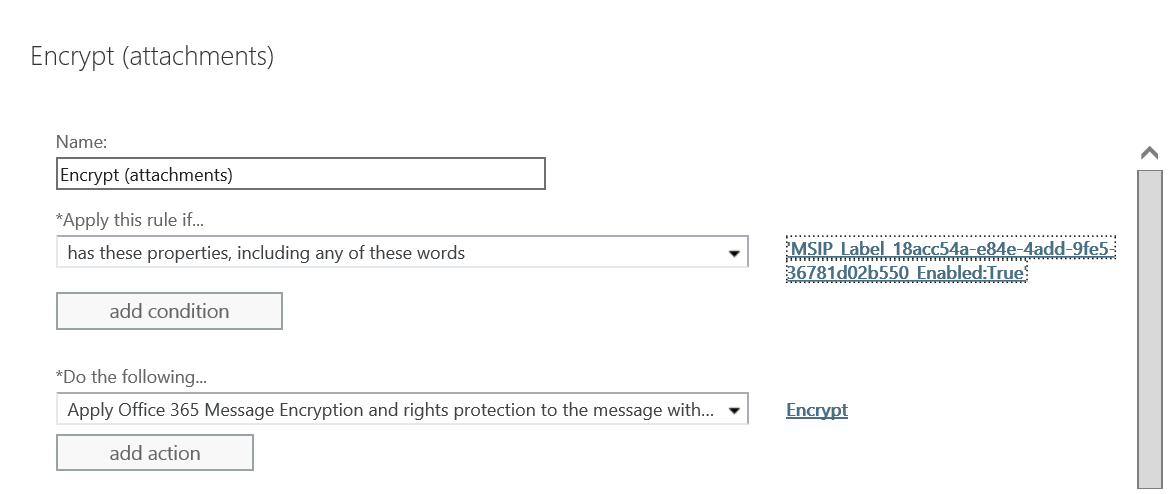
- Click Save on the new rule to finish the creation process.
And that's it! You now have a label that will show up in your AIP Client across all of your versions of Office in a consistent manner and you can encrypt any mail traffic labeled with that and similarly encrypt the mail if a document is attached that has been classified using this label.
NOTE: If you plan on using this to send email out to non-Office 365 users, you may want to also take a look at my post at https://blogs.technet.microsoft.com/kemckinn/2018/07/19/sending-protected-attachments-to-social-identities/ as that gives you additional options for decrypting attachments on download in the OME portal. Thanks!
Thanks,
Kevin
32/64-bit detection
The Codebase of RichCopy version 4.0 is completely different from version 3.x. RichCopy 3.x consists of COM components, and the UI is a just an interface for COM components. It supports automation and shell scripting; however component registration is required, and it is not light enough on Vista because of UAC. RichCopy version 4.0 is designed to run standalone and actually without updating registries or installing multiple components. If you copy RichCopy.exe or RichCopy64.exe into your working directory, and then it should run.
32/64-bit detection: RichCopy.exe determines whether the platform is 32-bit or 64-bit. On a 64-bit platform and RichCopy64.exe is present, and then RichCopy64.exe is executed instead. Here is actual code RichCopy uses.
hKernel32 = GetModuleHandle(TEXT("kernel32.dll"));
if (hKernel32)
{
pIsWow64Process = (LPISWOW64PROCESS)GetProcAddress(hKernel32, (LPCSTR)"IsWow64Process");
pGetNativeSystemInfo = (LPGETNATIVESYSTEMINFO)GetProcAddress(hKernel32, (LPCSTR)"GetNativeSystemInfo");
if (pIsWow64Process)
(*pIsWow64Process)(GetCurrentProcess(), &fWow64);
if (pGetNativeSystemInfo)
(*pGetNativeSystemInfo)(&si); FreeModule(hKernel32);
}
else
{
GetSystemInfo(&si);
} .....
if ((sizeof(LONG_PTR) == sizeof(DWORD)) &&
(si.wProcessorArchitecture == PROCESSOR_ARCHITECTURE_AMD64))
{
Command option update
There are some errors in helpfile installed by RichCopy setup program, such as no description of file and directory filtering.
>RichCopy.exe <source path> <destination> <flags>
<n> numbers
<s> string
<t> date/time
RichCopy has a feature to help you generating necessary command parameters.
- Switch Basic to Advanced mode from View menu
- Change copy setting in property dialog
- Change tab to "Other'
You will find command parameters equivalent to what you have confiured.
Command
Description
Conditions to decide if a copy should be copied
/CSSD
Compare the security setting of a file in source and destination.
/CDSD
Compare the security setting of a file in source and destination.
/FSS
Compare size of a file in source and destination.
/FSD
Compare size of a file in source and destination.
/FAS
Compare size of a file in source and destination.
/FAD
Compare attributes of a file in source and destination.
/TSS
Compare time stamp of a file in source and destination. Copy if it is same. This option is used with one of /CCD, /CLA, /CLW flag.
/TSD
Compare time stamp of a file in source and destination. Copy if it is different. This option is used with one of /CCD, /CLA, /CLW flag.
/TSU
Compare time stamp of a file in source and destination. Copy if it is earlier than source. This option is used with one of /CCD, /CLA, /CLW flag.
/CCD
Check create date. This flag is valid when one of /TSS, /TSD or /TSU flag is specified.
/CLA
Check last access date. This flag is valid when one of /TSS, /TSD or /TSU flag is specified.
/CLW
Check last wrote date. This flag is valid when one of /TSS, /TSD or /TSU flag is specified.
/NE
Copy if it does not exist in destination.
/II
Copy if it exist in destination.
/O
This option force to copy files to destination when file already exist with READ-ONLY flag. If this option is not selected, copy will fail otherwise.
/ALWS
This option force to copy files to destination when file already exist with READ-ONLY flag. If this option is not selected, copy will fail otherwise.
/NONE
Do not copy files, but create only directories.
/CNF
Turn off popup system error dialog.
Information to be copied.
/CT
Set same date/time to destination file as source.
/CA
Set same attributes to destination file as source.
/CSA
Copy security settings from source to destination. This flag has to be used with one or some of /CSD, /CSG, /CSO and /CSS.
/CSD
Copy discretional access control information from source file to destination. This is valid only when /CSA flag is set.
/CSG
Copy security group information from source file to destination. This is valid only when /CSA flag is set.
/CSO
Copy owner information from source file to destination. This is valid only when /CSA flag is set.
/CSS
Copy security access control from source file to destination. This is valid only when /CSA flag is set.
/L
Indicate specified date/time will be set to copied files.
/SD <d>
Specify the date/time to be applied.
Copy mode
/N
(This is currently not available) Keep monitoring source directory, and copy if any change is captured.
/PRP
Parse all source directories before starting actual copy process. This makes enable to collect total file counts and size, and know the remained files size to be copied.
/T
Set time to kick copy process. When this flag is set, copy process will not start until reaching to specified date/time. This flag is used with /TM flag.
/W
RichCopy will wait until specified source directory become available.
/NC
Specify not to use system cache for file read and write. If you want to system to directly transfer data to storage system, you may turn of system cache by selecting this option.When this option is selected, the file is being opened with no system caching. This does not affect hard disk caching or memory mapped files. This option may gives maximum asynchronous performance, because the data the I/O does not rely on the synchronous operations of the memory manager. However, some I/O operations take more time, because data is not being held in the cache. RichCopy also does following additional tasks when this option is selected.
- Align file access byte offset to integer multiples of the volume sector size.
- Align buffer addresses for read and write operation with sector size.
- Set file size afterwards
/SZ
Some storage devices are not good at performing simultaneous disk access, such ATA based disk drives especially over the USB. When this option is selected, RichCopy serialize all disk access to the storage, and minimize the overhead at storage device end. This does not mean that RichCopy limits the number of thread running simultaneously.
/TM <t>
Specify date/time to start copy process. This flag is valid only when /T flag is specified.
Copy mode
/P
Files in destination will be removed if it does not exist in source directory. This option is often selected when source and destination directories need to be identical. (Remove files in destination when it is removed in source)
/M
Move files from source to destination. Actual operation is to delete files in source after successfully copying files from source to destination.
/C
RichCopy version 4.0 supports specifying multiple source directories. Default behavior is to create directories with same name as source, and make a copy. When this option is selected, RichCopy copy all sources files and directories into specified destination directory without creating directories with same name as source. See also.
/V
All copied files will be compare with source files after all copy operation successfully completes.
Set or remove file attributes
/+R
Set a file or directory that is read-only.For a file, applications can read the file, but cannot write to it or delete it.For a directory, applications cannot delete it.
/+H
Set a file or directory is hidden. It is not included in an ordinary directory listing.
/+S
Set a file or directory that the operating system uses a part of, or uses exclusively.
/+A
Set a file or directory that is an archive file or directory. Applications use this attribute to mark files for backup or removal.
/+C
Set a file or directory that is compressed. For a file, all of the data in the file is compressed.For a directory, compression is the default for newly created files and subdirectories.
/+I
Set a file is not to be indexed by content indexing service.
/+T
Set a file that is being used for temporary storage. File systems avoid writing data back to mass storage if sufficient cache memory is available, because typically, an application deletes a temporary file after the handle is closed. In that scenario, the system can entirely avoid writing the data. Otherwise, the data is written after the handle is closed.
/+O
Set the data of a file is not available immediately. This attribute indicates that the file data is physically moved to offline storage. This attribute is used by Remote Storage, which is the hierarchical storage management software. Applications should not arbitrarily change this attribute.
/-R
Remove read-only flag. See /+R flag for more detail.
/-H
Remove hidden flag. See /+H flag for more detail.
/-S
Remove system flag. See /+S flag for more detail.
/-A
Remove archive flag. See /+A flag for more detail.
/-C
Remove compressed flag. See /+C flag for more detail.
/-I
Remove none-index flag. See /+I flag for more detail.
/-T
Remove temporary flag. See /+T flag for more detail.
/-O
Remove offline flag. See /+O flag for more detail.
File and directory filtering
/IFR
Copy files if read-only flag is set.
/IFH
Copy files if hidden flag is set.
/IFS
Copy files if system flag is set.
/IFA
Copy files if archive flag is set.
/IFC
Copy files if compress flag is set.
/IFI
Copy files if none-index flag is set.
/IFE
Copy files if encrypted
/IFT
Copy files if temporary flag is set.
/IFO
Copy files if offline flag is set.
/IDR
Copy directories if read-only flag is set.
/IDH
Copy directories if hidden flag is set.
/IDS
Copy directories if system flag is set.
/IDA
Copy directories if archive flag is set.
/IDC
Copy directories if compress flag is set.
/IDI
Copy directories if none-index flag is set.
/IDE
Copy directories if encrypted
/IDT
Copy directories if temporary flag is set.
/IDO
Copy directories if offline flag is set.
/EFR
Don't copy files if read-only flag is set.
/EFH
Don't copy files if hidden flag is set.
/EFS
Don't copy files if system flag is set.
/EFA
Don't copy files if archive flag is set.
/EFC
Don't copy files if compress flag is set.
/EFI
Don't copy files if none-index flag is set.
/EFE
Don't copy files if encrypted
/EFT
Don't copy files if temporary flag is set.
/EFO
Don't copy files if offline flag is set.
/EDR
Don't copy directories if read-only flag is set.
/EDH
Don't copy directories if hidden flag is set.
/EDS
Don't copy directories if system flag is set.
/EDA
Don't copy directories if archive flag is set.
/EDC
Don't copy directories if compress flag is set.
/EDI
Don't copy directories if none-index flag is set.
/EDE
Don't copy directories if encrypted
/EDT
Don't copy directories if temporary flag is set.
/EDO
Don't copy directories if offline flag is set.
/FIF
Filter string for files to be copied. Filter string should be surrounded by double quote character if it includes space.
/FID
Filter string for directories to be copied. Filter string should be surrounded by double quote character if it includes space.
/FEF
Filter string for files to be excluded. Filter string should be surrounded by double quote character if it includes space.
/EDO
Filter string for directories to be excluded. Filter string should be surrounded by double quote character if it includes space.
Directory search configuration
/TS <n>
Specify the number of thread to be used for directory search. Increasing number of thread for directory search is effective when directory structure is rather complex, but it does not contribute to the performance so much when directory structure is simple.
/SC <n>
Number of file information to be stored. If 10 is specified, information of 10 files and/or directories can be stored. It is suggested to specified double size of directory copy thread count. Search cache is traditional FIFO ring cache.
Thread configuration
/TD <n>
Specify the number of thread to be used to copy files. Thread number actually identical to the number of copy process executed simultaneously. When 10 is specified, and then 10 files are copied simultaneously.
/TP <n>
Specified the number of thread to be used to copy a file. This is effective to copy small number of huge file copy. It is not recommended to use more than 1 thread for a file copy as it could consume large size of system resource. (Multiple number of directory copy thread by number of file copy thread. )
/FC <n>
This is the cache size used for file copy. Each file copy transaction will occur per this cache size. The other word, this is the data size read and written by RichCopy. For example, RichCopy read and write 10 times to copy 64K bytes when 7K bytes is set as cache size
Process Priority
/PP <#>
Set process priority of RichCopy. (0 = idle, 5 = critical). Critical means to try using all system resource. Idle means to run copy tasks without impacting other process.
Retry configuration
/R <n>
Number of errors to retry. For example, RichCopy will stop copy process when error occurs three times if three is set.
/RI <n>
Interval to retry. RichCopy will wait specified interval until retry the task.
Command
/XG <s>
Any executable can be specified. If exit code of executed command is none-zero, RichCopy will not process rest of tasks. The other word, command can control whether to start copy process or not by returning zero or non-zero.
/XA <s>
Any executable can be specified.
FTP
/EA <s>
Account to be used when access to FTP server
/EP <s>
Password to be used when access to FTP server
Copy option profile
/PF <s>
Specify copy option profile.
Logging
/QA
Information will be added to the specified file if it exist, otherwise new file will be created.
/QO
The specified file will be deleted file if it exist before writing out information.
/QN
No logging
/QP <s>
Specify the file to be write log information out.
/UE
Write out error information
/US
Write out source path
/UD
Write out destination path
/UC
List all copied file.
/UPF
List purged file list
/UPC
Write out purged file count
/UPS
Write out purged file size
/UFC
Write out copied file count
/UCS
Write out copied file size
/USC
Write out file count in source path
/USS
Write out total file size in source path
/USD
Write out total directory count in source path
/UPR
Write out average of copy performance
/UET
Write elapsed time
Popular posts from this blog
[Excel] 문서에 오류가 있는지 확인하는 방법 Excel 문서를 편집하는 도중에 "셀 서식이 너무 많습니다." 메시지가 나오면서 서식을 더 이상 추가할 수 없거나, 문서의 크기가 예상보다 너무 클 때 , 특정 이름이 이미 있다는 메시지가 나오면서 '이름 충돌' 메시지가 계속 나올 때 가 있을 것입니다. 문서에 오류가 있는지 확인하는 방법에 대해서 설명합니다. ※ 문서를 수정하기 전에 수정 과정에서 데이터가 손실될 가능성이 있으므로 백업 본을 하나 만들어 놓습니다. 현상 및 원인 "셀 서식이 너무 많습니다." Excel의 Workbook은 97-2003 버전의 경우 약 4,000개 2007 버전의 경우 약 64,000개 의 서로 다른 셀 서식 조합을 가질 수 있습니다. 셀 서식 조합이라는 것은 글꼴 서식(예- 글꼴 종류, 크기, 기울임, 굵은 글꼴, 밑줄 등)이나 괘선(괘선의 위치, 색상 등), 무늬나 음영, 표시 형식, 맞춤, 셀 보호 등 을 포함합니다. Excel 2007에서는 1,024개의 전역 글꼴 종류를 사용할 수 있고 통합 문서당 512개까지 사용할 수 있습니다. 따라서 셀 서식 조합의 개수 제한을 초과한 경우에는 "셀 서식이 너무 많습니다." 메시지가 발생하는 것입니다. 그러나 대부분의 경우, 사용자가 직접 넣은 서식으로 개수 제한을 초과하는 경우는 드뭅니다. 셀 서식이 개수 제한을 넘도록 자동으로 서식을 추가해 주는 Laroux나 Pldt 같은 매크로 바이러스 에 감염이 되었거나, 매크로 바이러스에 감염이 되었던 문서의 시트를 [시트 이동/복사]하여 가져온 경우 시트의 서식, 스타일이 옮겨와 문제가 될 수 있습니다. "셀 서식이 너무 많습니다." 메시지가 발생하지 않도록 하기 위한 예방법 글꼴(종류, 크기, 색, 굵기, 기울임, 밑줄), 셀 채우기 색, 행 높이, 열 너비, 테두리(선 종류, ...
Announcing the AdventureWorks OData Feed sample
Update – Removing Built-in Applications from Windows 8 In October last year I published a script that is designed to remove the built-in Windows 8 applications when creating a Windows 8 image. After a reading some of the comments in that blog post I decided to create a new version of the script that is simpler to use. The new script removes the need to know the full name for the app and the different names for each architecture. I am sure you will agree that this name - Microsoft.Bing – is much easier to manage than this - Microsoft.Bing_1.2.0.137_x86__8wekyb3d8bbwe. The script below takes a simple list of Apps and then removes the provisioned package and the package that is installed for the Administrator. To adjust the script for your requirements simply update the $AppList comma separated list to include the Apps you want to remove. $AppsList = "Microsoft.Bing" , "Microsoft.BingFinance" , "Microsoft.BingMaps" , "Microsoft.Bing...
How to control your World with Intune MDM, MAM (APP) and Graph API
VSS yedekleme testi nasıl yapılır Exchange üzerinde bulunan verilerin yedeklenmesi (backup) ve geri yüklenmesi (restore) baslibasina çok önemli bir konudur. Bir yedegin saglikli alinmasi kadar restore isleminin basarili bir biçimde yapilabilmesi de test edilmesi gereken önemli bir islem. Exchange destegi olan (aware) diye adlandirdigimiz yazilimlar exchange writer'lari kullanarak VSS teknolojisi ile yedek alirlar. Yedekleme esnasinda karsilasilan sorunlarin büyük bölümünün nedeni, yazilimlarin uyumsuzlugu ya da bu yazilimlardaki yanlis bir ayar olabilmektedir. Bunun tespiti için, yani yedek alma sirasinda sorunun VSS Writer'dan mi, disk sisteminden mi ve/veya yedekleme yazilimindan mi kaynaklandigini anlayabilmek için Betest aracini kullanabilirsiniz. BETEST, Windows SDK yada Volume Shadow Copy Service SDK 7.2 (sonraki versiyonlarda mevcut) içerisinde bulunan yardimci bir araçtir. Araci kolaylikla bulabilir ve kurabilirsiniz. Kurulum islemini exchange sunucunuz...


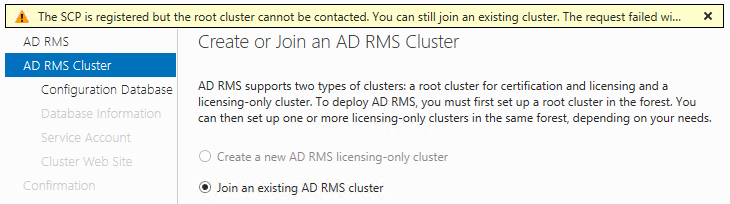
Comments
Post a Comment