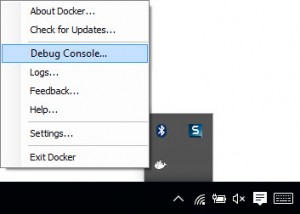
Defaulting to Docker for Windows with Docker Tools for Visual Studio
When using Docker Tools for Visual Studio, we default the Docker host to use Docker Toolbox. Or, more specifically, we set the default docker machine to be named default, which people typically create a VirtualBox host named default. This is documented here.
Docker for Windows doesn't use Docker-Machine, rather assumes no HOST entries are set. To make Docker Tools for Visual Studio work with Docker for Windows, we'll need to change the host. In the Debugging apps in a local Docker container walk through, we show how to change the host once added to your project. However, if you're always using Docker for Windows, why not change the default template?
Our intention is to move to Docker for Windows as the default host once it's released publicly, and make this docker.props an easier file/designer to edit. In the meantime, if you're using Docker for Windows, and want to set the default to use it as your host, you can edit the Visual Studio template with the following steps.
Launch Notepad as Administrator
Open C:\Program Files (x86)\Microsoft Visual Studio 14.0\Common7\IDE\ItemTemplatesCache\CSharp\Docker\1033\Docker.ASPNetTemplate.zip\Properties\Docker.props
Remove $DockerMachineName$ from the following line <DockerMachineName Condition=" '$(DockerMachineName)'=='' ">$DockerMachineName$</DockerMachineName> it should now look like: <DockerMachineName Condition=" '$(DockerMachineName)'=='' "></DockerMachineName>
Save the file
You're all set. The next time you Add Docker Support to your project, it will now default to the Docker for Windows beta.
Deploying Docker Images from the Azure Container Registry to Azure Container Instances
In just a few minutes you can easily deploy Docker Container Images using just a context menu from the repositories blade of the Azure Container Registry.
Azure Container Instances allow you to deploy Container Images directly without first provisioning VMs, Container Orchestrators, or any other container infrastructure. With Azure Container Instances, you pay just for what you use. Azure Container Instances are not a replacement for Container Orchestrators, in fact you may run your Container Orchestrator hosts on Container Instances to give burstable resources. For more about Azure Container Instances, see this post from Corey: Fast and Easy Containers: Azure Container Instances
Seeing is believing, so here's a video on just how easy it is.
While the tools support both Linux and Windows, and you can deploy the same project to Linux and Windows, we didn't necessarily optimize for this scenario because:
We wanted to stay true to the Docker standard, which uses a single Dockerfile
We didn't think developers would deploy to both, and it was only us "demo jockeys" (PMs) that wanted to deploy to both
As it turns out, people kicking the tires like the idea of deploying to Linux and then deploying to Windows to see how it works. Or, your also riding the demo horse.
The source of the problem - horse, not the cart, and not sure if it's the chicken or the egg - that's a much larger problem that only a special pig was able to solve:
Linux and Windows have different content to build the image:
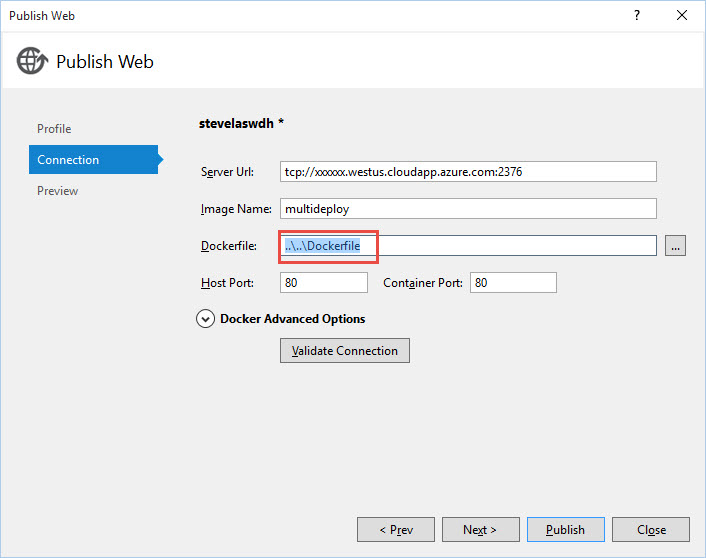
Note that the Docker file is specific to the operating system. If you choose to republish to a different OS, you'll need to rename the Docker file so that Visual Studio can create a new default based on the target OS. For instance, if you first publish to a Linux container and later decide to publish to Windows, you should rename the Docker file to a unique name, such as DockerLinux. Then, when you republish to Windows, Visual studio will recreate the default Docker file for Windows. Later, when you republish either one, just select the appropriate Docker file for the OS.
What is a Dockerfile?
A Dockerfile is the definition for how to build the Container. Remember, in Docker, you're not just deploying an app to a target environment. You're building a component of the environment, which includes the app. The Dockerfile defines the baseline OS Image, where to get the app, and how to start the app. Among many other options.
If you're building for Windows and/or Linux, by definition you're targeting different environments, or for Docker, your targeting different container types. Linux or Windows, and of course which version of Linux or WIndows.
Lets take a look at the content of the DockerFile
Linux Dockerfile
If you first published to Linux, your Dockerfile would contain the following:
FROM microsoft/aspnet:1.0.0-beta6 ADD . /app WORKDIR /app ENTRYPOINT ["./kestrel"]
FROM - what is the baseline OS image you want to use?
ADD - add the output of your compiled app
WORKDIR - set the working directory for the entry point
ENTRYPOINT - what should be started when the container spins up? Remember, this isn't just a normal Windows Server with IIS. It's a dedicated container for specific scenarios.
How do I deploy to both Linux and Windows?
When you initially run the publishing experience in Visual Studio, the Docker File textbox is blank, with a watermark of (auto generate) as we're happy to create the default Docker File for you, based on the target OS:
Once you hit publish, the app and container are built and run. If you re-enter the publish dialog will now contain the default Docker file:
Renaming the Docker File
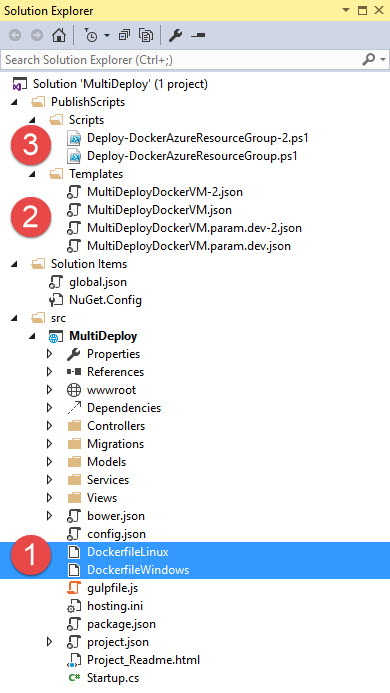
Once the publish is finished, and the default Docker file is created, simply rename the Docker file within solution explorer
Name it DockerWindows or DockerLinux, or whatever you'd like. Put it in a sub folder for Windows\Docker or Linux\Docker. The point is isolate the two docker files related to the target OS
Go back to the publish wizard. This time, use the [...] and select the renamed docker file.
Summary of Steps
Provision a Linux Container Host
Publish to the Linux Host Docker Tools for Visual Studio will create a default DockerFile for Linux
Within Solution Explorer, rename the DockerFile to DockerFileLinux
Publish again, this time selecting the renamed DockerFileLinux
Provision a Windows Container Host
Publish to the Windows Host Docker Tools for Visual Studio will re-create the DockerFile as it doesn't see the previous file as it was renamed
Within Solution Explorer, rename the DockerFile to DockerFileWindows
Publish again, this time selecting the renamed DOckerFileWindow
Your project should now look something like this:
Your Linux and Windows Dockerfiles
Azure Resource Manager (ARM) Templates and parameter files for creating the Docker Container Hosts
PowerShell scripts to run the ARM templates
I hope that helps explain our tooling options, and perhaps peeks into the details a docker a bit with the contents of the DockerFile
Thanks,
Steve
Developing ASP.NET Apps in Docker Containers
This week we released our latest Docker Tools for Visual Studio which continues our journey for developing apps in their target environment with Docker containers.
Our 3 step goals have been the following:
Run code in a container Switch the Visual Studio F5 experience from running code on your development machine to running in a the target operating system/environment using Docker Containers
Edit & Refresh Make changes to your code, without having to rebuild the container each time
Break-point debugging Set a break-point, hit F5, ...just as you have today
With release 0.10, we have reached milestone 2 and we wanted to get your feedback. For more info on our Docker Tools journey, you can read this post.
Take an existing ASP.NET 5 RC1 based web application
Enable Docker Support using the Project context menu for Add --> Docker Support This will add docker assets you'll need for containerization and some visual studio files.
Hit F5 to start running your application in the target operating system, with Docker Containers The PowerShell DockerTask.ps1 script runs building and running your containers using Docker-Compose
You make changes to your files within Visual Studio. As you save the files, ASP.NET will rebuild your code and you can refresh the browser to see your changes
Once you're happy with your debugged app, you'll rebuild the docker image in release mode and re-validate
If you're happy with everything, you can either check in your code to your favorite SCC solution, or skip to pushing your release based image to your docker repository.
If your using a SCC and CI/CD solution, you'll rebuild the container images using a dockerfile.integration and docker-compose.integration.yml file with the DockerTask.ps1 PowerShell script to build and instance your integration containers in your CI system
Assuming your integration tests pass, you'll use docker push to push the validated image to your docker repository
The CD solution will use a Docker-Compose.Staging.yml file to instance the containers using the image pushed to your repository
A walk through
Rather than repeat the steps, Tom covers the pre-reqs and basic experience in this article.
Looking deeper into the docker assets added to your project:
An important design goal for our Docker tools was enable your development work, not impose glass ceilings, putting the code in your project you would have added yourselves. We don't abstract or change the way the underlying runtimes or tooling work. The Docker Tools for Visual Studio scaffold the assets, getting your started with the "smart" or common defaults. As you want to enhance or change the sequence, you simply edit the files in your project. Success for us means you find these tools handy even after you've become an expert with Docker.
Let's look at the files in more depth:
\Docker\Dockerfile.debugDockerfiles are used to build a docker image. It includes the base OS [FROM ], copies the code that executes in the container, runs some commands and sets the ENTRYPOINT when the container is instanced
\Docker\Dockerfile.release The release version of the dockerfile that removes the developer optimizations, such as volume mapping and the DNX Watch functionality. The release build is what you'd use to push to your docker repository once your validation tests complete successfully
\Docker\Docker-compose.debug.yml Docker-Compose.yml is a definition file used to instance one or more containers with the docker-compose command. Docker-Compose may instance containers you've just built with a dockerfile, or may instance existing containers using the image reference. In this case, we reference the dockerfile as we're building a debug version of the container to enable the Edit & Refresh scenarios and provide developer optimizations. The basic premise of docker-compose.yml files are configuration information for instancing containers. dockerfiles contain the image definition, and docker-compose.yml files instance configuration.
\Docker\Docker-compose.release.yml This is the definition for your release configured containers. If you compare the debug and release versions, you'll see some subtle differences. The most obvious is the remove of the Edit & Refresh scenario that uses DNX Watch and Volume Mapping.
\Docker\DockerTask.ps1 A PowerShell script for building the docker images and instancing them with Docker-Compose Up. The script was added so developers had more control over how the tasks were completed. Docker is a quickly evolving technology and we found developers needed more functionality and options than we could develop in some configuration UI. Instead, the docker tools provides a scaffolded script for the common needs, and allows you to extend or alter the specific steps and/or parameters.
.dockerignore.dockerignore is a file used by docker build, or docker-compose build that tells the docker runtime to ignore certain files from being copied to the container. This is an important optimization step to avoid docker from re-creating cached image layers. These are files you wouldn't need in your containers, and therefore hide them from the docker image which avoids invalidating the image cache when they change.
Docker.targets &Docker.props These are files used by Visual Studio to hook the F5 experience. We don't believe you'll need to edit these files and are hoping to incorporate them into the existing Visual Studio project files. If you do find scenarios you need to edit them, we'd like to hear about them
launchSettings.json This file already existed in your project. However, the Docker entry point was added to enable running in a Docker Container. In the 0.10.* release, you may need to edit this file to keep the DockerTask.ps1 PowerShell script from closing upon an error. See my other post for more details and troubleshooting.
Next Steps
If your working with ASP.NET and looking for how to use Docker, give our tools a whirl and let us know what you think.
In a future post, I'll discuss how to use docker-compose, environment variables, secrets, images and docker-compose.integration.yml files for instancing your containers from your docker registry. As a preview, you can view this repo with a prototype and a ppt that shows the developer workflow
More docker tools from Microsoft
We have a few other efforts we've been working on to get a full breadth of experience and engage with developers already using Docker in production:
yo docker Scaffolding docker assets without Visual Studio
We're excited to get these early releases to you helping developers make the transition to a containerized application workflow. We're working hard to give you the best Docker container experience and we'd like your feedback. You can provide feedback in the MSDN Forum with docker in the title, or provide us some feedback here.
Thanks and we're looking forward to your feedback,
Steve
Docker Containers as the new Binaries of deployment
In prep for .NET Conf, I was asked by Vaso to explain some of the benefits of containers. I was talking with one of our engineering leaders in Azure, John Gossman about how we view containers more broadly. Our Azure Container Service is our Microsoft Container Orchestration solution, offering Container as a Service (CaaS).
We'll be adding container support to Service Fabric, which we think of as a Micro service PaaS.
When people think of containers, are they a specific app pattern, or the new app deployment model, for all app solutions?
To answer the benefits of Containers compared to VMs, here's an overly simply answer:
Containers spin up in seconds, compared to several minutes of a VM
Containers provide much more density, allowing you to run many more containers on a single VM, compared to how many VMs you could run on a host OS. This is achieved through a shared kernel model
Containers are designed to be instanced multiple times, from a single Image - in the same seconds metric
Docker hosts have a caching model for images, allowing them to spin up quickly
Containers are deployed using a Docker Registry,which handles a layering system, allowing only the deltas to be deployed across the network
With these primitives, a host of new scenarios are available, such as:
Instancing containers on demand for tasks, rather then leaving them running all the time.
Auto scaling, self healing, in seconds.
Blue/Green deployments, that don't require you to keep the old instances running.
Today, we think of deploying code as binaries. We compile the code, we deploy those binaries to environments we prep to accept those specific binaries, and update the environment for each app/service version change we make.
If we look forward, we see containers as the new binary. You build/compile your app as a container (Docker) image. You then deploy your app/image to generic environments. Today, these are Container Orchestration systems, like ACS with Mesos and Swarm. Kubernetes, etc. If you look forward, when doing PaaS solutions, like WebSites, App Services, any cloud deployed solution, why would you deploy individual binaries? Wouldn't it be nice if containers were the new binaries of deployment?
There are many enhancements, including my top ...6
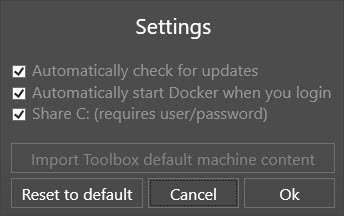
Works with Hyper-V Docker Toolbox utilized VirtualBox. An alternate Virtualization technology that meant developers had to disable Hyper-V. Which means they can't run VMs or the various developer emulators, which also use Hyper-V
Starts automatically - no more docker-machine start default The docker process will start automatically, by default.
Resolves much of the problems VirutalBox had with Volume Mapping VirtualBox used the c:\users directory, Which meant if you placed your project under c:\Source\Github, you couldn't access your code from within the container. There in theory was a way to fix that, but we never did get it working. Now, it's just a checkbox, provide your credentials for the host to mount the share, and voila. It's just that easy.
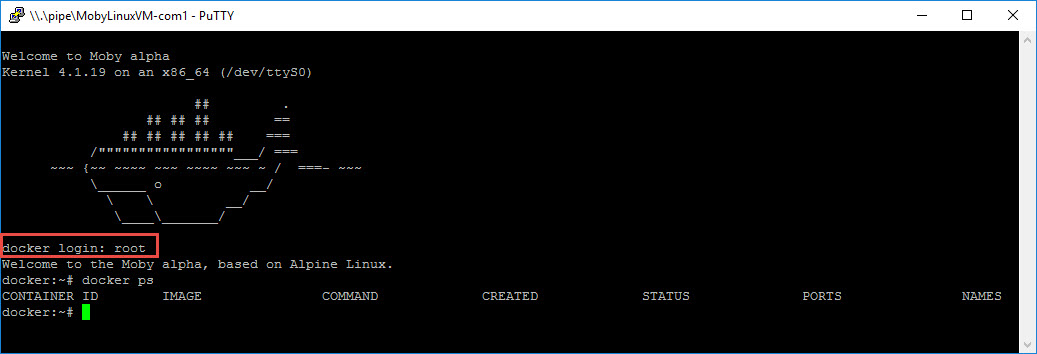
Terminal Window directly to the host There are times when you just want to jump on the host VM and see what's going on. Including troubleshooting your own container configurations, or the sometimes connectivity issues between your client and the host. Just right-click Moby in the system tray and choose the Developer Console You'll need to login first, so just enter root and hit enter. You can then run your standard docker commands
Update Notifications In the spirit of ease of use, Docker has integrated auto update notifications, or the ability to disable it, and check for updates
No need for docker-machine, sort of... This is slight bit of a change, and you may be switching between various hosts, including those in Azure or other hosts on your local network. You may be used to using docker-machine env [hostname] | Invoke-Expression Since Docker for Windows doesn't depend on docker-machine, you actually need to clear the environment variables. Which is the default case. If you're switching between an AzureHost and your Docker for Windows Host, use: docker-machine env -u | Invoke-Expression to clear environment variables. If you haven't used docker-machine, then you're good to go, and don't need to use docker-machine.
We have been working with docker on their latest tools and will release an update to support the local docker host shortly.
Give docker a shout, and give it a whirl. Developing apps in containers is far easier than just treating docker as a deployment technology...
Steve
Docker for Windows, Creators Update and Volume Sharing Linux Containers
If you're attempting to use Volume Sharing with Docker for Windows after you've installed the Creators Update, you may get errors indicating a Firewall Port must be opened. This combination of the Creators Update, Domain Joined machines and enabling volume sharing has had a recent regression we're working to resolve.
Note: this only applies to Linux Volume Sharing. Be sure Docker for Windows is set to Linux.
Steps to re-enable volume mounting:
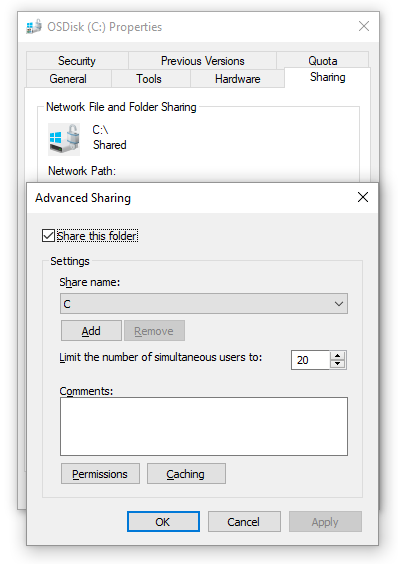
Open Explorer, right-click on drive C and select properties
Click the Sharing tab and then Advanced Sharing button
Check the Share this folder, hit [OK], and then close
Repeat above steps for other drives that you want shared (I did this for C,D, and E), all my local drives in case it matters
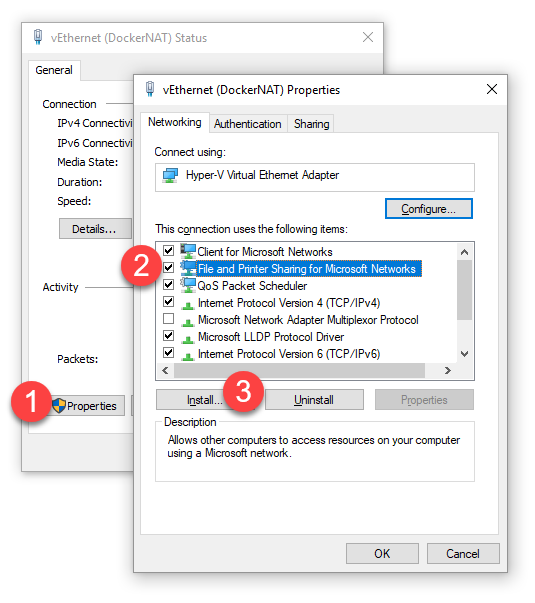
Open Control Panel\Network and Internet\Network and Sharing Center
Select the vEthernet (DockerNAT) connection
Click [Properties]
Select File and Printer Sharing for Microsoft Networks
Choose Uninstall, and [Yes] to the dialog that appears
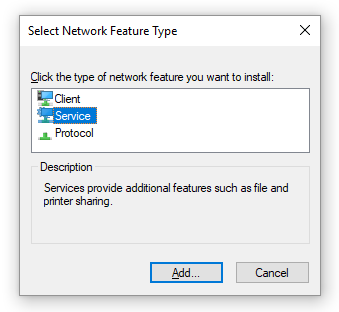
Click [Install..] and select "Service"
Click Add.. and then select "File and Printer Sharing for Microsoft Networks"
Close all the dialogs
Open Docker for Windows and share the drives again
This should get you going. If not, please help us understand what's unique.
We hope to post an update here that all you need is to simply update ___ and you'll no longer need this workaround.
Docker for Windows, Network Shares and $ in your password
If you've been using our docker tools you've noticed we depend highly on network sharing for Docker for Windows. For the Linux host to mount your Windows drives, you need to provide a username/password. What you may not realize is Linux has some special characters it may not always handle.
Short story: if you're having trouble with volume sharing & Docker for Windows, make sure you don't have a $ in your password. " and ; are also suspect at this point. Simply changing from these characters to alternate characters across the top of your numbered keyboard should work.
The Docker folks say they're working on solving this, but at least for 1.12.0-beta21 (build: 5971), we can confirm this is a problem.
Steve
Docker-Machine and Visual Studio Tools for Docker
If you're using Docker Tools for Visual Studio, version 0.14 or later, you'll notice that we depend on a docker-machine entry. What exactly does that mean?
We wanted the Docker Tools for Visual Studio to align with the Docker tools from Docker. It doesn't make sense for us to have different ways to reference remote hosts, and how the VS Tools resolve certs for hosts. In earlier builds, using the "publishing" UI, we placed certs in the root of the .docker folder. This meant the tools couldn't work with multiple hosts, unless each had the same certs. When we moved the tools over to the inner loop, develop and test in a container scenarios, we moved to using docker-machine to resolve hosts.
An example: When routing calls to a docker host, you likely use docker-machine env to set the environment variables. Docker-machine stores these certs under the machines path.
When you run commands against a docker host, you'll first use something similar to the following command
docker-machine env azurehost | Invoke-Expression
Which sets several environment variables: $Env:DOCKER_TLS_VERIFY = "1" $Env:DOCKER_HOST = "tcp://13.93.215.124:2376" $Env:DOCKER_CERT_PATH = "C:\Users\SteveLas\.docker\machine\machines\azurehost" $Env:DOCKER_MACHINE_NAME = "azurehost"
When you issue docker commands, the docker CLI, including docker-compose, will use these environment variables to connect to the remote host
Targeting different Hosts
If you look at the files scaffolded into your project, you'll notice Docker\DockerTask.ps1
Within the dockerTask.ps1 file, we check what host you wish to target and use docker-machine to set the environment variables. Remember, environment variables are only set per process. Setting docker-machine env in one PowerShell instance doesn't impact other sessions, or the session VS uses.
if (![System.String]::IsNullOrWhiteSpace($Machine)) {# Set the environment variables for the docker machine to connect todocker-machine env $Machine | Invoke-Expression}
The $Machine variable comes from Properties\Docker.props See here for the docs on the flow.
Note: you do need to restart VS for the docker.props file to be read. This is a temporary solution. We do have a backlogged item to replace this with some UI that will not require VS to restart to read the value.
Do I need docker-machine installed on hosts that run the PowerShell script
Yes, and no.
As you see in the Docker-Task.ps1 script, we are using docker-machine env to set the environment variables for each session. These scripts are scaffolded into your project, which means they're your scripts. We very explicitly gave you the script so you can edit it, as that was one of the biggest pieces of feedback from our earlier publish tools. You can bypass the docker-machine call, and set the environment variables directly if you'd like.
However, if you remove the docker-machine call, you still need the certs for the client to call the docker host. The steps involve:
Copying the certs under %userprofile%\.docker\machine\machines\[yourhost] from the machine you created them upon, to the remote machine.
If you are using docker-machine, you'll need to update %userprofile%\.docker\machine\machines\[yourhost]\config.json to reference the correct paths on the remote machine
If you're using Docker For Windows beta, you no longer need docker-machine env. If no environment variables are set, the docker CLI knows where to find the host. Looking at the DockerTask.ps1 script, you'll notice we only call docker-machine env if there's a machine name. When using Docker for Windows, blank out the entry in docker.props
Hopefully that gives a little insight to the docker flows. Does this match your flows? Are you doing something different that we should incorporate into the tools? Please let us know
Thanks,
Steve
Docker Tagging: Best practices for tagging and versioning docker images
In any new tech, there are lots of thoughts around "best practices". When a tech is new, what makes a best practice? Working at Microsoft, running the Azure Container Registry (ACR), talking with lots of customers, some that use Azure and some that don't, we've had a lot of exposure to what customers have encountered. We've been working on a number of scenarios, including container life cycle management and OS & Framework patching with containers. This has surfaced a number of interesting issues. Issues that suggest, "both sides" of the tagging argument have value. It's easy to get caught up, arguing a particular best practice, …if you don't first scope what you're practicing. I'll start by outlining two basic versioning schemes we've found map to the most common scenarios. And, how they are used together to solve the container life cycle management problem.
Container Patterns Support a Self-Healing Model
Before I get into specific tagging schemes, it may help to identify a specific scenario impacted by your tagging scheme.
The most basic container scenario supports restart type policies. docker run --restart always myunstableimage:v0 This helps when a container fails due to some internal reasoning. But, the host is still available. In this case, our code must be resilient. Or, to an old friends point (Pat Helland), "we must write our software with a apology based computing approach." Apology based computing suggest our code must deal with "stuff" that happens. A set of code, or a container may fail and need to re-run that logic.
For the purposes of tagging, I'll stay focused on the other aspect; we must assume a container host may fail at any point. Orchestrators will re-provision the failed node, requiring a new docker pull. Which begs the question: when you have a collection of containers running the same workload, do you want them to all run the same workload, or some of them have the last version, while new nodes have a newer version?
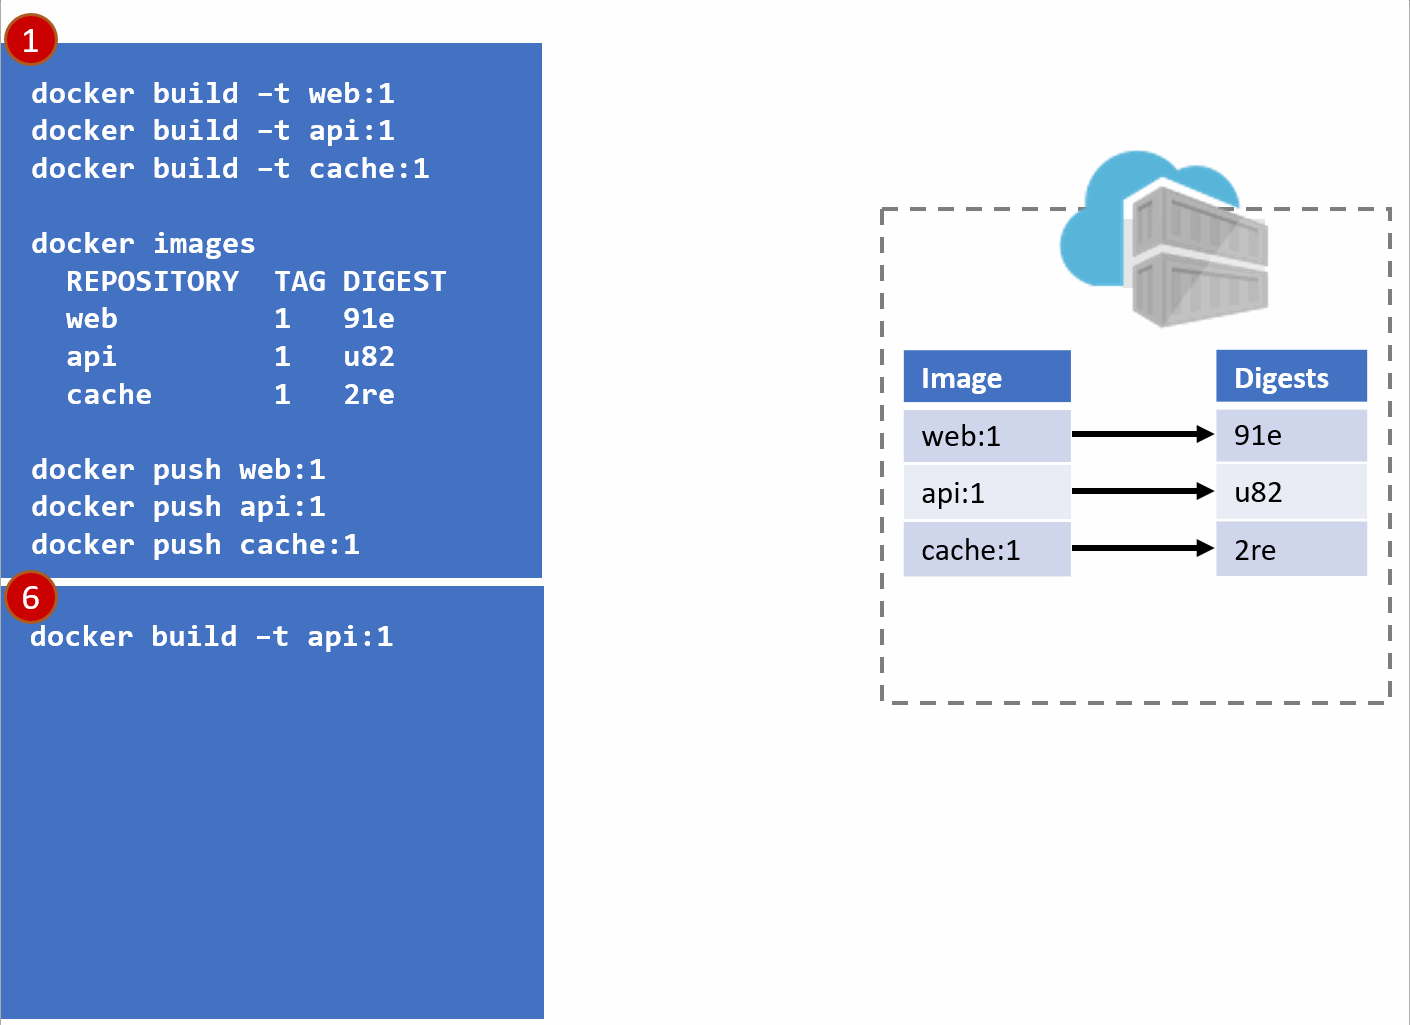
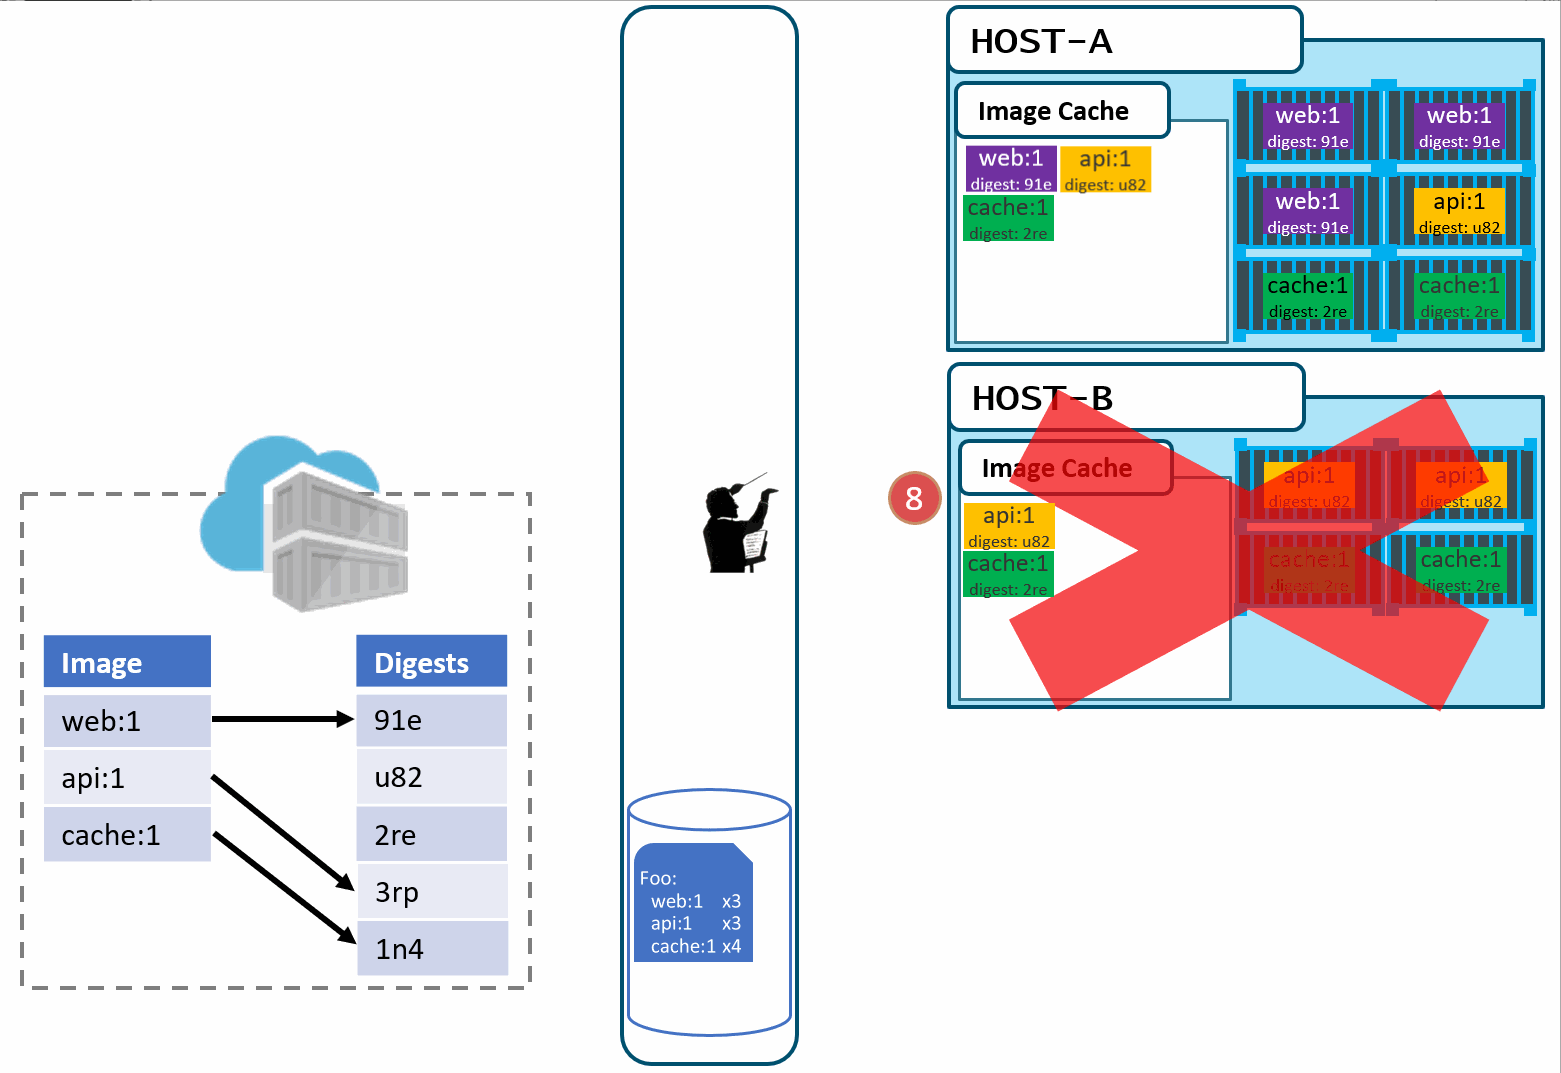
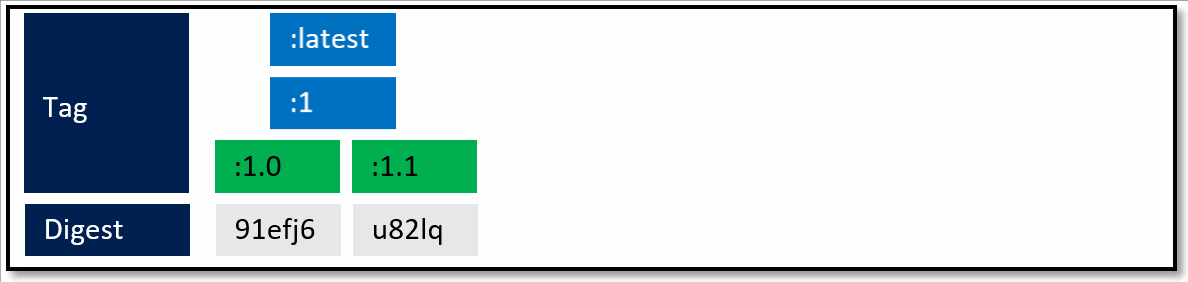
In the above diagram, we have:
a local build of 3 images: web:1, api:1, cache:1. Looking closely, we can see every tag has an ID, otherwise known as a digest.
When the images are pushed to a registry, they are stored as two parts. The image:tag, and the underlying digest. These are actually separate elements, with a pointer between them.
A deployment is made, using the tag. Not the digest. Although, that is an option. Digests aren't as clean as I show here. They actually look like this: f3c98bff484e830941eed4792b27f446d8aabec8b8fb75b158a9b8324e2da252. Not something I can easily fit in this diagram, and certainly not something you'd want to type, or even try and visually find when looking at the containers running in your environment.
When a deployment is made to a host, the orchestrator keeps track of what you asked it to deploy and keep deployed. This is the important part. ...wait for it...
With a deployment saved, the orchestrator starts its work. It evaluates what nodes it has to work with and distributes the request.
A few things here. While many would argue Kubernetes has become the defacto standard for container orchestrators, orchestration is a generalized concept. Over time, we expect orchestration to just become the underpinnings to higher level services. But, that's another post...
As our development team moves along, a new version of the api and cache are built and pushed. Since this is just a minor fix to version 1, the team uses the same tag.
Our registry acknowledges the request, saving the new :1 version of the api and cache. Notice the original tags are now pointing to the new digests (3rp, 1n4)
At this point, you likely see where this is going.
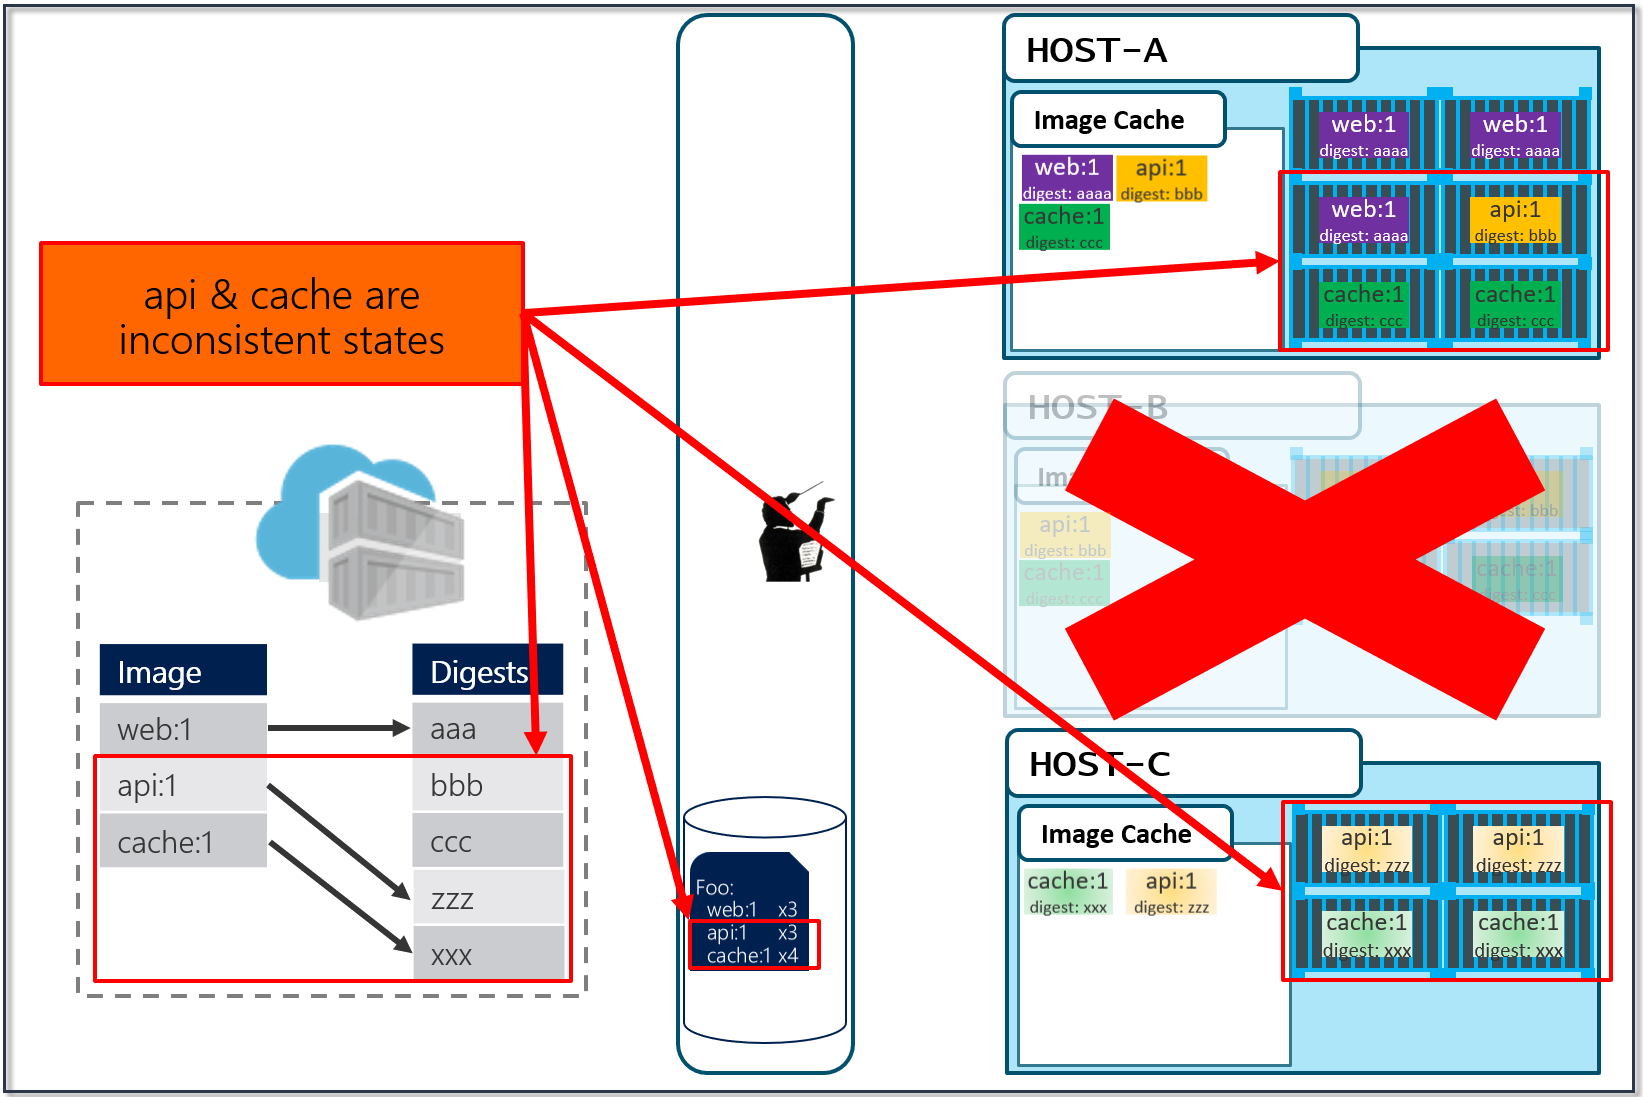
As Pat would say "Stuff Happens". Actually, Pat would say something else. Our Host-B node has failed.
No problem, our orchestrator's job is to maintain a requested deployment. It sees the failure, evaluates the request made of it, and provisions the necessary resources to recover. Our deployment chart clearly says, keep 3 copies of web:1, 3 copies of api:1 and 4 copies of cache:1. So, it does a docker run of each of those image:tag combinations. It's doing what it was told. Our Host-C now has the replacement images running
Is this the desired state you want? The orchestrator did it's job. It was told to deploy and maintain a given set of images.
The problem was actually further upstream, when we re-used the same tag for our images.
Now, if you're like most people, you're likely thinking:
I can deploy with the digest - yup, and you can view lots of these: f3c98bff484e830941eed4792b27f446d8aabec8b8fb75b158a9b8324e2da252
I can use semantic versioning, and always bump the number - yup, that sort of works, but read on
I can use my git commit id - that's pretty good as each commit is unique, and you can easily match a container image to its source. However, do you only rebuild your images when your source changes? ...read on
OS & Framework Patching
While I believe in "never say never", using stable tags for deployments are fraught with problems. However, Stable Tags do have their value.
Let's consider what happens when developers stop checking in code changes. In the VM world, Ops would continue to patch the running hosts for updates to the framework and patches to the host operating system. And, at some point, those patches may break the apps running on those nodes. One of the many benefits of containers are the ability to isolate the things our apps and services depend upon. Those dependencies are contained within our image, declared within our dockerfile.
A multi-stage dockerfile for an aspnetcore app, based linuxFROM microsoft/aspnetcore:2.0 AS base WORKDIR /app EXPOSE 80FROM microsoft/aspnetcore-build:2.0 AS build WORKDIR /src COPY HelloWorld.sln ./ COPY HelloWorld/HelloWorld.csproj HelloWorld/ RUN dotnet restore -nowarn:msb3202,nu1503 COPY . . WORKDIR /src/HelloWorld RUN dotnet build -c Release -o /appFROM build AS publish RUN dotnet publish -c Release -o /appFROM base AS final WORKDIR /app COPY --from=publish /app . ENTRYPOINT ["dotnet", "HelloWorld.dll"]
In the above example, we can see two images. The aspnetcore-build:2.0 image to compile our code, then we copy the output from our build image to an optimized asnetcore:2.0 image. See: .NET and MultiStage Dockerfiles for more details
For the focus of tagging and OS & Framework patching, notice our base image, used for the image we actually deploy.
FROM microsoft/aspnetcore:2.0 AS base
You can see we're using the stable tag, 2.0. This is where semantic versioning does play a role. The ASP.NET Core team releases new capabilities, indicated by the major version. They shipped 1.0, 2.0 and you can imagine they'll continue to ship new capabilities. In the real world, new capabilities means things change, behaviors change, and thus, you want the development team to make a conscious choice which major version of aspnetcore they depend upon. This basic pattern is used across all major frameworks, java, go, node, etc.
While the team focuses on new capabilities, they must also service each version. The aspnetcore image contains aspnetcore, dotnet core, as well as linux or windows server nanao base layers, depending on which architecture you're running. How do you get OS & Framework updates? Should you have to bump your FROM statement for every release? While the team will publish additional tags for minor, non-breaking changes, each team does update their stable major tags.
This does mean, depending on when you pull aspnetcore:2.0, you'll get different content. But, that's the intent. Whenever you pull the stable tag, you should get the latest OS & Framework patched image. I say should as not all repo owners do proper maintenance on their images. Why, because it's actually pretty hard. (insert smallest fiddle) .
Stable tags mean a developer, or a build system can continue to pull a specific tag, which continues to get updates. Stable doesn't mean the contents are frozen, rather stable implies the image should be stable, for the intent of that version. To keep it "stable", it's serviced to keep the evil people from corrupting our systems. (ok, evil can also be a simple mistake that has huge impacts)
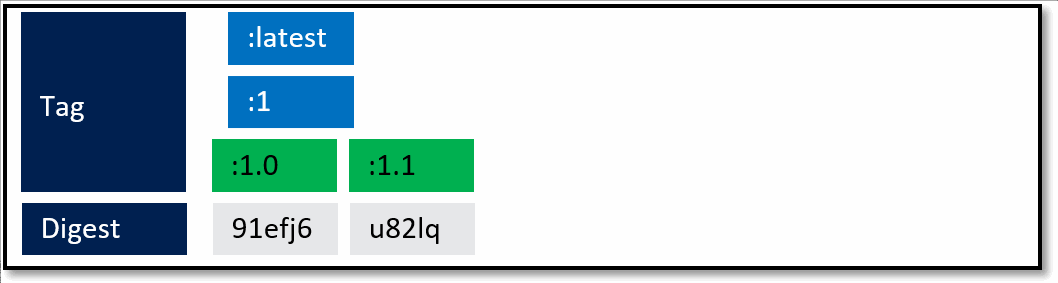
An example:
A framework team ships 1.0. They know they'll ship updates, including minor updates. To support stable tags for a given major and minor version, they have two sets of stable tags.
:1 - a stable tag for the major version. 1 will represent the "newest" or "latest" 1.* version.
:1.0 a stable tag for version 1.0, allowing a developer to bind to updates of 1.0, and not be rolled forward to 1.1
:latest which will point to the latest stable tag, no matter what the current major version is.
What's not quite captured above are servicing releases to any of the given tags. As base image updates are available, or any type of servicing release of the framework, the stable tags will be updated to the newest digest that represents the most current stable release of that version.
In the above example, updates are provided for the specific versions. In this case, both the major and minor tags are continually being serviced. From a base image scenario, this allows the image owner to provide serviced images.
If you really wanted to bind to a specific image, that never changes, you'd set your FROM statement to the digest.
FROM favframework@sha256:45b23dee08asdfls3a7fea6c4cf9c25ccf269ee113ssc19722f87876677c5cb2
However, I'd highly suggest "never" doing binding to a digest. Yeah, I went there - never. If you bind to the digest, how would you get servicing of your base image?
Unique Tagging
Unique tagging simply means, every image pushed has a unique tag. Tags are "never" reused. We've had a number of customers request the ability to enforce this policy, which we'll be adding to ACR. Along with several other policies.
What value should use for your unique tags?
There are a number of options.
git commit - works until you start supporting base image updates, where your build system will kick off, with the same git commit as the previous built. However, the base image will have new content. Using a git commit winds up being a semi-stable tag.
date-time-stamp - this is a fairly common approach as you can clearly tell when the image was built. But, how do correlate it back to your build system? Do you have to find the build that was completed at the same time? What time zone are you in? Are all your build systems calibrated to UTC?
digest - it's unique, or should be. But, it's really not usable as it's just toooooo long. And, it doesn't really correlate with anything easily found.
build id - this one is closest to the best as its likely incremental, gives you correlation back to the specific build to find all the artifacts and logs.
<build-system>-<build id> - If your company has several build systems, prefixing the tag with the build system helps you differentiate the API team's Jenkins build system from the Web teams VSTS build system.
Wrapping up
Whew, that was a lot... As with many things, an answer, especially a best practice, depends on ___. Hopefully I've given some context for the various tagging schemes, and the reasoning behind them.
To summarize:
Use stable tagging for base images "Never" deploy with stable tags as deploying stable tags leads to instability
Use unique tags for deployments as you likely want deliberate deployments of a consistent version of components. Your hosts won't accidentally pull a newer version, inconsistent with the other nodes when "stuff" happens
Use build id's for your deployed images, so you can correlate it back to the rest of the information in your build system
You may have a good reason for deploying stable tags such as a test environment. But, just realize that images will be updated underneath, and you can very easily spend hours troubleshooting a node that pulled a slightly different version of that tag.
Some things to also consider:
Container best practices are evolving
The underlying technology is evolving
You're learning. I like to remind people, learning docker takes a day to realize it's cool, but 3 months to really "get it". Then, you're really just getting started
I'm just a person with an opinion, and I've very possibly missed something. Tell me what you think...
Heading to Tech Ed to talk about Silverlight Offline Applications
Looking forward to a week with business like geeks, grounded in business, but finding a way to make technology meet their business needs.
I'll be around at the Silverlight booth (not quite booth babe, but I'll try), and have a talk on Wednesday.
Hope to see many people there and hear about what you've been building.
Steve
Help improve Docker Container Tooling
The Microsoft Cloud Platform tooling team is looking for customers that are already using Linux Docker Containers in development and/or production to see how we might improve overall Docker tooling.
I'd really like to understand:
How are you using Containers Today?
What is your actual development through production workflow?
What would you like your workflow to be?
What's really easy; don't worry about it?
What's really hard; please help us?
What do you really need, vs it would be nice?
While we've recently added Windows Container Support, from an Azure and Tooling Perspective, we're most interested in what customers are already doing with Linux Docker Containers today so that we can provide great tooling for development, testing, build, production, or wherever you feel you need the most support. That might be in Visual Studio, Visual Studio Code, eclipse, the Azure Portal, or stand alone tools. We'd like your help understanding what you're already doing before we decide what we'd like to focus on next.
I'd really like to talk with you for just 15 minutes. Please contact me here so we can learn more about what you're doing.
Thanks
Steve
How ACR Build Id's are generated
As you use ACR Build, for OS & Framework patching, native container builds, or validating a docker build without having the docker client installed, you may be wondering, what is the format for those alpha-numeric Build id's. aa12
The short answer is it's based on the region the build was executed upon, and a base 32, alpha-numeric sequence to provide independent execution, with multi-region fault tolerance.
The format is: [2 digit, base 32 region code][base 32 sequence]
For some background why we chose this solution...
Accepting failure as reality
As we build ACR, and its associated services, we accept the premise that "failure is reality". One of the base foundations of container orchestrators is to accept failure as reality, at the infrastructure level. Its not that we don't strive to make ACR and all our container services reliable. But attempting to make a service n9's reliable is a costly investment. Rather than spend 90% of our effort, getting the last n% of reliability, we invest in recovering from and accepting failure, and providing more capabilities. The end result is you achieve n9's, but you do so by accepting any number of elements may individually fail, and we avoid single points of failure.
ACR supports geo-replicated registries. Which means a single registry can span multiple regions. ACR supports multi-master changes, so any push, any delete, any meta-data update to any region is eventually consistent. Meaning, there's no guarantee for the ordering of each regions replicated arrival. However, all replicated regions will eventually have all the images and meta-data. There's no single master controller. This means any registry can go down, and the rest will continue to operate. As a practice, we have no single points of failure, other than the big rock we all reside. We have planetary replication, to replicate to Mars and other destinations on our backlog, so the sky is not the limit.
Each replicated registry should be able to build, on its own, and become eventually consistent.
Balancing Needs for a Unique ID
With a little background, we can see why we didn't just use a Count Dracula approach of 1, 2, 3... We then had to decide; how can we generate a unique id?
It must be short enough to be able remember as you tell someone across the room, or type into another device while looking at another screen
It must be easy for a human to read, and not get confused between 1 and l. 0 and o. 2 and z.
It would be nice if there was some sense of sequential ordering. Although it wasn't critical to use every digit.
It didn't have to be globally unique. It could be unique to a specific registry. Meaning myregistry.azurecr.io and yourregistry.azurecr.io could have the same build id. Making it globally unique would conflict with principals 2-4.
We could seed each region with it's own pre-qualifier, so each geo-replicated region of a registry could be sequential
We considered prefacing the region specific unique number with the region id. eastus-1234. Although the first private preview used this, it seemed long and could be confusing when you consider that ACR Build could load balance builds across geo-replicated regions. By using generic numbers, there's no guarantee the preface characters really meant a specific thing.
Where we landed:
To keep it short, human readable, we went with a base 32 alpha-numeric sequence. All digits will be lower case, including the numbers. (what's the point of doing this if we can't laugh at the details)0123456789abcdefghjkmnpqrstuvwxy
Each region will get a sequential two digit preface. Rather than do an elaborate zip code model, we'll take a simplistic agile approach. Every region we'll add, will simply get the next sequential two digit seed. An insider secret. You'll know the order we roll out build regions by its preface characters.
Region
Seed
East US
aa
West Europe
ab
The next region
ac
Each region will track its next id.
If a build fails, the build id is associated with the failed build, and the next sequential number is used for the next build.
Quick builds az acr build -t ., will also get sequential build ids.
Build Ids are assigned as the build is queued. If two builds are queued at the same time, that started at 1pm, that took 2 minutes will have a lower number than the build that started at 1:01 pm, and only took 30 seconds.
The preface characters are not tied to the closest registry from where the command is executed. As customers adopt base image updates, we expect huge bursts of automated builds as popular OS and run times update. As we scale ACR Build, we will stage the events, globally, just as Windows Update does today. If a region is at capacity, we may utilize any geo-replicated regions of a registry to load balance builds. If a registry is replicated between East US and West Europe, a build initiated on the east coast, may be bounced to West Europe based on capacity. ACR Geo-replication will kick in, and the Build ID will start with ab, the seed from West Europe.
We're excited to participate in building reliable systems, based on the reality that failure is a thing. We also strive on building systems that are easy to maintain as all too often, failures are triggered by complexity of simple things: quick-6-six-unit-conversion-disasters
Steve
I'm speaking at VSLive Vegas. Come here more about Docker and Azure
Come join the fun at At VSLive Las Vegas, where I'll be presenting our latest Docker Tooling and how you can work with Azure.
Steve
Key Differences between VM and Container Vulnerability Scanning
As we explore the various options for integrating vulnerability scanning into containers running in Azure, we encountered many different approaches and requests. I was initially writing a document for internal discussions, outlining some of our internal goals for how we want to think about container security, and why we might take one approach or another. While I'd suggest Azure has the best breadth and depth of containers in any of the major clouds, we are a large company, and not everyone is familiar with containers. In our busy lives, we only have a few seconds of mental processing, before we look to apply what we've just learned to the problems we have. Containers solve many problems, some more short term than others. However, until you've inverted your thought process, and think about a container-first mindset, you'll find yourself using a new tech as a better tool, but not nearly unlocking its potential.
As I wrote the document, there are lots of details and examples I wanted to outline to help people think about vulnerability from a container first mindset. Many of which represent opinions, or "best practices". As I wrote the Docker tagging best practices for tagging and versioning docker-images post, I thought about what makes a best practice for a new and rapidly evolving technology?
I don't consider myself a security expert, and I certainly don't play one on Twitter. I have worked in the industry for many years and have watched the balance of secure, usable and practical. We don't always get these right. And I don't believe the concept that something must be hard to be secure. I believe in good, obvious processes and realistic expectations for making something secure. After all, what's the first thing developers do when security gets in the way? ...we disable it. Not a very secure result, now is it?
To put some context to this paradigm shift, below are a number of concepts to consider when you think about adopting a container scanning solution. Just because something has been done a certain way for years, doesn't mean it's still relevant.
Virtual Machine and Container Differences
Below are several concepts we think about when running compute. I've provided a VM centric and Container centric view to each one.
Container Bigot Disclaimer: For those working with products like Vagrant, Terraform and other awesome products that automate VM creation; this isn't meant to suggest the challenges couldn't/aren't addressed with them. And while I'm far to say anything you can do in a VM, I can do better in a container, I think we all recognize containers, and specifically Docker has brought about the next foundational shift in how we package and run software.
Where Is Fast a Priority
VM VMs are typically measured in the length of up-time. How long was the VM running before it had to be rebooted or retired? While startup time is always important, VM startup time is typically measured in minutes. As long as they come up in single digits, they're considered "the norm".
Container Containers are assumed to be relatively short-lived processes. They may be long running services, like websites or APIs, but the expectation is they get moved, updated, scaled with far more frequency. Containers are measured in the number of seconds, or preferably milliseconds from the time of docker run to processing requests. Customers are also looking for docker pull to complete in seconds, reducing the amount of time to run a new image on a new node. Considering containers are becoming the base of functions, where a workflow kicks off, and each step of the process may be its own container that's pulled, instanced and tossed in the matter of seconds, anything that can slow down the instancing must be changed.
Configuring and Applying Changes
VM While projects/products like Terraform, Spinnaker, Vagrant and others aim to automate the final configuration of VMs, they are most commonly configured post instancing. Teams routinely remote into the machine, applying software or patches. Even when it's not intended, many teams still do, and these long running nodes need to be protected.
Container
Containers are considered immutable. Meaning, once an image is instanced, it's not changed. One would likely argue a running container shouldn't be changed as it defeats the ability for a new instance to reflect the exact behavior. Rather than update a running container, the image dockerfile is changed to implement the configuration change or software. The image is rebuilt, pushed to a registry, and awaits its time to be instanced.
Applying OS & Framework Patching
VM Like configuring and applying changes, teams work to update templates for deployments. However, most operations teams will monitor and update their running VMs. These are updated, without necessarily understanding what apps are running, as it's just too difficult for companies to track which VMs could be impacted.
Container Also, like configuring and applying changes, a container isn't patched while running. The image is rebuilt with the OS and framework patches. In this model, the image can be scanned and tested before its deployed.
Receiving Data
VM As VMs are designed as long running instances, VMs are designed to host data. It may involve downloading EDI files to be processed, customer binaries to signed, pictures to be processed. In each case, the VM has the ability to download malicious content. If the VM is found to be vulnerable, the data on the VM must be scrubbed and typically recovered.
Container Containers are considered immutable processes that may be run for seconds or hours. Any data that may be placed in a container would/should be considered disposable. The container must be assumed to fail at any point. Containers store their data externally, using volume drivers or data services like DocDB, Relational or Blob storage. An image that becomes suspect could/should be deleted without any worry for what temporary storage that may have been written.
Multiple Lines of Defense
VM In the VM world, the VM itself has multiple lines of defense. It may be secured within a VNNet, locked down to where it may communicate through firewalls, which also run on the VM. Scanning is placed within each running VM.
Container In the container world, securing the process within the container is the last line of defense. Containers themselves do not actively run scanning. They are lightweight processes. The container host may likely run scanning for what images are being deployed. In the best world, the image being requested to run is verified against a list of pre-scanned images. If the image has been already, and recently scanned, it's allowed to run. The first line of defense for containers is the source where they are kept, before deployment. This is referred to as the container registry. Each company running containers will host their own private registry. The scanner keeps an inventory of all images in the company's private registries. Scanning at the source allows offline scanning, before the image has been requested to be deployed. This makes instancing a container fast as it's just verified to have been seen prior. The host monitoring will either block or scan images it hasn't previously seen.
Vulnerability Detection and Impact
VM In the VM world, for an enterprise solution, scan results are reported back to a central server. However, the report indicates what was found and the action. It doesn't necessarily trigger a recursive action for other like VMs.
Container In the container world, the registry is actively scanned. Each protected node may report back what images it's running. As the scanner finds existing vulnerabilities in newly pushed images to the container registry, or it finds new vulnerabilities in existing images in the registry, the scanner determines the impact. It can use the data for what images are running (referenced by their image digest) to understand the impact of the vulnerability. If the scanner happens to find a vulnerability that was in a single image that was never deployed, the risk is non-impactful. The action is as simple as either quarantining the image, or deleting it. If the scanner finds a new, critical vulnerability in a base image that has 50 other derived images, which are deployed on 220 production nodes, the impact is far more severe. The fundamental difference between containers and VMs is where the scanning occurs, with the analysis and action taken. In the container world, a single scan and detection can account for hundreds to thousands of nodes being remediated.
Remediating Vulnerabilities
VM Remediating vulnerabilities in a VM typically involves applying a patch to a running VM. The intent involves the patch removing or replacing the initial offending binary or configuration.
Container When vulnerabilities are found with containers, a new, remediated image is built, pushed and deployed. Some of the key differences being the original configuration and/or binary shouldn't have any traits in the newly built image. When the vulnerability is found in a top-level image, meaning an image that copied the offending binary in its dockerfile, it's built once and deployed to the intended nodes. To remediate a base image, all the subsequently derived images must be rebuilt. A shameless plug for ACR Build. In the VM environment, without products like Terraform, each node must be individually updated.
The Scanning Paradigm Shift
With the above differences, we can see the approach for scanning containers would be very different from Virtual Machines. The basic approach of containers represents a paradigm shift from working with virtual machines. While Virtual Machines were a major change in 2001, improving many challenges of installations of the OS and software, installed on dedicated hardware, they are now nearly two decades old. We've learned a lot since. We've changed the workloads from machines under someone's desk, in a closet with hopefully enough air conditioning, or a bigger closet in the basement of an enterprise. Expectations of 3 months to get infrastructure acquired and provisioned are long gone. Customers spin up instances in an instant, on-demand, with expectations of seconds in a cloud they have no care as to where it runs.
Containers aren't just a better mousetrap, they account for many of the lessons the industry has learned and adjusted to as the workloads have grown and transitioned from assisting humans at work. Compute now accounts for most of the work, and the humans control and interact with the computers. As a result, it's no longer just an annoyance when the excel spreadsheet is locked or not available. Having a system down, just for a few minutes, can kill the reliability of the business, cost them millions of dollars in fines or lost revenue, or cause complete failure of the business.
As with any new tech, taking the time to digest its impact, understanding the opportunity for things it can resolve, and things it can't are just as important as understanding the calorie count of your favorite new dessert.
Looking for LOB Developers
We're looking to speak with companies that are building internal, enterprise, LOB applications. If you can spare just 30 minutes to help us shape the future of Visual Studio, we'd like to get insights into what you're doing today and what you're company is planning for the future.
If you or someone in your company is interested, please contact me here
Thanks,
Steve.
Moving the cheese - SteveLasker.blog
Microsoft is retiring personal MSDN blogs. As a result, I've moved all my blog content to:
I hope you'll keep the great feedback coming there.
Steve
.NET and MultiStage Dockerfiles
A while back I talked about building optimized docker images. (Building Optimized Docker Images with ASP.NET Core) With compiled runtimes like Go, Java and .NET, you'll want to first compile your code before having a binary that can be run. The components required to compile your code are not required to run your code. And the SDKs can be quite big, not to mention any potential attack surface area. The best practice has been to build docker images in steps. This could have been done on your local machine, taking the output and placing it in a container. Or, create solutions like we did with Visual Studio, creating a docker-compose.ci-builld.yml file to first compile the code.
The challenge with building on the host, including hosted build agents is we must first have a build agent with everything we need, including the specific versions. If your dev shop has any history of .NET Apps, you'll likely have multiple versions to maintain. Which means you have complex agents to deal with the complexities. We could refer to these as "Pets".
One of the big benefits of Docker is treating our build environments as "cattle". The build agents only need to know how to run docker. They have no need for .NET, Node, bower, gulp or any other build tools. The build environment can be specified with our source. This completely empowers the dev team of each project to determine and provide a build environment specific to their needs. The maintainers of your build environment need not know anything about the current versions or runtimes. They simply maintain generic cattle farms that know how to run docker, aggregate the build output logs and report on the build status.
Lets take a look at a multi-stage dockerfile: FROM microsoft/aspnetcore:2.0 AS base WORKDIR /app EXPOSE 80 FROM microsoft/aspnetcore-build:2.0 AS builder WORKDIR /src COPY *.sln ./ COPY Web/Web.csproj Web/ RUN dotnet restore COPY . . WORKDIR /src/Web RUN dotnet build -c Release -o /app FROM builder AS publish RUN dotnet publish -c Release -o /app FROM base AS production WORKDIR /app COPY --from=publish /app . ENTRYPOINT ["dotnet", "Web.dll"]
At first, it simply looks like several dockerfiles stitched together. Multi-stage Dockerfiles can be layered or inherited. When you look closer, there are a couple of key things to realize. Notice the 3rd stage
FROM builder AS publish builder isn't an image pulled from a registry. It's the image we defined in stage 2, where we named the result of our our -build (sdk) image "builder". Docker build will create a named image we can later reference.
We can also copy the output from one image to another. This is the real power to compile our code with one base sdk image (microsoft/aspnetcore-build) , while creating a production image, based on an optimized runtime image. (microsoft/aspnetcore). Notice the line COPY --from=publish /app . This takes the /app directory from the publish image, and copies it to the working directory of the production image.
Breakdown Of Stages
The first stage provides the base of our optimized runtime image. Notice it derives from microsoft/aspnetcore. This is where we'd specify additional production configurations, such as registry configurations, MSIexec of additional components,... Any of those environment configurations you would hand off to your ops folks to prepare the VM. The second stage is our build environment. microsoft/aspnetcore-build This includes everything we need to compile our code. From here, we have compiled binaries we can publish, or test. More on testing in a moment.
The 3rd stage derives from our builder. It takes the compiled output and "publishes" them, in .NET terms. Publishing simply means take all the output required to deploy your "app/service/component" and place it in a single directory. This would include your compiled binaries, graphics (images), javascript, etc.
The 4th stage is taking the published output, and placing it in the optimized image we defined in the first stage.
Why Is Publish Separate From Build?
You'll likely want to run unit tests to verify your compiled code, or the aggregate of the compiled code from multiple developers being merged together, continues to function as expected. To run unit tests, you could place the following stage between builder and publish. FROM builder AS test WORKDIR /src/Web.test RUN dotnet test If your tests fail, the build will cease to continue.
Why Is Base First?
You could argue this is simply the logical flow. We first define the base runtime image. Get the compiled output ready, and place it in the base image. However, it's more practical. While debugging your applications under Visual Studio Container Tools, VS will debug your code directly in the base image. When you hit F5, Visual Studio will compile the code on your dev machine. It will then volume mount the output to the built runtime image; the first stage. This way you can test any configurations you've made to your production image, such as registry configurations or otherwise. When docker build --target base is executed, docker starts processing the dockerfile from the beginning, through the stage (target) defined. Since base is the first stage, we take the shortest path, making the F5 experience as fast as possible. If base was after compilation (builder), you'd have to wait for all the subsequent steps to complete. One of the perf optimizations we make with VS Container Tools is to take advantage of the Visual Studio compilations on your dev machine.
A Closer Look at Multiple Projects and Solutions
The multi-stage dockerfile above is based on a Visual Studio solution. The full example can be found in this github repo representing a Visual Studio solution with a Web and API project. The additional unit tests are under the AddingUnitTests branch.
The challenge with solutions is they represent a collection of projects. We often think of dockerfiles specific to a single image. While true, that single image may be the result of multiple "projects".
Consider the common pattern to develop shared dlls that may represent your data access layer, your logging component, your business logic, an authentication library, or a shipping calculation. The Web or API project may each reference these project(s). They each need to take the compiled output from those project and place them in the optimized image. This isn't to say we're building yet another monolithic application. There will certainly be additional services, such as checkout, authentication, profile management, communicating with the telco switch. But there's a balance. Microservices doesn't mean every shared piece of code is it's own service.
If we look at the solution, we'll notice a few key aspects:
Each project, which will represent a final docker image, has it's own multi-stage dockerfile
Shared component projects that are referenced by other resulting docker images do not have dockerfiles
Each dockerfile assumes it's context is the solution directory. This gives us the ability to copy in other projects
There's a docker-compose.yml in the root of the solution. This gives us a single file to build multiple images, as well as specify build parameters, such as the image name:tag
We can now build the solution with a single docker command. We'll use docker-compose as our compose file has our image names as well as the individual build defintions version: '3' services: web: image: stevelas.azurecr.io/samples/multiproject/web build: context: . dockerfile: Web/Dockerfile api: image: stevelas.azurecr.io/samples/multiproject/api build: context: . dockerfile: Api/Dockerfile
Opening a command or powershell window, open the root directory of the solution: PS> cd C:\Users\stevelas\Documents\GitHub\SteveLasker\AspNetCoreMultiProject PS> docker-compose build Elements of the output contain the following: Building web Step 1/17 : FROM microsoft/aspnetcore:2.0 AS base Step 4/17 : FROM microsoft/aspnetcore-build:2.0 AS builder Step 12/17 : FROM builder AS publish Step 14/17 : FROM base AS production Successfully tagged stevelas.azurecr.io/samples/multiproject/web:latest Building api Step 1/17 : FROM microsoft/aspnetcore:2.0 AS base Step 4/17 : FROM microsoft/aspnetcore-build:2.0 AS builder Step 6/17 : COPY *.sln ./ Step 7/17 : COPY Api/Api.csproj Api/ Step 8/17 : RUN dotnet restore Step 11/17 : RUN dotnet build -c Release -o /app Step 12/17 : FROM builder AS publish Step 13/17 : RUN dotnet publish -c Release -o /app Step 14/17 : FROM base AS production Step 16/17 : COPY --from=publish /app . Successfully tagged stevelas.azurecr.io/samples/multiproject/api:latest
Coming Into Port
With multi-stage dockerfiles, we can now encapsulate our entire build process. By setting the context to our solution root, we can build multiple images, or build and aggregate shared components into images. By including our build environment in our multi-stage dockerfile, the development team owns the requirements to build their code, helping the CI/CD team to maintain a cattle farm without having to maintain individual build environments.
The multi-stage dockerfiles provided will scaffolded by Visual Studio. As of this post, we're finalizing the release date, but hope to have it out soon. I'll present our Visual Studio tooling, including multi-stage dockefile support at an Ignite Pre-Con, so for those attending, I hope to see you there. If you've got questions, thoughts, please let us know so we can incorporate the feedback into our Visual Studio tooling. Thanks, Steve
Authenticate with a Service Principal for service to service authentication; such as your Kubernetes cluster or Build System
CLI Commands including Docker Login, Push, Pull
This enabled the most common scenarios, and provided a GA product as we heard customers needed a private registry, network-close to their deployments that wasn't in preview.
The March GA release placed the storage of the registry in the customers subscription. This was an Azure implementation of the Open Source Docker Registry. Since March, we've seen a number of customers experiencing problems as they accidentally delete the storage account backing their registry. Or they dig into the storage account attempting deleted images and/or tags; which in many cases have caused corruption and support calls.
Pricing was deferred to Azure Storage and associated networking fees. From an SLA perspective, ACR had no means to provide an SLA for the registry service itself as an SLA provides financial recourse for outages.
Addition of the Basic, Standard and Premium SKUs
Customers have been asking for features such as deletes, web hooks, easier login model as Service Principals can be difficult to create and maintain and global scale capabilities. As we considered the additional features in our backlog, we found many would benefit from managing the storage of the registry on behalf of the customer.
Managed Storage
As we looked at additional features like deletes, Webhooks, multi-arch manifest management and a few other features coming, having tighter integration with the storage of the images became core to our efforts. We have additional features like caching the common images from DockerHub across all registries within a region. When you push your first image, you'll find the common layers will already exist. This minimizes the storage for each subscription, passing savings to you and improves the overall performance as there's just less to manage.
For Deletes., two repos in the same registry may share a common set of layers. Attempting to delete one repo requires ref counting to know when to delete the common layers. This indexing is something we've added on top of the OSS docker registry and takes advantage of the internal storage.
To provide these capabilities, the new SKUs manage the storage of the images behind each container registry. ACR stores them with Storage Service Encryption enabled, so all images are safely secured at rest as well as in-transit. Only the common DockerHub layers will be shared across registries (in the near future), so their's not potential for leaking layer information across customers. We do take the security of our customers image layers a top priority.
Pricing
Basic
Intended as the developers sandbox, basic has all the features a developer would need to interact with, including Individual Identity, Webhooks and Deletes. As we provide multi-arch manifest editing, layer caching, etc, the developer will be able to design their solution against these features. Basic is limited on the amount of usage and scale.
Standard
Intended for the most common deployments with several hosts pulling images, continuous build and integration solutions pushing images. Here you'll see larger throttle and storage limits and geo-redundant storage assuring your production data is backed up across two regions.
Premium
Intended for the larger, more complex deployment. Premium includes higher throttle limits, but will also include more complex features for managing registries across the globe. More will be coming here as we complete the next round of feature work, so stay tuned. As of this post, Premium is differentiated with higher throttle limits and storage.
Classic
Basic
Standard
Premium
Azure AD Individual Access Control
N/A
Yes
Yes
Yes
Repo/Tag Delete
N/A
Yes
Yes
Yes
Web Hooks
N/A
2
10
100
Available Storage (GB)
See Azure Storage
10
100
500
Encryption at Rest & In Transit
See Azure Storage
Yes
Yes
Yes
Geo Redundant Storage
See Azure Storage
N/A
Yes
Yes
Global Scale Features*
N/A
N/A
N/A
Yes
Price / Month
See Azure Storage
$5
$20
$50
During the Preview Period, Basic, Standard and Premium are discounted 50%. The pricing page reflects the discounted rate.
Tell us what you think
I'll of course monitor here for your comments, but you can also find us at:
At Tech Ed US in Atlanta this week I presented a session for building Offline Silvelright Applications. The session covered an end to end solution for developing applications, building on the work we've done with relative Sync technologies, local storage and the common feedback we've head over the last several years of working on these technologies.
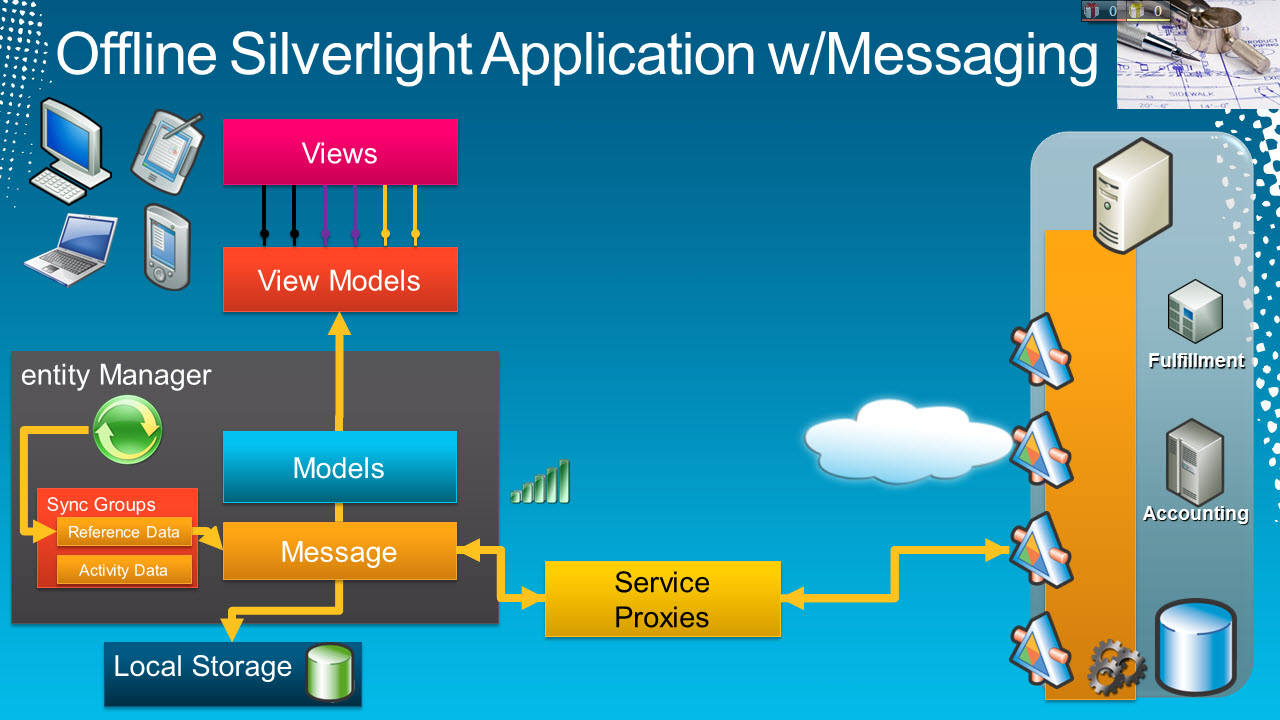
Messaging Based Sync The concepts presented here are just that, concepts for things we've been brainstorming a bit and not reflective of products we're shipping. The idea is to bridge the gap for the "data sync" scenarios that we continually received feedback that it wasn't very "service oriented". It also addresses the problems for where to get data when online. In the traditional sync scenario, we would have said always fetch your data locally, even when online and just keep synching the local cache. This is the traditional Outlook model. The problem with this approach is most LOB data isn't "Outlook like". Meaning, most LOB data isn't as cleanly partitioned. In email, these are your emails. Nobody else edits your emails. In fact, you don't really "edit" your emails either. You receive messages, view them, and create new messages.. In LOB data, you may have data that you're viewing, but someone else edits it. In our sample, we're assigning appointments to insurance adjusters. Someone may change that appointment, or the details of the claim.
Active/Passive Caching The concept presented here mixes active caching and passive caching. Depending on the data, when online we look at the server/service for the data, but cache it locally. When offline, we read from the local cache for data we know changes often. For reference data, we always read from the cache, as we don't expect the list of states or company codes to change that often. This reduces server workload as we only periodically ask for changes, and it speeds the local processing.
Local Storage Other topics that I didn't have time to delve into is the local storage scenario. There are many solution for local storage, and for this presentation, I chose to use Sterling DB. https://sterling.codeplex.com/ I hope you find the deck and session helpful
Jason Shaver, a PM on our Silverlight team did most of the development for the messaging portion of the Insurance Adjuster application and I know he's interested in getting feedback on the approach. Insurance Adjuster Sample on CodePlex
VSS yedekleme testi nasıl yapılır Exchange üzerinde bulunan verilerin yedeklenmesi (backup) ve geri yüklenmesi (restore) baslibasina çok önemli bir konudur. Bir yedegin saglikli alinmasi kadar restore isleminin basarili bir biçimde yapilabilmesi de test edilmesi gereken önemli bir islem. Exchange destegi olan (aware) diye adlandirdigimiz yazilimlar exchange writer'lari kullanarak VSS teknolojisi ile yedek alirlar. Yedekleme esnasinda karsilasilan sorunlarin büyük bölümünün nedeni, yazilimlarin uyumsuzlugu ya da bu yazilimlardaki yanlis bir ayar olabilmektedir. Bunun tespiti için, yani yedek alma sirasinda sorunun VSS Writer'dan mi, disk sisteminden mi ve/veya yedekleme yazilimindan mi kaynaklandigini anlayabilmek için Betest aracini kullanabilirsiniz. BETEST, Windows SDK yada Volume Shadow Copy Service SDK 7.2 (sonraki versiyonlarda mevcut) içerisinde bulunan yardimci bir araçtir. Araci kolaylikla bulabilir ve kurabilirsiniz. Kurulum islemini exchange sunucunuz...
Update – Removing Built-in Applications from Windows 8 In October last year I published a script that is designed to remove the built-in Windows 8 applications when creating a Windows 8 image. After a reading some of the comments in that blog post I decided to create a new version of the script that is simpler to use. The new script removes the need to know the full name for the app and the different names for each architecture. I am sure you will agree that this name - Microsoft.Bing – is much easier to manage than this - Microsoft.Bing_1.2.0.137_x86__8wekyb3d8bbwe. The script below takes a simple list of Apps and then removes the provisioned package and the package that is installed for the Administrator. To adjust the script for your requirements simply update the $AppList comma separated list to include the Apps you want to remove. $AppsList = "Microsoft.Bing" , "Microsoft.BingFinance" , "Microsoft.BingMaps" , "Microsoft.Bing...
Moving on with WebParticles 1 Deploying to the _app_bin folder This post adds to Tony Rabun's post "WebParticles: Developing and Using Web User Controls WebParts in Microsoft Office SharePoint Server 2007" . In the original post, the web part DLLs are deployed in the GAC. During the development period, this could become a bit of a pain as you will be doing numerous compile, deploy then test cycles. Putting the DLLs in the _app_bin folder of the SharePoint web application makes things a bit easier. Make sure the web part class that load the user control has the GUID attribute and the constructor sets the export mode to all. Figure 1 - The web part class 2. Add the AllowPartiallyTrustedCallers Attribute to the AssemblyInfo.cs file of the web part project and all other DLL projects it is referencing. Figure 2 - Marking the assembly with AllowPartiallyTrustedCallers attribute 3. Copy all the DLLs from the bin folder of the web part...


Comments
Post a Comment