Skip to main content
Creating Docker Hosts in Azure w/Docker-Machine 0.7.0
unread writer
I've never read a book by my favorite writer. Joss Whedon created the TV shows Buffy the Vampire Slayer, Angel, and Firefly. Now, he's created the movie Serenity. Orson Scott Card (also not bad in the writing department) says Serenity is the best sci fi movie he's seen. I thought it was incredible, but for me, my Mom's reaction was the most surprising.
My Mom is no breathless sci fi fan. I wasn't sure she would like it at all. She said it reminded her of seeing the original Star Wars. She doesn't think it was like Star Wars. Instead it was remembering the feeling of not knowing what to expect and finding something new and great in a movie.
Shai and I didn't get to experience it that way. We've watched the Firefly series on TV, then the entire series on DVD. The characters, and the writing were familar to us, but the result was still great. If you haven't heard of Firefly go see this movie. If you have, convince someone you wouldn't expect to be a fan to go see it with you.
Use the symbol server
Below you see the sad state of affairs that comes from not using the public symbol server:
![No Symbol Server]()
This is not the callstack you want to see. With only exports loaded for ntdll.dll you are missing the whole show. What you need is the public symbol server! (Don't bother clicking on this link, use this URL in Symbol settings dialog in VS, not internet Explorer: "https://msdl.microsoft.com/download/symbols").
![Symbol Settings]()
If you add the public symbol server, be sure to cache those symbols locally. If you don't use a cache devenv will hit the network on each module load. Below you can see the improved callstack, and the heading in the modules window that shows the public symbols are 'stripped' of source information.
![With Symbol Server everything is better]()
From other tools that support symbol server you will need a slightly more verbose syntax as the cache and the server are specified on one line:"srv*c:\symcache*https://msdl.microsoft.com/download/symbols;"
Using Note flags in Onenote
How I expected to use note flags was very ambitious. How I actually use them is much simpler.
I like the ability to flag TODO items more than the ability to browse by bug, email alias, etc. I use check box style flags and keep the summary set to show only unchecked items, while keeping the search scope at the current folder.
Then I made 3 categories. Habit, is specific advice that I found so valuable I want to remember and make it a habit over time. Non-urgent, is for the times I hope I am doing all day. Urgent, is for anything that is on a tight deadline. If you've read the 7 habits Urgent and Non-urgent correspond to quadrant I and II (important/urgent, and important/non-urgent). I don't bother making todo items for unimportant things.
Finally I decided I need to keep all items visible in the note flags summary. This means for example, if I need to make a new non-urgent item and I have no room, I am forced to make a 'tough call' and admit I won't do something. I've been using this for two weeks. It may require a few more tweaks, but I like it so far.
XSLT debugging in Visual Studio
Visual Studio is a big tool. It's easy to miss some useful features. Hopefully the XSLT debugger won't get missed. If you want to learn how to use XSLT debugging take a look at Neetu Rajpal's msdn article Introducing Xml tools in VS 2005. Below you can see the debugger in action as an xslt transform is being applied to some XML.
(Please excuse the nonsense XSLT I use in the example. I haven't had a chance to play around with XSLT for quite some time.)
![XSLTdebugging]()
XSLT debugging is interesting to me because much of it is the managed debugger. XSLT is compiled to msil, and the managed debugger is used to provide things like breakpoints and stepping. You can see this by opening the modules window. You'll see in the last column that the process is a managed process called the Microsoft.XSLDebugProxy.exe, and there will be some modules loaded with names like System.Xml.Xsl.CompiledQuery.1. All of the debugger windows work as expected: callstack, locals, immediate, threads, modules. You can see below the callstack for my nonsense example:
![XSLTcallstackwithJMC]()
However! Go to the callstack window and right click to get the context menu. There will be an item called Show External Code. Pick that and you get to see much in the callstack window that was hidden before. The grey colored frames are because there is no debug info (pdb file) for that assembly, which is why those frames were marked as 'External Code' before. The CompiledQuery frames were hidden because the XSLT compiler placed an attribute on them to tell the debugger they were not of interest. With the expanded view you can now see the compiled query and the code that dispatched it.
![XSLTCallstackWithoutJMC]()
However, while that is interesting it is unlikely to help you get at a bug in your XSLT. The Locals window however appears to be one of the more useful windows, that can help you see what is happening as the transforms are applied.
![LocalsWindowXSLTdebugging]()
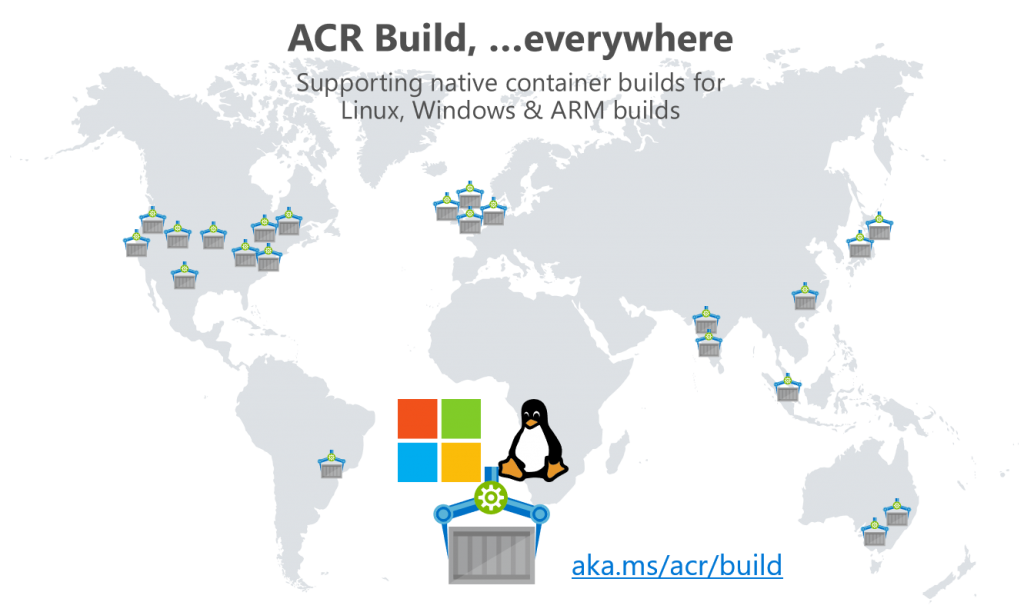
ACR Build (Preview) Now Supported In All Public Regions
ACR Build, a native container build capability of the Azure Container Registry is now available in all regions ACR is available. That's 23 regions worldwide as of July 23rd 2018.
ACR Build enables network close builds, alongside your container registry. While docker has an efficient image layering scheme, image layers can grow in size. Reducing the network distance your image pull and push operations must travel is key to improving reliability, speed and reducing network egress costs.
Wherever you run your Azure Container Registry, you can now build Linux, Windows and ARM right alongside.
OS & Framework Patching of Containers
ACR Build is primarily focused on the container lifecycle management challenge. ACR Build supports:
ACR Build is currently in preview, incorporating feedback. Based on feedback, we've recently enabled:
- remote context, such as an existing git repository with nested folders
az acr build \ -t hello-acr:{{.Build.ID}} \ https://github.com/Azure-Samples/acr-helloworld.git
and nested folders
az acr build \ -t hello-world-of-windows:{{.Build.ID}} \ https://github.com/AzureCR/acr-builder-os-tests.git#master:Windows/Servercore - multi-tagging support
-t image1:{{.Build.ID}} -t image1:latest - ARM support
- Windows support
- {{.Build.Date}} is coming soon
Watch more on Azure Friday with Lara Rubbelke
Give it a try. Tell us what you need.
Any other feedback, feel free to leave larger comments here, user voice, twitter (@SteveLasker)
Thanks,
Steve and the great members of the ACR team
ACR Build OS & Framework Patching Now Supports Docker Hub
In May we announced the public preview of ACR Build, enabling OS & Framework patching. When we announced the preview, only Azure Container Registries were supported for base image update notifications.
With DockerCon starting this week, it's only appropriate we add support for base in Docker Hub.
- Docker build a locally scoped directory in Azure, with a tag based on the build id:
git pull https://github.com/demo42/helloworld az acr build -t helloworld:{{.Build.ID}} .
- Create a build-task that automatically builds, based on git commits, or base image updates
az acr build-task create \ -n helloworld \ -c https://github.com/demo42/helloworld \ -t helloworld:{{.Build.ID}} \ --git-access-token $PAT
When az acr build completes, the base images dependencies are dynamically discovered. We believe dynamic discovery is key, so your build task and dependencies are kept in sync with your code:
ACR Builder discovered the following dependencies: - image: registry: demo42.azurecr.io repository: helloworld tag: aanc digest: sha256:581a6215cae409690a4106fb06f8a1f7b9cd4790b956cb197b22eb4cae9b3977 runtime-dependency: registry: registry.hub.docker.io repository: baseimages/node tag: 9-alpine digest: sha256:1c3d74a201d4169a2dff0d49e831510384063df7546ee89bb806febfe29eaadb git: git-head-revision: e578d0e125be1599fb125bdd07c05f16d45ff1c1
Build Latency
To meet the scale of builds that we expect over time, ACR build has a built in randomness to the delay by which a base image update will be notified. This is currently between 10 and 60 minutes.
Using az acr build-task list-builds, you can see the build change from a Git Commit to Image Update
BUILD ID TASK PLATFORM STATUS TRIGGER STARTED DURATION ---------- ------------------ ---------- --------- ------------ -------------------- --------- aanc helloworld Linux Succeeded Image Update 2018-06-11T18:34:55Z 00:00:45 aanb helloworld Linux Succeeded Git Commit 2018-06-11T18:31:13Z 00:00:45
We believe automated OS & Framework patching is a key element of container life cycle management. We also know that running ahead means we may not always have the the experience just right. We encourage your thoughts and feedback:
You can always reach me directly at Steve.Lasker at microsoft dot com or twitter: @SteveLasker
Steve
Azure Container Registry Build Supports All Windows Versions (Preview of Preview)
ACR Build, a cloud-native container build capability of the Azure Container Registry now supports all supported versions of Windows Containers.
In May of 2018, Azure announced ACR Build (Preview), a component of Azure's OS & Framework Container Life-cycle Management Today, we wanted to give customers early access to Windows Builds, in addition to the Linux and ARM builds customers could do since last May.
ACR Build Enables All Supported Versions of Windows Containers
The most significant element of Windows support is the support for all supported version of Windows, including ltsc2016, 1709 and 1803. In addition to Windows Server Core, Nano Server is also supported by ACR Build.
A suite of tests for Windows containers are available here: https://github.com/AzureCR/acr-builder-os-tests/tree/master/Windows
What is (Preview of Preview)
Updates to the az cli will not be publicly available until July 31. There are two ways to get ACR Build for Windows Container support today (July 16th, 2018)
- Create a build task with the public az cli
build-task already supports the --os parameter, so you're good to go if you just want build-tasks - To use
az acr build; the equivalent of docker build, use a preview build of the az cli, which can be - installed directly: https://github.com/Azure/azure-cli#edge-builds
- or with a docker image: https://github.com/Azure/azure-cli#docker
docker run -v ${HOME}:/root -it azuresdk/azure-cli-python:dev
A quick test
We'll use the most consistent way, a docker container of the dev builds of the az cli
- On Windows, or Mac, instance a docker container, running the latest dev build, including updates to
az acr build docker run -v ${HOME}:/root -it azuresdk/azure-cli-python:dev - Note: ACR Build is currently supported:
- East US
- West Europe
- Central US
- South Central US
More regions are coming on weekly, with full global coverage coming "soon"
- Build a Windows Server Core image, with a .NET Framework app
az acr build \ -t helloworld-windowsservercore:multi-arch-{{.Build.ID}} \ -f helloworld-windowsservercore/multi-arch.Dockerfile \ --os windows \ https://github.com/AzureCR/acr-builder-os-tests.git#master:Windows/Servercore
How this works:
az acr build is the functional equivalent of docker build. Rather than having to install the docker client, az acr build sends the context to an ACR Build server in Azure-t uses the standard docker tag, with the added ability to get a unique build id.-f uses the standard dockerfile syntax to reference a Dockerfile that isn't in the root of the context--os tells ACR Build to use a Windows host. As many FX and platform tags are multi-arch, this parameter is required to specify which OS you require for docker buildhttps://github... is a remote context for the build. While . is supported for a local directory, acr build and build-task can also specify remote git repos, avoiding the necessity of first git clone
Since this references the multi-arch tag for Windows and the .NET Framework, this will produce an 1803 version of Windows Server Core. To get a specific windows version, use the following:
- Windows Server 1709, using the 1709.Dockerfile
az acr build \ -t helloworld-windowsservercore:1709-{{.Build.ID}} \ -f helloworld-windowsservercore/1709.Dockerfile \ --os windows \ https://github.com/AzureCR/acr-builder-os-tests.git#master:Windows/Servercore - Windows Nano Server 1709, using the 1709.Dockerfile for Nano Server and .NET Core
az acr build \ -t helloworld-nanoserver:1709-{{.Build.ID}} \ -f helloworld-nanoserver/1709.Dockerfile \ --os windows \ https://github.com/AzureCR/acr-builder-os-tests.git#master:Windows/Nanoserver
Automated Build Tasks, based on Git Commits, or Based Image Updates
The primary scenario for ACR Build revolves around Container OS & Framework patching. Just as your builds kick off, based on git-commit changes, as base images are patched, your builds can also be triggered.
See Overview of ACR Build, targeting OS & Framework Patching for more details.
Creating automated builds
Note: this can be done directly with the publicly released az cli, however, we'll use the az cli docker image for consistency.
- Fork the https://github.com/AzureCR/acr-builder-os-tests repo
- Create a Personal Access Token.
For more info, see the ACR Build Docs for creating a build task. - Set the PAT to an environment variable
PAT=[pastePAT] - Create an acr build-task
az acr build-task create \ -n HelloworldWinServercoreLtsc2016 \ -t helloworld-windowsservercore:ltsc2016-{{.Build.ID}} \ -f helloworld-windowsservercore/ltsc2016.Dockerfile \ -c https://github.com/AzureCR/acr-builder-os-tests.git#master:Windows/Servercore \ --os windows \ --git-access-token $PAT - Trigger a build manually
az acr build-task run HelloworldWinServercoreLtsc2016
Any other feedback, feel free to leave larger comments here, user voice, twitter (@SteveLasker)
Thanks,
Steve and the great members of the ACR team
Are you building apps for, or customizing SharePoint 2013 with the new App Model? Microsoft would like your feedback.
Are you willing to provide input & feedback that will help us make Visual Studio better for your?
If you are customizing or building apps for SharePoint 2013 using the new App Model, we're interested in getting your feedback.
If you're replacing Lotus/IBM Notes Apps, we'd like to hear about your experience and scenarios.
If you've been working with SharePoint 2010 and are struggling with moving to SharePoint 2013, we'd like to hear your blockers.
We're looking to make the Visual Studio tools better, and we'd like your help understanding the types of customizations and apps your building.
If this matches your development please fill out a quick questionnaire and we will contact you to
schedule a phone call.
Click here to start the questionnaire
Thanks,
Steve
Azure Container Registry User Accounts; Single, Multi, Admin and Service Principals
The Azure Container Registry went into public preview yesterday. We're excited to add this core platform feature for the breadth of container deployments being added to Azure. These include Azure Container Service, Azure Service Fabric, Azure App Service and Azure Batch, ...as of now. More are coming...
When designing the Azure Container Registry, we felt it important to maintain common CLI support, such as using Docker login, push and pull.
Docker login is a basic auth flow, requiring a username and password. What we want to do, and will do, is support your Azure Login credentials so you can manage access to the registry with Azure Active Directory groups. Such as your development team has read/write access, while others outside your org may not have access, or they may have read access. To use active directory identities, we need a token flow, and because many companies require 2 factor auth, it gets even more complex. At this point the docker client doesn't yet support 2 factor auth flows. Rather than wrap the docker api in an Azure specific API, we chose to stay true to the docker CLI. Which means things got a bit more complex and/or limited in the short term.
Shipping a Public Preview - managing time/resources/quality
When we decided to land a public preview for Connect() 2016, we needed to decide which top problems we were going to take on.
- Fully Qualified Image Names - that won't change
We felt the top priority was to design the service such that image fully qualified names won't chnage as we add features or go GA. We went through several designs for how to name the registry URL. We want to provide geo-replication features that mean an image tag of stevelas-microsoft.azurecr.io/helloworld would be available across any region I decide. But, I can decide later, not at the time of creation.
We also want to support several groups autonomy from each other. For intance, warranty-contoso.azurecr.io/web from marketing-contoso.azurecr.io/web from contoso.azurecr.io/aspnetcore for corporate images. - Headless access to the registry for Build/Deploy and Production Systems
When VSTS, Jenkins or other build systems need to push/pull images, they need authentication. This includes your production hosting solution, such as ACS or App Services. While we want to provide token flows with Service Principals over time, the current docker flows use basic auth. - Multi-Region Support
While we will support geo-replicaiton n the future, we first need to support multiple regions. Deploying a core Azure Service and resource provider turns out to be a lot of work. - Azure CLI
An open source CLI for managing the container registry, such as az acr - Azure Portal Integration
Enabling developers to easily provision in the portal - Reliable Availability
What good is an azure service if it's not reliably available for your build and deploy scenarios.
When we considered these priorities, along wiht our backlog, we realized we couldn't fit the token flows in reliably in time for the public preview at Connect(), so, what to do...?
The Azure Container Registry Admin Account and Service Principals
The docker CLI supports basic auth. You use this for docker hub and other private registries. We felt this was the first important goal.
We also wanted to support more than one account, and we know we need to support headless scenarios. Azure AD and service principals is great for this. You create a service principal and we can use the App Id as the username and the password as the password. You can regenerate the passwords and manage these over time with secured storage of Azure Ad.
At the same time, the AD integration can be tricky. We don't yet have great AD support in the new Azure Portal.
Until we get full AD / Individual Identity and 2 factor token flows working with the Azure Container Registry, we chose to add a special Admin Account.
When you create an ACR instance, you have the option of creating it with the Admin Account enabled/disabled. We debated the default as we want this to go away over time.
When the admin account is enabled, you get a single user, username/password combination you can immediately use to interact with the registry. Simply issue: docker login myregistry-company.azurecr.io -u [admin username] -p [admin password] and your good to go.
However, when you want multiple users to have access to the registry, you really don't want to give out these credentials. This means everyone would use a single account, which doesn't scale as it makes it near impossible to reset the password without breaking someone/something you want to keep running.
Until we get AD Identity complete, you can add service principals. The easiest way is to use the az cli.
az resource group create -l westus -n myregistry-acraz acr create -n myregistry -l westus -g myregisry-acr --admin-enabled true
Once the registry is created, the az acr cli will provide some helpful commands:
Create a new service principal and assign access:
az ad sp create-for-rbac --scopes /subscriptions/[your subscription id]/resourcegroups/myregistry-acr/providers/Microsoft.ContainerRegistry/registries/myregistry --role Owner --password <password>
You can also assign existing service principals to the registry
az role assignment create --scope /subscriptions/[your subscription id]/resourcegroups/myregistry-acr/providers/Microsoft.ContainerRegistry/registries/myregistry --role Owner --assignee <app-id>
You can use other roles of course for:
- Owner: Push, Pull and can assign Push & Pull to other users
- Contributor: Pull and Push access
- Reader: Pull only access
Summing it up:
We're excited to bring you the Azure Container Registry to support your Azure and even On Prem Container workloads. We're working to prioritize the features you need, expect, want and value. ...in that approximate order.
We will be adding AD individual identity with 2 factor auth flows, but wanted to get customers something they can easily use today.
We do not recommend using the admin account for anything other than some basic testing. Please use the service principal flows, even for individual users, until we complete the AD individual identity flow complete.
Steve
Balancing change: feedback + learning / impact to customers = change
I was reading a post about the frustration a customer had around the constant change. First, I do apologize for the frustration as it is difficult to continually learn new things when the things you've learned keep changing. With each change, we balance the impact it will have on our existing customers, the challenges they're currently facing, what we're learning from our previous releases, and the impact we can have for new customers.
While I won't speak for Docker, I can speak to the tooling we provide in VS, which is the same basic model Docker follows as well. The Visual Studio Container Tools are currently in beta/pre-release. With the release of VS 2017, we'll consider this our 1.0 official release. Before we release any major release, we are willing to make significant changes. The pre-release moniker implies major changes may, or likely will occur; as we're learning. We of course have two basic models to work with. Only release major releases, hope we get it right and deal with the consequences of not. Or, release major releases with a commitment of upgrade and support, and provide interim releases that are building up to the next major release. The interim releases are a view into what we're thinking and doing. Many companies like Docker achieve this with beta and stable channels: https://docs.docker.com/docker-for-windows/ As we release Visual Studio Container Tools in Visual Studio 2017, we're working to have this same model. If you install the "stable" channel from Visual Studio, you'll get a stable release of tools. As we release major versions, we'll provide some sort of upgrade path. How depends on the change of course.
So, first. Thanks for all the feedback and patience. Working with containers is a major shift in how we develop software. We're working hard to maintain the docker experience customers expect, while providing the productive experiences developers have come to expect from Visual Studio. We want to be careful to not change the the technology to match the tools, but rather shape the tools to match the technology.
Steve
//build session: On the Shoulders of Giants: �Building Apps that Consume Modern SaaS Endpoints with Visual Studio 2015
Dave Carrol @DCarroll and I just finished presenting a session for consuming services using the new Add Connected Services experience in Visual Studio.
For info on Connected Services:
https://aka.ms/ConnectedServices General info
https://aka.ms/ConnectedServicesSDK for building a Connected Service
I also want to take another chance to thank Tanner Lindsay www.TannerLindsay.com and LANDESK www.LANDESK.com for letting us talk to their scenario and let us review and share portions of their code.
The LANDESK UMP Sample is available here: github.com/SteveLasker/LandeskDemo
The Visual Studio Online Connected Service Sample is available here: github.com/SteveLasker/VSOnlineConnectedService
Thanks,
Steve
Build2015LaskerConnectedServices.pptx
Building Dashboards with LightSwitch
This morning we published a walkthrough for building Dashboard reports using Visual Studio LightSwitch and the recently released HTML Client.
For me, it's a great to get back to DevDiv building features in our Visual Studio tools.
https://blogs.msdn.com/b/lightswitch/archive/2013/04/22/create-dashboard-reports-with-lightswitch-webapi-and-serverapplicationcontext.aspx
Steve
Building In Browser Experiences with Silverlight 5 Mix 11
Here's my deck from one of our Silverlight 5 sessions @ Mix 11.
We'll be creating a Forum for Silverlight 5 discussions, but please use Connect for any bugs.
Thanks and hope you enjoy the productivity of Silverlight 5
Steve
Building .NET Core Linux Docker Images with Visual Studio Team Services
If you've been wondering how to build a .NET Core app into a Docker image using VSTS, well here's the current steps as of June 2016.
Prerequisites
You'll need the following to complete this walk through
Provision the Linux Build Agent
To build a .NET Core Docker Image, you'll need a VSTS Build Agent. Since this post focuses on a Linux Docker Image, we'll use the new Linux VSTS Build Agent that Donovan explains how to provision here:
If' you're unfamiliar with how to add VSTS extension, you can follow the steps here
Starting with a project to build
You'll need an ASP.NET Core project to deploy. Following the steps here, we'll walk you through the creation of an ASP.NET Core site, debug it, and set it up for deployment.
Configuring VSTS Docker Build Steps
Now that we have everything installed, we're ready to start configuring. I do assume you've already configured VSTS and are ready to configure the unique part of VSTS and Docker. See here more info on Visual Studio Team Services
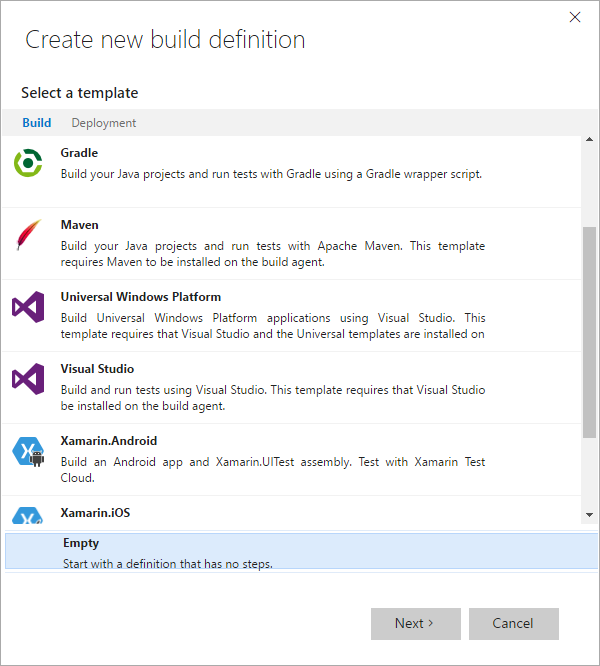
Create a new build definition
- Choose the + sign in the top left corner to create a new build definition
- Choose the Empty build definition. We'll look to create one from this post
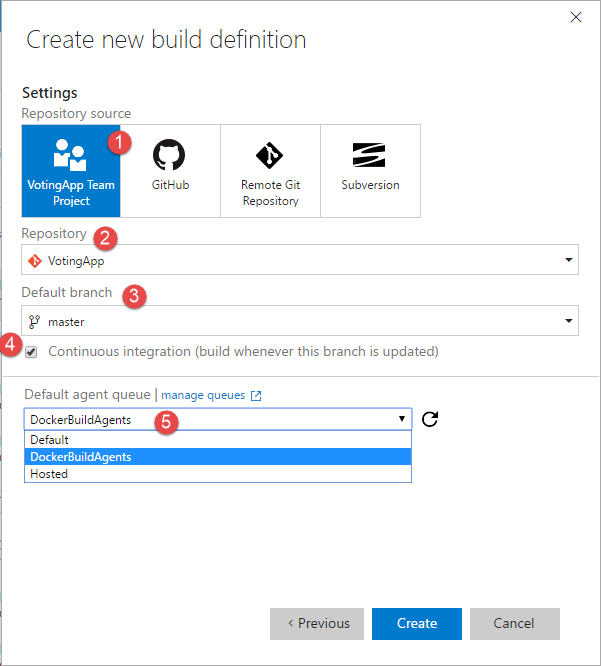
- Configure your build definition
- 1-3 configure your repo, including the branch you wish to build from
- 4 - you'll likely want continuous integration
- 5 - choose the build agent you previously configured
- click Create
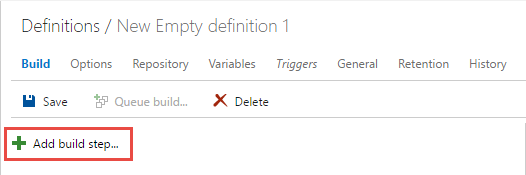
Add the build steps
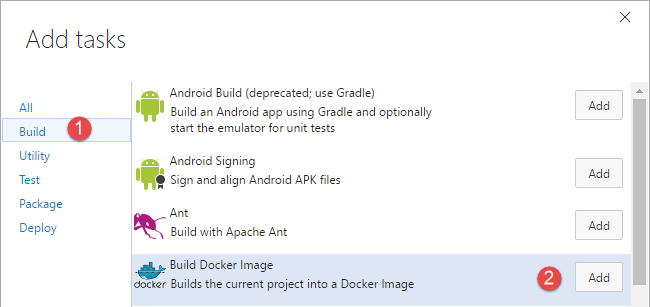
- Click the Add build step...
- Add 2 command line steps by hitting the [add] button twice. Note, although this step looks like a Windows/Doc command shell, the same step can be run on a Linux image
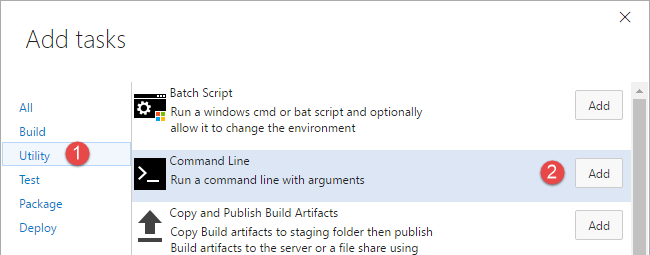
- Add 4 docker steps
We'll now walk through the various build steps, and the configuration for each one.
dotnet restore
- step name = dotnet restore
- tool = dotnet
- Arguments = restore -v minimal
- Advanced --> Working Folder = $(Build.StagingDirectory)
This is the root of your source, where the project.json file lives as it will perform the restore based on the project.json
dotnet publish
- step name = dotnet publish
- tool = dotnet
- Arguments = publish -c $(Build.Configuration) -o $(Build.StagingDirectory)/app/
the app/ directory is where we'll place the resulting files that will be placed in the runtime container. This must match the COPY command in your dockerfile as this is the source of that COPY command - Advanced --> Working Folder - same as above as both commands must be run in the context of your project
docker build
- step name = docker build
- Skip the Docker Host and Registry Connection for a moment
- Action = Build an image
- Docker File = $(Build.StagingDirectory)/app/dockerfile
This is the "release" mode dockerfile that has your optimized settings. It should not be the dockerfile.debug which is only used for the developers inner loop. - Image Name = {your hub username}/{your image name}:$(Build.BuildNumber)
for me, this was stevelasker/example-voting-app-worker:$(Build.BuildNumber) - Context = $(Build.StagingDirectory)/app
This one is really important, and the source of a lot of confusion. When you issue docker commands from the client to the host, this directory is first copied up to the docker host. When you see a COPY command, the left side is from the Context directory - Working Directory = $(Build.StagingDirectory)/app
Docker Host Connection
- From within the docker build step, choose manage next to the Docker Host Connection
- Click New Service Endpoint
- Choose docker Host
- Enter the Name for your connection and your Docker Hub details to create the service endpoint
- Connection Name = LinuxBuildHost
In this Linux VSTS build agent, the host is on the same machine - Server URL = tcp://138.91.245.113:2376/
Get this from the output of docker-machine ls, for the specific host you'll connect to. Notice the tcp protocol and port number - CA Certificate, Certificate, Key - Use the handy dandy tooltip to figure out which files to use. Just simply open the file from your docker machine directory (eg:
%userprofile%\.docker\machine\machines\vsts-linux-buildagent) into notepad. Be sure to copy the entire contents, not just what's between the --- BEGIN and ---END text. - Press OK, then switch tabs to the previous screen
- Refresh the list and select the host you just configured
Docker Registry Connection
- From within the docker build step, choose manage next to the Docker Registry Connection
- Click New Service Endpoint
- Choose Docker Registry
- Connection Name: Docker Registry
- Docker ID = your username for docker hub
- Password = yup, your password
- Email = the email you associated with your docker hub account
- Press ok, then switch tabs to the previous build step configuration page
- Refresh the list, and select the registry you just configured
Docker Push Build Number - Public Registry
- Step Name = Docker Push :BuildNumber
- Docker Host Connection = LinuxBuildHost
- Docker Registry Connection = Docker Registry
- Action = Push an image
- Image Name = stevelasker/example-voting-app-worker:$(Build.BuildNumber)
- Advanced --> Working Directory = $(System.DefaultWorkingDirectory)
Validation Steps
This is where you'd most likely do your validation steps against the images. You now have a production ready image (binary). You haven't yet tested it, but you haven't set it to the :latest tag, which typically indicates the thing you want to deploy. For the purposes of this post, we'll skip this step. But, I wanted to cover why we first tagged our image with the build number, push, then re-tagged with latest, and re-pushed
Docker Tag Latest
- Step Name = Docker Tag Latest
- Docker Host Connection = LinuxBuildHost
- Docker Registry Connection = Docker Registry
- Action = Run a docker command
- Command = tag stevelasker/example-voting-app-worker:$(Build.BuildNumber) stevelasker/worksonmymachine:latest
Notice I've used the original image name, and re-tagged it with latest. This doesn't create yet another copy. The Docker layering system knows this image is based on another image, that actually has nothing different, other than the tag. In the subsequent step, where we push, docker will know to just send the metadata up for latest. - Advanced --> Working Directory = $(System.DefaultWorkingDirectory)
Docker Push Latest - Public Registry
- Step Name = Docker Push :Latest
- Docker Host Connection = LinuxBuildHost
- Docker Registry Connection = Docker Registry
- Action = Push an image
- Image Name = stevelasker/example-voting-app-worker:latest
- Advanced --> Working Directory = $(System.DefaultWorkingDirectory)
CI Complete - lets validate it
Our configuration should now be complete, and look something like this:
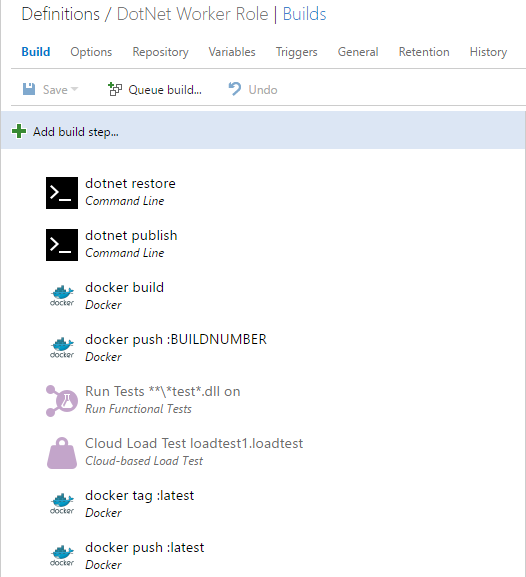
Lets save the definition, and give it a try
Queue a build
At this point, you should be able to queue a build, which should find our Linux VSTS Build agent, and execute the steps
If you have problems, just look close at the logs. You may have forgotten a cert, typo'd one of the parameters, or forgotten the advanced working folder for some of the steps.
If you've hooked up continuous integration, you can also kick things off by making a change
Instancing a built image
In this post, we didn't get into the specifics of deploying a built image. You may deploy to the Azure Container Service with Swarm or the Mesos template. You may have instanced Kubernetees. You may have some dedicated VM Hosts, or submit the image to Service Fabric.
To test the image, lets simply do a pull from the hub we pushed to.
From a powershell prompt, on a desktop. If possible, a machine that you didn't write the code that went into the image to have full isolation from other images. try the following
docker run -d -p 80:80 stevelasker/worksonmymachine:latest
That wraps up this post. Please keep the feedback coming
Steve
Building Optimized Docker Images with ASP.NET Core
If you're exploring docker, you'll often see dockerfiles that demonstrate the simplicity of building a docker image by copying your source into a container and voila, you have a docker image with the environment packaged with your app.
FROM microsoft/dotnet WORKDIR /app ENV ASPNETCORE_URLS https://+:80 EXPOSE 80 COPY . . RUN dotnet restore ENTRYPOINT ["dotnet", "run"]
While very true, and very cool, there are big optimizations to be had.
Dynamic Compilation
.NET has a long history of productivity. When working with server based deployments, customers wanted fast ways to deploy updates. If all they changed was an image, .js, .html, .cshtml, .cs or web.config file, would you think about rebuilding the server? Re-publishing the entire app, bundled up? Or, would you run a routine that simply copied the delta, hopefully remembering to remove the older, no longer needed files?
.NET would handle dynamic compilation of the .cshtml and .cs files, and provided means to reset IIS for the web.config files. In a server environment, this was pretty cool. You're page might take a second or so to recompile the code, but that was more efficient than creating another site, copying the entire contents and switching dns over.
Containers are Immutable, Pre-Optimize
In the server/vm world, you might take a hit on the first page request, however the page and the code were compiled and cached within that request. Subsequent requests were fast, and if the server rebooted, you had pre-compiled pages waiting for fast responses.
In the container model, you're constantly starting containers. And we don't shut them down, per se, we kill them. The common model doesn't restart a sleeping container as they're disposable. The orchestrators simply instance new instances of a common image. What this means is we need to optimize, pre-compile the app when built. When the container is started, it's already to run.
We've been doing a lot of great work to make .NET Core and ASP.NET Core a container optimized framework. We've focused on startup performance and produced some optimized images:
In the last few weeks we've released two images to help in this journey, and docker tools to leverage them:
microsoft/aspnetcore-build used to compile and build asp.net core apps. The output would be placed in a microsoft/aspnetcore image which is an optimized runtime image.
The aspnetcore-build image contains everything you need to compile an ASP.NET Core app including:
- .NET Core
- ASP.NET SDK
- NPM
- Bower
- Gulp
While we need these dependencies at build time, we don't want to carry these with our app at runtime as it would just make the image unnecessarily bigger.
Using the aspnetcore-build and aspnetcore images
Lets start with a basic ASP.NET Core Web application. To save some time, clone the sample at: https://github.com/SteveLasker/BuildASPDotNetInAContainer which contains a web and unit test project.
You should be able to F5 and run your app in the Visual Studio environment. You can even "Publish" the app using the context menu. However, if you try to call dotnet publish form the command line, you'll likely get an error that bower isn't installed. It turns out bower is installed, but privately to the Visual Studio environment.
This is a great example of having, or not having all the dependencies you need. While you could install bower, how do you know all the developers on the team, and the build server are building your app the same way? How do you know that someone doesn't have a slightly different version of one of the dependencies to build your app?
We're going to use our aspnetcore-build image to be the common build environment for everyone, including our build server.
- Open a power shell window in the root of your solution.
I happen to use power shell because the syntax is a bit easier for commands like docker rm -f $(docker ps -a -q)
Tip: Right-click on your solution and select Open Folder in File Explorer.
Copy the path
In the powerhsell window, type cd "[paste]"
Or, better yet, use Mad Mads Open Command Line extension - Run the aspnetcore-build image
docker run -it --rm -v "$pwd\:/sln" microsoft/aspnetcore-build:1.0.1 -it means keep the container running in interactive mode
--rm means remove the container when complete. This keeps your docker ps -a results clean.
-v means volume mount the present working directory (the solution directory) to a root folder in the Linux image named sln
You're now running an instance of the aspnetcore-build environment, with your source code volume mounted, or you might think of it as network shared, into the container.
Lets build the contents interactively to see how this would work
- Switch into the solution directory
cd sln/ - Restore the packages. Remember, we only have our source here. The packages are unique to this image.
dotnet restore - You can also run any unit tests you might have in your project
dotnet test test/WebTests/project.json - Publish the app into a publish folder in the root of the solution
dotnet publish src/Web/project.json -c releaes -o $(pwd)/publish/web - Explore the directory on your dev machine. Notice we now have a publish/web folder in the root of our solution. This contains everything we need place into our optimized image
Create a build.sh script
Now that we've proven we can compile, test and publish our app, we'll automate this a bit with a build script.
In the root of the solution, create a new file named batch.sh. We don't yet have a template in Visual Studio for bash scripts, so we have to do a few tricks.
On Solution Items, select Add --> New Item
Choose any text file template and name the file bash.sh
Delete any previous contents from the template
Add the following, which you could copy/paste the commands from your powershell window to make sure you've got all the casing and paths correct:
#!bin/bash set -e dotnet restore dotnet test test/WebTests/project.json rm -rf $(pwd)/publish/web dotnet publish src/Web/project.json -c release -o $(pwd)/publish/web
Notice we clear out the publish/web directory to make sure we have a clean state each time
Important:
By default, all files created in Windows uses CRLF, which aren't supported in Linux. . To fix this, we'll need to tell VS to save the files with just LF
Select File --> Advanced Save Options
Change Line Endings to Unix (LF)
Compile and Publish the project with the build script
- From the root of your solution, open your power shell prompt
- Run the following docker command
docker run -it --rm -v "$pwd\:/sln" microsoft/aspnetcore-build:1.0.1 sh ./build.sh - You'll get an error:
sh: 0: Can't open ./build.sh
This is because the build.sh file is in the /sln directory. We can't just call /sln/build.sh as all our commands are assuming a working directory at the root of our solution. No problem, docker has a solution for this as well - Run the modified docker command, setting the working directory:
docker run -it --rm -v "$pwd\:/sln" --workdir /sln microsoft/aspnetcore-build:1.0.1 sh ./build.sh
Voila, we now have our app compiled, tested published, using a consistent environment across the entire team
Using Docker-Compose to encapsulate our docker run parameters
Entering the docker run parameters each time can be quite tedious. You could capture yet another script to call the commands that call the build script in the container. Or, we can leverage docker-compose to encapsulate our comamnds
In the root of the solution, add docker-compose-build.yml
Enter the following content:
version: '2' services: tradapp-build: image: microsoft/aspnetcore-build:1.0.1 volumes: - .:/sln working_dir: /sln entrypoint: ["sh", "./build.sh"]
You can now use the following command to simplify the entire build
docker-compose -f docker-compose-build.yml up
Building the optimized image
Now that we have our published content, we can place it in an optimized image
In the Web app, add a dockerfile
Note, you'll need to use a text file, rename it to dockerfile.
If you have the Visual Studio Docker Tools installed you'll get some language service help, but you'll need to close and reopen the file to see it as VS still thinks it's a text file.
Add the following content to the dockerfile:
FROM microsoft/aspnetcore:1.0.1 WORKDIR /app COPY . . EXPOSE 80 ENTRYPOINT ["dotnet", "Web.dll"]
Note, if you have a different project name, Web.dll must match the folder name of your project. Just look in the publish/web folder to confirm the name of the dll
Add the dockerfile to the published output.
Edit the project.json file in the Web project and add the dockerfile to the publishOptions section
"publishOptions": { "include": [ "dockerfile",
Run our build again, to validate the dockerfile gets pushed to the publish/web folder
docker-compose -f docker-compose-build.yml up
Validate the dockerfile was placed in the publish/web folder
Build your optimized docker image
docker build publish/web -t web:optimized
Run the image
docker run -it --rm -P 8080:80 web:optimized
Browse to https://localhost:8080
Note: although kestrel is listening to port 80, we've told docker to nat the containers port to 8080 on the host.
Press CTRL + C to stop the running container
Comparing Optimized Images
To compare the initial image that copies the source into a container and simply calls dotnet run isn't really a fair comparison, but we've seen this a lot as it just looks so easy and it's not immediately obvious why it matters.
First, lets build an image using the dockerfile at the beginning
Copy/Paste the dockerfile in the web project
Name it dockerfile.single
Replace the contents with:
FROM microsoft/dotnet WORKDIR /app ENV ASPNETCORE_URLS https://+:80 EXPOSE 80 COPY . . RUN dotnet restore ENTRYPOINT ["dotnet", "run"]
Change to the root of the project directory, where the dockerfile.single is added
Build the image
docker build . -f dockerfile.single -t web:single
Run the image
docker run -d -p 8080:80 web:single
First, lets do the most obvious, check the image size:
docker images
IMAGE ID REPOSITORY TAG SIZE 0ec4274c5571 web optimized 276.2 MB f9f196304c95 web single 583.8 MB f450043e0a44 microsoft/aspnetcore 1.0.1 266.7 MB 706045865622 microsoft/aspnetcore-build 1.0.1 896.6 MB
Notice the web:optimized image is <10mb larger than our aspnetcore image, providing a small image to travel across the network and a fast, optimized image for serving requests
Now, you might argue, size doesn't matter. This is easier to build. We can talk about network-close, and the desire to have your images small and close to your deployments to reduce latency and ingress/egress costs.
But, lets talk about startup time. If we measure the amount of time docker run takes to return, then the amount of time the container takes to start serving requests, we can see some interesting numbers. And, the impact of dynamic compilation.
| Restore/Run in a single container | 583.8 | 0.530ms | 14.600ms |
| Compile and Build in separate containers | 276.2 | 0.540ms | 3.768ms |
While there are many ways to optimize the single build solution such as using dotnet publish, removing content, the reality is you're attempting to cleanup an image that was loaded with stuff we're trying to avoid. So, while it is a few extra steps, hopefully this article helps show that with a few scripts and docker-compose, we can automate this without having to cleanup a dirty image.
Thanks and please let us know what else you'd like to see in our tools, docs and runtime
Steve
The Microsoft Ignite 2016 talk is now available here.
And a special thanks to Glenn Condron for working through the various build options we considered along the way.
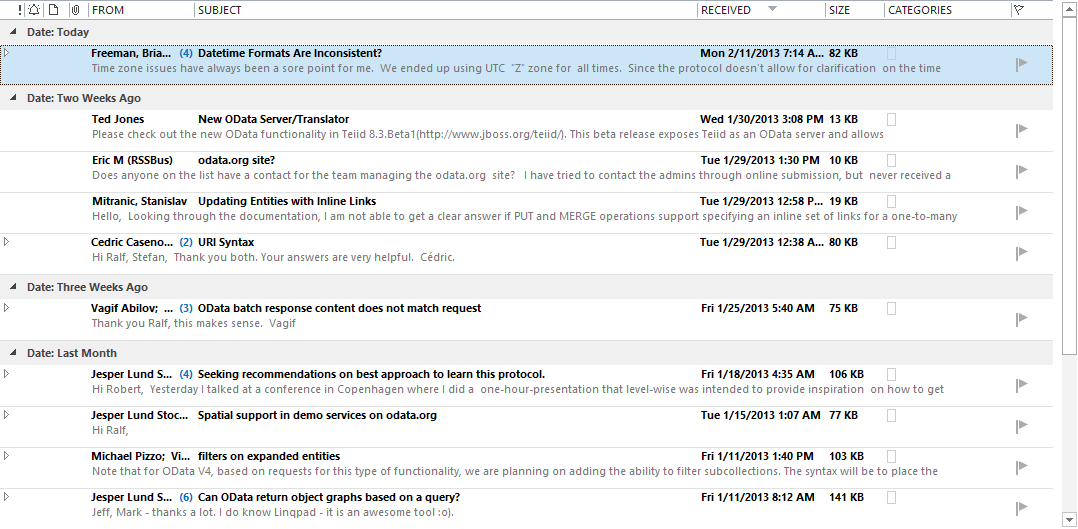
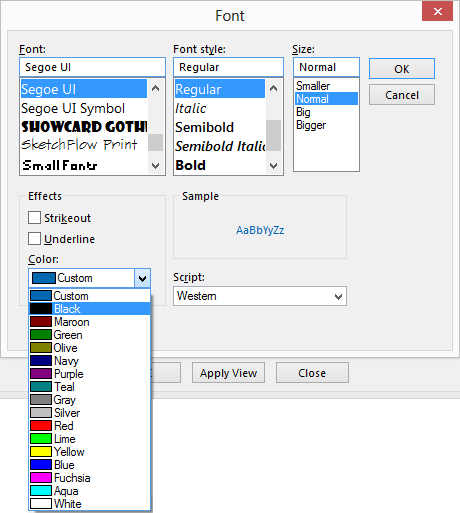
Changing the color theme for Outlook 2013
If you've upgraded to Outlook 2013 and are struggling with the new softer look, and missing the older higher contrast look in the reading view, you may be wondering about changing the themes. Outlook does have a few themes that can be changed, however they really only change the perimeter, and don't change the email list.
I'm told to give the new themes some time, and they will grow on you, and perhaps they will, and perhaps I'll give them a try, but for now, I've got way too much email, and I feel like I'm straining to read and find relevant content. so, here's an quick way to at least get a higher contrast, black on white email list:
| Outlook 2013 Default Theme (Blue on white) | Modified View to Black on White |
 |  |
To Change the email:
- In the Ribbon, select View
- Within the View tab, select Change View
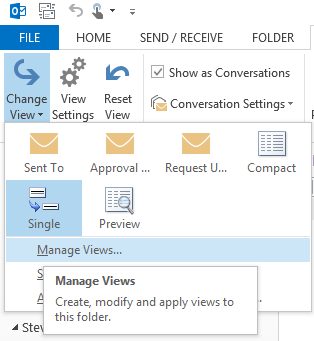
- In the Manage All Views dialog, select <Current view settings>, then select [Modify…]
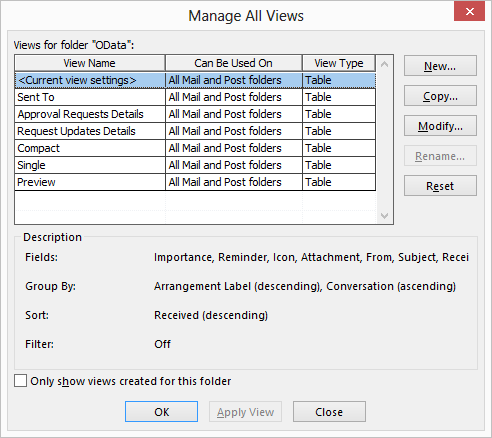
- Select [Conditional Formatting…]
- Notice the [Font…] configuration, with the nice soft blue font color
- Simply select Color and change from Custom to Black
- Apply the view to all folders
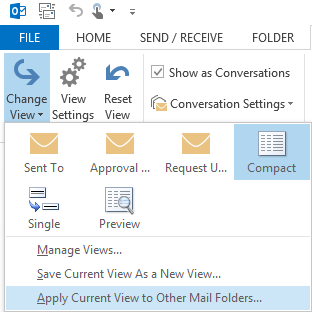
- From the same view menu, select Change View
- Select Apply Current View to Other Mail Folders…
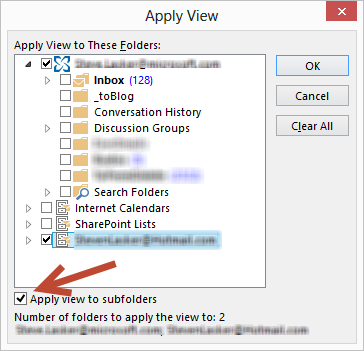
- Simply select the folders you wish to update, and check the Apply view to subfolders checkbox if you'd like as well.
While this doesn't change all the elements back to the 2010 theme, like the folder icons in the navigation, it at least provides a little more contrast to view way too much email.
Steve
Clear-History Powershell Doesnt Clear the History
PowerShell turns out has a great memory, and can help you with those tedious list of commands you've entered time over time. No worries if you've closed the PowerShell window, rebooted your machine, PowerShell will remember your history.
In most cases, that would be an awesome feature. However.... if you've ever tried to prep a VM, or otherwise tried to clear your history, perhaps a username and/or passowrd is in the list, you may wonder how to clear it.
You may find the Clear-History command. You may even run it. And, if you hit the up arrow, you'll find your history now includes the Clear-History command...
Hmmm
Well, if you want to clear the history, or actually pre-load the history with a list of commands to be used in a Lab VM, here's where you go:
%userprofile%\AppData\Roaming\Microsoft\Windows\PowerShell\PSReadline\ConsoleHost_history.txt
You can turn it off with:
Set-PSReadlineOption –HistorySaveStyle SaveNothing
Or point to a different location with:
Set-PSReadlineOption –HistorySavePath
And if you want to delete your history:
del (Get-PSReadlineOption).HistorySavePath
That's it...
Yet another thing that's really simple, once you know the answer...
Thanks to Jason Shirk from the PowerShell team
Steve
Configuring Docker for Windows Shared Drives / Volume Mounting with AD
If you've had a chance to work with the Docker for Windows beta, you've seen the promise for how much easier this can be compared to VirtualBox.
That said, there are still some issues, thus the beta tag.
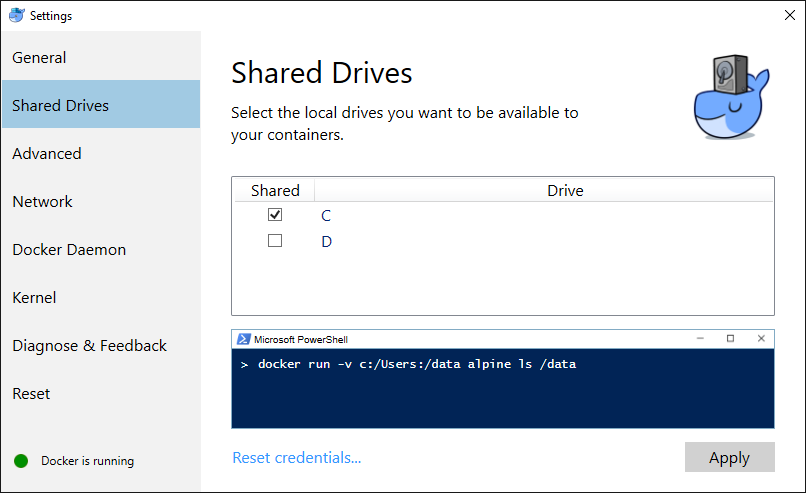
One such issue is volume mounting. If you work for an enterprise, you more than likely log into your machine with corporate/domain credentials. When you configure Docker for Windows Shared Drives, you'll get prompted with your credentials.
You most likely entered your corporate domain account. <domain>\user and this will work just fine while you're in the office.
However, once you leave the comply/cozy network; like going home to get work done, or at a customer site, you may have noticed volume sharing has stopped working. It may still work if you happen to have everything cached. But, if you restart Moby, reboot your computer; you're SOL. Sitting On Lollipops, as Docker for Windows is unable to re-verify the credentials when it attempts to remount the drives. grrrrr
You might assume you could just use a local user account, and you could, but theirs one extra step that will likely confuse you at first.
- On Windows 10, hit the start menu (CTRL + ESC)
- Type "local users" , and launch the Edit local users and groups control panel applet.
- Add a new user. I use DockerHost
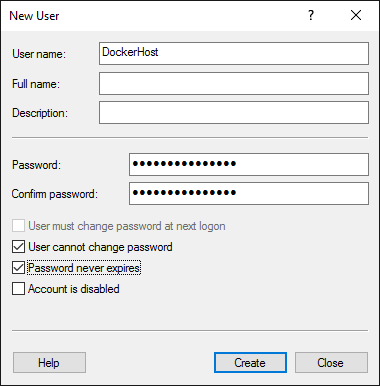
- Set the password policy settings as above
- Add a password, that you'll remember, but others wont guess. This is an account that will have broad access to your hard drive
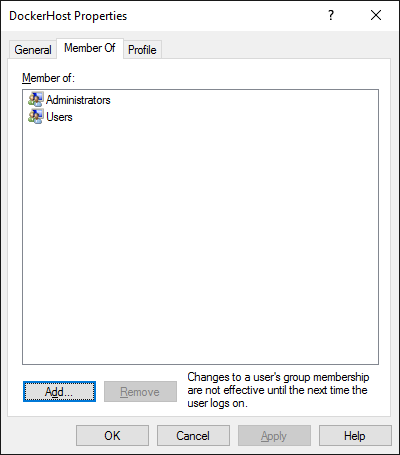
- Add them to the local administrators group
So, that's what I would have assumed would work. And it did, sort of. When I use the handy dandy snippet to test volume mounting, I found I had strange results. Kudos to the docker team for having some fun with XAML and giving such a great visual, that actually functions. Between the professional cartoonist and developers focused on productivity, docker really has the user experience down.
If I ran docker run -v c:/Users:/data alpine ls /data, I noticed I was only seeing a partial list of information. And, it didn't include the directories, or my projects.
It turns out, that since Windows 7, users in the Administrators group don't actually have access to everything. Particularly, the c:\Users\<another user> directory.
To fix this, do the following:
- [CTRL] + [ALT] + [DEL] and select Switch Users
- Log in as the DockerHost account you created. In my case, .\DockerHost. Note, you'll need to use .\ to tell Windows you want to login to the local group, not the default domain.
- Once Windows gracefully welcomes you, navigate to c:\Users\
- Now, try to open your user folder. The one you typically log in using your corporate credentials
- You'll notice an interesting dialog coming up that was the "blues clue" to this whole issue.
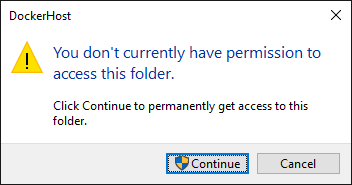
- Click [Continue] , wait a bit for Windows to apply all the ACLs, and voila. You're now in.
Log out of this local account, and go back to your primary account.
Try the docker command again: docker run -v c:/Users:/data alpine ls /data
Does that directory listing look a bit more accurate?
As with most problems, the answer is quite obvious why it works, once the answer to the puzzle has been viewed. In this case, I don't mind skimming to the back of the book and seeing the answer. I hope this was helpful to you as well
Steve
Connecting to Azure Storage with Visual Studio 2015 RC
To get a feel of the productivity we're adding in Visual Studio 2015 for connecting to services, here's the quick video for connecting to Azure Storage
We're finalizing the experience for Visual Studio 2015, and would like your feedback for how we can improve Connected Services, and specifically the Azure Storage connected service.
You can provide your feedback here or through UserVoice
Thanks,
Steve
Creating Docker Hosts in Azure w/Docker-Machine 0.7.0
Last week, Docker released version 0.7.0 of Docker-Machine. You can get the latest docker-machine with Docker Toolbox or Docker for Windows beta.
Among many new features, Azure users will find the new Azure driver extremely helpful. In previous versions, developers would need to create management certs and upload them to Azure. Configure firewall ports manually, and the VM was created using the RDFE APIs which meant it showed up as a "classic" VM. Apparently, classic is becoming the old/dated demarcation.
With 0.7.0, you can now use the following command:
On Windows, open a PowerShell prompt, set the subscription ID, then call docker-machine with the azure driver. Note the case sensitivity. It must be azure, not Azure. $env:AZURE_SUBSCRIPTION_ID = "Your subscription ID" docker-machine create -d azure --azure-open-port 80 --azure-open-port 8000-8200 yourhostname
You can pass the subscription ID as a parameter as well, but unless your editing the text in a text editor, it can be a bit of a pain to construct the command.
Notice you can open the firewall ports, including a range. You can also set --azure-location and the --azure-resource-group name as well as many other options.
You can get the list of available options using:
docker-machine create -d azure --help
Or, simply review the Docker-Machine docs
A big thanks to Ahmet Alp Balkan who wrote the updated driver.
Steve
Popular posts from this blog
VSS yedekleme testi nasıl yapılır Exchange üzerinde bulunan verilerin yedeklenmesi (backup) ve geri yüklenmesi (restore) baslibasina çok önemli bir konudur. Bir yedegin saglikli alinmasi kadar restore isleminin basarili bir biçimde yapilabilmesi de test edilmesi gereken önemli bir islem. Exchange destegi olan (aware) diye adlandirdigimiz yazilimlar exchange writer'lari kullanarak VSS teknolojisi ile yedek alirlar. Yedekleme esnasinda karsilasilan sorunlarin büyük bölümünün nedeni, yazilimlarin uyumsuzlugu ya da bu yazilimlardaki yanlis bir ayar olabilmektedir. Bunun tespiti için, yani yedek alma sirasinda sorunun VSS Writer'dan mi, disk sisteminden mi ve/veya yedekleme yazilimindan mi kaynaklandigini anlayabilmek için Betest aracini kullanabilirsiniz. BETEST, Windows SDK yada Volume Shadow Copy Service SDK 7.2 (sonraki versiyonlarda mevcut) içerisinde bulunan yardimci bir araçtir. Araci kolaylikla bulabilir ve kurabilirsiniz. Kurulum islemini exchange sunucunuz...
Announcing the AdventureWorks OData Feed sample
Update – Removing Built-in Applications from Windows 8 In October last year I published a script that is designed to remove the built-in Windows 8 applications when creating a Windows 8 image. After a reading some of the comments in that blog post I decided to create a new version of the script that is simpler to use. The new script removes the need to know the full name for the app and the different names for each architecture. I am sure you will agree that this name - Microsoft.Bing – is much easier to manage than this - Microsoft.Bing_1.2.0.137_x86__8wekyb3d8bbwe. The script below takes a simple list of Apps and then removes the provisioned package and the package that is installed for the Administrator. To adjust the script for your requirements simply update the $AppList comma separated list to include the Apps you want to remove. $AppsList = "Microsoft.Bing" , "Microsoft.BingFinance" , "Microsoft.BingMaps" , "Microsoft.Bing...
ASP.NET AJAX RC 1 is here! Download now
Moving on with WebParticles 1 Deploying to the _app_bin folder This post adds to Tony Rabun's post "WebParticles: Developing and Using Web User Controls WebParts in Microsoft Office SharePoint Server 2007" . In the original post, the web part DLLs are deployed in the GAC. During the development period, this could become a bit of a pain as you will be doing numerous compile, deploy then test cycles. Putting the DLLs in the _app_bin folder of the SharePoint web application makes things a bit easier. Make sure the web part class that load the user control has the GUID attribute and the constructor sets the export mode to all. Figure 1 - The web part class 2. Add the AllowPartiallyTrustedCallers Attribute to the AssemblyInfo.cs file of the web part project and all other DLL projects it is referencing. Figure 2 - Marking the assembly with AllowPartiallyTrustedCallers attribute 3. Copy all the DLLs from the bin folder of the web part...


Comments
Post a Comment