EventCreate and "ERROR: Source parameter is used to identify custom applications/scripts only"
Update to Graph API consent permissions
Folks,
We're letting you know that we made a change yesterday to one of the Graph API permission scopes. The "Access your organization's directory" delegated permission now requires an administrator to consent to this permission scope, for a web application. This permission scope, once granted, allows the application to fully impersonate the signed in user to the Graph API. Previously users were able to consent to this permission scope.
NOTE: This does not affect a user's ability to consent to native client applications that request this permission. Nor does it affect any consent grants that have already been made.
End users who attempt to consent to web applications that request the "Access your organization's directory" will see the following error. They must now ask their IT administrator to consent to the application on their behalf.
AADSTS90093: User cannot consent to web app requesting user impersonation as an app permission.
Why we made this change
This change was made based on guidance from our security team. The "Access your organization's directory" permission is a tenant-wide permission scope that should not be granted to a web application without oversight by an IT administrator, since it gives broad access to the user's directory. The IT administrator is in a better position to make a decision about the trustworthiness of the web application, before granting consent. Details on the supported Graph API scope permissions can be found here: https://msdn.microsoft.com/en-us/library/azure/dn132599.aspx#BKMK_Graph.
Do I need to make any changes to my web app?
If you want to continue to offer user consent for your web application, then you'll need to go to the Azure Management Portal and remove the "Access your organization's directory" permission from the "permissions to other applications" section in your application's configuration. You may also need to update your code so that the application can only query the Graph API for the signed-in user's details only.
On the other hand, if your web application relies on the additional level of access offered by the "Access your organization's directory" permission, then you'll require administrator permission for your application. This means that you may need to offer a "sign my company up" button experience to force administrator consent. This is described here: https://msdn.microsoft.com/en-us/library/azure/dn132599.aspx#BKMK_Granting
Using OAuth 2.0 Authorization Code Grant for delegated access of Directory via AAD Graph
Updated: Feb 14, 2014 - the Permissions section below has bee revised to use who how to configure an App, to use OAuth 2.0 Authorization Code Grant, by using the Azure Management Portal's Application Configuration capabilities.
You might have seen the recent announcement of developer preview for support of OAuth Code Grant in Azure Active Directory. You can use this to provide delegated access when accessing resources. We can use the same mechanism to access AAD resources using delegated access via Graph API. We have an updated PHP sample that shows how to use this. The blog post provides details on what's required in building such an application.
Using Authorization Code v/s Client Credentials
In our previous posts on this blog and our samples web site, we have shown various kinds of Applications you can build that consume information from AAD Graph. But the one thing that was common to all the applications was that they used Application credentials exclusively when talking to AAD Graph and did not use User identity. Since the user identity is not used in the Client Credentials flow, the application has to take the responsibility for making sure that the users are authenticated and are given the appropriate level of access when accessing resources in AAD. Users get different permissions in AAD depending on the role they belong to. For example, all Users get permissions to read their own information. But if a User belongs to "Company Administrator" role, he has administrator permissions and can read and write objects of other users as well. So how can application developers just depend on the Access Checks put into place in AAD Graph rather than enforcing them in their application when accessing AAD data? This is where OAuth 2.0 Authorization code grant will help us build an application using delegated access to the directory resources.
Overview of the PHP Sample
The functionality provided by the PHP sample is very limited. The goal is to show how Authorization Code can be used to access AAD Graph and so the application does not do much beyond that. The first thing the application asks the customer to do is to authorize via the AAD portal. Typically the application would authenticate the user via WS-Fed or SAML protocol but to make things simple, the sample application directly takes user to authorization. Once authorized, user is redirected to a page showing his/her details. There is an Edit link at the bottom of this page. You can only use this link if you have are using Administrator credentials while authorizing the application. And this access check is not done by the application but by the Graph API. Here is a brief description of the files that are part of this sample.
- Authorize.php: It's the home page of the application and redirects the user to the AAD portal for retrieving authorization code.
- HandleAuthorizationResponse.php: The page handles the redirect from the AAD authorize page after the user authorizes.
- AuthorizationHelperForGraph.php: Takes care of putting together the URL for retrieving the authorization code and also getting the access token for accessing Graph using the authorization code fetched.
- GraphServiceAccessHelper.php: Takes care of putting together the HTTP requests to the Graph service and handling the JSON response.
- Settings.php: This file contains the constant values for clientId, Password, RedirectURI etc. that need to be updated to match the service principal you create (explained in the next section).
Setting up permissions
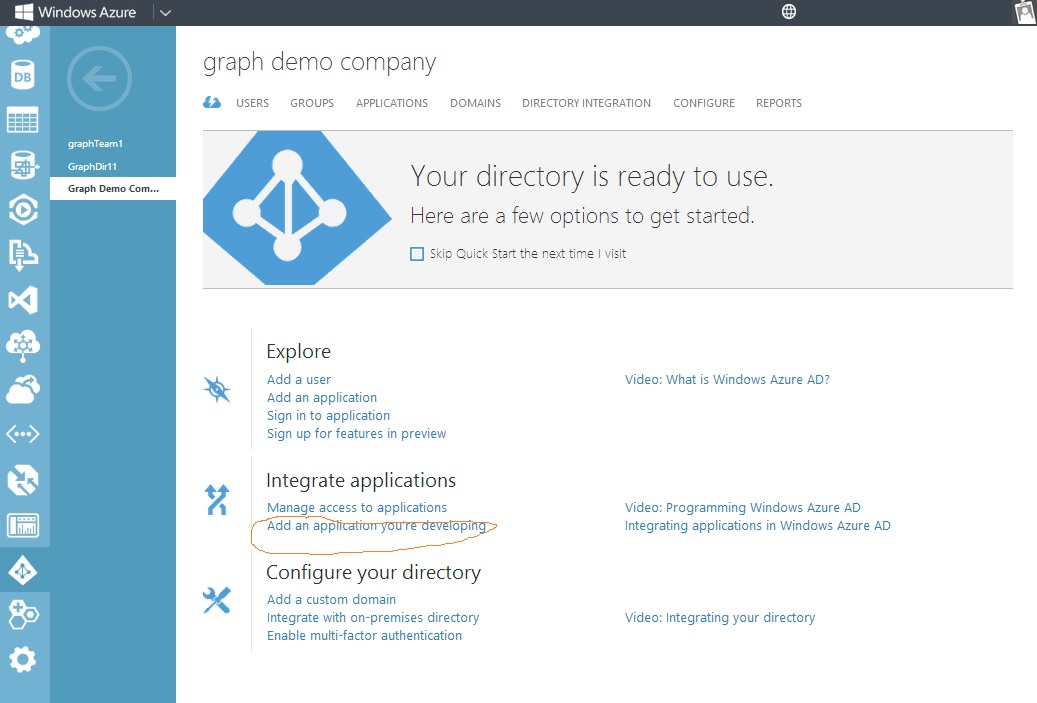
The previous steps below are now replaced using the Windows Azure Management Portal: https://manage.windowsazure.com/ Login to your Azure AD company, from this portal, and select "Add an application you're developing"
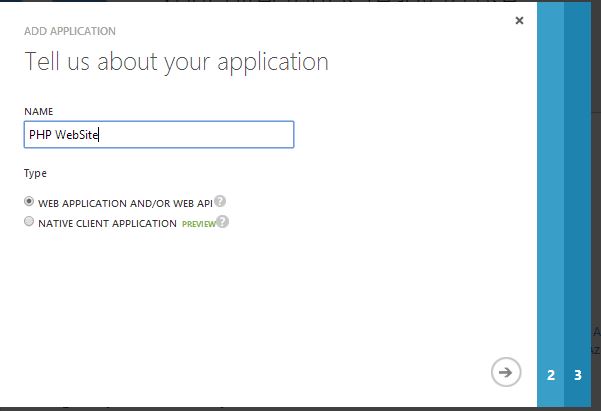
Next, select the type of App that you're developing - select Web Application and give it a friendly name, advance to the next step.
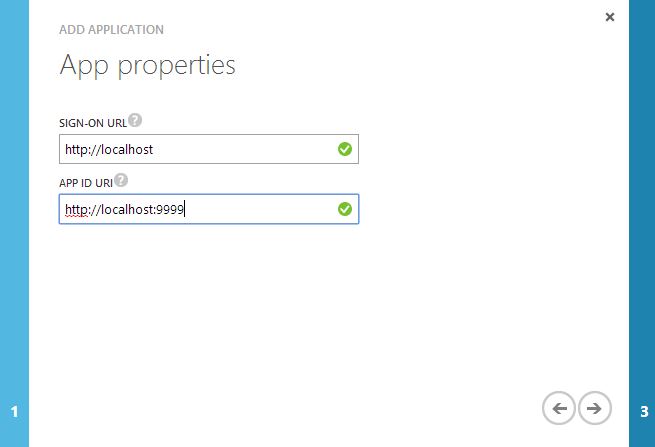
On step 2, add your App properties - the Sign-on URL will not be used in the PHP demo app, so set to any value. The App ID URI is a unique identifier for the app, and will be used in the PHP app's config file later.
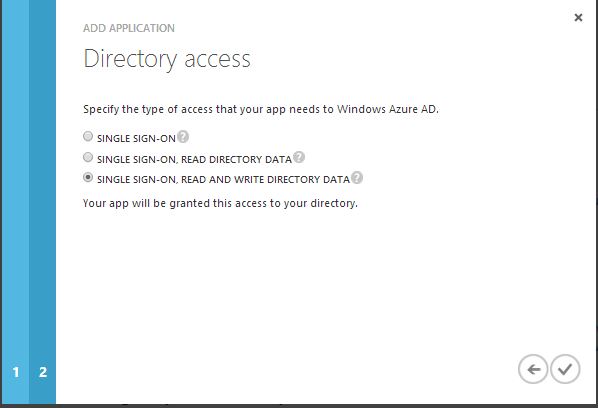
Next configure permissions - for this demo, select the 3rd option Single Sign-on, Read and Write Directory Data. Select the check mark to finish the initial application configuration.
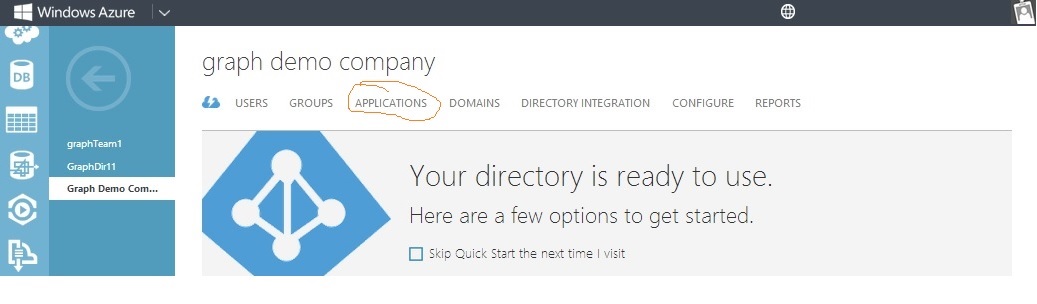
From the main Azure AD management portal, select "Applications" from the top menu bar. Find your application and select it.
From the Application page, Expand the section "Enable your app to read or write directory data", and select the Configure Key link,
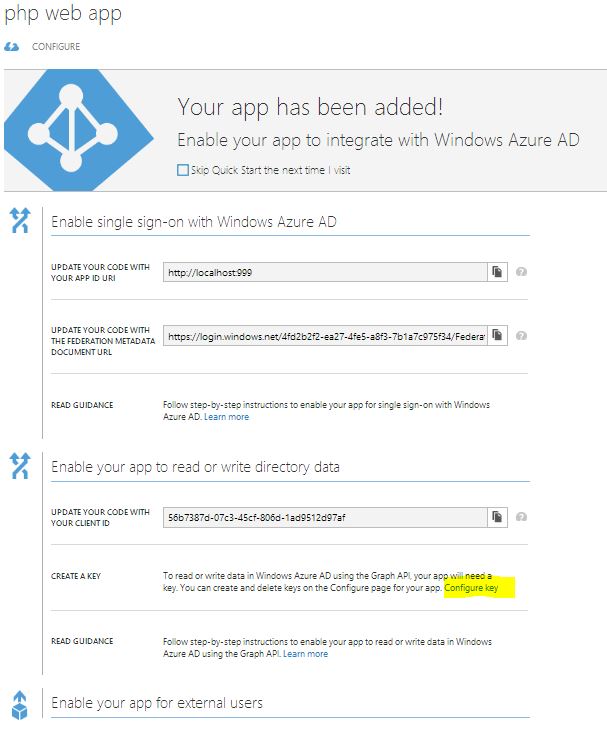
You should now see the Configure page similar to the one shown below.
On the Configure App page:
1. Write down the Client ID value - this is the application ID, and will be used in the settings.php of the PHP app ($clientId variable).
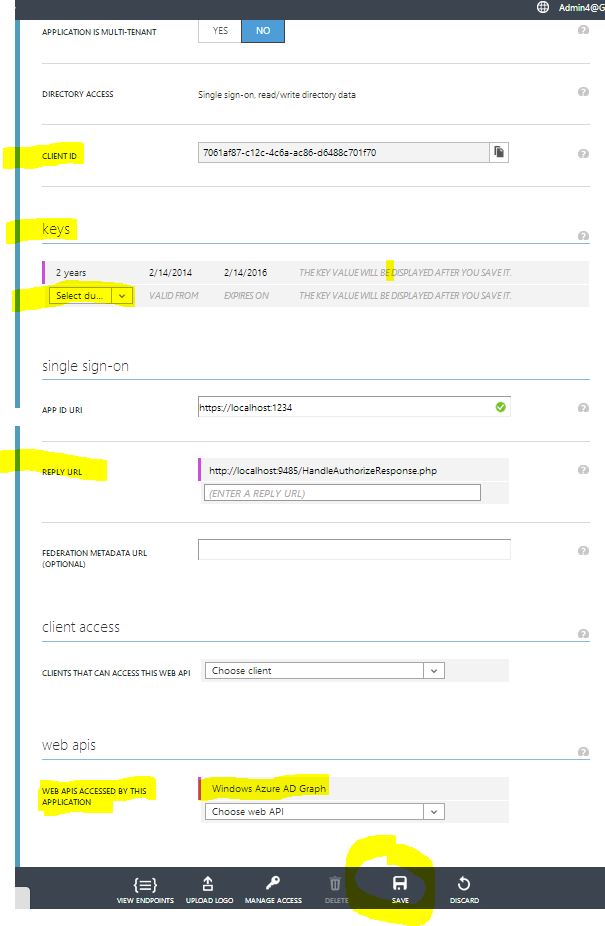
2. Under the keys section, select a key duration (1 or 2 year) - the key value will be displayed after you select Save at the end. The key value will be used in the settings.php file ($password variable)
3. in the Reply Url section - enter https://localhost:9485/HandleAuthorizeResponse.php - this is the URL that the Authorization endpoint will redirect to, after the user successfully authenticates. This should be equal to the $ridrectUri value in the settings.php file.
4. Under Web apis - select "Windows Azure AD Graph" from the drop down menu - in the settings.php file, the value of the $resourceUri is "https://graph.windows.net", which is the WIndows Azure AD Graph Uri.
5. Select the Save button on the bottom.
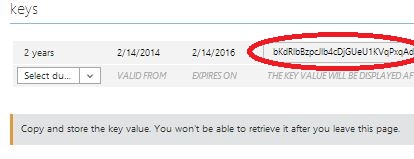
After successfully saving the configuration, the key value should be displayed under keys - please record and save this value in a safe location. This key value cannot be retrieved after exiting this page. As mentioned in the above step, the key value is used for $clientId value in the settings.php file.
Your App configuration is now complete on the Azure AD side, now update the PHP sample app's settings.php values to match your configuration - Note: you will also need to add your tenant's name in the $appTenantDomainName variable in the settings.php file - this can be any domain owned by your tenant.
Below this line was the original, out of date instructions on Application Configuration.
------------------------------------------------------------------------------------------------------------------------------------------------------------------------------
Steps to setting up permissions for application:
- Go to https://graphexplorer.cloudapp.net/
- Click the "Sign In" link on the right top hand corner.
- Sign in using admin credentials for your AAD tenant.
- Click the "Add Application Permission" link on the top.
- You can choose an existing client application or create a new client application. Let's create a new client application.
- Choose any "Client APP Display Name" of your choice.
- Choose a "Client APP URL" that's unique with in your tenant and maps to the address of your application. You can choose something like https://localhost:44305 while you are developing the application and replace 44305 with the port that your application is using.
- For the Service, select the "Microsoft.Azure.ActiveDirectory" from the dropdown. This service will exist in every tenant and represents nothing but AAD itself. We are trying to building an application that accesses AAD and thus AAD is the resource for us.
- For Scope, enter the name of any well-known role name in Azure Active directory. There are 3 roles in particular that are interesting when talking about application permissions:
- Directory Readers: Provides Read permission.
- Directory Writers: Provides Read+Write access but no Delete permissions.
- Company Administrator: Full admin permissions including deletes.
- Uncheck the "Public Client" check box since we are creating a web application. If we were building a native application like a windows store application, we would choose "Public Client".
- Enter a password.( only needed for Private client)
- Click "Create Permission" which will display the "Client Id" and "Credentials" which you need to copy and paste in the Settings.PHP file of the PHP sample.
This is how the form looks before clicking "Create Permission".
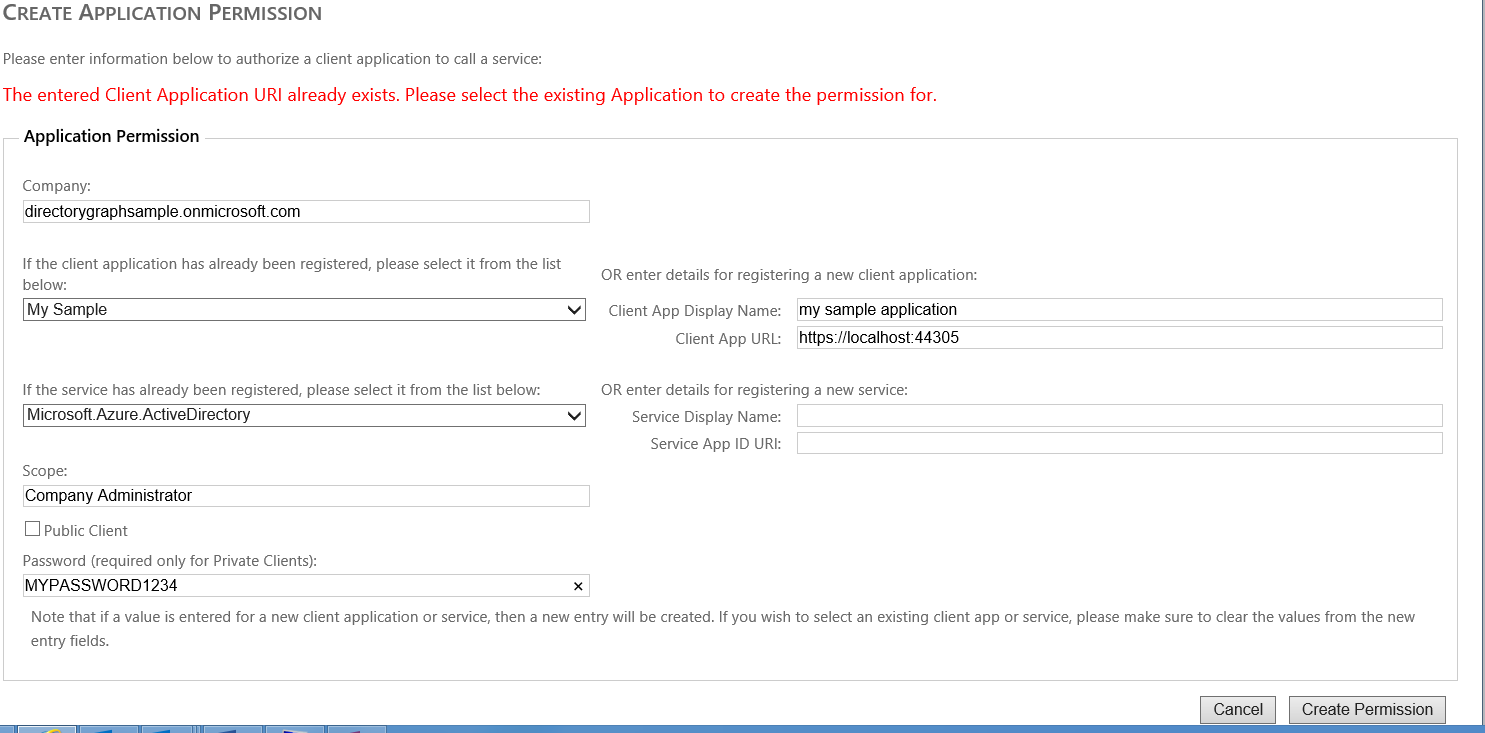
Once you click the "Create permission" button, Graph explorer will create the permission and show you the Client Id, App URL, Credentials Key for the Client application. Copy these values to settings.php file in the sample. App Url is called redirectURI in the application and Credentials Key is called password.
Getting an Authorization code
Now that the permission object has been set up, we can proceed to access Graph from our Application. The first thing we need to do is access the Authorization end point and get the authorization code. The end point for Authorization is: https://login.windows.net/common/oauth2/authorize . We need to specify the Application Id for the client application, application URI for the resource (in our case Graph) and the redirect URI we had specified while creating the Service Principal. The user will be redirected to the Azure AD login page and the user will be redirected back to the Redirect URI we specified in the request parameter after a successful login. The redirect URL will have the Authorization code. The sample response shown below is the redirect request to the application after a successful login. The client_id and redirect_uri in the request below comes from the above step when you created permission for this application.
Request URL:
Request Parameters:
response_type code |
client_id 599cea60-a2ba-4f9b-8f06-9f92986560f1 |
resource https://graph.windows.net |
redirect_uri https://localhost:9385/HandleAuthorizeResponse.php |
|
HTTP Method: GET
Response:
Getting an Access token with Auth Code
We can now use the Authorization code in conjunction with the client application Id, client Application Secret etc. to fetch the Access token. The Access token can be used to access the data of the tenant and the permissions that the App gets will be based on the role that the User belongs to and the Role that was used in Scope parameter when creating the Permission object for this application. The client_id and client_secret are the values from the Graph explorer when we created permission for this application.
Request URL:
Request Parameters:
grant_type | authorization_code |
client_id | 599cfa60-a2ba-4f9b-8f06-9f92986560f1 |
redirect_uri | |
client_secret | DhjYU…kqqyHiqNm/PY= |
Code | AAAAAAA…zS |
HTTP Method: GET
Response:
{ "access_token":"eyJ0eXAiOiJKV1QiLCJhbGciOiJSUzI1NiIsIng1dCI6Ik5HVEZ2CzkwXeiVQ", token_type":"Bearer", "expires_in":"28799", "expires_on":"1368676551", "refresh_token":"AAAAAAAADENAfM5UpyznQ8EHSHp0GI8GTGXonaBFZHZADR1Kf...-Q9SAA", "scope":"62e90394-69f5-4237-9190-012177145e10" } |
You can use access token in the response to talk to Graph by providing in the Authorization header(Authorization: Bearer eyJ0eXAiOiJKV1QiLCJhb…….. VQ). The sample application does not login the user and stores a profile locally but a lot of real world application may want to do that in which case you can go back and fetch the access token without user interaction by using the refresh_token value in the response. The next section explains how to get an access token using a refresh token.
Getting an Access token with Refresh token
Request URL:
Request Parameters:
grant_type | refresh_token |
client_id | 599cea60-a2ba-4f9b-8f06-9f92986560f1 |
|
|
client_secret | DhjYUdb4PHA…..PY= |
refresh_token | AAAAAAAAD…..A |
HTTP Method: GET
Response:
| "access_token":"eyJ0eXAiOiJKV1QiLCJhbGciOiJSUzI1NiIsIng1dCI6Ik5HVEZ2CzkwXeiVQ", token_type":"Bearer", "expires_in":"28799", "expires_on":"1368676551", "refresh_token":"AAAAAAAADENAfM5UpyznQ8EHSHp0GI8GTGXonaBFZHZADR1Kf...-Q9SAA", "scope":"62e90394-69f5-4237-9190-012177145e10" } |
Accessing information of the user from AAD using Graph
So the user has authenticated to the application and we have the access token to access Graph. But how do we get the information about the currently authorized user. It's really simple with the new functionality that just got added in the Graph service. You can refer to the current user using the "me" alias. So the following URL can be used to get all the groups and roles that the user is memberOf: https://graph.windows.net/me/isMemberOf?api-version=2013-11-08 . Graph will figure out the user information from the claims in the token. The PHP application just displays the information regarding the user and thus does the following query to the graph: https://graph.windows.net/me?api-version=2013-11-08 and provides the token retrieved previously from token end point in Authorization Header. Apart from the "me" alias, "myorganization" alias was also added recently to Graph and refers to the tenant associated with the currently authenticated user or application trying to access graph. So you can use the following query to get all users for the tenant: https://graph.windows.net/myorganization/users?api-version=2013-11-08 .
As always, feedback and questions are welcome.
Walk through for building a .Net application for accessing Windows Azure Active Directory Graph Service
The post provides a walk through for accessing Azure Active Directory (AAD) Graph Service through a .Net application. If you would like to download a full working sample, you can download the sample MVC application from here. If you would like to learn more about Azure Active Directory Graph Service, visit our previous blog posts.
Creating a sample tenant
You can now manage your azure active directory tenants through Windows Azure Management Portal. If you do not have an azure subscription, it is easy to sign up for one using free trial. If you login to the Azure management portal, you will see an active directory tab. If you have an existing Azure AD tenant associated with this Azure subscription, it will show up here. If you don't have one, you can create one using the UX.
Register your application for working with AAD
The next step is to register our application with Azure AD which will let the application access the data in Azure AD through Graph. The following MSDN topic provides a step by step instruction on registering application: https://msdn.microsoft.com/library/windowsazure/dn151791.aspx#BKMK_Configuring . If you followed the steps, you will have the ClientID and Key values that you will need later as you build the application.
Getting Authentication Token from Windows Azure AD for accessing Graph Service
An authentication token from Windows Azure AD is required to access Graph Service. The authentication token proves that the application has been authorized to access the directory information for the tenant in Azure AD through Graph service. To get the token, we need to provide the TenantDomainName, AppPrincipalId/ClientId and Password/Key generated in the previous step to Azure AD via a HTTP post request. Here is a code snippet that puts together all of this information in the format that Azure AD expects and sends it over in a HTTP Post request. Windows Azure AD can provide authentication tokens for accessing different services and if you need to change the code to get token for accessing a different service than Graph, you have to provide the principal id of that service instead of the one for Graph service.
HttpWebRequest request = (HttpWebRequest)WebRequest.Create(String.Format( "https://login.windows.net/{0}/oauth2/token?api-version=1.0", tenantName)); System.Text.ASCIIEncoding encoding = new System.Text.ASCIIEncoding(); string postData = "grant_type=client_credentials"; postData += "&resource=" + HttpUtility.UrlEncode("https://graph.windows.net"); postData += "&client_id=" + HttpUtility.UrlEncode(appPrincipalId); postData += "&client_secret=" + HttpUtility.UrlEncode(password); byte[] data = encoding.GetBytes(postData); request.Method = "POST"; request.ContentType = "application/x-www-form-urlencoded"; request.ContentLength = data.Length; using (Stream stream = request.GetRequestStream()) { stream.Write(data, 0, data.Length); } If successfully authenticated, we will get back a JSON response from Azure AD with token_type, access_token and a few other fields. A sample response for a successful authentication request will look like this:
{ "token_type":"Bearer", "access_token":"eyJ0eXA…..Q", "expires_in":"43199", "not_before":"1358887748", "expires_on":"1358930948", "resource":00000002-0000-0000-c000-000000000000/graph.windows.net@4fd2b2f2-ea27-4fe5-a8f3-7b1a7c975f34 }
We need to take the token_type and access_token fields from this response for putting together the Authorization header for Graph service.
using (var response = request.GetResponse()) { using (var stream = response.GetResponseStream()) { DataContractJsonSerializer ser = new DataContractJsonSerializer(typeof(AADTokenFormat)); AADTokenFormat token = (AADTokenFormat)(ser.ReadObject(stream)); returnString.Format(CultureInfo.InvariantCulture,"{0}{1}{2}", token.token_type, " ", token.access_token); } } The AADTokenFormat class used above has two fields token_type and access_token and is used to read the JSON response into the strongly typed object.
[DataContract] internal class AADTokenFormat { [DataMember] internal string token_type { get; set; } [DataMember] internal string access_token { get; set; } } Creating the Service Reference for Graph Service
Now that we have the Authorization header, we are ready to access Graph service for querying and updating the information for our tenant. In the last post we saw that all operations against Graph service can be done using standard HTTP operations like GET, POST, DELETE etc. and advanced query operations can be done using OData query options via HTTP request parameters. We can definitely work with the Service using HTTPRequest and HTTPResponse by putting together the requests manually and parse the responses and extract information we need. But since Graph service is an OData service, we can use the WCF Data Services client library which provides a strongly typed access for working with OData services.
The first step for using WCF Data Services client library is to create a Service Reference. You can add a Service Reference in Visual Studio by right clicking the project and clicking "Add Service Reference". In the Address text box, type the following URL which points to the metadata of the Graph service: https://graph.windows.net/contoso.onmicrosoft.com/$metadata ( you can replace contoso with your tenant name). The Service Reference thus generated will have a set of classes that will have 1:1 correspondence with the collections/feeds exposed by the Graph service. If you double click the Service Reference, you can browse through the classes and you will see classes for User, Group, Contact etc. Another class that's part of the Service Reference will be a class called DirectoryDataService which derives from DataServiceContext class. The DirectoryDataService class will expose collections of types exposed by Graph service like DirectoryObjects, Applications etc. as IQueryable. You can query over these collections using LINQ queries like any other IQueryable collections. The DirectoryDataService class also has the ability to track the changes of objects and exposes a SaveChanges method that can be used to submit the appropriate POST, PATCH or DELETE requests to the Graph service.
Adding the required HTTP request headers
Each HTTP request to the Graph service needs a couple of headers - Authorization Header and the Version of the Graph service. The easiest way to attach these headers on each request is by hooking up to an event on DirectoryDataService instance as shown in the below code.
Code to hook up the event handler:
var svcUri = new Uri("https://graph.windows.net/" + ConfigurationManager.AppSettings["TenantDomainName"]); var graphService = new DirectoryDataService(svcUri); // Register the event handler that adds the headers for HTTP requests graphService.SendingRequest += new EventHandler<SendingRequestEventArgs>( OnSendingRequest); return graphService; Code in the event handler that adds the headers:
// Add an Authorization header that contains an OAuth WRAP access token to the request. string authzHeader = AzureActiveDirectoryGraphAuthorizationHelper. GetAuthorizationToken(ConfigurationManager.AppSettings["TenantDomainName"], ConfigurationManager.AppSettings["AppPrincipalId"], ConfigurationManager.AppSettings["Password"]); e.RequestHeaders.Add("Authorization", authzHeader); Querying for all objects in a collection
Below is a snippet of code that gets all the Users from the Graph service. As you can see, it is as simple as writing these two lines of code to get back a collection from the Service. The reason we use a Helper method to create the instance of the DirectoryDataService is to hook up the event handler that adds the required Headers as we have seen in the previous section.
DirectoryDataService graphService = DirectoryDataServiceHelper.CreateDirectoryDataService(); List<User> users = graphService.directoryObjects.OfType<User>().ToList(); So what really happened?
So what magic happened under the covers to make the things so simple? The Data Services client library produced a HTTP request under the covers based on our LINQ query (graphService.Users), read the response from the Graph service, deserialized the response stream and handed us back the strongly typed objects. Here's a sample of the HTTP request that is sent out by the WCF client library and response that it gets back from the Graph service. Our application doesn't need to deal with any of this but it is still good to understand what happens under the covers. Our last blog post has plenty of examples (including this one) for the HTTP request and response formats for various operations on Graph service.
Request URL:
HTTP Method: GET
Response:
{
"odata.metadata": "https://graph.windows.net/GraphDir1.OnMicrosoft.com/$metadata#directoryObjects/Microsoft.WindowsAzure.ActiveDirectory.User"
"value":[
{
"objectId": "e428a9cb-7550-4991-afc3-48fe8b60be33",
"accountEnabled": true,
"city": "Seattle",
"displayName": "Adam Barr"
},
{
"objectId": "bafb9fea-d7f3-4cec-af6a-bca2b553e83b",
"accountEnabled": true,
"city": null,
"displayName": "Admin",
}
] } |
Querying Users collection for a Key value
All Collection types exposed by Graph service have the objectId property which acts as a Key property. We can do LINQ query on the objectId property to retrieve a User entry with the given Key value. You can also see the URL that the query gets mapped to below.
LINQ Query:
User user = graphService.users.Where (it => (it.objectId == 'e428a9cb-7550-4991-afc3-48fe8b60be33')) .SingleOrDefault(); Request URL:
https://graph.windows.net/GraphDir1.OnMicrosoft.com/users/e428a9cb-7550-4991-afc3-48fe8b60be33' |
Querying Users collection for a non-Key property value
The query for a non-Key property looks very similar to the one you did for a Key property. Since it is not a Key property, you cannot expect the query to return at most one object. But the URL that the query gets mapped to under the covers is very different. While the query on a Key property gets expressed in the URL itself, all other queries are expressed via Request parameters as defined by OData specification. You can use LINQ queries for different operations supported by the AD Graph service and the WCF Data Services client library will translate them to the correct HTTP request. Currently Graph service supports "Where", "Top" and "SkipToken" operators. We plan to support more operators like "Select", "Expand" etc. in the near future. Here we see an example for querying Users collection for a particular displayName.
LINQ Query:
IEnumerable<User> users = graphService.directoryObjects.OfType<User>(). Where(user => user.displayName.Equals('Derek Brown')); Request URL:
https://graph.windows.net/GraphDir1.OnMicrosoft.com/users?$filter=displayName eq 'Derek Brown' |
Navigating through Links
Objects exposed by the Graph service are interconnected via various links. For example the following concepts are represented by links in the Graph service, Users belong to different Roles and Groups, Groups have Members which are Users or Contacts, Roles have Members which are Users or Contacts etc. All of these links are exposed as first class properties on the generated types in the Service Reference we created. These properties are referred to as Navigation properties. These navigation properties are not fetched by default though. For example, if you fetch the User, the "memberOf" property on the User will be null. And this is to be expected since if we load all Navigation properties by default, we could end up navigating through the whole Directory. In order to fetch the Navigation property, we would need to call the LoadProperty on the DirectoryDataService. The code below fetches the "memberOf" property on the User and you can also see the URL that this call maps to under the covers.
Code to fetch the Roles that a User belongs to:
graphService.LoadProperty(user,"memberOf"); var currentRoles = user.memberOf.OfType<Role>(); Request URL:
Create a new entry
You can use the SaveChanges method on DirectoryDataService class to persist any change to the Graph service. Let's first look at an example for creating a new User object. The SaveChanges call takes the content of newly created User and submits it as the body of a HTTP Post request to the Users collection URL.
User user = new User(); user.displayName = ""Bob"; user.userPrincipalName = "alias@tenant.onmicrosoft.com"; user.mailNickname = ""alias"; user.password = ""xxxxxxxx"; user.accountEnabled = true; graphService.AddToDirectoryObjects(user); graphService.SaveChanges(); Updating an entry
Once you fetch an object through LINQ query, any changes you do on the object are tracked by the DirectoryDataService instance that was used to fetch the object. In such a case, you can just do SaveChanges and the DirectoryDataService will produce the appropriate HTTP Patch/Merge request for submitting the change. But in case you are building a Web application, you typically would not cache the instance of DirectoryDataService instance between the requests. In such a case, you can make changes to the object and explicitly tell the DirectoryDataService instance that the Object has changed and then call SaveChanges as shown in the code below.
User user = graphService.directoryObjects.OfType<User>(). Where(it => (it.objectId == user.objectId)).SingleOrDefault(); user.displayName = newDisplayName; user.mailNickname = newAlias; graphService.UpdateObject(user); graphService.SaveChanges(SaveChangesOptions.PatchOnUpdate);
Deleting an entry
To delete an entry, you can call DeleteObject method on the DirectoryDataService and then call SaveChanges. The call will translate to a HTTP Delete request submitted to the Graph Service.
User user = graphService.directoryObjects.OfType<User>(). Where(it => (it.objectId == user.objectId)).SingleOrDefault(); graphService.DeleteObject(user); graphService.SaveChanges(); Adding or Removing Links between existing Entries
You can add or remove a link between two existing entries via AddLink and RemoveLink methods on DirectoryDataService class respectively followed by a call to SaveChanges. The changes will be mapped to a HTTP POST for AddLink and HTTP DELETE request for RemoveLink. Below is a code snippet for adding and removing "Members" link between a User and Role entry. In this case both user and role exists in the Graph already.
graphService.AddLink(existingRole1, "members", existingUser1); graphService.DeleteLink(existingRole1,"members", existingUser2); graphService.SaveChanges();
Using the code snippets provided in this post, you should able to access and manipulate most of the information in AAD Graph service from your .Net application. If you have any questions or would like to see some particular code snippet, please leave a comment and we will be happy to add it.
Welcome!
Welcome to Windows Azure Active Directory( AAD ) Graph Team blog! The AAD Graph team is responsible for creating RESTful services that developers can consume to integrate AAD functionality into their applications.
Purpose of the blog
We will use this blog to have a regular and open communication with the developer community by providing updates on our progress, design ideas, walkthroughs, samples etc. We would also like to hear back from you on what you would like to see in the service and in this blog - any particular functionality that you are missing, any particular samples you would like to see etc.
AAD Graph Overview
Windows Azure Active Directory( AAD ) provides identity management and access control capabilities for your cloud applications. The AAD graph API will let you access the information in the directory through a very simple RESTful service. The AAD graph service is built upon Web technologies like HTTP, JSON and OData and thus it is platform and device independent. You should be able to build your application using your favorite platform whether it be .Net, PHP, Java script, Java etc and should be able to consume the Graph API in a simple manner. There are several classes of cloud applications and the specific needs for these are vastly different. We will try to provide samples and walk throughs for some end to end scenarios on different platforms using Graph API through this blog.
What is available now?
The AAD graph service is currently available as a developer preview here. Since this is a developer preview, please expect some breaking changes as we try to incorporate additional functionality and improve the overall experience.
Additional Resources
You can find more information about Windows Azure Active Directory here.
The MSDN page for AAD graph has some useful links and also includes the documentation for the service end point.
[Reference] AADSync Beta has been released on Connect
The beta release is available on Connect from this link:
https://connect.microsoft.com/site433/Downloads/DownloadDetails.aspx?DownloadID=53361
Make sure to read the updated installation guide and release notes available on TechNet:
https://go.microsoft.com/fwlink/?LinkID=393942
Please continue to provide feedback through Connect. This allows us to deliver a high-quality product which is solving your scenarios.
On behalf of the AAD Sync team,
Andreas Kjellman
Program Manager, Active Directory Identity & Access Management - Sync
[Reference] AADSync Tags
- AADSyncHelp:: Common Tag for all support AADSync Blogs
- AADSyncServices:: Common Tag for support AADSync Blogs
- AADSync Technical Article:: AADSync Technical Troubleshooting Article
- AADSync Reference Article:: AADSync Reference Article
[Reference] How to execute initial or delta sync via command-line
Overview
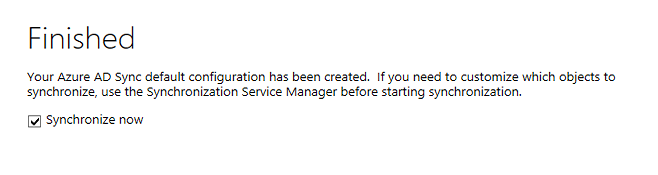
If you un-check the box in the configuration wizard to prevent the initial synchronization from happening, you can fire the initial synchronization using DirectorySyncClientCMD.Exe.
File:
- DirectorySyncClientCmd.Exe
Location:
- %programfiles%\Microsoft Azure AD Sync\Bin
- %programfiles%\Microsoft Azure AD Connection Tool
Arguments
-
- Initial – (DirectorySyncClientCMD Initial)
- This will run through the steps to execute the initial synchronization to the cloud.
- Executes the following:
- Initial – (DirectorySyncClientCMD Initial)
-
- Full Import (Stage Only) on all connectors
- Delta Import (Stage Only) on all connectors
- Delta Synchronizaiton on all AD connectors
- Export, Delta Import and Delta Synchronization on WAAD Connector
- Export on all AD Connectors
-
- Delta - (DirectorySyncClientCMD Delta)
-
-
- This will run through the steps to execute a delta synchronization to the cloud
- Executes the following:
- Delta Import (Stage Only) on all connectors
- Delta Synchronization on all AD connectors
- Export, Delta Import and Delta Synchronization on WAAD Connector
- Export on all AD Connectors
-
[Reference] The scheduled task is disabled after install
You have just installed Microsoft Azure Active Directory Sync Services (AADSync). You discover that the Scheduled Task in Task Scheduler is disabled.

The Status of the Scheduled Task is determined by what you do with the Synchronize Now checkbox on the last page of the Configuration Wizard.
Scheduled Task Enabled
Scheduled Task Disabled

If your scheduled task is disabled, simply enable the task to begin your runs every 3 hours.
[Troubleshooting] Unable to update this object because the following attributes associated with this object
Environment
Microsoft Azure AD Sync Services (AADSync)
Windows Azure Active Directory (WAAD) Connector
Windows Azure Active Directory (WAAD) Connector – Export Run Profile
Problem Statement
The below error message is generated when running an export on the Windows Azure Active Directory (WAAD) Connector.
Export Error Message
Unable to update this object because the following attributes associated with this object have values that may already be associated with another object in your local directory services: [UserPrincipalName sup2@timmac.onmicrosoft.com;]. Correct or remove the duplicate values in your local directory. Please refer to https://support.microsoft.com/kb/2647098 for more information on identifying objects with duplicate attribute values. |
Cause
The issue is caused because there is an object in the cloud that is not the object that you are exporting that contains the same userPrincipalName attribute value.
Resolution
Correct the source data in the source Active Directory
Import and Sync the modified information from the source Active Directory to the WAAD Connector
Run the export again
VSTest Runsettings samples
This blog is a collection of useful runsettings files that would help drive the VSTest runner. You can find documentation and schema of the runsettings xml here.
| Functionality | Description |
|---|---|
| TestRunParametersrunsettings | These are key-value pairs you pass into your tests based on the environment they are run on or simply a dynamic configuration that the tests need. More details here |
| TestAdaptersPathsrunsettings | One or more paths pointing to where custom test adapters are located. |
| AssemblyResolutionrunsettings | Helps specify additional resolution paths to search for dependencies when running tests. This is only applicable for MSTest based tests. |
| DataCollector - Dynamic Code coveragerunsettings | Enables dynamic code coverage for the test session. |
| Emulator 10.0 Anniversary editionrunsettings | Enables running UWP based tests on an Emulator 10.0.14393.0 WVGA 4 inch 512MB. |
| Emulator 8.1runsettings | Enables running UWP based tests on an Emulator 8.1 WVGA 4 inch 512MB. |
| Devicerunsettings | Enables running UWP based tests on a Windows Phone Device. |
| AppxInstallTimeoutrunsettings | Specifies the installation timeout for a UWP test projects app package. The default value is 30 seconds and if for some reason the app takes longer time to install, then this helps tell the vstest engine to wait the specified amount of time before it decides that something went wrong with the app install and terminate connection with a "Error: (0x5B4) Operation timed out. Unable to install Windows app package in 30 sec" |
Happy unit testing!
"AaronLocker" big perf and feature updates (17 June 2019)
(On the 15th anniversary of my first blog posts...)
Performance improvements in the "AaronLocker" scripts, especially in Get-AppLockerEvents.ps1.
And:
Get-AppLockerEvents.ps1 ...
- Now retrieves Packaged App events;
- -EventLogNames parameter supports retrieving from named event logs, to support the use case when forwarded events are saved in event logs other than "ForwardedEvents";
- Removed all the field-omission switches (as part of the perf upgrade)
Generate-EventWorkbook.ps1 ...
- No longer requires a saved .csv file; invoke it without parameters and Generate-EventWorkbook.ps1 retrieves events from the local computer and slices/dices the results into a multi-tabbed Excel workbook.
Documentation updated, including updated troubleshooting/tips section.
https://github.com/Microsoft/AaronLocker
"AaronLocker" moved to GitHub
"AaronLocker" is a robust, practical, and free PowerShell-based application whitelisting solution for Windows, built on Windows AppLocker. Earlier posts with description here and here.
Rather than continuing to attach zip files to blog posts, I have moved the "AaronLocker" materials, including scripts and documentation, to GitHub: https://github.com/Microsoft/AaronLocker. Among other things, this will make it easier to upload changes as I make them rather than building up a whole package first. I'll continue to post here to announce significant changes, but the materials now have a permanent home instead of whatever the latest blog post URL is.
Changes since the previous version include:
- The generated rule set now includes an inoperative rule that contains the date and time the rule set was generated to help differentiate policy versions, and to associate an in-use policy with a policy rule file with the same timestamp in its filename. You can retrieve this time stamp from the policy even after it has been imported into Group Policy:

- Added Get-AaronLockerTimestamp.ps1 to retrieve the generated timestamp from local policy, effective policy, or a saved policy XML file.
- Added DownloadAccesschk.ps1 to download the current version of AccessChk.exe from Sysinternals.
- Improvements to the workbook produced by Generate-EventWorkbook.ps1 (three user-focused tabs).
- Added -Objects switch to Get-AppLockerEvents.ps1 to output PSCustomObjects instead of CSV.
- Scan-Directories.ps1 produces more data, recognizes additional "default" root directories.

AaronLocker.docx is also on GitHub and explains everything in detail.
"AaronLocker" update (v0.91) -- and see "AaronLocker" in action on Channel 9!
"AaronLocker" is a robust, practical, PowerShell-based application whitelisting solution for Windows. See it in action in this new Defrag Tools episode on Channel 9!
[Update 28 January 2019: content moved to GitHub ]
This update to the original 0.9 release includes these improvements:
- Documentation updates, particularly in the area of Group Policy control;
- Blocks execution from writable alternate data streams on user-writable directories under the Windows and Program Files directories;
- Blocks older versions of Sysinternals BgInfo.exe that were not AppLocker-aware and allowed execution of unapproved VBScript files (N.B., release of an AppLocker-aware BgInfo.exe is imminent -- subscribe to the Sysinternals blog for notifications);
- Improvements to the information retrieved from event logs, including an additional date/time column that Excel can filter on, a file extension column that can help track files with non-standard extensions, and a label for when an event is associated with the built-in local administrator account;
- Additional info in the event workbook's Summary tab, and a new "Users and event counts" tab;
- Performance improvements in Generate-EventWorkbook.ps1;
- PowerShell v2 DLLs blocked with explicit deny rules instead of exceptions;
- Minor bug fixes.
I still intend to put it on GitHub but haven't gotten to it yet. In the meantime, I want to get the update out, so you can download the updated AaronLocker here from GitHub . (I also need to create new sample event content, but don't want to hold this up any longer.)
Brief description of "AaronLocker" repeated from original post:
AaronLocker is designed to make the creation and maintenance of robust, strict, AppLocker-based whitelisting rules as easy and practical as possible. The entire solution involves a small number of PowerShell scripts. You can easily customize rules for your specific requirements with simple text-file edits. AaronLocker includes scripts that document AppLocker policies and capture event data into Excel workbooks that facilitate analysis and policy maintenance.
AaronLocker is designed to restrict program and script execution by non-administrative users. Note that AaronLocker does not try to stop administrative users from running anything they want – and AppLocker cannot meaningfully restrict administrative actions anyway. A determined user with administrative rights can easily bypass AppLocker rules.
AaronLocker's strategy can be summed up as: if a non-admin could have put a program or script onto the computer – i.e., it is in a user-writable directory – don't allow it to execute unless it has already been specifically allowed by an administrator. This will stop execution if a user is tricked into downloading malware, if an exploitable vulnerability in a program the user is running tries to put malware on the computer, or if a user intentionally tries to download and run unauthorized programs.
AaronLocker works on all supported versions of Windows that can provide AppLocker.
A personal note: the name "AaronLocker" was Chris (@appcompatguy) Jackson's idea – not mine – and I resisted it for a long time. I finally gave in because I couldn't come up with a better name.
The zip file contains full documentation, all the scripts, and sample outputs.
By the way, I'd also like to point out that AaronLocker addresses many of the AppLocker bypasses that various sites have published.
"AaronLocker" updates (12 May 2019)
Just committed some changes to the "AaronLocker" repo on GitHub and its documentation. Changes include:
Rule-generation for files in unsafe paths: always used to create one publisher or hash rule for each file in the directory hierarchy. New granularity options enable rules tied only to publisher name or publisher+product name instead of one-rule-per-file. Can dramatically reduce the number of rules generated, and increases flexibility/resilience when product updates might introduce new files and reduce the likelihood that the AppLocker rules also need to be updated. See the documentation for details, as well as the special handling for Microsoft-signed files.
UnsafePaths... - called out in rule name and description when hash rule is created for a signed file that doesn't have version information needed for a publisher rule;
Used new lower-granularity rules for provided OneDrive XML rules; dramatically reduces number of rules required.
Small difference in inert timestamp rule so that Compare-Policies shows it as a rule change instead of an added rule + a deleted rule
Scan-Directories.ps1 - fixed bug in -SearchAllUsersProfiles
Scan-Directories.ps1 also outputs BinaryName and BinaryVersion
Exe files to blacklist: added Microsoft.Workflow.Compiler.exe
"AaronLocker" updates (13 May 2019)
Hot on the heels of yesterday's changes, "AaronLocker" now handles EXE and DLL files with non-standard extensions. Scan a directory with, say, "*.pyd" files or "*.api" files or any other non-standard extension, the "AaronLocker" scripts now identify them, distinguish whether they are Win32 EXE or DLL rules, and builds rules to cover them.
Reminders of "AaronLocker" resources:
7 minute "Intro to 'AaronLocker:'"
https://youtu.be/nQyODwPR5qo
13 minute "AaronLocker Quick Start" - how to build, customize, and deploy robust and practical AppLocker rules quickly using AaronLocker:
https://youtu.be/E-IrqFtJOKU
All scripts and full documentation on GitHub:
https://github.com/Microsoft/AaronLocker
Blog posts:
https://blogs.msdn.microsoft.com/aaron_margosis/tag/aaronlocker/
"AaronLocker" updates (22 May 2019)
Always handles Portable Executable files even with non-standard extensions such as .tmp and determines whether it's an EXE or DLL. (Ignores files with extensions that should never be PE files such as .txt).
Ignores .js files by default; switches on scripts enable overriding to build rules for .js. (AppLocker enforced on .js files only through Windows Script Host; most .js files are processed by other tools that do not enforce AppLocker rules).
Added -SearchNonDefaultRootDirs to Scan-Directories.ps1; makes it quicker to identify files that might need AppLocker rule customization.
Improved optimization to lead to more publisher rules and fewer hash rules, where possible.
Documentation updated.
Download here: AaronLocker
"AaronLocker" videos on YouTube
7 minute "Intro to 'AaronLocker'," a set of PowerShell scripts that automate AppLocker-related tasks to achieve robust, practical, customizable, and maintainable application whitelisting for Windows. https://youtu.be/nQyODwPR5qo
13 minute "AaronLocker Quick Start:" how to build, customize, and deploy robust and practical AppLocker rules quickly using AaronLocker. https://youtu.be/E-IrqFtJOKU
ANNOUNCING: Application whitelisting with "AaronLocker"
[Update 11 Oct 2018: "AaronLocker" v0.91 released]
Announcing the pre-release (v0.9) of "AaronLocker:" robust and practical application whitelisting for Windows.
AaronLocker is designed to make the creation and maintenance of robust, strict, AppLocker-based whitelisting rules as easy and practical as possible. The entire solution involves a small number of PowerShell scripts. You can easily customize rules for your specific requirements with simple text-file edits. AaronLocker includes scripts that document AppLocker policies and capture event data into Excel workbooks that facilitate analysis and policy maintenance.
AaronLocker is designed to restrict program and script execution by non-administrative users. Note that AaronLocker does not try to stop administrative users from running anything they want – and AppLocker cannot meaningfully restrict administrative actions anyway. A determined user with administrative rights can easily bypass AppLocker rules.
AaronLocker's strategy can be summed up as: if a non-admin could have put a program or script onto the computer – i.e., it is in a user-writable directory – don't allow it to execute unless it has already been specifically allowed by an administrator. This will stop execution if a user is tricked into downloading malware, if an exploitable vulnerability in a program the user is running tries to put malware on the computer, or if a user intentionally tries to download and run unauthorized programs.
AaronLocker works on all supported versions of Windows that can provide AppLocker.
A personal note: the name "AaronLocker" was Chris (@appcompatguy) Jackson's idea – not mine – and I resisted it for a long time. I finally gave in because I couldn't come up with a better name.
For now, download AaronLocker here from the updated page (I will move it to GitHub sometime soon). The zip file contains full documentation, all the scripts, and sample outputs.
"Defrag Tools" - a new Channel 9 series (that will talk a lot about Sysinternals utilities)
My colleague and debug super-guru Andrew Richards sent this announcement out earlier today:
Larry Larsen, Andrew Richards and Chad Beeder are pleased to announce our new Channel 9 show called Defrag Tools .
https://channel9.msdn.com/Shows/Defrag-Tools
Each week, the show dives deep in to a support tool - how to get it, how to configure it, how to use it, and how to be an expert at using it. New episodes are released each Monday (RSS feed).
Today's episode (Ep. #2) covers Process Explorer. The next two weeks are on Process Monitor, and then the next week is on Autoruns.
If you have favorite support tool that you'd like to see covered (sooner than later), email us at defragtools@microsoft.com
Enjoy!
EventCreate and "ERROR: Source parameter is used to identify custom applications/scripts only"
EventCreate.exe is a command line utility that comes with Windows that lets you write events into the Windows event log and to create custom event sources. For example, this command line creates an Information event in the Application log, associated with the source "MyStuff":
EventCreate /L APPLICATION /SO MyStuff /ID 1 /T INFORMATION /D "Text that goes into the event"
If the "MyStuff" source doesn't exist, EventCreate creates it, assuming the user has the necessary permissions.
I recently came across an undocumented quirk that causes EventCreate to fail and to report this error message:
ERROR: Source parameter is used to identify custom applications/scripts only (not installed applications).
I chased this one down and finally determined what causes it. For whatever reason, EventCreate was designed only to log events that are associated with event log sources that EventCreate created. It does this by adding a REG_DWORD value called CustomSource in the source's registry key when it creates a new source, and checking for that value for a source that already exists. So in the above example, if the "MyStuff" source didn't already exist in the Application log, the above command would have created it and configured its key with a CustomSource value. Subsequent calls to EventCreate with the same source would succeed after verifying the existence of the CustomSource value. If, however, the "MyStuff" source had been created through another mechanism that didn't create a CustomSource flag, such as with the PowerShell New-EventLog cmdlet, then you'd get the error message. If you create a CustomSource value in an event source's key, then EventCreate will work with that source. (The key associated with an event source is HKLM\System\CurrentControlSet\Services\EventLog\logname\sourcename. E.g., HKLM\System\CurrentControlSet\Services\EventLog\Application\MyStuff.)
There's more to it when /SO isn't specified, but at that point I had figured out what I needed to unblock my work and lost interest. It's left as an exercise to the more bored.


Comments
Post a Comment