Skip to main content
Hyper-V Powershell module not installed during Bare Metal Deployment
Achieving over 1-Million IOPS from Hyper-V VMs in a Scale-Out File Server Cluster using Windows Server 2012 R2
Hi,
I'd like to point you to a Whitepaper from your Development Group that impressively shows how to build High Performance Hyper-V Clusters today.
https://www.microsoft.com/en-ie/download/details.aspx?id=42960
Cheers
Robert
After installing Hyper-V Integration Services on the next reboot the VM displays BSOD 0x0000007B
Hi,
Recently, I had some customers with VMs they just P2V'ed, or even had them running already on Virtual Server or Hyper-V. Now, they installed the latest Integration Components that came with the R2 Release.
After the required reboot, the VM shows a Bluescreen 0x0000007B INACCESSIBLE_BOOT_DEVICE
During Debugging I found that the Storage Driver of the ICs require the Windows Driver Framework (WDF), which was not loaded in this case. So the Storage Driver fails to load.
Looking into the Registry of the VM, shows that the WDF Driver was already installed previously, but had the wrong Group relationship, so it is initialized too late.
So here's how to fix this issue:
1. Boot the VM into LastKnownGood. Press F8 during boot.
2. Open the Registry and drill down to HKEY_LOCAL_MACHINE\SYSTEM\CurrentControlSet\Services\Wdf01000
3. There is a Group Value that should have the Value WdfLoadGroup. In my cases it was wrongly set to base. Change this to WdfLoadGroup
4. Then remove the Integration Components from Control Panel/Software.
5. Reboot the VM (now without ICs)
6. Install the ICs once again
Cheers
Robert
Availability of Hotfix Rollup package for System Center Virtual Machine Manager 2008 R2
Update: Meanwhile there is a further Februar Rollup available:
Description of the System Center Virtual Machine Manager 2008 R2 hotfix rollup package: February 9, 2010
https://support.microsoft.com/default.aspx?scid=kb;EN-US;978560
Please note that when you installed the Rollup, you need to allow the Host agents to be updated, as described here:
https://blogs.technet.com/mbriggs/archive/2010/02/25/host-in-needs-attention-state-after-installation-of-kb978560.aspx
/Update End
Recently we published a Rollup Fix for System Center Virtual Machine Manager 2008 R2, and an Update for the Management Console on Microsoft Update.
Description of the System Center Virtual Machine Manager 2008 R2 hotfix rollup package: November 10, 2009
https://support.microsoft.com/kb/976244
When you remove a virtual hard disk from a virtual machine in System Center Virtual Machine Manager 2008 R2, the .vhd file on the Hyper-V server is deleted without warning
https://support.microsoft.com/kb/976246
When your SCVMM Server or Admin Client is not directly connected to the Internet you may have the need to download the package from another machine
You can get the fixes from https://catalog.update.microsoft.com and specifying Article 976244 and/or 976246.
You'll get .cab files containing .msp files which you can install from an elevated Command Prompt.
To install the Server rollup specify:
msiexec /p vmmServer64update.msp BOOTSTRAPPED=1
To install the Client rollup specify:
msiexec /update vmmClient64Update.mspBOOTSTRAPPED=1
or, if your Admin Machine is 32bit :
msiexec /update vmmClient32Update.mspBOOTSTRAPPED=1
Cheers
Robert
Availability of Hotifx Rollup package for System Center Virtual Machine Manager 2008
Recently we published a Rollup for System Center Virtual Machine Manager 2008 on Microsoft Update.
https://support.microsoft.com/kb/961983/en-us
When your SCVMM Server is not directly connected to the Internet you may have the need to download the package from another machine
You can get the fix from https://catalog.update.microsoft.com and specifing Article 961983.
You receive a package containing a file vmmServer64update.msp
Transfer this file to the target SCVMM server and install it with the following command:
msiexec /p vmmServer64update.msp BOOTSTRAPPED=1
Cheers,
Robert
BITS Compact Server cannot process the request for the following URL in the %1 URL group: %2. The request failed in step %3 with the following error: %4.
Hi,
Windows Server 2008 R2 has a new feature component: Bits Compact Server! This is a lightweight Server for Background Intelligent Transfer Service.
SCVMM 2008 R2 makes use of it and enables this feature on the Hyper-V Hosts during Agent installation.
Recently, I had a customer where all Bits Transfers (creatíng, migration, etc) to one particular Host where failing.
ERROR CODE: 0x80072efe
ERROR CONTEXT: 0x00000005
The error in Eventlog is:
Following warning is logged in BITS analytic log:
Log Name: Microsoft-Windows-Bits-CompactServer/Analytic
Source: Microsoft-Windows-Bits-CompactServer
Date: 16.09.2009 0:49:22
Event ID: 50
As it turned out, removing the host (in this case all cluster nodes) from SCVMM, deleting the Certificates and adding the hosts back to SCVMM resolved the issue.
These steps are also described in here: https://blogs.technet.com/scvmm/archive/2009/07/20/vm-creation-may-fail-and-stall-with-copying-0kb-of-16gb.aspx
Cheers
Robert
Building a teamed virtual switch for Hyper-V from SCVMM
Hi!
A common question today is how to setup your cluster blades with (10GB) Ethernet connections. How do I configure that correctly with the following requirements:
- A LBFO (Load Balanced FailOver) Team of the available physical Connections.
- Several Networks which are controlled by QoS to not use up the entire channel.
Management Network
Cluster Network
iSCSI Network
Live Migration Network
(Optional) multiple isolated virtual networks
Let's see how this can be build using SCVMM 2012 R2.
I start with 2 Nodes. Each has 3 Ethernet interfaces. Ethernet1 is already used by a virtual switch (NodeSwitch). The Switch used Ethernet1 as a team with one NIC.
A virtual NIC vEthernet(Management) is exposed to give the Host Network connectivity
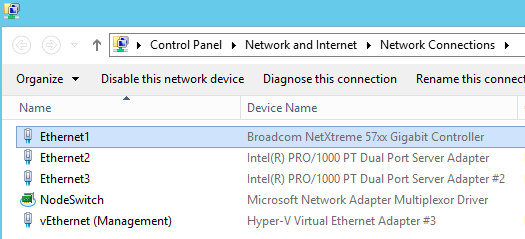
This Setup makes it easier to build the desired switch with the 2 remaining NICs, as I will always have connectivity during the creation of the new switch. Later, I can easily destroy the NodeSwitch and add Ethernet1 to the newly build Switch as 3rd NIC.
Let's start building:
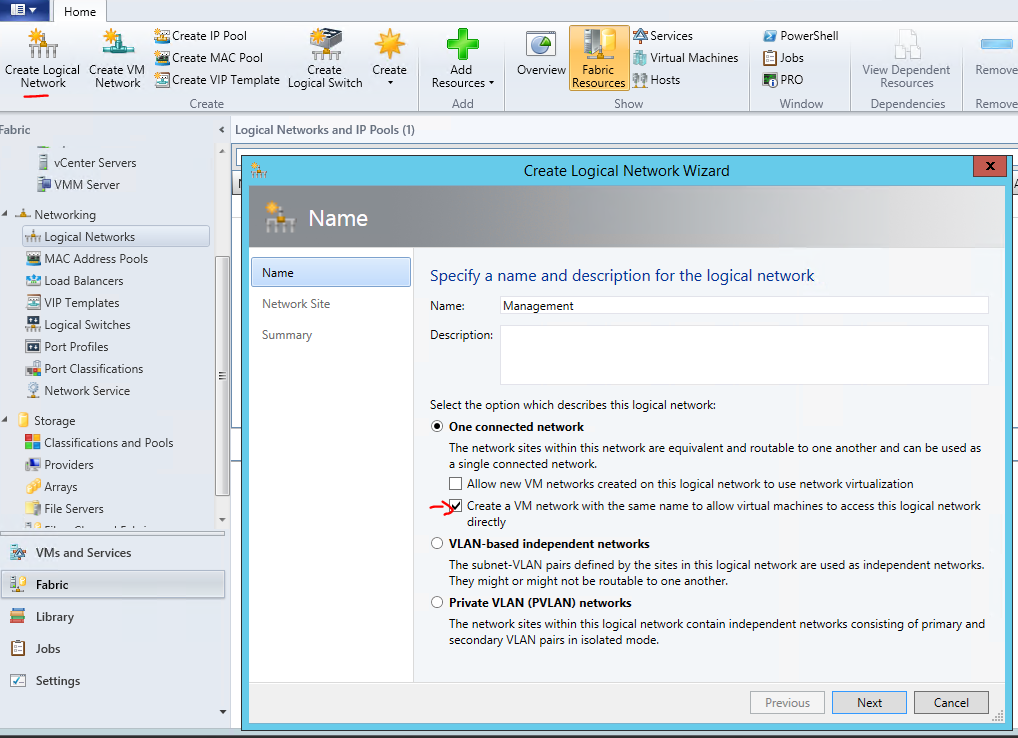
1. Define the Logical Networks the new Switch should connect to.
The Wizard allows you to already create an identical VM Network right here. As you always need a VM Network mapped to one logical Network let's use this.
First creating the "Management" Logical Network:
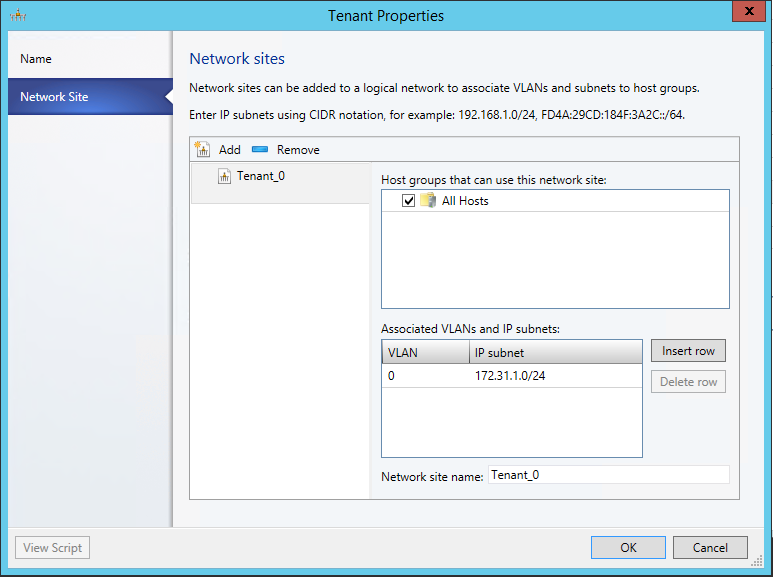
Add a Network site for this Logical Network. Here is the IP Address range for my management purposes. It matches my DHCP Scope, so I do not specify that again here.

Do the same steps to create the other Networks. To allow separation and QoS of those connections you have to work with own subnets on top of the existing network.
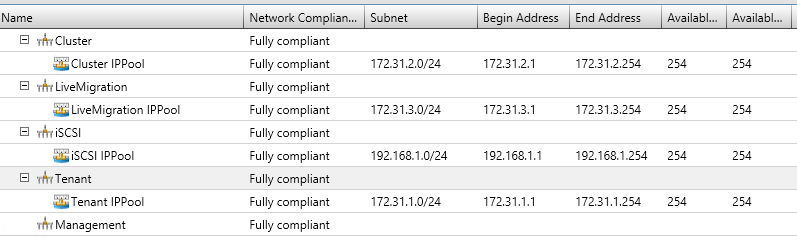
I use:
Tenant (172.31.10/24), Cluster (172.31.2.0/24), iSCSI (192.168.1.0/24) , Live Migration (172.31.3.0/24)
When adding the Network Sites for those specify the IP Subnet.
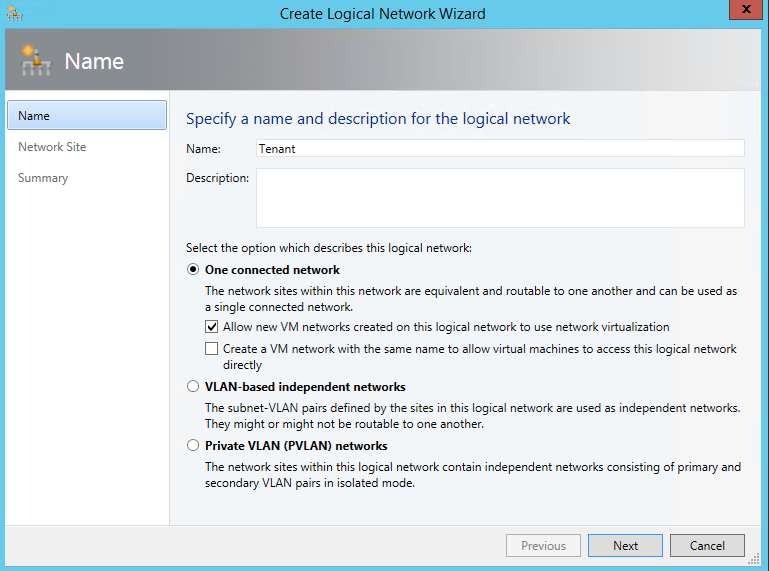
For the Tenant Network, specify to use Network virtualization and don't create the VM network yet.
As it uses Network virtualization we can connect several isolated VM Networks later (Red and Blue)
That results in the following logical Networks
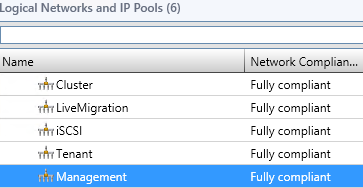
And corresponding VM Networks:

Back on logical Networks, create IP Pools on each Network so that VMM can give that out statically later. (I just accepted the defaults, after giving it a corresponding name…)
Just as Management Network is using DHCP in my case, no need for an IP Pool.
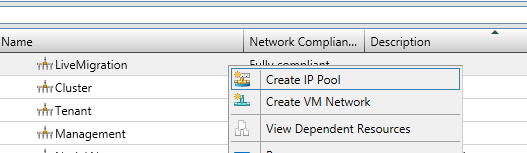
Now as we have created these Networks, we can start building the Switch Template using those.
(You can later create new Networks, and associate it with the Template, if you have to.)
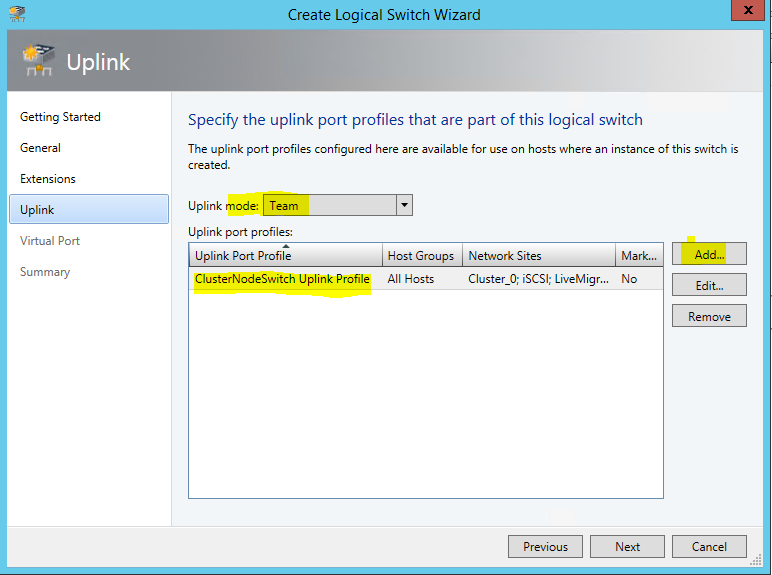
2. Define the Uplink Port Profile for your new switch.
We need to specify which networks are reachable by the switch.
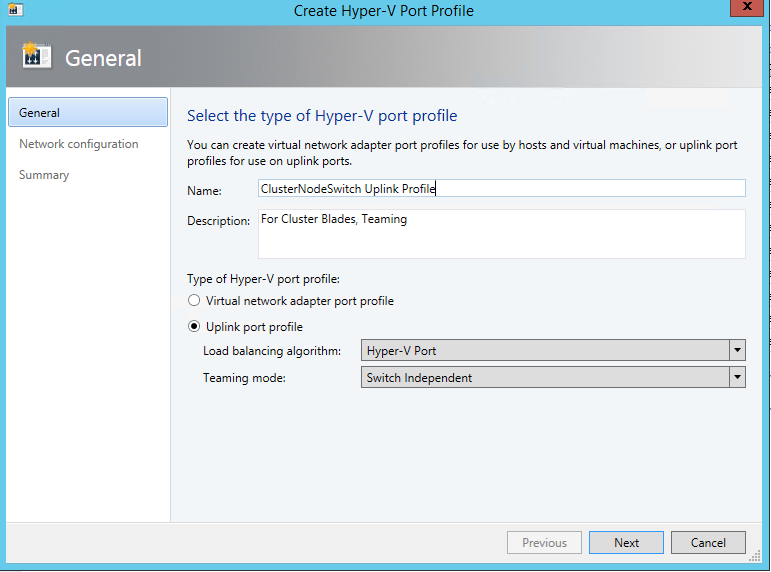
As I used the switch for VM's mainly, I use Hyper-V Port balancing.
Next, add all Network Sites this switch will be connected to, and enable Network virtualization too

NodeLN_0 belongs to my other Switch. So not connecting it here.
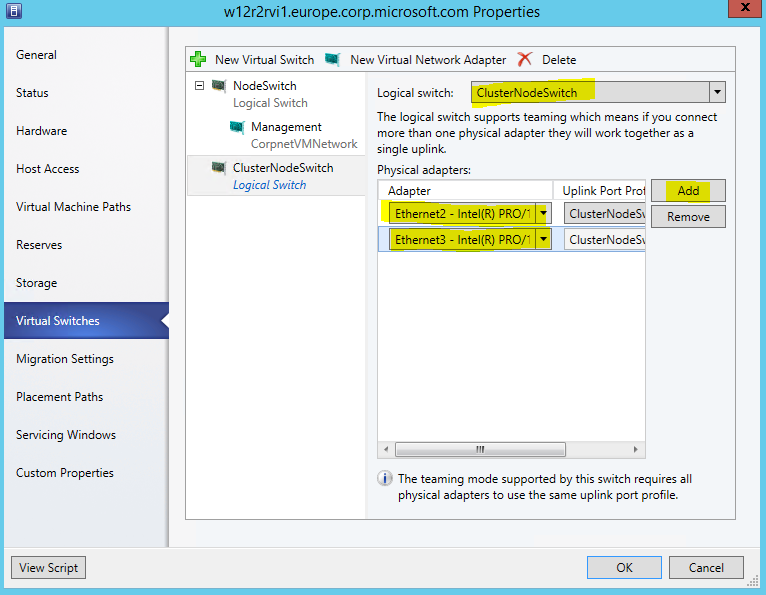
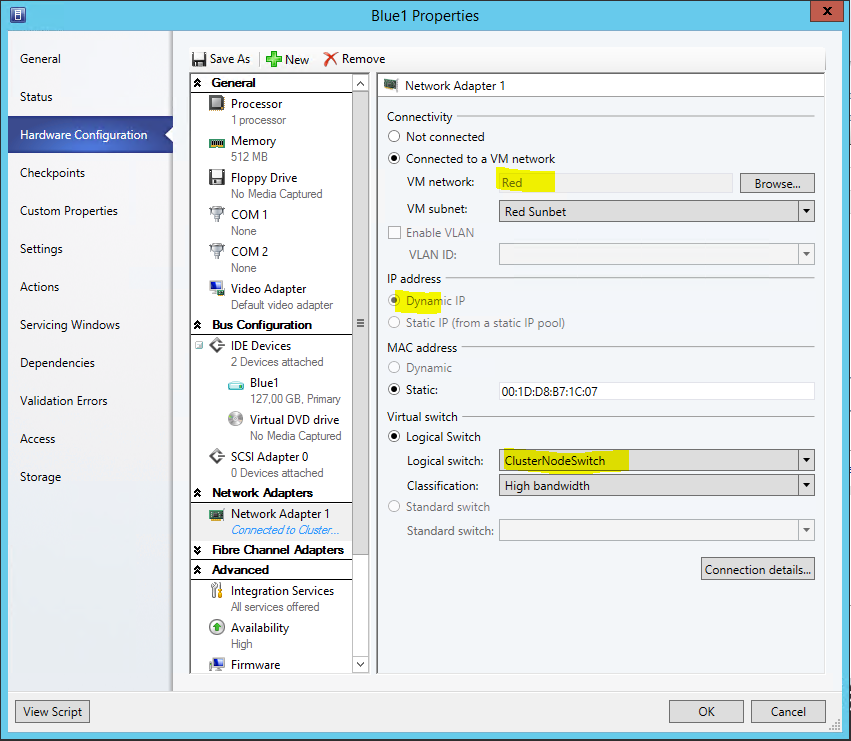
3. Create new Virtual Switch Template (Name ClusterNodeSwitch)
Here the important part is to select Uplink mode, and Add the previously created Uplink Port Profile
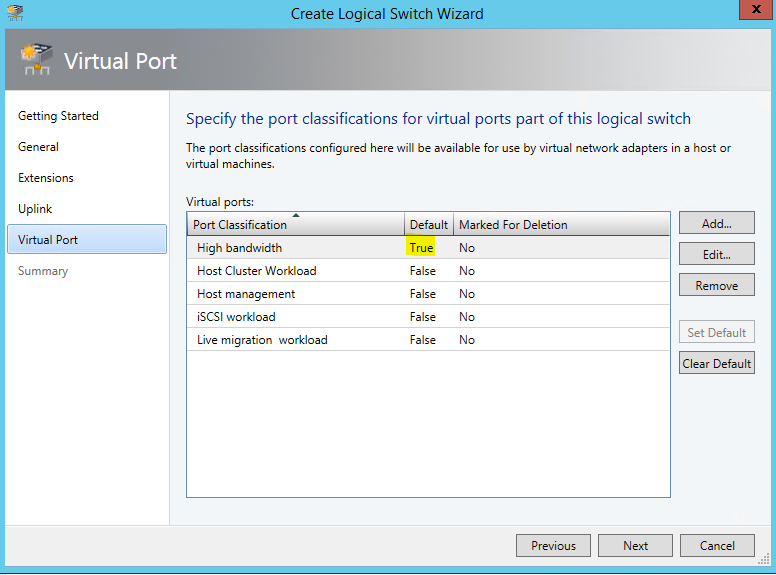
Next, we need to specify which Virtual Ports with which qualification should be available when later placing the switch. You could basically include every type here, and pic later the ones you need.
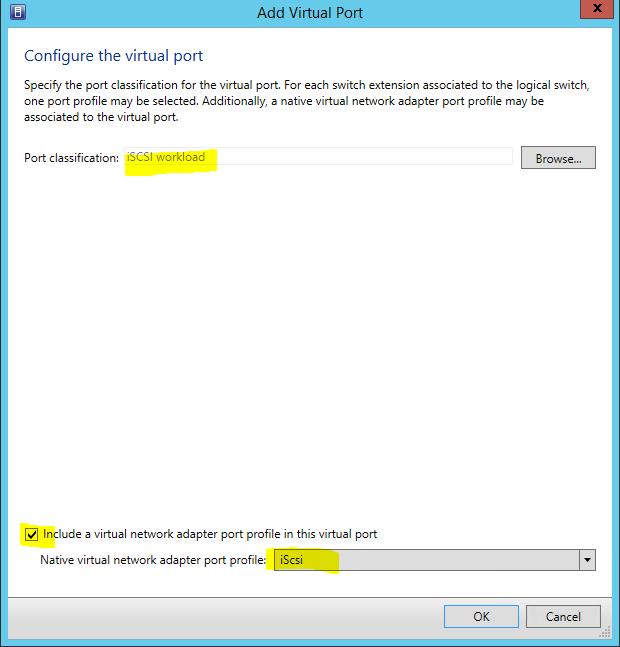
I did this for the possible networks I created previously. The Default helps to have the field prepopulated later when I assign VM Networks to VMs.
4. Finally, placing the switch on the nodes.
Here's one of my hosts properties before placing the switch: (as this was pre-existing, to how the differences later. There is no need to have this)
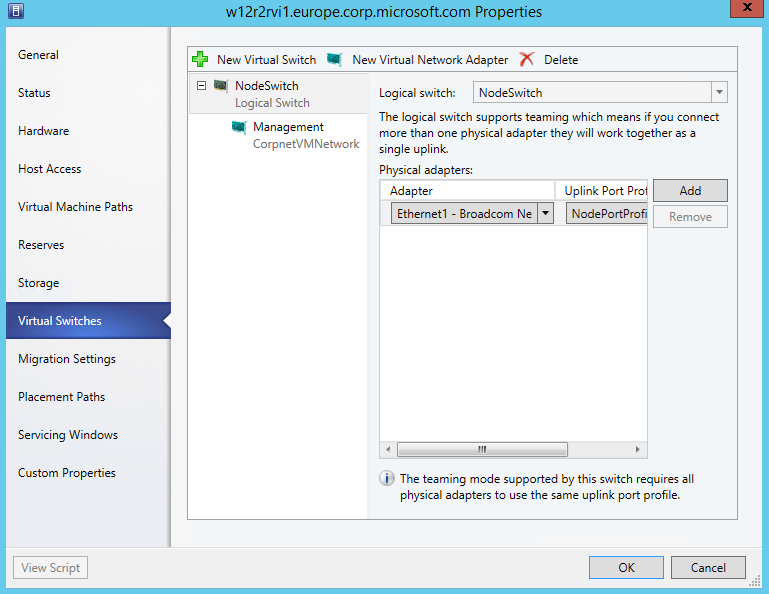
Start adding a New Logical Switch
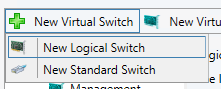
Select the right Switch Template, and adding the physical NICs
Now, create the Virtual Network Adapters the Host should have available for it's use. Otherwise it would have no connectivity.

I chose not to inherit the settings, as I have a already existing management connection. This is required if you have no other connection yet.
For all Networks I selected to pick a Static IP from the suggested pool

Do the same on the other nodes….
So in NCPA on one node this now shows as:
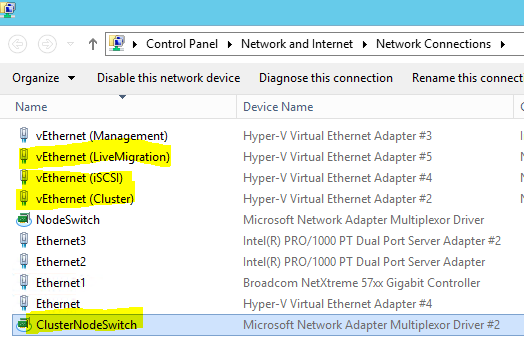
Ipconfig:
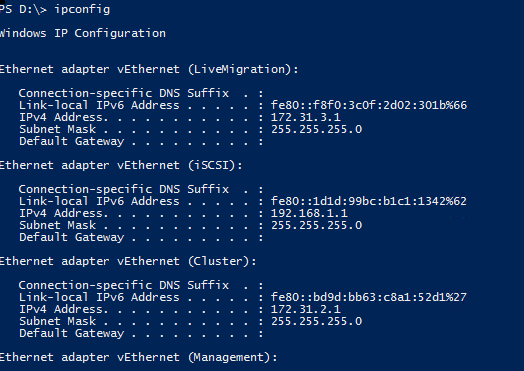
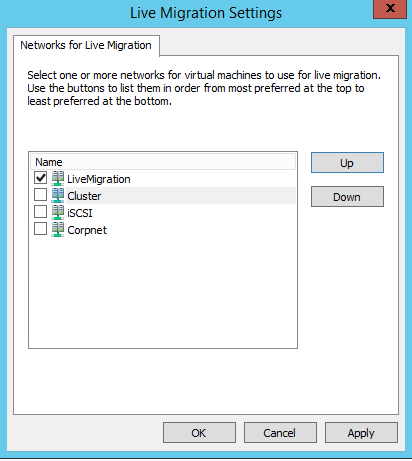
All those Networks also show up in Failover Cluster Manager. (I've given them the correct names based on the used IP already.
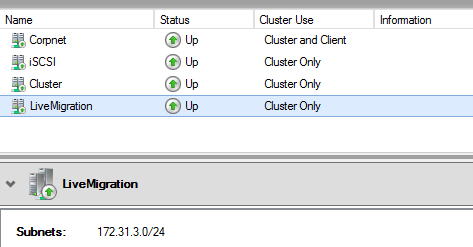
Now, select the correct Network for LiveMigration:
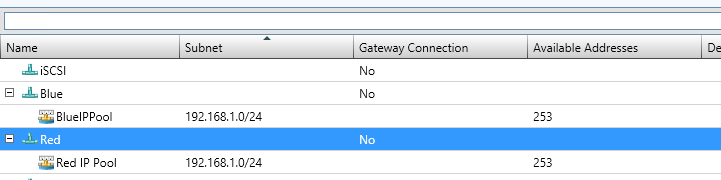
5. (Optional): Create Isolated BLUE and RED VM Networks
To run virtual networks with identical subnets, isolated, you create VM Networks that map to the Tenant Logical Network.
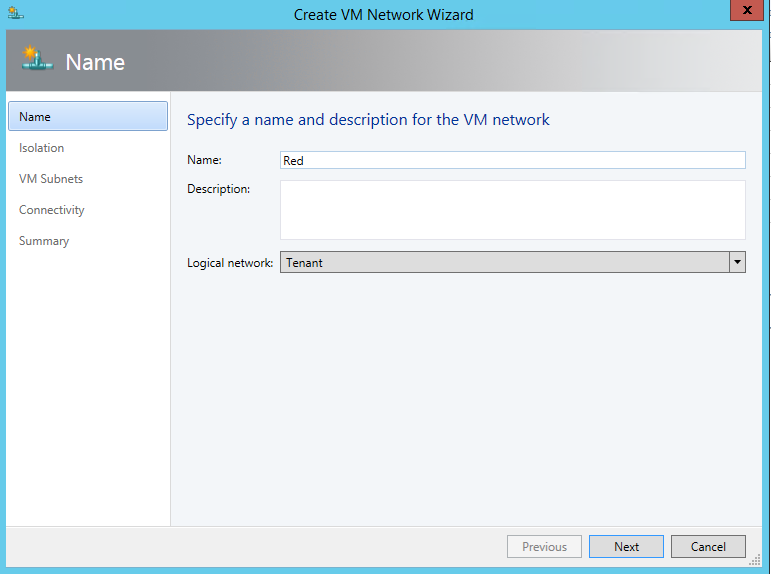
Give it a subnet that might seem to collide with your on premises or other VM Networks, but it's isolated.
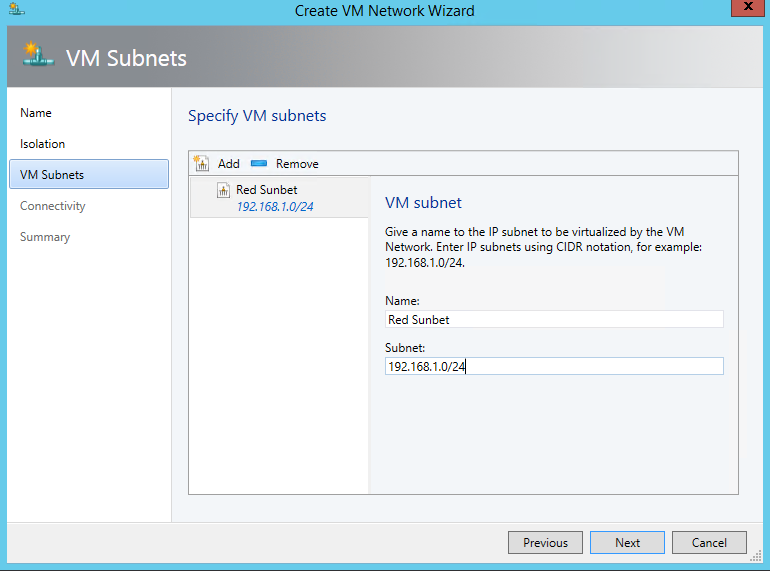
And we create an associated IP Pool, so that we can assign later IP addresses to the VM and they will receive them from a DHCP extension installed in every Hyper-V switch.
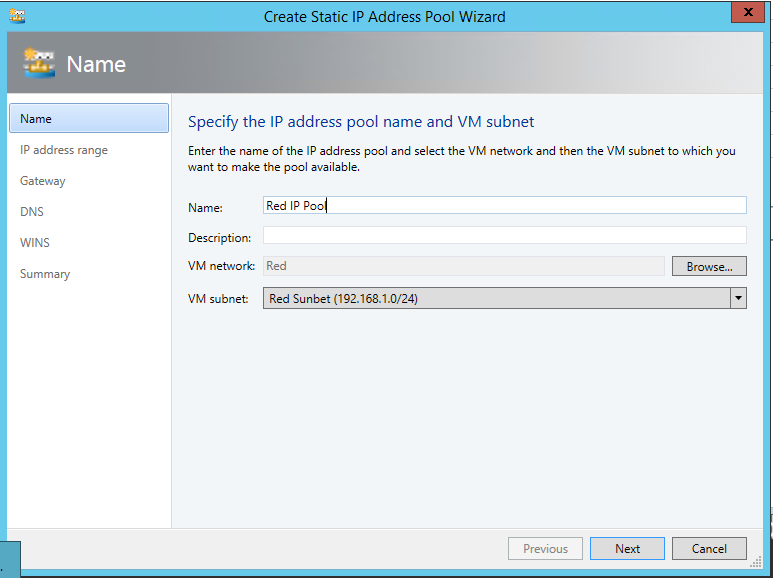
Doing the same for Blue, creates us two isolated VM networks.
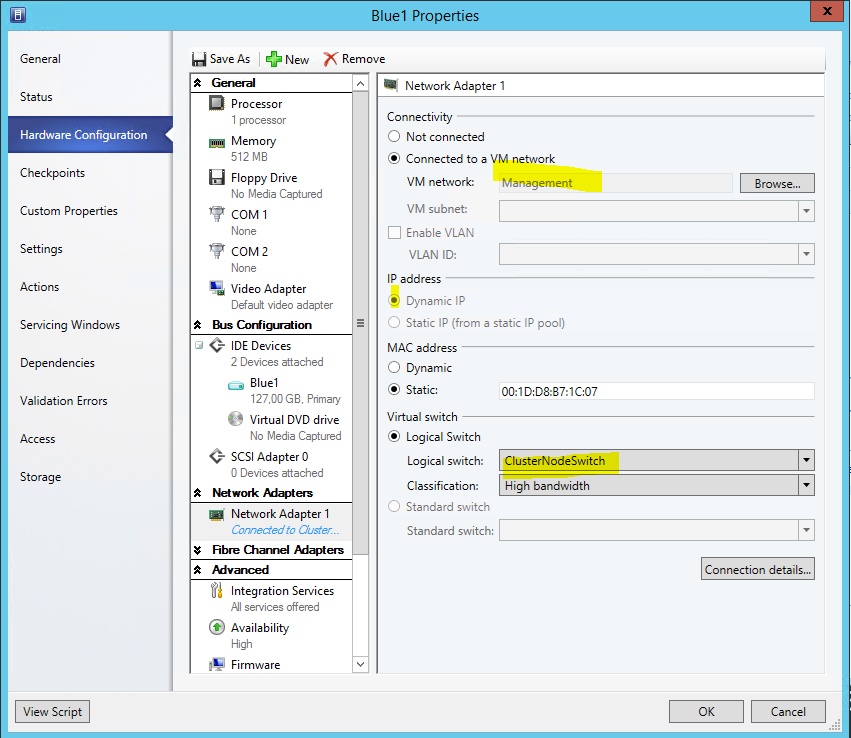
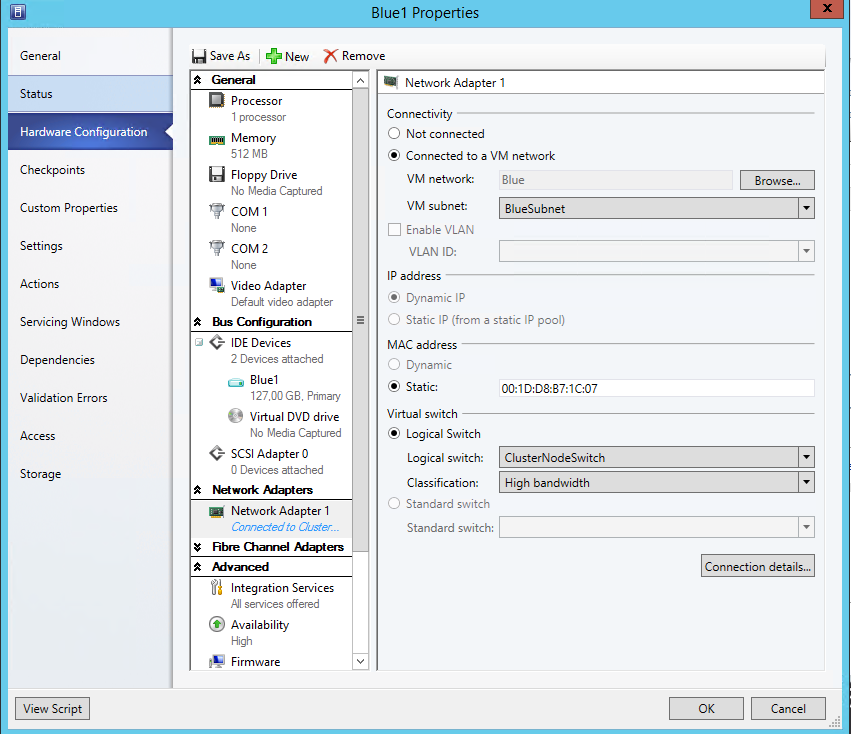
Now, to see that in action, I assign VMs to 3 different networks:
First, to my Management Network, it will get a DHCP address from there
Second, to the Blue Network, DHCP on the Hyper-V Switch will give out IP address here
Lastly, to the Red Network, DHCP on the Hyper-V Switch will give out IP address here of the Red scope:
I hope that helps you better understand and use this cool feature. It turns out handy when you configure more then just 2 nodes.
Cheers
Robert
Compliance Scan from SCVMM fails with Error (2927)
Hi,
recently, I had some occurrences of the following error while scanning the compliance state of particular hosts or clusters from SCVMM:
Error (2927)
A Hardware Management error has occurred trying to contact server <hostname> .
WinRM: URL: [https://<hostname>:5985], Verb: [INVOKE], Method: [ScanForUpdates], Resource: [https://schemas.microsoft.com/wbem/wsman/1/wmi/root/scvmm/UpdateManagement]
Unknown error (0x80338043)
Recommended Action
Check that
WinRM is installed and running on server <hostname>. For more Information use the command "winrm helpmsg hresult" and https://support.microsoft.com/kb/2742275
This happens because the answer of the host with the installed Hotfixes grows larger and needs to be fragmented. Here WinRM Needs to be updatedt to a later version.
To solve this problem you need to install "Windows Management Framework (WMF) 5.0" at least on your SCVMM Server.
At the time of this writing the Production Preview of WMF 5.0 is available at https://www.microsoft.com/en-us/download/details.aspx?id=48729
Cheers
Robert
Comprehensive List of Hyper-V Updates
I'm often getting asked for paritcular fixes required for Hyper-V . There is a comprehensive list published here:
https://technet.microsoft.com/en-us/library/dd430893.aspx
Note the links for other products like SCVMM and DPM.
Here is the list for Windows Server 2008 R2
https://technet.microsoft.com/en-us/library/ff394763(WS.10).aspx
Cheers
Robert
During Quick Migration the Virtual Machine Configuration resource stays in "Offline Pending"
I have seen this at a customer site. Whenver one VM was moved from one node to the other, it took hours.
During that the Virtual Machine Configuration resource in Failover Manager showed in "Offline Pending"
As it turned out, we found a self-referencing link in the Default Configuration folder. C:\ProgramData\Microsoft\Windows\Hyper-V
A dir in this folder showed a file that looked like this:
17.02.2009 11:56 <SYMLINK> 08CF336C-A430-4D3B-B47E-63AF9AE867E9.xml [C:\ProgramData\Microsoft\Windows\Hyper-V\Virtual Machines\08CF336C-A430-4D3B-B47E-63AF9AE867E9.xml]
This is a SYMLINK pointing to itself.
Normally, it should look similar to:
07/29/2008 02:15 PM <SYMLINK> 0DB03AC6-FB95-4F83-A52A-31A04A5154B0.xml [V:\CONTOSO\W2KDC\CONTOSO W2KDC\Virtual Machines\0DB03AC6-FB95-4F83-A52A-31A04A5154B0.xml]
Resolution: Delete the self-referencing link(s) on all nodes,and restart the VMMS Service.
Please drop me a short note if you figure out how to get into this sitation.
Cheers
Robert
E-Book on MS Virtualization Solutions
Just got a link to this free edition. It covers Hyper-V, SCVMM, MED-V and more. I browsed the Hyper-V section and it appears to be very profound.
Free E-Book: Understanding Microsoft Virtualization Solutions
Cheers
Robert
Error Applying New Virtual Network Changes
When you create a new switch and assign it a pyhsical Network card, you might see this error.
Error Applying New Virtual Network Changes
Setup switch failed
The switch could not bind to <physical NIC name> because it is already bound to another switch.
This might happen if you used this NIC with a switch before and later removed the switch. The physical NIC on the host is still connected to the switch Protokoll and cannot be added a second time.
Solution:
Use NCPA.CPL on your host and check the properties of the physical NIC. If it's already bound to the switch Protocol, uncheck this binding and try again.
Cheers
Robert
Error Message: The server encountered an error while creating "Name of the VM"
Recently, I worked on the below issue and though this might be worth to blog:
On a Hyper-V Server, existing VMs where running just fine, however, we could not create new VMs. The error at the final stage of the Wizard was:
The server encountered an error while creating "Name of the VM"
The operation failed
Failed to create external configuration store at <Path to the VM>: A required privilege is not held by the client. (Virtual machine ID 0x80070522)
As it turned out, the Virtual Machine Management Server was not able to create a symbolic link for the machine at "%systemdrive%\programdata\Microsoft\Windows\Hyper-V\Virtual Machines"
By default the local User Right "Create Symbolic links" is assigned to the Adminstrators group. Once you install Hyper-V a extension is installed on this machine that allows Service SIDs to be used and the Service SID "Virtual Machines" is allowed to "Create Symbolic links"
Now, you might have the requirement to configure the User Right "Create Symbolic links" with a Domain GPO. Once configured it replaces the local assignment, and for Hyper-V Hosts you'd need to add the "Virtual Machines" Service SID. The Domain Controller is most likely not a Hyper-V Host, and does not have the necessary Hyper-V extension. Also the GPO Admin tools will not allow you to browse the Service SID namespace. Simply adding the string "Virtual Machines" does not help either as it needs to have the Hyper-V Service SID Prefix "NT VIRTUAL MACHINES".
To get the necessary Service SID added, you need to edit the GptTmpl.inf that is associated with the GPO on the Sysvol directly. [You need to locate the correct GptTmp.inf by the GPO's Unique ID]
Example with Administrators and added "Virtual Machines"
….
[Privilege Rights]
SeCreateSymbolicLinkPrivilege = *S-1-5-32-544, NT Virtual Machine\Virtual Machines
…
Cheers
Robert
Errors discovered during backup of VHDS in guest clusters
Hi,
with Windows Server 2016 we introduced VHD Sets to create a shared virtual disk to be used with guest clusters. We also introduced production checkpoints to create application consistent backups.
Recently, I worked on a case where this may fail, and would like to share the Error codes and their reason:
Error code: '32768'. Failed to create checkpoint on collection 'Hyper-V Collection'
Reason: We failed to query the cluster service inside the Guest VM. Check that cluster feature is installed and running.
Error code: '32770'. Active-active access is not supported for the shared VHDX in VM group
Reason: The VHD Set disk is used as a Cluster Shared Volume. This cannot be checkpointed
Error code: '32775'. More than one VM claimed to be the owner of shared VHDX in VM group 'Hyper-V Collection'
Reason: Actually we test if the VHDS is used by exactly one owner. So having 0 owner also creates this error. The reason was that the shared drive was offline in the guest cluster
Hope this helps you to identify backup problems easier.
Cheers
Robert
Getting some more info about my .vhd and .avhd files.
I often have the need to get more info on the .vhd and .avhd (Snapshots or Differencing) files. I use the below .vbs script to read the info from the file.
Here's a sample output:
C:\VMs\mergetest\>cscript vhdinfo.vbs C:\VMs\mergetest\mergetest\mergetest_23855B6F-070C-426D-82FC-94E2916391EC.avhd
Microsoft (R) Windows Script Host Version 5.8
Copyright (C) Microsoft Corporation. All rights reserved.
VHDInfo.vbs v1.00 robertvi 091217
Cookie .................... conectix
Feature.................... 2
Format .................... 65536
Creator ................... win
Creator Host OS............ Wi2k
Disk Type.................. Differencing
Saved State................ 0
Dynamic Info
Cookie .................... cxsparse
Parent .................... C:\VMs\mergetest\mergetest\mergetest.vhd
VHDSize 328191
Finished!
The most used info is Parent to identify the Parent of a snapshot
copy and paste the below and save as vhdinfo.vbs
Option Explicit
WScript.Echo "VHDInfo.vbs v1.01 robertvi 091217"
' common consts
Const TypeBinary = 1
' getting file from args (no checks!)
Dim arguments, inFile
Set arguments = WScript.Arguments
inFile = arguments(0)
Dim inByteArray, disktype
inByteArray = readBytes(inFile)
' Basic Footer
'ByteArray2Text(inByteArray)
WScript.Echo "Cookie .................... " & ByteArray2Text(inByteArray,0,8)
WScript.Echo "Feature.................... " & ByteArray2DWORD(inByteArray,8)
WScript.Echo "Format .................... " & ByteArray2DWORD(inByteArray,12)
WScript.Echo "Creator ................... " & ByteArray2Text(inByteArray,28,4)
WScript.Echo "Creator Host OS............ " & ByteArray2Text(inByteArray,36,4)
disktype = ByteArray2DWORD(inByteArray,60)
If disktype = 1 Then WScript.Echo"Disk Type.................. Reserved(deprecated)" End If
If disktype = 2 Then WScript.Echo"Disk Type.................. Fixed" End If
If disktype = 3 Then WScript.Echo"Disk Type.................. Dynamic" End If
If disktype = 4 Then WScript.Echo"Disk Type.................. Differencing" End If
If disktype = 5 Then WScript.Echo"Disk Type.................. Reserved(deprecated)" End If
If disktype = 6 Then WScript.Echo"Disk Type.................. Reserved(deprecated)" End If
If disktype >= 6 Then WScript.Echo"Disk Type.................. Unknown!" End If
'bare with me, if it would be C i would have used switch
WScript.Echo "Saved State................ " & ByteArray2DWORD(inByteArray,84)
'Dynamic Info
If disktype = 3 Then
WScript.Echo vbCrLf & "Dynamic Info"
WScript.Echo "Cookie .................... " & ByteArray2Text(inByteArray,512,8)
End If
If disktype = 4 Then
WScript.Echo vbCrLf & "Dynamic Info"
WScript.Echo "Cookie .................... " & ByteArray2Text(inByteArray,512,8)
WScript.Echo "Parent .................... " & ByteArray2UText(inByteArray,1536,512)
End If
WScript.Echo vbcrlf & "VHDSize " & UBound(inByteArray)
WScript.echo "Finished!"
private function readBytes(file)
dim inStream
' ADODB stream object used
set inStream = WScript.CreateObject("ADODB.Stream")
' open with no arguments makes the stream an empty container
inStream.Open
inStream.type= TypeBinary
inStream.LoadFromFile(file)
readBytes = inStream.Read()
end function
Function ByteArray2Text(varByteArray,offset,lenght)
Dim strBuffer, lngCounter, strData
strData = ""
strBuffer = ""
For lngCounter = offset to offset+lenght-1
strBuffer = strBuffer & Chr(255 And Ascb(Midb(varByteArray,lngCounter + 1, 1)))
Next
ByteArray2Text = strData & strBuffer
End Function
Function ByteArray2UText(varByteArray,offset,lenght)
Dim strBuffer, lngCounter, strData
strData = ""
strBuffer = ""
For lngCounter = offset to offset+lenght-1 Step 2
strBuffer = strBuffer & Chr(255 And Ascb(Midb(varByteArray,lngCounter + 1, 1)))
Next
ByteArray2UText = strData & strBuffer
End Function
Function ByteArray2DWORD(varByteArray,offset)
Dim strBuffer, lngCounter, strData
strData = ""
strBuffer = ""
For lngCounter = 0 to 3
ByteArray2DWORD = ByteArray2DWORD * 256
ByteArray2DWORD = ByteArray2DWORD + Ascb(Midb(varByteArray,offset+ lngCounter + 1, 1))
Next
End Function
'*** End
How does a NIC inside a VM get a MAC address assigned?
Hi,
If you add a NIC to a VM, it needs a MAC address that should be unique (at least in the network segment) to avoid duplicate MAC conflicts.
In the properties for the VM you choose between a Dynamic or Static assignment. In case you select a Static MAC, it is your responsibility that they are unique.
As this is a FAQ, let me explain how your VM's get a dynamic MAC address:
Each host has a pool of MAC Addresses. By default the Pool holds 256 Addresses, and when asked gives them out in a Round Robin fashion.
The address range is generated when the Hyper-V Role is added, based on the IP Address of the Hyper-V host. Also see https://blogs.technet.com/b/jhoward/archive/2008/07/15/hyper-v-mac-address-allocation-and-apparent-network-issues-mac-collisions-can-cause.aspx
The Pool is controlled by the following values:
HKEY_LOCAL_MACHINE\SOFTWARE\Microsoft\Windows NT\CurrentVersion\Virtualization
MinimumMacAddress, MaximumMacAddress
The last given Address is:
HKEY_LOCAL_MACHINE\SOFTWARE\Microsoft\Windows NT\CurrentVersion\Virtualization\Worker
CurrentMacAddress
So the MAC address has 3 bytes fixed "00-15-5d", followed by 2 bytes specific to the current host, and one byte as the individual MAC in this Pool.
This algorithm works fine on a standalone host until you create less than 256 NIC's. Due to the Round Robin method, addresses are given out again.
Every time a VM is started, the dynamic MAC address assigned to the NIC is checked against this pool. If the MAC is outside of this pool, a new MAC is taken from the Pool and assigned to the NIC.
Again, this check is done during VM startup only. Not after a LiveMigration or VM resume. Unfortunately, your MAC Pool might get exhausted earlier when you frequently restart the VMs on a different Host, due to this check.
Knowing this, you might go and check the remaining MAC addresses on your host, ensure it hasn't wrapped already, and you might consider to enlarge the Pool, or use static MAC Addresses.
If you are using SCVMM, it has a default Pool of 1024 MAC Addresses. If you choose to set a static MAC Address from inside SCVMM, you can "Generate" one out of the SCVMM Pool.
Cheers
Robert
Howto manually add a VM Configuration to Hyper-V
With Hyper-V you cannot simply „Add" a configuration file to your Hyper-V machine as you could with Virtual Server. Mainly because of the use of Live Snapshots. The recommended way is to use Export and Import.
If you have a given VHD it is way easier to create a new VM and simply add the VHD to it. If you used snapshots, see my earlier blog on how to merge them to a new VHD.
However, recently a colleague had a customer issue, where we only had the flat directory structure and needed to restore that. Here's how we managed to get this running:
We start from a folder that contains the VM in v:\manualrecover
.
In this folder you usually have:
1. The machine VHD
2. The Virtual Machines Folder with
a: The <GUID>.xml File holding the machine Configuration
b: The <GUID> Folder
3. The Snapshots Folder with a <Snapshot GUID>.xml
Hyper-V uses a new Feature in Windows 2008 called Service SIDs. To access files from a VM, these files need to give this Service SID access permissions.
This SID is a combination of the Service SID ""NT VIRTUAL MACHINE" and the VM GUID
Example:
"NT VIRTUAL MACHINE\2F855D88-F990-47BA-95D6-0029BCD8C059"
Note, The GUIDS we used here are from our VM, You will need to adjust to the GUIDs used on your installation
=========================================================================
The first step to make this machine known to Hyper-V is to create a Symbolic link to the <GUID>.xml configuration files, in the following folder:
"%systemdrive%\programdata\Microsoft\Windows\Hyper-V\Virtual Machines"
We use the mklink command built into cmd.exe
C:\>mklink "%systemdrive%\programdata\Microsoft\Windows\Hyper-V\Virtual Machines\2F855D88-F990-47BA-95D6-0029BCD8C059.xml" "V:\manualrecover\Virtual Machines\2F855D88-F990-47BA-95D6-0029BCD8C059.xml"
The VM Name should now already appear in Hyper-V Manager. When using Windows Server 2008 R2, you might need to restart the vmms service to make the VMs visible at this point.
We need to add the Service SID to this Symbolic link so that Hyper-V is allowed to access it
C:\>icacls "%systemdrive%\programdata\Microsoft\Windows\Hyper-V\Virtual Machines\2F855D88-F990-47BA-95D6-0029BCD8C059.xml" /grant "NT VIRTUAL MACHINE\2F855D88-F990-47BA-95D6-0029BCD8C059":(F) /L
Note the /L parameter to indicate we work on a symbolic link
=========================================================================
We also need to give the Service SID access to all files of our VM
C:\>icacls v:\manualrecover\ /T /grant "NT VIRTUAL MACHINE\2F855D88-F990-47BA-95D6-0029BCD8C059":(F)
Note for simplicity we give Full Control, whereas the default is more granular
=========================================================================
If your machine had Snapshots, we also need to create another symbolic link
The snapshot itself has yet another guid.xml found in the snapshots folder.
C:\>mklink "%systemdrive%\ProgramData\Microsoft\Windows\Hyper-V\Snapshots\7DD74401-C2B4-4BD9-8079-3D48D8A78B32.xml" "V:\manualrecover\Snapshots\7DD74401-C2B4-4BD9-8079-3D48D8A78B32.xml"
Also give the Service SID access here too:
C:\>icacls "%systemdrive%\ProgramData\Microsoft\Windows\Hyper-V\Snapshots\7DD74401-C2B4-4BD9-8079-3D48D8A78B32.xml" /grant "NT VIRTUAL MACHINE\2F855D88-F990-47BA-95D6-0029BCD8C059":(F) /L
You will need to do the above for each individual snapshot!
=========================================================================
Before starting the VM, open the settings of the VM and assign the Network Adapters to the correct Switches, as those need to be created newly on the switch.
=========================================================================
NOTE:
This is not a supported way of adding a VM to Hyper-V. Use this just for disaster recovery, and once you are able to run the VM, backup your VM and recreate it from scratch.
If you restore to a different drive/ or folder, you may need to manually adjust the path to the VHD, and having Snapshots will make this far more complicated .
NOTE2: This procedure does not work on Windows Server 2008 R2.
Cheers
Robert
HowTo monitor the NIC used by a Virtual Machine in a Hyper-V cluster
Recently I had a customer with the following problem: Hyper-V Host Clusters don't support NIC Teaming. So I have my VM clustered, but my machine does not failover when the NIC used for that machine has a problem. E.g. Network cable unplugged.
One approach to workaround this, is to add a cluster resource script to the Cluster Group. Below is a script, with short instructions.
Please note, this is a sample script, so you should consider testing and modifications to adjust for your own needs.
Unfortunately, this approach is not applicable if you manage your cluster with SCVMM 2008, as it will mark your VM as "unsupported"
This "unsupporte cluster configuration" notice in SCVMM will go away with SCVMM 2008 R2, and a April updated to SCVMM 2008
Cheers
Robert
copy and paste the below and save as NicHa.vbs
'*******************************************************************************************************************************************************
' Nic HA Script. Sample. Please feedback to robertvi at microsoft.com
'
'INSTALL INSTRUCTIONS
'
' 1. copy this script to all cluster nodes into %windir%\cluster
' 2. In Failover Cluster Management Select the VM you wish to add NIC Monitoring
' 3. Select "Add a resource" -> Generic Script
' 4. Enter %windir%\cluster\nicha.vbs
' 5. Next, Finish. Note the name of the created resource (nicha Script)
' 6. Run ncpa.cpl
' 7. Identfiy the Phyiscl NIC that is used by the Switch for this VM (This NIC should only have the Switch Protocol bound)
' Usually something like "Local Area Connection"
' 8. Rename this NIC to something like "VM Network 1"
' 9. Do steps 6 to 8 on all cluster nodes
' 10. Open a Elevated CMD Prompt
' 11. Using the names from above, "nicha script", "VM Network 1"'
' 12. In cmd prompt, issue the following command: cluster res "nicha Script" /priv NicName="VM Network 1"
' 13. Online the Script Resource
'
'You may edit the properties of the Virtual Machine Group in Failover Cluster Management to allow more failovers in a given period.
'The Default of 2 may be reached easily during testing. The script resource will then fail, but the group will not move
'
'The availability of the NIC is checked every minute by default.
'This could be changed in the Advanced Properties of the Script Resource in the "Thorough resource health check interval", if needed
'
'
'
'*******************************************************************************************************************************************************
'*******************************************************************************************************************************************************
'*******************************************************************************************************************************************************
'Global variables
'*******************************************************************************************************************************************************
'Script Version
ScriptVersion = "0.2"
'*******************************************************************************************************************************************************
'Open()
'
'*******************************************************************************************************************************************************
Function Open()
On Error Resume Next
Resource.LogInformation("Entering Open() for NIC Monitoring Generic Script Version " & ScriptVersion)
If Resource.PropertyExists("NicName") = FALSE Then
Resource.AddProperty("NicName")
Resource.LogInformation("NICHA: Property NicName not configured")
End If
Open = 0
End Function
'*******************************************************************************************************************************************************
'Online()
'
'*******************************************************************************************************************************************************
Function Online()
'Check if the NIC is connected, otherwise fail Open
Online = 1
strComputer = "."
strNicName = Resource.NicName
strquery = "Select * from Win32_NetworkAdapter where NetConnectionID = '" & strNicName & "'"
Set objWMIService = GetObject("winmgmts:" _
& "{impersonationLevel=impersonate}!\\" & strComputer & "\root\cimv2")
Set colItems = objWMIService.ExecQuery(strquery)
if colItems.Count = 0 then
Resource.LogInformation("NICHA: Error - NIC not found")
set objWMIService = nothing
Set colItems = nothing
Exit Function
end if
set objItem = colItems.ItemIndex(0)
if objItem.NetConnectionStatus = 2 then
Online = 0
else
Resource.LogInformation("NICHA: Error - NIC not in connected state")
end if
set objWMIService = nothing
Set colItems = nothing
set objItem = nothing
End Function
'*******************************************************************************************************************************************************
'LooksAlive()
'
'Return success
'*******************************************************************************************************************************************************
Function LooksAlive()
On Error Resume Next
LooksAlive = TRUE
End Function
'*******************************************************************************************************************************************************
'IsAlive()
'
'*******************************************************************************************************************************************************
Function IsAlive()
On Error Resume Next
IsAlive = FALSE
strComputer = "."
strNicName = Resource.NicName
strquery = "Select * from Win32_NetworkAdapter where NetConnectionID = '" & strNicName & "'"
Set objWMIService = GetObject("winmgmts:" _
& "{impersonationLevel=impersonate}!\\" & strComputer & "\root\cimv2")
Set colItems = objWMIService.ExecQuery(strquery)
if colItems.Count = 0 then
Resource.LogInformation("NICHA: Error - NIC not found")
set objWMIService = nothing
Set colItems = nothing
Exit Function
end if
set objItem = colItems.ItemIndex(0)
if objItem.NetConnectionStatus = 2 then
IsAlive = TRUE
else
Resource.LogInformation("NICHA: Error - NIC not in connected state")
end if
set objWMIService = nothing
Set colItems = nothing
set objItem = nothing
End Function
'*******************************************************************************************************************************************************
'Offline()
'
'*******************************************************************************************************************************************************
Function Offline()
On Error Resume Next
Offline = 0
End Function
'*******************************************************************************************************************************************************
'Terminate()
'
'*******************************************************************************************************************************************************
Function Terminate()
On Error Resume Next
Terminate = 0
End Function
'*******************************************************************************************************************************************************
'Close()
'
'Return success
'*******************************************************************************************************************************************************
Function Close()
Close = 0
End Function
Howto move a Linux VM from Vmware to Windows Azure VM
Hi,
I just had a interesting task I'd like to share:
Customer had some Linux CentOS 6.3 VMs running on VmWare ESX. The task was to convert this machines to Windows Azure VMs. Here are the steps we made:
1. For the destination Platform Azure customer installed the Linux Integration Services into CentOS before starting the conversion. https://www.windowsazure.com/en-us/manage/linux/common-tasks/upload-a-vhd/ Step 4: Prepare the image to be uploaded
2. We then copied all files belonging to the VM(vmdk, vmx,nvram,….) to the Library Share of SCVMM 2012 SP1 installation
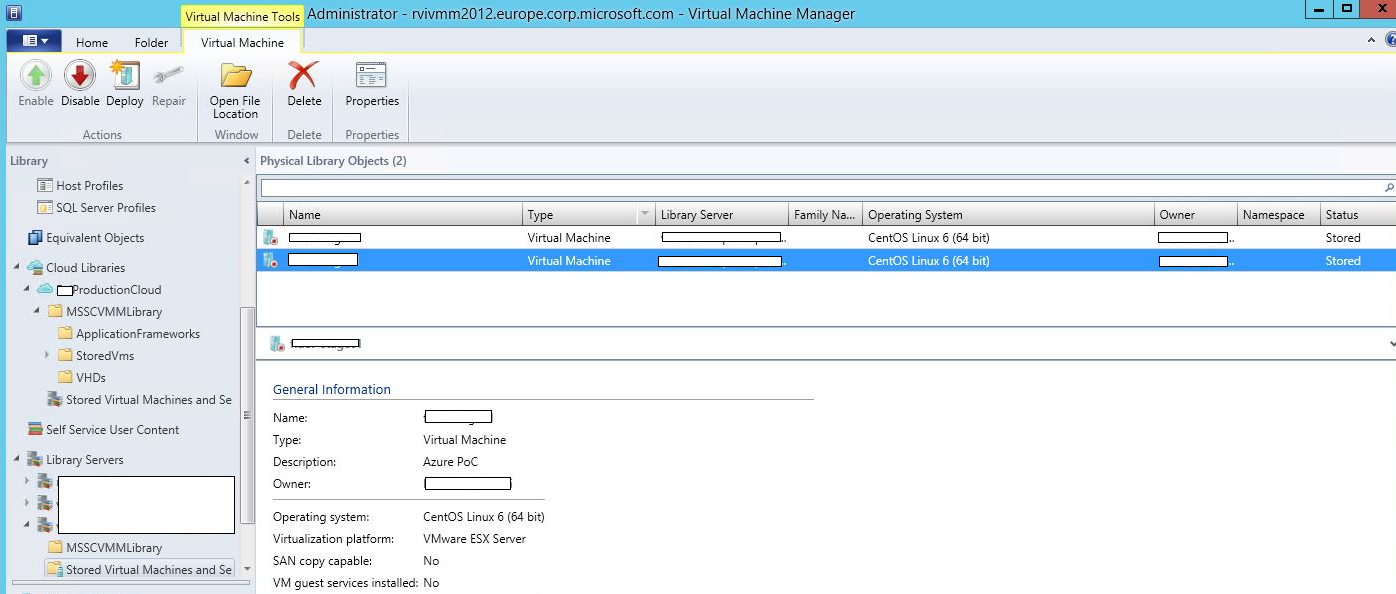
Two VMs in the SCVMM Library
3. From SCVMM we started to „Create a Vitual Machine", this time „Convert Virtual Machine" and selected the VM from the Library. This converts the VMware installation to a Hyper-V VM (with vhd) and deploys it to a Hyper-V host.

SCVMM does not know how to modify Linux VMs,so this Warnings are expected.
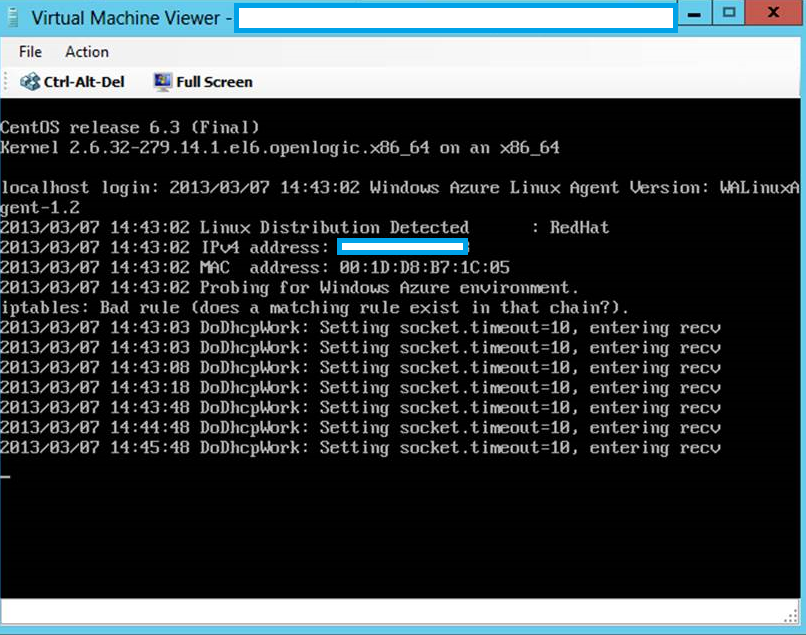
The VM with the Linux Integration Services, starting on Hyper-V. The WALinuxAgent tries to detect Azure Environment.
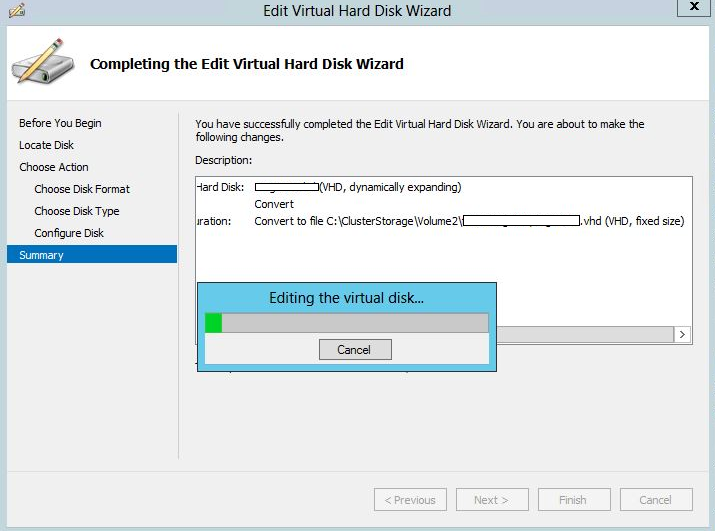
4. As Azure requires fixed size VHD format, we used Hyper-V Manager „Edit Disk", selected the previously converted vhd, and converted this to a new fixed size vhd.
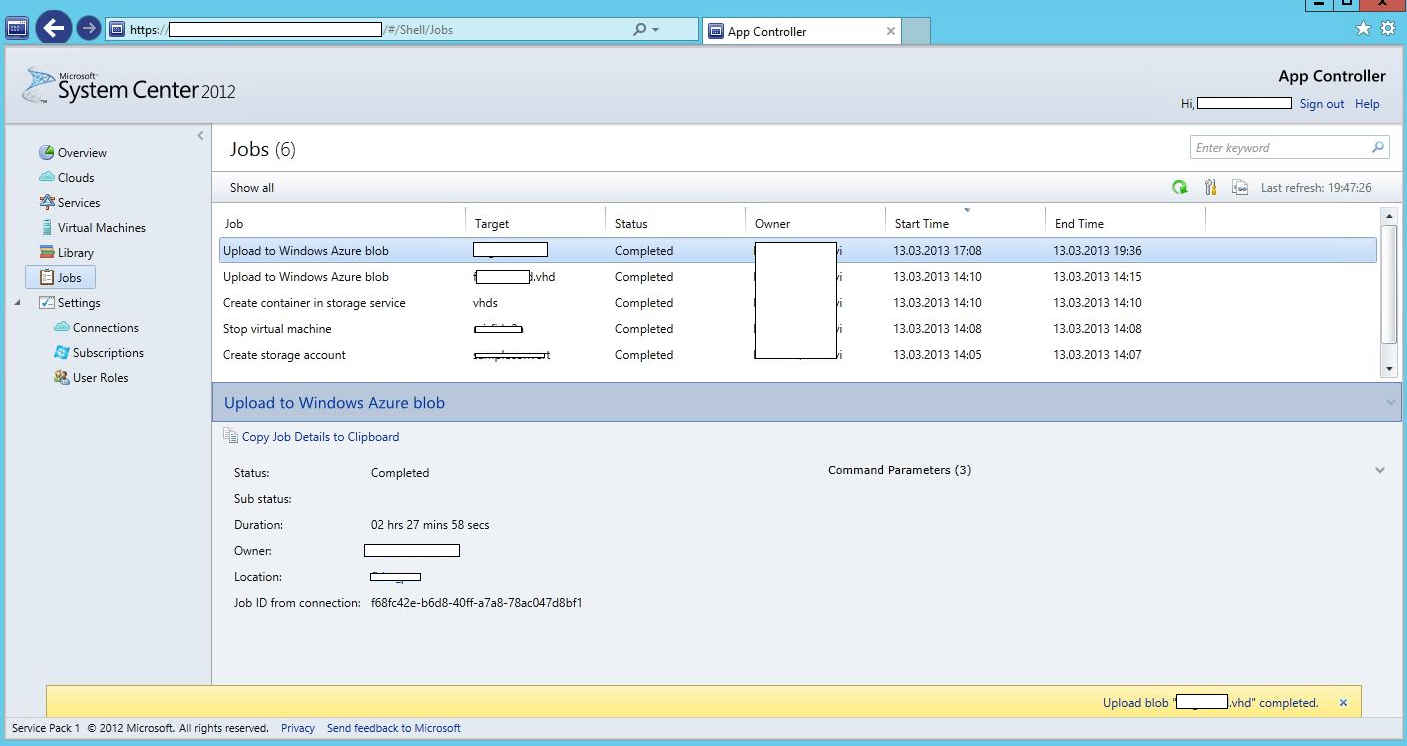
5. With App Controller 2012 SP1, we added the Share which holds the vhd. This allows to simply copy and paste the VM from the local share to the Azure Storage Blob.
6. Within Azure Portal, we created a Disk from this VHD, and build a VM with this Disk. (That could also be done with App Controller if you like)
Cheers
Robert
Hyper-V: Live Migration Network Configuration Guide
Hi,
we just release a guide on how to configure your Network Cards with Hyper-V https://technet.microsoft.com/en-us/library/ff428137(WS.10).aspx
I had the chance to check this out up front, and if you just don't have plenty of NIC's (>3), the approach to use Quality of Service (QoS), worked out rather nice for me.
Cheers
Robert
Hyper-V Powershell module not installed during Bare Metal Deployment
Hi,
I just had an issue that my 2012 Hyper-V Hosts did not have the new powershell commands available. (get-vm, etc)
I installed the Hosts using SCVMM 2012 SP1 (beta) using Bare Metal Deployment https://blogs.technet.com/b/cloudytom/archive/2012/01/02/scvmm-2012-bare-metal-deployment-checklist.aspx
As it turned out, this does not add the optional hyper-v powershell module.
To add them afterwards, use the following powershell command:
install-windowsfeature -name hyper-v -IncludeManagementTools
Cheers
Robert
Popular posts from this blog
[Excel] 문서에 오류가 있는지 확인하는 방법 Excel 문서를 편집하는 도중에 "셀 서식이 너무 많습니다." 메시지가 나오면서 서식을 더 이상 추가할 수 없거나, 문서의 크기가 예상보다 너무 클 때 , 특정 이름이 이미 있다는 메시지가 나오면서 '이름 충돌' 메시지가 계속 나올 때 가 있을 것입니다. 문서에 오류가 있는지 확인하는 방법에 대해서 설명합니다. ※ 문서를 수정하기 전에 수정 과정에서 데이터가 손실될 가능성이 있으므로 백업 본을 하나 만들어 놓습니다. 현상 및 원인 "셀 서식이 너무 많습니다." Excel의 Workbook은 97-2003 버전의 경우 약 4,000개 2007 버전의 경우 약 64,000개 의 서로 다른 셀 서식 조합을 가질 수 있습니다. 셀 서식 조합이라는 것은 글꼴 서식(예- 글꼴 종류, 크기, 기울임, 굵은 글꼴, 밑줄 등)이나 괘선(괘선의 위치, 색상 등), 무늬나 음영, 표시 형식, 맞춤, 셀 보호 등 을 포함합니다. Excel 2007에서는 1,024개의 전역 글꼴 종류를 사용할 수 있고 통합 문서당 512개까지 사용할 수 있습니다. 따라서 셀 서식 조합의 개수 제한을 초과한 경우에는 "셀 서식이 너무 많습니다." 메시지가 발생하는 것입니다. 그러나 대부분의 경우, 사용자가 직접 넣은 서식으로 개수 제한을 초과하는 경우는 드뭅니다. 셀 서식이 개수 제한을 넘도록 자동으로 서식을 추가해 주는 Laroux나 Pldt 같은 매크로 바이러스 에 감염이 되었거나, 매크로 바이러스에 감염이 되었던 문서의 시트를 [시트 이동/복사]하여 가져온 경우 시트의 서식, 스타일이 옮겨와 문제가 될 수 있습니다. "셀 서식이 너무 많습니다." 메시지가 발생하지 않도록 하기 위한 예방법 글꼴(종류, 크기, 색, 굵기, 기울임, 밑줄), 셀 채우기 색, 행 높이, 열 너비, 테두리(선 종류, ...
How to control your World with Intune MDM, MAM (APP) and Graph API
VSS yedekleme testi nasıl yapılır Exchange üzerinde bulunan verilerin yedeklenmesi (backup) ve geri yüklenmesi (restore) baslibasina çok önemli bir konudur. Bir yedegin saglikli alinmasi kadar restore isleminin basarili bir biçimde yapilabilmesi de test edilmesi gereken önemli bir islem. Exchange destegi olan (aware) diye adlandirdigimiz yazilimlar exchange writer'lari kullanarak VSS teknolojisi ile yedek alirlar. Yedekleme esnasinda karsilasilan sorunlarin büyük bölümünün nedeni, yazilimlarin uyumsuzlugu ya da bu yazilimlardaki yanlis bir ayar olabilmektedir. Bunun tespiti için, yani yedek alma sirasinda sorunun VSS Writer'dan mi, disk sisteminden mi ve/veya yedekleme yazilimindan mi kaynaklandigini anlayabilmek için Betest aracini kullanabilirsiniz. BETEST, Windows SDK yada Volume Shadow Copy Service SDK 7.2 (sonraki versiyonlarda mevcut) içerisinde bulunan yardimci bir araçtir. Araci kolaylikla bulabilir ve kurabilirsiniz. Kurulum islemini exchange sunucunuz...
Announcing the AdventureWorks OData Feed sample
Update – Removing Built-in Applications from Windows 8 In October last year I published a script that is designed to remove the built-in Windows 8 applications when creating a Windows 8 image. After a reading some of the comments in that blog post I decided to create a new version of the script that is simpler to use. The new script removes the need to know the full name for the app and the different names for each architecture. I am sure you will agree that this name - Microsoft.Bing – is much easier to manage than this - Microsoft.Bing_1.2.0.137_x86__8wekyb3d8bbwe. The script below takes a simple list of Apps and then removes the provisioned package and the package that is installed for the Administrator. To adjust the script for your requirements simply update the $AppList comma separated list to include the Apps you want to remove. $AppsList = "Microsoft.Bing" , "Microsoft.BingFinance" , "Microsoft.BingMaps" , "Microsoft.Bing...


Comments
Post a Comment